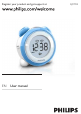
Register your product and get support at EN User manual AJ3138
EN 1 Important Safety a Read these instructions. b Keep these instructions. c Heed all warnings. d Follow all instructions. e Do not use this apparatus near water. f Clean only with dry cloth. g Do not block any ventilation openings. Install in accordance with the manufacturer’s instructions. h Do not install near any heat sources such as radiators, heat registers, stoves, or other apparatus (including amplifiers) that produce heat.
l Unplug this apparatus during lightning storms or when unused for long periods of time. m Refer all servicing to qualified service personnel. Servicing is required when the apparatus has been damaged in any way, such as power-supply cord or plug is damaged, liquid has been spilled or objects have fallen into the apparatus, the apparatus has been exposed to rain or moisture, does not operate normally, or has been dropped.
Warning •• •• •• •• •• •• Never remove the casing of this apparatus. Never lubricate any part of this apparatus. Never place this apparatus on other electrical equipment. Keep this apparatus away from direct sunlight, naked flames or heat. Never look into the laser beam inside this apparatus. Ensure that you always have easy access to the power cord, plug or adaptor to disconnect this apparatus from the power. Notice This product complies with the radio interference requirements of the European Community.
Please inform yourself about the local separate collection system for electrical and electronic products. Please act according to your local rules and do not dispose of your old products with your normal household waste. Correct disposal of your old product helps to prevent potential negative consequences for the environment and human health. Your product contains batteries covered by the European Directive 2006/66/EC, which cannot be disposed with normal household waste.
Observer: Nettbryteren er sekundert innkoplet. Den innebygde netdelen er derfor ikke frakoplet nettet så lenge apparatet er tilsluttet nettkontakten. For å redusere faren for brann eller elektrisk støt, skal apparatet ikke utsettes for regn eller fuktighet. 2 Your clock radio Congratulations on your purchase, and welcome to Philips! To fully benefit from the support that Philips offers, register your product at www.philips.com/welcome.
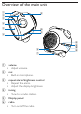
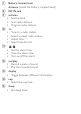
Overview of the main unit a k b c d e j i f l h g a b c d • volume Adjust volume. • mic Built-in microphone. • • repeat alarm/brightness control Repeat the alarm. Adjust the display brightness. • tuning Tune to a radio station. Display panel e f • radio Turn on/off the radio.
g Battery compartment Antenna (Inside the battery compartment) h DC IN jack i j k l m n o • • • set/scan Set the clock. Scan radio stations. Program radio stations. • • • • +/Tune to a radio station. Select a preset radio station. Adjust time. Select time format. • • • / Set the alarm timer. View the alarm time. Turn on/off the alarm. • • rec/play Record a piece of sound. Play the recorded sound. • display Toggle between different information. • nap Select the nap time.
3 Get started Caution •• Use of controls or adjustments or performance of procedures other than herein may result in hazardous radiation exposure or other unsafe operation. Always follow the instructions in this chapter in sequence. If you contact Philips, you will be asked for the model and serial number of this apparatus. The model number and serial number are on the bottom of the apparatus. Write the numbers here: Model No. __________________________ Serial No.
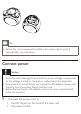
Tip •• When the unit is powered by battery, the screen lights up for 5 seconds after any operation. Connect power Caution •• Risk of product damage! Ensure that the power voltage corresponds to the voltage printed on the back or underside of the apparatus. •• Risk of electric shock! When you unplug the AC adaptor, always pull the plug from the socket. Never pull the cord. •• Before connecting the AC adaptor, ensure you have completed all other connections.
Set time and date 1 In clock mode, press set/scan. »» The hour digits begin to blink. 2 3 4 5 6 7 8 4 Press +/- to set hour. Press set/scan to confirm. Repeat steps 2-3 to set the minute. Repeat steps 2-3 to select 12 hour or 24 hour format. Repeat steps 2-3 to set the year. Repeat steps 2-3 to set the date. Repeat steps 2-3 to set the month-day display mode. Listen to radio Tune to a radio station 1 2 Press radio to turn on the radio.
Program radio stations automatically Note •• You can program a maximum of 20 preset radio stations. 1 2 Press radio repeatedly to turn on the radio. Press and hold set/scan for 2 seconds. »» All available stations are programmed in the order of waveband reception strength. »» The first programed radio station broadcasts automatically. Program radio stations manually Note •• You can program a maximum of 20 preset radio stations. 1 2 Press radio repeatedly to turn on the radio.
Tip •• To overwrite a programmed station, program another station in its place. Select a preset radio station 1 2 5 Press radio to turn on radio. Press +/- to select a radio station. Set the alarm timer You can set two separate alarms. For the alarm tone, you can select the buzz, the FM radio, or a piece of recorded sound. 1 Before you start, ensure that the time is set correctly. 2 Press / . »» or is displayed. 3 Press set/scan. »» The hour digits begin to blink. 4 5 Press +/- to set the hour.
Tip •• You can also press and hold / to start alarm setting. •• The gentle wake up function is designed for buzzer source only. Turn on/off the alarm timer Note •• Ensure that you already set the alarms successfully. Press or repeatedly to turn on or off the alarm timer. »» If the alarm timer is turned on, or appears. or disappears. »» If the alarm timer is turned off, Repeat alarm 1 When the alarm rings, press repeat alarm/brightness control. »» The alarm repeats ringing minutes later.
View the alarm settings 1 6 Press / or display. Other features Set the sleep timer You can set the clock radio to turn off automatically after a certain period of time. 1 Press sleeprepeatedly to select time (in minutes). »» The apparatus turns off automatically after the set period of time. To turn off the sleep timer: 1 Press sleeprepeatedly until [OFF] (off )appears or press radio. »» is displayed when sleep timer is on and disappears when it is off.
Record a piece of sound Note •• You can record for a maximum of 8 seconds. 1 Press and hold rec/play during the whole process of recording. »» [ REC] is displayed. is displayed. »» When the sound is recorded, Tip •• Keep the sound source close to mic on the top of the unit. • »» To play the recorded sound, press rec/play. is displayed. Adjust the volume level 1 Rotate volume to increase/decrease the volume level.
To deactivate the backlight blinking function 1 Press and hold repeat alarm/brightness control for 5 seconds again. Change the decorative ring and knobs Note •• You can change the decorative ring and knobs with the supplied ring and knobs. To change the decorative ring 1 Rotate the ring counter-clockwise. »» The ring separates from the main unit. 2 Place the ring to be installed onto the main unit.
3 Rotate the ring clockwise. »» The ring is installed. To change the knobs 1 Pull the knobs directly out of the socket. 2 Plug the knobs to be installed into the sockets.
7 Product information Note •• Product information is subject to change without prior notice. Specifications Tuner (FM) Tuning Range 87.
General information Power - AC: Model: AD39673 Input: 220 - 230V~ ,50Hz, 0.02A , Output: 5V, 0.2A - DC: 3 x AAA batteries Operation Power Consumption 2W Standby Power Consumption 1W Dimensions - Main Unit (W x H x D) 102 x 102 x 102 mm Weight - With Packing - Main Unit 0.6 kg 0.3 kg 8 Troubleshooting Caution •• Never remove the casing of this apparatus. To keep the warranty valid, never try to repair the system yourself.
• • • Ensure that the Mains cord is connected securely. Ensure that there is power at the AC Mains. Ensure that the batteries are inserted correctly. No sound •• Adjust the volume. No response from the unit •• Disconnect and reconnect the AC power plug, then turn on the unit again. Poor radio reception •• Increase the distance between the apparatus and your TV or VCR. •• Fully extend the antenna. •• Connect an outdoor antenna instead. Timer does not work •• Set the clock correctly. •• Switch on the timer.
En Chile Importado por : Philips Chilena S.A. Av. Sta. Maria, 0760 - Providencia - Santiago, RUT 90.761.000-4 © 2010 Koninklijke Philips Electronics N.V. All rights reserved. AJ3138_12_UM_V3.