Always there to help you Register your product and get support at www.philips.
Contents 1 Important Safety 2 2 2 Your clock radio 3 3 3 4 3 Get started 5 5 5 6 4 Listen to FM radio 7 7 7 7 7 8 8 5 Set alarm timer 9 9 9 9 6 Other features 10 10 11 11 7 Product information Specifications 12 12 8 Troubleshooting 13 9 Notice 14 14 Introduction What's in the box Overview of the clock radio Power supply Set time Turn on Prepare FM antenna Tune to FM radio stations Store FM radio stations automatically Store FM radio stations manually Select a preset FM radio station Adju
1 Important • Safety Warning •• Never remove the casing of this clock radio. •• Never lubricate any part of this clock radio. •• Never place this clock radio on other electrical • •• Keep this clock radio away from direct sunlight, naked • equipment. flames or heat. •• Make sure that you always have easy access to the power cord, plug or adaptor to disconnect the clock radio from the power. • • • • • • • • 2 • Read and follow these instructions.
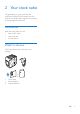
2 Your clock radio Congratulations on your purchase, and welcome to Philips! To fully benefit from the support that Philips offers, register your product at www.philips.com/welcome. Introduction With this clock radio, you can: • listen to FM radio; • view time, and • set two alarms. What's in the box Check and identify the contents of your package: Always there to help you Register your product and get support at www.philips.
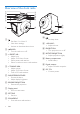
Overview of the clock radio a h b c d e i j k l f p o m g n a b j • • • Set Alarm 1 or Alarm 2. View alarm settings. Activate or deactivate alarm timer. /RADIO • Turn the radio on or off. c + PRESET/ HR • Adjust hour. • Adjust 12/24 hour format. • Select preset radio stations. • Select a number to store radio stations. d + TUNING/ MIN • Adjust minute. • Adjust 12/24 hour format. • Tune to FM radio stations. e SNOOZE/BRIGHTNESS • Snooze the alarm. • Adjust display brightness.
3 Get started 1 2 Always follow the instructions in this chapter in sequence. Open the battery compartment on the bottom of the clock radio. Insert 4 x 1.5V R6/UM3/AA batteries (not supplied) with correct polarity (+/-) as indicated. Power supply Either AC power or battery can be used as power supply of this product. Option A: AC power Caution •• Risk of product damage! Make sure that the power voltage corresponds to the voltage printed on the back or underside of the clock radio.
Turn on Press to turn on the radio. »» The product switches to FM tuner mode. Switch to ECO standby mode Press again to switch to ECO standby mode. »» The clock (if set) is displayed.
4 Listen to FM radio Store FM radio stations automatically Note •• You can store a maximum of 20 FM radio stations. Prepare FM antenna For better reception, fully extend and adjust the position of the pig-tail antenna. In FM tuner mode, press and hold SCAN/ PROG for two seconds. »» The clock radio stores all the available FM radio stations automatically. »» The first available station broadcasts automatically. Tip •• To stop full scan, press SCAN/PROG.
Select a preset FM radio station In tuner mode, press + PRESET/ HR repeatedly to select a preset radio station. Adjust volume During play, press + VOLUME - repeatedly to increase or decrease volume.
5 Set alarm timer Set alarm You can set two alarms to ring at different time. Note •• Make sure that you have set the clock correctly. 1 2 3 4 5 6 Press and hold or for two seconds to activate alarm setting mode. »» The hour and minute digits and the alarm icon ( or ) begin to blink. Press + PRESET/ HR - to set hour. Activate/deactivate alarm timer Press or repeatedly to activate or deactivate the alarm timer. »» or appears if the alarm timer is on and disappears if it is off.
6 Other features 3 Scroll the wheel on the ROTATE PROJECTION knob to adjust the projected angle slightly (maximum 60-degree left or 60-degree right). Project time onto a surface By projecting time onto a surface such as a wall, this clock radio offers you a unique way to read time in the dark. 1 Press PROJECTION to turn the projection on. »» The projection lens lights up. 4 Press REVERSE PROJECTION to reverse the projected time (if necessary).
Set sleep timer Press repeatedly to select the sleep timer period (in minutes). »» The clock radio switches to standby mode automatically after the preset period. To deactivate the sleep timer: In sleep timer setting mode, press repeatedly until [OFF] (off) appears. Adjust display brightness Press BRIGHTNESS repeatedly to select different brightness levels: • High • Medium • Low Tip •• In battery-powered mode, if there is no operation for 10 seconds, the backlight turns off automatically to save power.
7 Product information General information Power supply - AC power (power adapter) Note •• Product information is subject to change without prior notice. - Battery Specifications Amplifier Rated Output Power Frequency Response 0.4 W RMS 75 Hz - 12.5 KHz, ±3 dB Tuner Tuning Range (FM) Tuning Grid - Mono, 26dB S/N Ratio Search Selectivity Total Harmonic Distortion Signal to Noise Ratio 87.
8 Troubleshooting Warning •• Never remove the casing of this device. To keep the warranty valid, never try to repair the system yourself. If you encounter problems when using this device, check the following points before requesting service. If the problem remains unsolved, go to the Philips Web page (www. philips.com/support). When you contact Philips, make sure that the device is nearby and the model number and serial number are available.
9 Notice Any changes or modifications made to this device that are not expressly approved by Gibson Innovations may void the user’s authority to operate the equipment. Hereby, Gibson Innovations declares that this product is in compliance with the essential requirements and other relevant provisions of Directive 2014/53/EU. You can find the Declaration of Conformity on www.philips.com/support.
Copyright © 2015 Gibson Innovations Limited. Revised Edition © 2017 This product has been manufactured by, and is sold under the responsibility of Gibson Innovations Ltd., and Gibson Innovations Ltd. is the warrantor in relation to this product. Philips and the Philips Shield Emblem are registered trademarks of Koninklijke Philips N.V. and are used under license. AJ4800_12_UM_V4.