
Owner's Manual


3140 115 2881.1 Printed in China
2
D
B
B
T
RA
CK
M
O
D
E
CD REWRITC
D
R
E
WR
I
T
ABLE C
O
MP
A
B
LE
CO
MP
ATI
BLETIBLE
P
R
O
G
R
A
M
M
O
D
E
D
B
B
T
R
A
C
K
M
O
D
E
D
I
G
I
T
A
L
D
Y
N
A
M
I
C
B
A
S
S
B
O
O
S
T
0
V
O
L
.
R
E
M
S
U
O
F
F
•
E
•
L
H
O
D
L
I
N
E
O
U
T/
O
P
E
N
1 OPEN
2
3
CD
5
HOLD➟
O
FF
6
PLA
Y
7 VOLUME
AA
LR6
UM3
!!!
2.
1.
C
D
RE
W
R
I
T
CD RE
W
RIT
ABLE
C
OM
P
AB
LE
C
OMP
ATIB
L
ETIB
LE
P
R
O
G
R
A
M
M
O
D
E
D
B
B
T
RA
C
K
M
O
D
E
D
I
G
I
T
A
L
D
Y
N
A
M
IC
B
A
S
S
B
O
O
S
T
0
V
O
L
.
R
E
M
S
U
O
F
F
•
E
•
L
H
O
D
L
I
N
E
O
U
T/
O
P
E
N
C
D
R
E
W
R
I
T
CD RE
W
RI
TA
B
L
E
C
O
M
P
AB
LE
COMP
AT
I
B
L
E
TI
B
L
E
P
R
O
G
R
A
M
M
O
D
E
D
B
B
T
RA
C
K
M
O
D
E
D
I
G
IT
AL
D
Y
N
A
M
IC
B
AS
S
B
O
O
ST
0
V
O
L
.
R
E
M
S
U
O
F
F
•
E
•
L
H
O
D
L
IN
E
O
U
T
/
O
P
E
N
1.
2.
4
C
D
R
E
W
R
I
T
C
D
R
EWRI
T
A
B
L
E
C
O
M
P
ABLE CO
MPA
T
I
B
L
E
TIBLE
0
V
O
L
.
L
I
N
E
O
U
T
/
O
P
E
N
4
C
D
R
E
W
R
I
T
CD REWRIT
A
B
L
E
C
O
M
P
ABLE COMP
AT
I
B
L
E
TIB
LE
P
R
O
G
R
A
M
M
O
D
E
D
B
B
T
R
A
C
K
M
O
D
E
D
I
G
I
T
A
L
D
Y
N
A
M
I
C
B
A
S
S
B
O
O
S
T
0
V
O
L
.
R
E
M
S
U
O
F
F
•
E
•
L
H
O
D
L
I
N
E
O
U
T
/
O
P
E
N
0
V
O
L
.
R
E
M
S
U
O
F
F
•
E
•
L
H
O
D
L
I
N
E
O
U
T
/
C
D
R
EW
R
IT
CD REWRITA
BLE C
OM
P
ABLE COMPAT
IB
LE
TIBLE
P
R
O
G
R
A
M
M
O
D
E
D
B
B
T
R
A
C
K
M
O
D
E
D
IG
IT
A
L
D
Y
N
A
M
IC
BA
SS
B
O
O
S
T
0
V
O
L
.
R
E
M
S
U
O
F
F
•
E
•
L
H
O
D
L
I
N
E
O
U
T/
O
P
E
N
%
$
1
2
3
4
5
6
7
8
9
0
!
@
#
1
Audio
Audio
Read this manual first!
If you have any problems, do not attempt
to return this product to the store.
For fast help, call us first!
1-800-531-0039
S
E
E
W
H
Y
I
N
S
I
D
E
I
M
P
O
R
T
A
N
T
!
Return
your Warranty
Registration Card
within 10 days
Portable CD Player
AX5111• AX5112 • AX5114 • AX5115 • AX5116
AX5121
• AX5122 • AX5123 • AX5124 • AX5125
CLASS 1
LASER PRODUCT
English
Français
Español
AX5111
AX5112
AX5114
AX5115
AX5116
AX5121
AX5122
AX5123
AX5124
AX5125
English
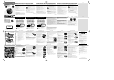
CONTROLS / POWER SUPPLY
1 OPEN 2 ..............opens the CD lid
2 9.........................stops CD play, clears a program or switches the player off
3 ∞ .......................skips and searches CD tracks backwards
4 2; ......................switches the player on, starts or pauses CD play
5 § .......................skips and searches CD tracks forwards
6 DBB.....................switches the bass enhancement on and off. This button also
switches acoustic feedback (the beep) on/off when it is
pressed for more than 2 seconds
7 ............................display
8 PROGRAM..........programs tracks and reviews the program
9 MODE.................selects the different playing possibilities:
SHUFFLE,
SHUFFLE REPEAT ALL, REPEAT, REPEAT ALL and SCAN
0 RESUME.............stores the last position of a CD track played
HOLD...................locks all buttons
OFF......................switches RESUME and HOLD off
! LINE OUT/p........3.5 mm headphone jack and LINE OUT jack to connect the
player to another audio input of an additional appliance,
remote control (not on all versions)
@ VOL E ............adjusts the volume
# 4.5V DC...............jack for external power supply
$ ............................belt clip holder
% ............................type plate
POWER SUPPLY / GENERAL INFORMATION
Use only the AY 3170 adapter (4.5 V / 300 mA direct
current, positive pole to the center pin). Any other product
may damage the player.
1 Make sure the local voltage corresponds to the power
adapter’s voltage.
2 Connect the power adapter to the 4.5V DC jack of the
player and to the wall outlet.
Note: Always disconnect the adapter when you are not using it.
Environmental information
• All redundant packing material has been omitted. We have done our utmost to
make the packaging easily separable into two materials: cardboard (box) and
polyethylene (bags, protective foam sheet).
• Your set consists of materials which can be recycled if disassembled by a
specialized company. Please observe the local regulations regarding the
disposal of packing materials, dead batteries and old equipment.
GENERAL INFORMATION / CD PLAY
Only use the AY 3545 (4822 219 10033) or AY 3548 (3140 118 71890) car voltage
converter (4.5 V DC, positive pole to the center pin) and the AY 3501 cassette car
adapter. Any other product may damage the set.
1 Put the set on a horizontal, vibration-free and
stable surface. Make sure it is in a safe place,
where the set is neither a danger nor an
obstacle to the driver and the passengers.
2 Plug the voltage converter into the
cigarette lighter jack (only for 12 V car
battery, negative grounding), then connect
the wired end with 4.5V DC input jack on the
set.
3 If necessary, clean the cigarette lighter jack to
obtain a good electrical contact.
4 Turn down the volume and connect the cassette adapter plug to LINE OUT/p
on the set.
5 Carefully insert the cassette adapter into the car radio’s cassette compartment.
6 Make sure the cord does not hinder your driving.
7 Set VOL E on the set to position 8. Start playback on the set and adjust
the sound with the car radio controls.
• Always remove the voltage converter from the cigarette lighter jack-
when the set is not in use.
Note: If your car radio has a LINE IN jack, it is better to use it for the
car radio connection instead of the cassette.adapter. Connect the signal
lead to this LINE IN jack and to LINE OUT/p on the set.
CD PLAY / FEATURES
• If a CD-Recordable (CD-R) or a CD-Rewritable (CD-RW) is not recorded
properly, nF dISC is displayed, indicating that the CD has not been
finalized. In that case, use FINALIZE on your CD recorder to complete the
recording.
• When playing a CD-Rewritable (CD-RW), please note that it takes 3–15
seconds after pressing 2; for sound reproduction to start.
• Playback will stop if you open the CD lid.
• While the CD is read, 1 -:- flashes in the display.
Volume and bass
Volume adjustment
• Adjust the volume by using VOL E.
Bass adjustment
• Press DBB to switch the bass enhancement on or
off
y is shown if the bass enhancement is
activated.
Remote control (supplied or optionally available)
Use the AY 3767 or AY 3768 cord remote control.The buttons on the remote
control have the same functions as the corresponding buttons on the set.
1 Press 9 twice to switch off the set.
2 Firmly connect the remote control to LINE OUT/p on the set.
3 Adjust the volume VOL E on the CD player and remote control.
FEATURES
You can store up to 30 tracks to play in a program.
A single track may be stored more than once in the
program.
1 While playback is stopped, select a track with
∞ or §.
2 Press PROGRAM to store the track.
yprogram lights up; the track number
programmed and P with the total number of
stored tracks are displayed.
3 Select and store all desired tracks in this way.
4 Press 2; to start playback of your selected tracks.
yprogram is shown and playback starts.
• You can review the program by pressing PROGRAM
for more than 2 seconds.
yThe display shows all the stored tracks in sequence.
Notes: – If you press PROGRAM and there is no track selected, SEL is
displayed.
– If you try to store more than 30 tracks, FULL is displayed.
Clearing the program
• While playback is stopped, press 9 to clear program.
yCLr is displayed once, program goes off,
and the program is cleared.
Note: The program will also be cleared if the power supply is interrupted, or if
the CD-player lid is opened, or if the set switches off automatically.
FEATURES / TROUBLESHOOTING
You can interrupt playback and continue (even after an
extended period of time) from the position where
playback stopped (RESUME) and you can lock all buttons
of the set so that no action will be executed (HOLD).
Use the RESUME–HOLD–OFF slider for these functions.
RESUME – continuing from where you have stopped
1 Switch the slider to RESUME during playback to activate RESUME.
yresume is shown.
2 Press 9 whenever you want to stop playback.
3 Press 2; whenever you want to resume playback.
yresume is shown and playback continues
from where you have stopped.
• To deactivate RESUME, switch the slider to OFF.
yresume goes off.
HOLD – locking all buttons
You can lock the buttons of the set by switching the slider to HOLD. Now, when a
key is pressed, no action will be executed. This is of use, for example, when
transporting the player in a bag. With HOLD activated, you can avoid accidental
activation of other functions.
1 Switch the slider to HOLD to activate HOLD.
yAll buttons are locked. HoLd is shown when
you press any button. If the set is switched off,
hold will be shown only when 2; is pressed.
2 To deactivate HOLD, switch the slider to OFF.
Note: If you deactivate HOLD by switching the slider to RESUME, you will be acti-
vating the RESUME function.
WARNING: Under no circumstances should you try to repair the set yourself as
this will invalidate the warranty. If a fault occurs, first check the points listed,
before taking the unit for repair. If you are unable to solve a problem by following
these hints, consult your dealer or service center.
The CD player has no power, or playback does not start
• Check that your batteries are not dead or empty, that they are inserted
correctly, that the contact pins are clean.
• Your adapter connection may be loose. Connect it securely.
• For in-car use, check that the car ignition is on. Also check player’s batteries.
The indication no diSC is displayed
• Check that the CD is clean and correctly inserted (label-side upward).
• If your lens has steamed up, wait a few minutes for this to clear.
The indication nF diSC is displayed
• CD-RW (CD-R) was not recorded properly. Use FINALIZE on your CD-recorder.
The indication
HOLD is on and/or there is no reaction to controls
• If HOLD is activated, then deactivate it.
• Electrostatic discharge. Disconnect power or remove batteries for a few seconds.
The CD skips tracks
• The CD is damaged or dirty. Replace or clean the CD.
• RESUME, SHUFFLE or PROGRAMis active. Switch off whichever is on.
No sound or bad sound quality.
• PAUSE might be active. Press 2;.
• Loose, wrong or dirty connections. Check and clean connections.
• Volume might not be appropriately adjusted. Adjust the volume.
• Strong magnetic fields. Check player’s position and connections. Also keep
away from active mobile phones.
• For in-car use, check that the cassette adapter is inserted correctly, that the car
cassette player’s playback direction is correct (press autoreverse to change),
and that the cigarette lighter jack is clean. Allow time for temperature change.
It is possible to play tracks in random order, to repeat a
single track or the entire CD, and to play the first few
seconds of each track.
1 Press MODE during playback as often as required in
order to activate one of the following ‘modes’. The
active mode is shown in the display.
yshuffle : All tracks of the CD are played in
random order until all of them have been played once.
yshuffle repeat all : All tracks of the CD
are played repeatedly in random order.
yrepeat : The current track is played repeatedly.
yrepeat all : The entire CD is played repeatedly.
y SCAN: The first 10 seconds of each of the
remaining tracks are played in sequence.
2 Playback starts in the chosen mode after 2 seconds.
• To return to normal playback, press MODE repeatedly until the display shows
no active modes.
ESP / Power Save Mode
With a conventional portable CD-player you might have experienced that the
music stopped e.g. when you were jogging. The Electronic Skip Protection
prevents loss of sound caused by light vibrations and shocks. Continuous playback
is ensured. However ESP does not prevent playback interruptions during vigorous
running. It also does not protect the unit against any damage caused by dropping!
In this set ESP is default ON. It is possible to set ESP off.
and enter the Power Save Mode.(PS). PS helps to extend
battery lifetime for longer playback.
• Press MODE for more than 2 seconds.
y disappears.
• Press MODE again for more than 2 seconds.
yPS is displayed once
ESP on ➟ ESP off ➟ Power Save ➟ESP on
Selecting a track during playback
• Briefly press ∞ or § once or several times to skip to
the current, previous or next track.
yPlayback continues with the selected track, and
the track’s number is displayed.
Selecting a track when playback is stopped
1 Briefly press ∞ or § once or several times to select the desired track. The
track number is displayed.
2 Press 2; to start CD play.
yPlayback starts with the selected track.
Searching for a passage during playback
1 Keep ∞ or § pressed to find a particular passage in
a backward or forward direction.
ySearching starts while playback continues at low
volume. After 2 seconds the search speeds up.
2 Release the button when you reach the desired passage.
yPlayback continues from this position.
Notes: – If the player is in SCAN mode (see MODE chapter), searching is not
possible.
– In shuffle, shuffle repeat all or repeat mode (see MODE chapter), or
while playing a program, searching is only possible within the
particular track.
This CD-player can play all kinds of Audio Discs such
as CD-Recordables and CD-Rewritables. Do not try to
play a CD-ROM, CDi, VCD, DVD or computer CD.
1 Push the OPEN 2 slider to open the player.
2 Insert an audio CD, printed side up, by pressing the
CD onto the hub.
3 Close the player by pressing the lid down.
4 Press 2; to switch the player on and start playback.
yThe current track number and elapsed playing
time are displayed.
• You can pause playback by pressing 2;.
yThe time at which playback was paused starts
flashing.
• You can continue playback by pressing 2; again.
5 Press 9 to stop playback.
yThe total number of tracks and the total playing
time of the CD are displayed.
6 Press 9 again to switch the player off.
• To remove the CD, hold it by its edge and press the
hub gently while lifting the CD.
Note: If there is no activity, the set will automatically
switch off after a while to save energy.
• Do not touch the lens A of the CD player.
• Do not expose the unit, batteries or CDs to humidity,
rain, sand or excessive heat (caused by heating
equipment or direct sunlight).
• You can clean the CD player with a soft, slightly
dampened, lint-free cloth. Do not use any cleaning
agents as they may have a corrosive effect.
• To clean the CD, wipe it in a straight line from the
center toward the edge using a soft, lint-free cloth. A
cleaning agent may damage the disc! Never write on a CD or attach a sticker
to it.
• The lens may cloud over when the unit is moved suddenly from cold to warm
surroundings. Playing a CD is not possible then. Leave the CD player in a warm
environment until the moisture has evaporated.
• Active mobile phones in the vicinity of the CD player may cause malfunctions.
• Avoid dropping the unit as this may cause damage.
Headphones HL351
• Connect the supplied headphones to the LINE OUT/p
jack of the player.
Note: LINE OUT/p can also be used for connecting the
player to your HiFi system (with a signal lead) or to
your car radio (with a cassette adapter or signal
lead). In both cases, the volume of the player must
be set to position 8.
IMPORTANT!
Hearing safety: Do not play your headphones at a high volume. Hearing experts advise
that continuous use at high volume can permanently damage your hearing.
Traffic safety: Do not use headphones while driving a vehicle. It may create a hazard
and it is illegal in many countries. Even if your headphones are an open-air type
designed to let you hear outside sounds, do not turn up the volume so high that you
cannot hear what is going on around you.
Batteries (supplied or optionally available)
You can use the following batteries with this CD-player:
• normal batteries type LR6, UM3 or AA (preferably Philips), or
• alkaline batteries type LR6, UM3 or AA (preferably Philips).
Notes:–
Old and new or different types of batteries should not be combined.
– Remove batteries if they are empty or if the player is not going to be used for
a long time.
Inserting batteries
1 Push OPEN 2 to open the CD lid.
2 Open the battery compartment and insert either 2
normal or alkaline batteries.
Battery indication
The approximate power level of your batteries is shown in the display.
Battery full
Battery two-thirds full
Battery one-third full
Battery dead or empty. When the batteries are dead
or empty, the symbol flashes, bAtt is
displayed, and the beep tone sounds repeatedly.
Average playing time of batteries under normal conditions
Battery type ESP on Power Save
Normal 5 hours 6 hours
Alkaline 22 hours 22 hours
Batteries contain chemical substances, so they should be disposed
of properly.
C
ONTROLS ( see figure
1
)
4
.5
V
D
C
Mains adapter (supplied or optionally available)
CD player and CD handling
4,5 V DC
12 V DC
C
D RE
WR
IT
CD REWRIT
AB
LE CO
MP
ABLE
COM
P
ATIB
LE
T
I
B
LE
PRO
G
RA
M
MO
DE
D
B
B
T
R
A
C
K
M
O
DE
D
I
G
I
T
AL
DY
N
AMI
C
BAS
S B
OO
ST
0
V
O
L
.
R
E
M
S
U
O
F
F
•
E
•
L
H
O
D
L
I
N
E
O
U
T
/
O
P
E
N
Playing a CD
C
D
R
E
W
R
I
T
CD REWRIT
A
B
L
E
C
O
M
P
ABLE COMP
AT
IB
L
E
TIBLE
0
V
O
L
.
O
P
EN
P
R
O
G
R
A
M
M
O
D
E
D
B
B
T
R
A
C
K
M
O
D
E
0
In-car use (connections supplied or optionally available) Playback information
P
R
O
G
R
A
M
M
O
D
E
D
B
B
T
R
A
C
K
M
O
D
E
Selecting a track and searching
P
R
O
G
R
A
M
M
O
D
E
D
B
B
T
R
A
C
K
M
O
D
E
Programming track numbers
P
R
O
G
R
A
M
M
O
D
E
D
B
B
T
R
A
C
K
M
O
D
E
program
program
program
Selecting different playing possibilities−MODE
P
R
O
G
R
A
M
M
O
D
E
D
B
B
T
R
A
C
K
M
O
D
E
shufflerepeatall
RESUME and HOLD
resume
resume
hold
Troubleshooting
IMPORTANT SAFETY INSTRUCTIONS
CONSIGNES DE SÉCURITÉ IMPORTANTES
INSTRUCCIONES IMPORTANTES DE SEGURIDAD
This product was designed and manufactured to meet strict quality and safety
standards. There are, however, some installation and operation precautions which
you should be particularly aware of.
1. Read these instructions – All the safety and operating instructions should
be read before the appliance is operated.
2. Keep these instructions – The safety and operating instructions should be
retained for future reference.
3. Heed all warnings – All warnings on the appliance and in the operating
instructions should be adhered to.
4. Follow all instructions – All operating and use instructions should be fol-
lowed.
5. Do not use this apparatus near water – for example, near a bathtub,
washbowl, kitchen sink, laundry tub, in a wet basement or near a swimming
pool, etc.
6. Clean only with a damp cloth. The appliance should be cleaned only as
recommended by the manufacturer.
7. Install in accordance with the manufacturers instructions. Do not block
any of the ventilation openings. For example, the appliance should not be sit-
uated on a bed, sofa, rug, or similar surface or placed in a built-in installation,
such as a bookcase or cabinet that may impede the flow of air through the venti-
lation openings.
8.
Do not install near any heat sources such as radiators, heat registers, stoves, or
other apparatus (including amplifiers) that produce heat.
9.
Only use attachments/accessories specified by the manufacturer.
10. Use only with a cart, stand, tripod, bracket, or table specified
by the manufacturer, or sold with the apparatus. When a cart is
used, use caution when moving the cart/apparatus combination
to avoid injury from tip-over.
11.
Refer all servicing to qualified service personnel. Servicing is required when the
apparatus has been damaged in any way, such as power-supply cord or plug is dam-
aged, liquid has been spilled or objects have fallen into the apparatus, the apparatus
has been exposed to rain or moisture, does not operate normally, or has been
dropped.
12. Battery usage
CAUTION
– To prevent battery leakage which may result in
bodily injury or damage to the unit:
•
Install all batteries correctly, + and - as marked on the unit.
•
Do not mix batteries (old and new or carbon and alkaline, etc.).
•
Remove batteries when the unit is not used for a long time.
EL 4562-E004: 99/3
Ce produit a été conçu et fabriqué en accord avec des normes de sécurité et de qualité très
strictes. Il existe toutefois des précautions d’installation et de fonctionnement qu’il est impor-
tant de connaître et de respecter.
1. Lisez ces instructions. - Il est impératif de lire toutes les consignes de sécurité et les
instructions de fonctionnement avant d’utiliser l’appareil.
2. Conservez ces instructions. - Il est recommandé de conserver ces consignes de sécu-
rité et instructions de fonctionnement pour référence ultérieure.
3. Respectez les avertissements. - Tous les avertissements inscrits sur l’appareil lui-même
ou figurant dans les instrutions de fonctionnement doivent être respectés.
4. Suivez toutes les instructions. - Il est impératif de suivre toutes les instructions de
fonctionnement et d’utilisation.
5.
N’utilisez pas cet appareil à proximité d’une source d’eau - comme par exemple, une
baignoire, un lavabo, un évier de cuisine, un baquet de lingerie, ou dans une cave humide,
près d’une piscine, etc.
6. Nettoyez l’appareil uniquement avec un chiffon humide. - Cet appareil doit être
nettoyé uniquement selon la procédure recommandée par le fabricant.
7.
Installez l’appareil selon les instructions du fabricant. N’obstruez aucun orifice de
ventilation. - Par exemple, l’appareil ne doit pas être posé sur un canapé, un lit, un tapis,
ou autre surface du même type ; il ne doit pas non plus être placé dans un meuble intégré
comme un ensemble bibliothèque ou autre où le sytème de ventilation de l’appareil serait
bloqué.
8. N’installez pas l’appareil près d’une source de chaleur comme par exemple des
radiateurs, bouches de chaleur, cuisinières, ou autres appareils (même des amplificateurs)
dégageant de la chaleur.
9.
Utilisez uniquement des accessoires ou options recommandés par le fabricant.
10.
Utilisez uniquement un meuble sur roulettes, un support, un pied,
une étagère ou une table de type recommandé par le
fabricant. Si vous utilisez un meuble sur roulettes, veillez à le déplacer
avec précaution afin d’éviter tout accident corporel si l’équipement se renversait.
11.
Pour toute réparation, faites appel à un personnel qualifié. Une réparation sera néces-
saire si l’appareil a subi des dommages tels que détérioration du cordon d’alimentation
ou de la prise, liquide renversé sur l’appareil, ou encore si un objet est tombé dessus, si
l’appareil a été exposé à la pluie ou à l’humidité, s’il ne fonctionne pas correctement ou
s’il a fait une chute.
12.
PRÉCAUTION
d’emploi des piles
–
Afin d’éviter toute fuite des
piles qui risquerait de causer des blessures corporelles ou d’endommager l’appareil
:
•
I
nstallez toutes les piles correctement
, +
et
-
tels qu’indiqués sur l’appareil
.
•
Ne mélangez pas les piles
(
pas de piles neuves avec des usagées ou de piles
au carbone avec des alcalines, etc.
).
•
Enlevez les piles lorsque l’appareil reste inutilisé pendant une longue période.
EL 4562-S004: 99/3
Este producto ha sido diseñado y fabricado para cumplir normativas rigurosas en materia de cali-
dad y seguridad. No obstante, deberán adoptarse ciertas precauciones en cuanto a su instala-
ción y manejo, que Ud. debe conocer.
1. Lea estas instrucciones - Antes de poner en funcionamiento el equipo, deberá leer todas
las instrucciones relativas a su manejo y seguridad.
2. Conserve estas instrucciones - Las instrucciones relativas al manejo y a la seguridad del
equipo deberán conservarse para su posterior utilización como material de referencia.
3.
Lea todos los avisos - Deberán respetarse todos los avisos existentes tatoen las instru-ccio-
nes de manejo como en el propio equipo.
4. Siga todas las instrucciones - Deberán seguirse todas las instrucciones relativas al fun-
cionamiento y a la utilización del equipo.
5. No utilice este aparato cerca del agua - Por ejemplo, cerca de bañeras, lavabos, fre-
gaderos, lavaderos, superficies mojadas, zonas próximas a piscinas, etc.
6. Para limpiar el aparato utilice sólo un trapo húmedo - Para limpiar el equipo deberán
seguirse estrictamente las instrucciones del fabricante.
7. Proceda a su instalación de acuerdo con las instrucciones del fabricante. No tape
las aperturas de ventilación - Por ejemplo, el equipo no deberá situarse
sobre camas,
sofás, alfombras, etc. ni en espacios cerrados, como estanterías, armarios, etc. si con ello se
impidiese la libre circulación de aire por las aperturas de ventilación.
8. No instale el equipo cerca de fuentes de calor - Como radiadores, calentadores, estu-
fas o cualquier otro aparato (incluyendo los amplificadores) generador de calor.
9.
Utilice exclusivamente aquellos dispositivos/accesorios recomendados
por el fabricante.
10.
Coloque el equipo exclusivamente sobre aquellos carros, bases,
trípodes, soportes o mesas
especifica
dos por el comerciante o vendidos con el equipo. Cuando utilice un carro,
tenga cuidado al desplazar el conjunto carro/ equipo para evitar posibles daños por vuelco.
11. Confíe el mantenimiento y las reparaciones a personal técnico especializado. El equipo
deberá repararse siempre que haya resultado dañado de alguna manera, como por ejemplo
por daños en el cable o en la clavija, por derrame de líquido sobre el equipo, por objetos que
hubieran podido introducirse en su interior, por exposición del equipo a la lluvia o a ambien-
tes húmedos, cuando el equipo no funcione con normalidad o cuando hubiera sufrido algún
tipo de caída.
12. Uso de las pilas
PRECAUCIÓN
–
Para prevenir escapes en las
pilas, que pueden ocasionar lesiones físicas o daños en la unidad
:
•
Instale todas
las pilas correctamente
, + y -
como está marcado en la unidad
.
•
No mezcle las pilas (viejas con nuevas o de carbono y alcalinas, etc.).
•
Extraiga las pilas cuando no vaya a usar la unidad durante largo tiempo.
EL 4562-S004: 99/3
Return your Warranty Registration card today to
ensure you receive all the benefits you’re entitled to.
•
Once your Philips purchase is registered,
you’re eligible to receive all the privileges
of owning a Philips product.
• So complete and return the Warranty
Registration Card enclosed with your
purchase at once.And take advantage
of these important benefits.
Warranty
Verification
Registering your product
within 10 days confirms
your right to maximum
protection under the
terms and conditions of
your Philips warranty.
Owner
Confirmation
Your completed Warranty
Registration Card serves
as verification of
ownership in the event of
product theft or loss.
Model
Registration
Returning your Warranty
Registration Card right
away guarantees you’ll
receive all the information
and special offers which
you qualify for as the
owner of your model.
This “bolt of lightning”
indicates uninsulated material
within your unit may cause an
electrical shock.For the safety of
everyone in your household,please
do not remove product covering.
The “exclamation point” calls
attention to features for
which you should read the enclosed
literature closely to prevent
operating and maintenance problems.
WARNING: TO PREVENT FIRE
OR SHOCK HAZARD, DO NOT
EXPOSE THIS EQUIPMENT TO
RAIN OR MOISTURE.
CAUTION:To prevent electric
shock,match wide blade of plug to
wide slot,and fully insert.
For Customer Use
Enter below the Serial No.which is
located on the rear of the cabinet.Retain
this information for future reference.
Model No. ________________________
Serial No. ________________________
Know these
safetysymbols
CAUTION
RISK OF ELECTRIC SHOCK
DO NOT OPEN
CAUTION: TO REDUCE THE RISK OF ELECTRIC SHOCK, DO NOT
REMOVE COVER (OR BACK). NO USER-SERVICEABLE PARTS
INSIDE. REFER SERVICING TO QUALIFIED SERVICE PERSONNEL.
MAC5097
PORTABLE COMPACT DISC
One Year Free Exchange
This product must be carried in for an exchange.
LIMITED WARRANTY
WHO IS COVERED?
You must have proof of purchase to exchange the product.A sales receipt or other
document showing that you purchased the product is considered proof of purchase.
Attach it to this owner’s manual and keep both nearby.
WHAT IS COVERED?
Warranty coverage begins the day you buy your product.For one year thereafter,a
defective or inoperative product will be replaced with a new,renewed or comparable
product at no charge to you.A replacement product is covered only for the original
warranty period.When the warranty on the original product expires, the warranty on
the replacement product also expires.
WHAT IS EXCLUDED?
Your warranty does not cover:
• labor charges for installation or setup of the product,adjustment of customer controls
on the product,and installation or repair of antenna systems outside of the product.
• product repair and/or part replacement because of misuse,accident, unauthorized
repair or other cause not within the control of Philips Consumer Electronics
Company.
• reception problems caused by signal conditions or cable or antenna systems outside
the unit.
• a product that requires modification or adaptation to enable it to operate in any
country other than the country for which it was designed,manufactured, approved
and/or authorized,or repair of products damaged by these modifications.
• incidental or consequential damages resulting from the product. (Some states do not
allow the exclusion of incidental or consequential damages,so the above exclusion may
not apply to you.This includes, but is not limited to, prerecorded material,whether
copyrighted or not copyrighted.)
• a product that is used for commercial or institutional purposes.
WHERE IS EXCHANGE AVAILABLE?
You may exchange the product in all countries where the product is officially distributed
by Philips Consumer Electronics Company. In countries where Philips Consumer
Electronics Company does not distribute the product, the local Philips service
organization will attempt to provide a replacement product (although there may be a
delay if the appropriate product is not readily available).
BEFORE REQUESTING EXCHANGE...
Please check your owner’s manual before requesting an exchange.Adjustments of the
controls discussed there may save you a trip.
Philips Service Solutions Group,P.O.Box 2976,
Longview,Texas 75606, (903) 242-4800
EL4967E005 / MAC 4110 / 1-97
EXCHANGING A PRODUCT IN U.S.A.,
PUERTO RICO OR U.S.VIRGIN ISLANDS...
Contact your dealer to arrange an exchange.Or, ship the product,insured and freight
prepaid,and with proof of purchase enclosed,to the address listed below.
Small Product Service Center
Philips Service Company
907 Snapps Ferry Road,Plant 2,Building 6
Greeneville,TN 37743
(In U.S.A.,Puerto Rico and U.S.Virgin Islands,all implied warranties,including implied
warranties of merchantability and fitness for a particular purpose,are limited in duration
to the duration of this express warranty. But, because some states do not allow limitations
on how long an implied warranty may last, this limitation may not apply to you.)
EXCHANGING A PRODUCT IN CANADA...
Please contact Philips at:
1-800-661-6162 (French Speaking)
1-800-363-7278 (English Speaking)
(In Canada,this warranty is given in lieu of all other warranties.No other warranties are
expressed or implied,including any implied warranties of merchantability or fitness for a
particular purpose. Philips is not liable under any circumstances for any direct,indirect,
special,incidental or consequential damages,howsoever incurred, even if notified of the
possibility of such damages.)
TO GET OUT-OF-WARRANTY EXCHANGE...
In U.S.A.,Puerto Rico or U.S.Virgin Islands, contact Philips Service Company at (800)
531-0039 to obtain the cost of out-of-warranty exchange.Then carefully pack the
product and ship it to the Small Product Service Center (address listed above). In
Canada,call the phone number listed above under “Exchanging a Product in Canada” to
obtain the cost of out-of-warranty exchange.
REMEMBER...
Please record the model and serial numbers found on the product below.Also,please fill
out and mail your warranty registration card promptly.It will be easier for us to notify
you if necessary.
MODEL # ____________________________________
SERIAL # ____________________________________
This warranty gives you specific legal rights.You may have other rights
which vary from state/province to state/province.
Renvoyez votre carte d’enregistrement de garantie pour vous
assurer de recevoir tous les avantages auxquels vous avez droit.
• Dès que l’achat de votre appareil
Philips est enregistré,vous avez droit à
tous les avantages dont bénéficient les
possesseurs des produits Philips.
• Remplissez et renvoyez votre carte
d’enregistrement de garantie jointe à
votre appareil sans tarder.Vous
bénéficierez de ces avantages
importants.
Vérification
de garantie
Enregistrez votre produit
dans les 10 jours pour
confirmer votre droit à
une protection maximum
selon les termes et les
conditions de votre
garantie Philips.
Confirmation
de possession
Votre carte
d’enregistrement de
garantie prouve que vous
possédez l’appareil en cas
de vol ou de perte du
produit.
Enregistrement
du modèle
Renvoyez votre carte
d’enregistrement de garantie
dès aujourd’hui pour vous
assurer de recevoir toutes
les informations,les offres et
les bonus auxquels vous
avez droit en tant que
possesseur de ce modèle.
Cet «éclair à pointe de flèche »
indique qu’un matériau non isolé,
situé à l’intérieur de l’unité,risque de
provoquer un choc électrique.Pour la
sécurité de chacun, nous vous prions de
ne pas retirer le boîtier de ce produit.
Le « point d’exclamation » attire
votre attention sur des sujets
risquant de provoquer des problèmes de
fonctionnement et d’entretien si vous ne
lisez pas les informations s’y reportant.
DANGER:
NE PAS EXPOSER CET
ÉQUIPEMENT A LA PLUIE NI A UNE
HUMIDITÉ EXCESSIVE POUR ÉVITER
LES RISQUES D’INCENDIE ET DE
CHOC ÉLECTRIQUE.
ATTENTION: Pour éviter les
chocs électriques, introduire la lame
la plus large de la fiche dans la borne
correspondante de la prise et
pousser jusqu’au fond.
Cet espace vous est réservé
Inscrivez ci-dessous le numéro de série situé
à l’arrière du bloc. Conservez cette
information pour vous y reporter à l’avenir.
N° de modèle _____________________
N° de série _______________________
Connaissez ces
symboles de
sécurite
ATTENTION
RISQUE DE CHOC ELECTRIQUE
NE PAS OUVRIR
ATTENTION: POUR REDUIRE LE RESQUE DE CHOC ELECTRIQUE, NE PAS ENLEVER
LE COUVERCLE (NI LE PANNEAU ARRIERE). CET APPAREIL NE COMPORTE AUCUNE
PIECE POUVANT TRE REPAREE PAR L’UTILISATEUR. CONFIER SON ENTRETIEN A
UN TECHNICIEN QUALIFIE.
MAC5097
Envie hoy su Tarjeta de Registro de la Garantía
para recibir todas las ventajas correspondientes.
• Una vez que se registre la compra de
su aparato Philips, Ud. tiene derecho a
todas las ventajas correspondientes al
dueño de un producto Philips.
•
Sírvase llenar y devolver en seguida
laTarjeta de Registro de la Garantía
empacada con su aparato.Saque
provecho de estas ventajas importantes.
Verificación
de la garantía
Registre su producto
dentro de 10días para
confirmar su derecho a
máxima protección
bajo los términos y
condiciones de la garantía
de Philips.
Confirmación
del dueño
Su Tarjeta de Registro de
la Garantía comprueba
que Ud.es el dueño del
aparato en caso de robo
o pérdida del producto.
Registro
del modelo
La devolución inmediata de
su Tarjeta de Registro de la
Garantía le garantiza que
recibirá toda la información
y todas las promociones
especiales que le
corresponden por ser el
dueño de su modelo.
El símbolo del «rayo» indica que
algún material no aislado dentro de
su unidad podría resultar en una sacudida
eléctrica.Para la seguridad de todos, favor
de no remover la cubierta del producto.
El «signo de exclamación» le
llama la atención a
características sobre las que Ud.debe
leer la información adjunta
detenidamente para evitar problemas
de funcionamiento y mantenimiento.
ADVERTENCIA: PARA
EVITAR EL RIESGO DE SACUDIDA
ELECTRICA O INCENDIO,NO
EXPONGA ESTE EQUIPO A
LLUVIA NI A HUMEDAD.
PRECAUCION:Para evitar
sacudida eléctrica,introduzca la
patilla ancha del enchufe al fondo de
la ranura ancha.
Para uso del cliente:
Escriba abajo el número de serie que se
encuentra en el panel posterior. Guarde
esta información para el futuro.
No.de modelo ____________________
No.de serie ______________________
Conozca estos
simbolos de
seguridad
PRECAUCION
RIESGO DE SACUDIDA ELECTRICA
NO ABRIR
PRECAUCION: PARA REDUCIR EL RIESGO DE SACUDIDA ELECTRICA,NO RETIRE
LA CUBIERTA (NI EL PANEL POSTERIOR). ESTE APARATONO CONTIENE NINGUNA
PARTE QUE PUEDA SER REPARADA POREL USARIO. DE SER NECESARIO ALGUN
SERVICIO O REPARACIONDEL APARATO, LLEVELO UN TECNICO CALIFICADO.
MAC5097
BELT CLIP CLIP CEINTURE CINTURÓN DE CIERRE
English
(supplied or optionally available)
1 To attach the belt clip to the CD player, position the shaped grip (found on the back of
the belt grip) so that it fits into the belt clip hole of the CD player. Turn the clip to
LOCK as indicated on the CD player.
2 To detach, gently lift the belt clip and turn to RELEASE as indicated on the CD player.
Français
(fourni ou en option)
1 Pour fixer le clip ceinture, placez l’attache (située sur le dos du clip) dans le trou prévu
à cet effet sur l’appareil. Tournez l’attache jusqu’à LOCK, comme indiqué sur l’appareil.
2 Pour enlever l’attache, soulevez-la doucement et tournez-la jusqu’à RELEASE.
Español
(suministrado o disponible de forma opcional)
1 Para ponerse el cinturón, encaje el broche (en la parte posterior del cinturón) en el orificio
del cinturón de cierre. Gire el cierre hasta LOCK tal y como se indica.
2 Para quitárselo, levante con cuidado el cinturón y gire hasta RELEASE tal y como se indica.
BELT CLIP
LIFT
LOCK
RELEASE
PHILIPS CONSUMER ELECTRONICS COMPANY
A Division of Philips Electronics North America Corporation
Knoxville, Tennessee 37914-1810, U.S.A.
Meet Philips at the Internet
http://www.philipsusa.com
QUICK START MISE EN SERVICE RAPIDE ENCENDIDO RAPIDO
CAUTION
Use of controls or adjustments or performance of procedures other than
herein may result in hazardous radiation exposure or other unsafe
operation.
ATTENTION: L’utilisation de commandes ou de réglages ou l’exécution de
procédures autres que celles décrites dans le présent manuel risque
d’entraîner une exposition à un rayonnement dangereux ou d’avoir d’autres
conséquences sur la sécurité.
PRECAUCIÓN
La utilización de controles o ajustes y la realización de procedimientos
distintos de los contenidos en este manual pueden provocar la
exposición a radiaciones peligrosas y a otros peligros.
El aparato cumple las normas FCC, Parte 15 y 21 CFR 1040.10. Funcionamiento
dependiente de dos condiciones siguientes:
1. Este aparato no puede provocar interferencia dañina, y
2. Este aparato debe aceptar cualquier interferencia recibida, incluyendo las
interferencias que pueden provocar un funcionamiento insuficiente.
L’appareil répond aux normes FCC, Part 15 et 21 CFR 1040.10. Fonctionnement
soumis aux deux conditions suivantes :
1. Cet appareil ne doit pas provoquer d’interférences nuisibles, et
2. Cet appareil doit accepter toute interférence reçue, y compris les
interférences susceptibles de provoquer un fonctionement peu satisfaisant.
The set complies with the FCC-Rules, Part 15 and with 21 CFR 1040.10.
Operation is subject to the following two conditions:
1. This device may not cause harmful interference, and
2. This device must accept any interference received, including interference
that may cause undesired operation.
NOTES
NOTES
Canada
English: This digital apparatus does not exceed the Class B limits for radio noise
emissions from digital apparatus as set out in the Radio Interference Regulations
of the Canadian Department of Communications.
Français : Cet appareil numérique n'émet pas de bruits radioélectriques dépas-
sant les limites applicables aux appareils numériques de Classe B prescrites dans
le Règlement sur le Brouillage Radioélectrique édicté par le Ministère des
Communications du Canada.
Ultra Focus /17 8/12/01 15:57 Page 1