User’s Guide Table of Contents Finding Information — What and How . . . . . . . . . . . . . . . . . . . . . . . . . . . . . . . . . . . . 3 For Windows 95, 98, 2000, and NT 4.0 Users . . . . . . . . . . . . . . . . . . . . . . . . . . . 3 For Windows 3.1x Users . . . . . . . . . . . . . . . . . . . . . . . . . . . . . . . . . . . . . . . . . . . . . . . . 3 For DOS Users . . . . . . . . . . . . . . . . . . . . . . . . . . . . . . . . . . . . . . . . . . . . . . . . . . . . . . . . 3 Printing Basics. . . .
User’s Guide: Table of Contents Print Cartridges . . . . . . . . . . . . . . . . . . . . . . . . . . . . . . . . . . 42 Print Cartridge Status . . . . . . . . . . . . . . . . . . . . . . . . . . . . . . . . . . . . . . . . . . . . . . . . . . . 42 Replacing Print Cartridges . . . . . . . . . . . . . . . . . . . . . . . . . . . . . . . . . . . . . . . . . . . . . .44 To Replace a Print Cartridge . . . . . . . . . . . . . . . . . . . . . . . . . . . . . . . . . . . . . . . . . .44 Storing Print Cartridges .
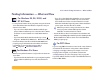
User’s Guide: Finding Information — What and How Finding Information — What and How For Windows 95, 98, 2000, and NT 4.0 Users • For complete information about your printer, view your electronic User’s Guide. Adobe® Acrobat® Reader is required to view your electronic User’s Guide. - If you do not have Adobe Acrobat Reader installed, begin printer software installation process, select View User’s Guide, and follow on-screen instructions to install Adobe Acrobat Reader.
Printing Basics Buttons and Lights The HP DeskJet 990C Series printer buttons (shown below) let you turn the printer on and off, cancel a print job, or resume printing. The lights give you visual cues about the state of your printer. The buttons and lights from left to right are: Power Button and Light – Use the Power Button to turn the printer on and off. After the Power Button is pressed, it takes approximately five seconds for the printer to power on.
Printing Basics: Paper Trays OUT Tray Paper Trays The printer sends finished pages to the OUT tray. IN Tray To print, place paper or other media types in the IN tray. Pull out the IN tray for easy loading. Be sure to slide the paper guides out of the way before loading the media print side down. Slide all media as far as it will go into the IN tray. Once you insert the media you want to use, slide the paper guides so they rest snugly against the media. Make sure the IN tray is pushed back in.
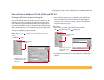
Printing Basics: How to Print How to Print The printer is controlled through printer software (sometimes called a “printer driver”) that you install on your computer. The printer software provides a dialog box (like the one shown here) that you use to communicate with the printer. In the dialog box, you select settings such as paper size and type, orientation, and print quality. • Windows 95, 98, 2000 or NT 4.0 users— see “How to Print in Windows 95, 98, 2000 and NT 4.0” on page 7. • Windows 3.
Printing Basics: How to Print in Windows 95, 98, 2000 and NT 4.0 How to Print in Windows 95, 98, 2000 and NT 4.0 Finding the HP Printer Properties Dialog Box How you find the HP Printer Properties dialog box depends on the software program and operating system that you are using. Since each software program is different, the dialog box that appears on your screen may differ from those shown here. One of the following methods will surely get you to the HP Printer Properties dialog box.
Printing Basics: How to Print in Windows 95, 98, 2000 and NT 4.0 HP Printer Properties Dialog Box There are three tabs located in the Printer Properties dialog box. Once you’ve opened this box, simply click a tab, then choose your settings. Right-click on any item shown on these screens to view helpful information. • Setup (see page 8) • Features (see page 9) • Advanced (see page 10) Setup Tab (Windows 95, 98, 2000 and NT 4.
Printing Basics: How to Print in Windows 95, 98, 2000 and NT 4.0 Features Tab (Windows 95, 98, 2000 and NT 4.0) Choose the best page orientation. • Click Portrait for vertical page layout. • Click Landscape for horizontal page layout. • Click Mirror Image to reverse the printed image. Click here to select Two-Sided Printing, then choose a method: • Book — binding on the side. • Tablet — binding on the top. Click Automatic when using the Automatic Two-Sided Printing Module.
Printing Basics: How to Print in Windows 95, 98, 2000 and NT 4.0 Advanced Tab (Windows 95, 98, 2000 and NT 4.0) Choose appropriate color options. • Click here to print in shades of gray. - High Quality provides optimal print quality for grayscale printing. - Black only provides faster grayscale printing by using only the black pen (not recommended for use with glossy paper). - Optimize for Photocopy or Fax is only available when printing in grayscale.
Printing Basics: How to Print in Windows 3.1x How to Print in Windows 3.1x Note: Windows 3.1x is not supported in Japan. Use your printer software to control how and what you print. Print quality, paper size and type, and two-sided printing are just a few of the options available to you in the HP DeskJet 990C Printer Properties dialog box.
Printing Basics: How to Print in Windows 3.1x Setup Tab (Windows 3.1x) Print Quality • Best - Highest quality printing • Normal - Every day printing • EconoFast - Quick printing Choose a paper size from the menu. Click here to select from a wide range of paper types. Click Cut Sheet for separated pieces of paper. Click here to print banners. Features Tab (Windows 3.1x) Two-sided Printing • None — single-sided printing (default) • Book — binding on the side. • Tablet — binding on the top.
Printing Basics: HP DeskJet Toolbox Color Tab (Windows 3.1x) HP DeskJet Toolbox Choose Automatic to use the system’s default ColorSmart II settings. Windows 95, 98, 2000, and NT 4.0 Choose Manual, then Options to adjust color intensity. Click here to print in shades of gray. Use the HP DeskJet Toolbox for cleaning and calibrating your printer, finding information, and printing a test page. • Click Start Programs HP DeskJet 990C Series HP DeskJet 990C Series Toolbox.
Printing Basics: HP DeskJet Toolbox Toolbox Tabs (Windows 95, 98, 2000 and NT 4.0) Click the Printer Services tab to: • Open the electronic User’s Guide. • Calibrate the printer when color and black ink aren’t aligned. • Clean the print cartridges when lines and dots are missing from what you have printed. • Check for clarity after cleaning, by printing a Test Page. • Check for printer problems by printing a Diagnostics Page.
Printing Basics: HP DeskJet Toolbox Windows 3.1x Note: Windows 3.1x is not supported in Japan. Use the HP DeskJet 990C Toolbox for finding information and maintaining your printer. The HP DeskJet Toolbox is installed in the HP DeskJet Utilities group in the Program Manager. The Toolbox has two tabs: How Do I? and Printer Services. You can also access Printer Services from the HP DeskJet 990C Series Printer Properties dialog box (see page 13). Simply click a tab, then choose an option.
Printing Basics: Printer Settings Taskbar Icon Printer Settings Taskbar Icon Windows 3.1x. Determining the Number of Pending Warning Messages Use the Printer Settings taskbar icon to determine the state of the printer, such as print cartridge status, and to adjust print settings, such as default print quality and automatic two-sided printing. The Printer Settings taskbar icon appears at the end of the taskbar. • Position the pointer over the Printer Settings taskbar icon.
Printing Basics: Printer Settings Taskbar Icon Opening the Default Print Settings Dialog Box 1 Click the Printer Settings taskbar icon. The Default Print Settings dialog box is displayed. This box allows you to change the default print quality of future documents and to turn on automatic two-sided printing. For information on these topics, see “How to Print” on page 6 or “Automatic Two-Sided Printing” on page 20. 3 When finished, click anywhere outside the dialog box.
Printing Basics: Printer Settings Taskbar Icon Displaying Print Cartridge Warning Messages Opening the Printer Properties Dialog Box 1 Click the Printer Settings taskbar icon to open the Default Print Settings dialog box. The Printer Properties dialog box is displayed. For more information on this dialog box, see “HP Printer Properties Dialog Box” on page 8. 2 When finished with the dialog box, click OK. 1 Double-click the Printer Settings taskbar icon.
Printing Basics: Automatic Paper-Type Sensor 3 Choose one of the following: • Change Default Print Settings to display the Default Print Settings dialog box. • Open Toolbox to display the HP DeskJet Toolbox. For more information on this box, see “HP DeskJet Toolbox” on page 13. • Exit to turn off the Printer Settings taskbar icon. Automatic Paper-Type Sensor Note: The Automatic Paper-Type Sensor is not supported in Windows 3.1x.
Printing Basics: Automatic Two-Sided Printing 4 Select from the other printer settings as necessary. Note: When using the Automatic paper type setting, the print quality setting is automatically set to Normal. If you wish to use a different print quality, you can manually change this setting. For more information, see “How to Print” on page 6. 5 Click OK.
Printing Basics: Automatic Two-Sided Printing 2 Insert the module into the back of the printer. 2 Open the HP Printer Properties dialog box. For more information, see “Finding the HP Printer Properties Dialog Box” on page 7. 3 On the Features tab: Printing with the Automatic Two-Sided Printing Module 1 Load the appropriate paper. Note: Not all paper types work with the Automatic Two-Sided Printing Module.
Printing Basics: Infrared (Ir) Printing Infrared (Ir) Printing Infrared (Ir) connectivity is a feature that enables wireless connectivity for personal digital assistants (PDAs), laptop or notebook computers, and other mobile devices. Use the Infrared feature to print to the HP DeskJet 990C from an infrared device such as a laptop or Palm device without any type of connecting cable. The 990C printer includes an infrared lens that can access and print information sent to it by another infrared device.
Printing Basics: Infrared (Ir) Printing Using Infrared with a Laptop or Notebook running Windows 98 Setting up a Laptop or Notebook for Infrared Enabling Infrared To configure a laptop or notebook for infrared communication, you may need to make changes to your computer’s BIOS settings. The procedures for configuring a computer for infrared vary, depending on the specific device.
Printing Basics: Infrared (Ir) Printing 3 Click the Options tab. Preparing to Print 1 Click Start Settings Printers. The Printers window is displayed. 2 Right-click the HP DeskJet 990C Series printer. 3 In the shortcut menu, click Properties. The Properties dialog box is displayed. 4 Click the Details tab. 5 In the Print to the following port box, choose one of the following: • LPTx: (Infrared Printing (LPT) Port) This is typically the LPT3 port.
Printing Basics: Infrared (Ir) Printing Printing using Infrared Note: If the laptop or notebook is moved out of range of the 1 Locate the infrared lens on the laptop or notebook. printer’s infrared lens at any time during the printing process, the infrared light will turn off and the printer may stop printing. If you realign the devices within approximately 3–30 seconds (depending on the laptop or notebook), the print job will resume. This is typically found on one of the sides of the computer.
Printing Basics: Infrared (Ir) Printing 3 Click the Preferences tab. Printing using a Palm Pilot 1 Locate the infrared lens on the Palm Pilot. This is typically found on the top edge of the Palm Pilot. 2 Align the Palm Pilot’s infrared lens with the printer’s infrared lens. Position the Palm Pilot up to 3 feet (1 meter) from the printer and within a 30-degree total angle from the printer’s infrared lens. Note: The path between the two infrared devices must be clear of obstacles.
Printing Basics: Infrared (Ir) Printing The infrared light on the printer displays a solid beam during the transfer process. When finished printing, the light will turn off. Note: If the Palm Pilot is moved out of range of the printer’s infrared lens at any time during the printing process, the infrared light will turn off and the printer may stop printing. If you realign the devices within approximately 3–30 seconds (depending on the device), the print job will resume.
Printing Basics: Infrared (Ir) Printing Printing using a Windows CE Device 5 In the Port box, choose IRDA. 1 Locate the infrared lens on the Windows CE device. 6 Click OK. This is typically found on one of the sides of the device. 2 Align the infrared lens of the Windows CE device with the printer’s infrared lens. Position the Windows CE device up to 3 feet (1 meter) from the printer and within a 30-degree total angle from the printer’s infrared lens.
Printing Basics: Printer Maintenance Tips Printer Maintenance Tips Because the printer ejects ink onto the paper in a fine mist, ink smudges will eventually appear on the printer case. To remove smudges, stains, and/or dried ink from the exterior of the printer, use a soft cloth moistened with water. Do not tip your printer after heavy usage. If the printer is tipped soon after heavy printing, it is possible for excess ink to spill. Clean up spilled ink using the methods previously listed in this section.
Beyond the Basics Getting the Right Paper Most plain photocopy paper works fine in your printer, particularly paper that is marked for use in inkjet printers. To get the best results, use one of the Hewlett-Packard papers, which were developed especially for HP inks and your printer. Brightness. Some papers are whiter than others and produce sharper, more vibrant colors. For photographs, you’ll want to use HP Premium Plus Photo Paper or HP Premium Photo Paper for the best results.
Beyond the Basics: Manual Two-Sided Printing Manual Two-Sided Printing I should… Book Binding Tablet Binding 1 Remove all paper from the OUT tray. 2 Load paper into the IN tray. 3 Slide the paper guides snugly against the sheets. 4 Push in the IN tray. 5 Open the HP Printer Properties dialog box (see page 7). Then… 6 Choose HP Print Settings.
Beyond the Basics: Printing Transparencies Printing Transparencies I should… 1 Pull out the IN tray. 2 Slide out both of the paper guides, and remove all paper from the IN tray. 3 Fan the edges of the transparency sheets to separate them, then align the edges. 4 Insert a stack of up to 25 transparency sheets, rough side down and the adhesive strip towards the printer. 5 Slide the paper guides snugly against the transparencies. 6 Push in the IN tray 7 Open the HP Printer Properties dialog box (see page 7).
Beyond the Basics: Printing Single Envelopes Printing Single Envelopes I should… 1 Slide the envelope, with its flap side on the left and flap facing up, into the single envelope slot. Push the envelope in until it stops. 2 Open the HP Printer Properties dialog box (see page 7). Then… 3 Choose HP Print Settings.
Beyond the Basics: Printing a Stack of Envelopes Printing a Stack of Envelopes I should… 1 Pull out the IN tray. 2 Slide out both of the paper guides and remove all paper from the IN tray. 3 Slide up to 15 envelopes, with their flap side on the left and flap facing up, into the IN tray as far as they will go. 4 Slide the paper guides snugly against the edges of the envelopes. 5 Push in the IN tray. 6 Open the HP Printer Properties dialog box (see page 7). Then… 7 Choose HP Print Settings.
Beyond the Basics: Printing Business Cards, Index Cards, and Other Small Media Printing Business Cards, Index Cards, and Other Small Media I should… 1 Pull out the IN tray. 2 Slide out both paper guides and remove all paper from the IN tray. 3 Insert up to 45 cards or other small media into the IN tray as far as they will go. 4 Push the paper length guide in as far as it will go. Push the fine-length guide (colored portion of paper length guide) snugly against the media.
Beyond the Basics: Printing Labels Printing Labels I should… 1 Pull out the IN tray. 2 Slide out both of the paper guides, and remove all paper from the IN tray. 3 Fan the edges of the label sheets to separate them, then align the label edges. 4 Insert up to 20 label sheets (label side down). 5 Slide the paper guides snugly against the sheets. 6 Push in the IN tray. 7 Open the HP Printer Properties dialog box (see page 7). Then… 8 Choose HP Print Settings.
Beyond the Basics: Printing Photographs Printing Photographs I should… 1 Pull out the IN tray. 2 Slide out both of the paper guides, and remove all paper from the IN tray. 3 Insert up to 20 sheets of photo paper (printable side down) into the IN tray. 4 Slide the paper guides snugly against the edges of the media. 5 Push in the IN tray. 6 Open the HP Printer Properties dialog box (see page 7). Then… 7 Choose HP Print Settings.
Beyond the Basics: Printing Greeting Cards Printing Greeting Cards I should… 1 Pull out the IN tray. 2 Slide out both paper guides and remove all paper from the IN tray. 3 Insert up to 5 cards into the IN tray as far as they will go. 4 Slide the paper guides snugly against the edges of the cards. 5 Push in the IN tray. 6 Open the HP Printer Properties dialog box (see page 7). Then… 7 Choose HP Print Settings.
Beyond the Basics: Printing Iron-On Transfers Printing Iron-On Transfers I should… Then… 7 Choose HP Print Settings. Setup Tab • Paper Type: Choose either Automatic or HP Iron-On T-Shirt Transfers • Print Quality: Choose Normal or Best • Paper Size: Choose A4 or Letter (8.5 x 11 in.) Features Tab 1 Pull out the IN tray. 2 Slide out both of the paper guides, and remove all paper from the IN tray. 3 Load the iron-on transfer paper with printable side down.
Beyond the Basics: Printing Posters Printing Posters I should… 1 Load paper in the IN tray. 2 Slide the paper guides snugly against the sheets. 3 Push in the IN tray. 4 Open the HP Printer Properties dialog box (see page 7). Then… 5 Choose HP Print Settings.
Beyond the Basics: Printing Banners Printing Banners I should… 1 Tear off up to 20 sheets. 2 Tear off and discard the perforated strips, if any. 3 Pull out the IN tray. 4 Slide out the paper guides, and remove all paper from the IN tray. 5 Raise the OUT tray and leave it in the up position to print your banners. 6 Put the banner paper in the IN tray so that the unattached edge of the banner paper stack is toward the printer. 7 Slide the paper guides snugly against the sheets. 8 Push in the IN tray.
Print Cartridges Print Cartridge Status The Print Cartridge Status Light flashes when one or both of your print cartridges are low on ink, improperly installed, or malfunctioning. It will also flash if you are trying to use the wrong print cartridge type. If the problem is low ink, the light will stop flashing when you open the top cover. For any other print cartridge-related problem, the Print Cartridge Status Light will continue to flash.
Print Cartridges: Print Cartridge Status Print Cartridge Status continued When the Print Cartridge Status Light flashes, open the printer’s top cover and follow the instructions below. For more information on replacing print cartridges, see page 44. If the arrow points to... It means...
Print Cartridges: Replacing Print Cartridges Replacing Print Cartridges To Replace a Print Cartridge Note: When buying replacement print cartridges, check the part 1 To access the print cartridge cradle, make sure the OUT tray is down (1.1) and then press the Power Button (1.2) to turn on the printer. 2 Open the top cover. The cradle moves to an accessible position. 3 Raise the cradle latch. numbers carefully. The print cartridge numbers for your printer are: Black HP 51645 Series or HP No.
Print Cartridges: Replacing Print Cartridges 5 Remove the replacement print cartridge from its packaging and carefully remove the protective vinyl tape. 6 Push the print cartridge firmly, straight down into the print cartridge cradle. 7 Close the cradle latch. When the latch is fully closed, you will hear a click. 8 Load plain white paper in the IN tray. 9 Close the top cover, then a calibration page will print.
Print Cartridges: Storing Print Cartridges Storing Print Cartridges Cleaning Print Cartridges To maintain excellent print quality from your print cartridges: When Do You Need to Clean? • Keep all print cartridges in their sealed packages, at room temperature (60-78° F or 15.6-26.6° C), until you are ready to use them. • Once installed, leave the print cartridges in their cradle at all times to keep them from drying out or becoming clogged.
Print Cartridges: Cleaning Print Cartridges If You See Ink Streaks Clean the print cartridges and the print cartridge cradle by following the instructions below. or sn ame jstujn d diam noft juestk ut labore qusft vo ed kitft ghocknor 1 Open the HP DeskJet Toolbox. For more information, see “HP DeskJet Toolbox” on page 13. 2 Click Clean the Print Cartridges and follow the on-screen directions.
Print Cartridges: Cleaning Print Cartridges 4 Manually clean the print cartridges 5 Manually clean the print cartridge cradle. a. Dip a clean cotton swab into distilled water and squeeze any excess water from the swab. b. Clean the face and edges of the print cartridge as shown. Do NOT wipe the nozzle plate. a. Using clean, moistened swabs, wipe the underside of each wall of the cradle. b. Repeat until no ink residue is seen on a clean swab. Do NOT clean nozzle plate Clean c.
Print Cartridges: Damage Resulting from Refilling the Print Cartridges Damage Resulting from Refilling the Print Cartridges To get the best performance from your printer, Hewlett-Packard recommends using only genuine HP supplies for HP DeskJet printers, including genuine factory-filled HP print cartridges. Damage resulting from the modification or refilling of HP print cartridges is specifically excluded from the coverage of HP printer warranties.
Problems? Troubleshooting Tips It’s frustrating when things go wrong, but the following pages contain tips that can help you determine what the problem is and how to fix it. • Be sure cable connections are secure. • Make sure that you are using the right cable for your operating system. • Check if your question is similar to those listed here and then follow the instructions found in that section: The printer software won’t install, what’s wrong? See pages 51–55. Why won’t it print? See pages 56–61.
Problems?: Troubleshooting Tips The printer software won’t install, what’s wrong? What is the problem? I inserted a CD, but the computer couldn’t read it. Possible cause • The CD wasn’t properly inserted. OR • The CD player may be damaged. OR • The CD may be damaged. To solve the problem… 1 Reinsert the CD and try again. If this doesn’t solve your problem… 2 Try inserting a CD that you know works. If that CD doesn’t work, you may need to replace your CD player.
Problems?: Troubleshooting Tips The printer software won’t install, what’s wrong? Continued What is the problem? The software did not install correctly. OR You need to uninstall the printer software for any reason. Possible cause • There may be a conflict with your virus protection program. OR • There may be a conflict with another software program. OR • There may be a conflict with a peripheral device connected to the printer. OR • Your printer software didn’t install properly.
Problems?: Troubleshooting Tips The printer software won’t install, what’s wrong? Continued What is the problem? When I connect a USB cable between the printer and my computer, the “New Hardware Wizard” message did not appear. Possible cause To solve the problem… You may not be using Windows 98 or 2000. Make sure Windows 98 or 2000 is running and your computer is connected using a USB cable. If you do not have Windows 98 or 2000, you need to use a parallel cable.
Problems?: Troubleshooting Tips The printer software won’t install, what’s wrong? Continued What is the problem? When I connect a USB cable between the printer and my computer, the “New Hardware Wizard” message appeared once, but the printer did not install, and now “New Hardware Wizard” will not appear again. Possible cause Installation was cancelled or had an error. To solve the problem… Select Start Settings Printers. Double-click on Add Printer. Click Next. Click Next. Click Have Disk.
Problems?: Troubleshooting Tips The printer software won’t install, what’s wrong? Continued What is the problem? When I connect a USB cable between the printer and my computer, an “Unknown device” message appears. Possible cause • Static electricity has built up in the cable between your computer and printer. OR • You may have a defective USB cable. To solve the problem… 1 2 3 4 5 6 Disconnect the USB cable from your printer. Unplug the printer from its power cable. Wait approximately 30 seconds.
Problems?: Troubleshooting Tips Why won’t it print? What is the problem? No page came out of the printer. Possible cause To solve the problem… Power may be off or there may be a loose connection. 1 Make sure the power is on. 2 Make sure that all cable connections are secure. You may not have any paper in the IN tray. Double-check that the media is placed in the IN tray correctly. The printer’s top cover may be open. Close the printer’s top cover.
Problems?: Troubleshooting Tips Why won’t it print? Continued What is the problem? No page came out of the printer. (continued) Possible cause To solve the problem… There may be a paper jam and you are using the Rear Access Door. 1 Pull the paper out of either the IN tray or the OUT tray. 2 Press the Resume Button on the front of the printer. 3 If you were printing labels, make sure a label did not become unglued from the label sheet while going through the printer.
Problems?: Troubleshooting Tips Why won’t it print? Continued What is the problem? No page came out of the printer. (continued) Possible cause To solve the problem… There is a paper jam in the back of the printer and the Automatic TwoSided Printing Module is attached. 1 Turn your printer off. 2 Simultaneously press the release buttons, located on each side of the Automatic Two-Sided Printing Module, to remove the Module. 3 Pull the jammed paper out of the printer, then replace the Module (see page 20).
Problems?: Troubleshooting Tips Why won’t it print? Continued What is the problem? A blank page came out of the printer. My printer is connected with a USB cable through another USB device or a hub and when I try to print I get a message saying “There was an error writing to .” Possible cause To solve the problem… You may be out of ink. 1 Lift the printer cover and check the Print Cartridge status icons to make sure you are not out of ink. See “Print Cartridge Status” on page 42.
Problems?: Troubleshooting Tips Why won’t it print? Continued What is the problem? Possible cause To solve the problem… I have a USB cable, and when I try to print I get a message saying “There was an error writing to LPT1.” You may not have plugged your USB cable in before installing the software. 1 Disconnect the USB cable from your printer. 2 Uninstall your printer software. HP DeskJet 990C Series HP DeskJet a Click Start Programs 990C Series Uninstall.
Problems?: Troubleshooting Tips Why won’t it print? Continued What is the problem? The printer is really slow. (continued) The printer will not turn on (all button lights are off). Possible cause To solve the problem… You may be using outdated printer software. Check the printer driver you are using. Check HP’s web site for the most recent software updates (see page 75 for web site addresses). You may be printing a complex document containing graphics or photographs. Be patient.
Problems?: Troubleshooting Tips What do the flashing lights mean? What is the problem? The Power Light The Resume Light is flashing. is flashing. Possible cause To solve the problem… Your printer may be receiving data. Be patient. The light will stop flashing when the printer has finished receiving data. You may be out of paper. 1 Insert paper. 2 Press the Resume Button . There may be a paper jam and you are using the Rear Access Door. 1 Pull the paper out of either the IN tray or the OUT tray.
Problems?: Troubleshooting Tips What do the flashing lights mean? Continued What is the problem? The Resume Light (continued) is flashing. The Print Cartridge Status Light is flashing. Possible cause To solve the problem… There may be a paper jam and the Automatic Two-Sided Printing Module is attached. 1 Turn your printer off. 2 Press the button on top of the Automatic Two-Sided Printing Module and lower the access door. 3 Pull the jammed paper out of the Module, then close the access door.
Problems?: Troubleshooting Tips What do the flashing lights mean? Continued What is the problem? Possible cause To solve the problem… All of the upper lights are flashing. The printer may need to be reset. 1 Press the Power Button to turn the printer off. Then press the Power Button again to turn the printer back on. 2 If that doesn’t solve the problem, press the Power button to turn the printer off. 3 Unplug the printer. 4 Plug the printer back in. 5 Press the Power Button to turn the printer on.
Problems?: Troubleshooting Tips Is there a problem with your printout? What is the problem? Parts of the document are missing or are in the wrong place. The document printed at an angle or is off-center. Possible cause To solve the problem… You may have selected the wrong paper orientation. Make sure you have selected the correct orientation (portrait or landscape) on the Features tab. See “Features Tab” on page 9. You may have selected the wrong paper size.
Problems?: Troubleshooting Tips Is there a problem with your printout? Continued What is the problem? Print quality is poor. Possible cause To solve the problem… You may be running out of ink. 1 Check the print cartridges status. See “Print Cartridge Status” on page 42. 2 If you are running out of ink, replace the print cartridge. See “Replacing Print Cartridges” on page 44. You may not be using the best media. • Make sure that you are using media intended for HP DeskJet printers.
Problems?: Troubleshooting Tips Is there a problem with your printout? Continued What is the problem? Print quality is poor. (continued) Possible cause To solve the problem… You may need to clean the print cartridges. See “Cleaning Print Cartridges” on page 46. You may have forgotten to remove the vinyl tape from the print cartridge. Make sure that you have removed the protective piece of vinyl tape on each of the print cartridges. See “Replacing Print Cartridges” on page 44.
Problems?: Troubleshooting Tips Is there a problem with your printout? Continued What is the problem? Banners aren’t printing correctly. Possible cause To solve the problem… You may have forgotten to raise the OUT tray. Make sure that the OUT tray is up. You may have forgotten to select Banner in the printer software. Make sure that you have selected Banner on the Setup tab. See “Setup Tab” on page 8. You may have problems with the paper.
Problems?: Troubleshooting Tips Is there a problem with your printout? Continued What is the problem? Photos aren’t printing correctly. The document didn’t print using the selected default print settings. Possible cause To solve the problem… You may not have inserted the photo paper correctly. Insert the photo media glossy side down. The photo paper may not be fully engaged. 1 Insert the photo paper as far as it will go into the IN tray.
Problems?: Troubleshooting Tips Is there a problem with your printout? Continued What is the problem? Possible cause To solve the problem… The print quality is different if the paper type is set to Automatic rather than the specific paper type. When the paper type is set to Automatic, the print quality is automatically set to Normal. When the paper type is set to a specific paper type, the default print quality may be something different. After selecting a paper type, choose the desired print quality.
Problems?: Troubleshooting Tips Is there a problem with your Automatic Two-Sided Printing Module? What is the problem? Possible cause To solve the problem… In the Two-Sided Printing section of the Features tab, the Automatic option is missing. The Automatic Two-Sided Printing Module is not enabled in the Toolbox. 1 Go to the Configuration tab of the HP DeskJet Toolbox. See “HP DeskJet Toolbox” on page 13. 2 Check Automatic Two-Sided Printing Module and click Apply.
Problems?: Troubleshooting Tips Is there a problem with your Automatic Two-Sided Printing Module? Continued What is the problem? Automatic Two-Sided Printing was selected, but printing is only on one side of the paper. The binding margin appears in the wrong place. Possible cause To solve the problem… The application you are using to print supports only manual twosided printing. It does not support Automatic Two-Sided Printing. Print using the manual two-sided printing feature.
Problems?: Troubleshooting Tips Is there a problem with infrared (Ir) printing? What is the problem? A connection cannot be established or the transmission seems to be taking longer than usual. Possible cause To solve the problem… The device from which you are trying to print may not be IrDAcompliant. Make sure the device is IrDA-compliant; look for an IrDA symbol or refer to the user’s guide for the device. Your laptop or notebook may not be configured for infrared.
Problems?: Troubleshooting Tips Is there a problem with infrared (Ir) printing? Continued What is the problem? Possible cause To solve the problem… A connection cannot be established or the transmission seems to be taking longer than usual. (continued) Bright lights may be interfering with the signal. • Make sure that no bright light of any type is shinning directly into either infrared lens. • Position the device from which you are printing closer to the infrared lens on the printer.
Problems?: HP Customer Care HP Customer Care HP DeskJet printers set the standard for quality and reliability, so you have made an excellent choice. Should you need help, however, HP Customer Care’s award-winning service and support is nearby to provide expert advice on using your HP printer or to answer specific questions about a problem you are having. Whether online or by phone, you’ll find the support you need—and you’ll find it fast.
Problems?: HP Customer Care HP Customer Care Online continued HP Customer Care User Forums They’re friendly. They’re informative. Check out our online user forums. Simply review existing messages left by other HP users to find the answers you’re looking for. You can also post your questions, then check back later for ideas and suggestions from knowledgeable users and system operators.
Problems?: HP Customer Care • If you are in the U. S. and need a software update, you can download the printer software from HP’s web site at: http://www.hp.com/go/support. If you do not have access to the web site, call (661) 257-5565. Software updates are available for the cost of the CDs or diskettes plus shipping. • If you are outside the U.S. and cannot download the driver from HP Customer Care Online (see page 75), call the HP Customer Care Center (see page 77) nearest you.
Problems?: HP Customer Care 4 If you cannot solve your problem using the above, then call an HP service technician while you’re in front of your computer and printer. Before you call, be sure you have the following information: - Your printer’s serial number (the label is on the bottom of the printer). _________________________________________ - Your printer’s model number (the label is on the front of the printer). _________________________________________ - The model of the computer.
Problems?: HP Customer Care • • • • • • • • • • • • • • • • • • • • • • • • • • Korea Korea, outside Seoul Malaysia Malaysia, Penang Mexico Netherlands New Zealand Norway Philippines Poland Portugal Republic of South Africa, inside RSA Republic of South Africa, outside RSA Russia, Moscow Russia, St. Petersburg Singapore Spain Sweden Switzerland Taiwan Thailand Turkey United Kingdom U.S.
Problems?: HP Customer Care Extended Warranty Options If you would like to extend your printer coverage beyond the limited warranty period, you have the following options: • Consult your reseller to get extended coverage. • If your reseller does not offer service contracts, please call HP directly and ask about our HP Service Agreements. In the U.S., call (800) 446-0522; in Canada, call (800) 268-1221. For HP Service Agreements outside the U.S. and Canada, contact your local HP Sales Office.
More About Your Printer Specifications Print Technology Dimensions Drop-on-demand thermal inkjet printing DeskJet 990Cxi model no. C6455A DeskJet 990Cse model no. C6455B Software Compatibility With Automatic Two-Sided Printing Module: 440 mm wide x 196 mm high x 435 mm deep 17.32 in wide x 7.72 in high x 17.13 in deep Black Text Print Speed ✽ Draft: Up to 17 pages per min. Mixed Text with Color Graphics Print Speed ✽ Draft: Up to 13 pages per min.
More About Your Printer: Specifications Power Requirements Media Handling Input Voltage: Input Frequency: Sheets: Banners: Envelopes: Cards: Greeting cards: Transparencies: Labels: 100 to 240 VAC (±10%) 50/60 Hz (+3 Hz) Automatically accommodates the worldwide range of AC line voltages and frequencies. Declared noise emissions in accordance with ISO 9296 Sound power level, LWAd (1B=10dB): 6.0 B in normal mode. Sound pressure level, LpAm (bystander positions): 47 dB in normal mode.
More About Your Printer: Specifications Automatic Two-Sided Printing Module Specifications Automatic Two-Sided Printing Module model no. C6463A Duty Cycle 5,000 sides of pages per month Minimum Printing Margins Media Type ✻ Letter and Executive: Left and right margins 0.25 in. (6.4 mm) Top and bottom margins 0.46 in. (11.
More About Your Printer: Specifications HP Felt-textured Greeting Card Paper, Ivory/ Half-fold Letter-size, 20 sheets, C6828A 20 envelopes HP Professional Brochure & Flyer Paper, Two-Sided Gloss Letter-size, 50 sheets C6817A A4-size, 50 sheets (Europe) C6818A A4-size, 50 sheets (Asia) C6819A HP Professional Brochure & Flyer Paper, Two-Sided Matte Finish Letter-size, 50 sheets C6955A ✻ Media availability varies by country.
More About Your Printer: System Requirements System Requirements Minimum Printing Margins The printer cannot print outside a certain area of the page, so you must make sure the contents of your document fall within the printable area. When you use nonstandard paper sizes and select User Defined Paper Size setting from the Setup tab on the HP Printer Properties dialog box, the paper width must be between 77 and 215 mm (3 and 8.5 inches) and the paper length must be between 127 and 356 mm (5 and 14 inches).
More About Your Printer: Language Codes Language Codes Language Code Bahasa Indonesia Bulgaria Chinese, Simplified Chinese, Traditional Czech Danish German English Spanish Finnish French Hungarian Italian Japanese Kazakh Korean Dutch Norwegian Polish Portuguese Russian Swedish Thai bin bul chs cht csy dan deu enu esm fin fra hun ita jpn kzh kor nld non plk ptb rus svc tha 86
More About Your Printer: Supplies and Accessories Supplies and Accessories For ordering information see page 91.
More About Your Printer: Supplies and Accessories Printer Quick Start Posters, Reference Manuals, and Network Guides Most HP printer documentation is available for viewing and printing at http://www.hp.
More About Your Printer: Supplies and Accessories Paper and Other Media Availability of special media varies by country. Paper Type/Description Part Number HP Bright White InkJet Paper ❋ A4 (210 x 297 mm), 250 sheets A4 (210 x 297 mm), 500 sheets U.S. letter, 250 sheets U.S. letter, 500 sheets C5977B C1825A C5976B C1824A C51634Z C51634Y HP Premium InkJet Heavyweight Paper ❋ A4 (210 x 297 mm), 100 sheets C1853A HP Professional Brochure & Flyer Paper, Two-Sided Matte Finish ❋ U.S.
More About Your Printer: Supplies and Accessories Paper Type/Description Part Number Paper Type/Description HP Photo Quality Inkjet Paper, Matte Finish ❋ HP Banner Paper A4 (210 x 297 mm), 100 sheets U.S. letter, 100 sheets C1821A C1820A U.S. letter, 100 sheets U.S. letter, 20 sheets, 20 envelopes ❋ C6828A HP Glossy Greeting Cards, White/Half-fold A4 (210 x 297 mm) 10 sheets, 10 envelopes U.S.
More About Your Printer: Ordering Information Ordering Information To order printer supplies or accessories, call your nearest HP dealer or call HP DIRECT at the following numbers for fast shipping service. In the U.S., you can buy supplies and accessories directly from HP at www.hpshopping.com, or call the HP Shopping Village at 1-888-999-4747. In Europe, you can buy supplies and accessories directly from HP at www.hp-gosupplies.com/order/index.shtml.
More About Your Printer: Ordering Information • Korea: (02) 3270-0720 Fax: (02) 3270-0894 Hewlett-Packard Korea 16-58 Hangangro3ga Yongsangu Seoul, Korea • Latin America Headquarters: (305) 267-4220 Fax: (305) 267-4247 5200 Blue Lagoon Drive, Suite 930 Miami, FL 33126 • Mexico: (52 5) 258-4600 Fax: (54 1) 258-4362 Hewlett-Packard de Mexico, S.A. de C.V Prolongación Reforma #470 Colonia Lomas de Santa Fe, C.P. 01210 Mexico • Netherlands: 0 33 450 1808 Fax: 0 33 456 0891 Hewlett-Packard Nederland B. V.
More About Your Printer: Legal Information Legal Information Regulatory Notices Hewlett-Packard Company This device complies with part 15 of the FCC Rules. Operation is subject to the following two conditions: (1) This device may not cause harmful interference, and (2) this device must accept any interference received, including interference that may cause undesired operation. • Reorient or relocate the receiving antenna. • Increase the separation between the equipment and the receiver.
More About Your Printer: Legal Information Limited Warranty Statement Software Ink cartridges Printer Duration of HP Product Limited Warranty 90 Days 90 Days 1 Year A. Extent of Limited Warranty 1. Hewlett-Packard (HP) warrants to the end-user customer that the HP products specified above will be free from defects in materials and workmanship for the duration specified above, which duration begins on the date of purchase by the customer. Customer is responsible for maintaining proof of date of purchase.
More About Your Printer: Environmental Statement Environmental Statement Hewlett-Packard continuously improves the design processes of HP DeskJet printers to minimize the negative impact on the office environment and on the communities where printers are manufactured, shipped, and used. HewlettPackard has also developed processes to minimize the negative impact of the disposal of the printer at the end of printing life.
Index Numerics 2400 x 1200 dpi 8, 37, 56, 61, 81 A accessories 87 adjusting color 10 Advanced tab 10 Automatic Image Enhancement 10 Automatic Paper-Type Sensor turning off 20 using 19 automatic two-sided printing 21 Book 21 Tablet 21 Automatic Two-Sided Printing Module installing 20 printing with 21 B banners ordering 90 printing 5, 8, 12, 41 problems 68 software compatibility 68 specifications 82 book binding 31 borders 9 Brightness 10 business cards printing 35 buttons Apply 10 Cancel 4, 10, 81 Factory
Index D F I DeskJet Toolbox accessing 13 Configuration tab 14 Estimated Ink Level tab 14 How Do I? tab 15 Printer Services tab 14 Windows 3.1x 15 dialog boxes HP Printer Properties 7 door, rear access 57, 62 DOS, printing 3 dpi 2400 x 1200 printing 8, 37, 56, 61, 81 PhotoREt 8, 37, 56, 61, 81 drivers, see printer software dry time decreasing 10 increasing 10 duty cycle 81 Factory Settings button 10 fax printing, problems 59 Features tab Windows 3.1x 12 Windows 95, 98, 2000, NT 4.
Index ink drying time 10 Estimated Ink Level tab 14 ink levels, see Low on Ink ordering 87 part numbers 14 replacing 44 streaking 46 supplies 87 volume 10, 67 ink cartridges cleaning 46–48 damage from refilling 49 Light 45 ordering 87 part numbers 44, 49 problems 46 replacement 44 status 42 storing 46 using 46 installing printer software 51, 52 problems 51, 52 software 51 USB cable 55 Ir 22 Ir, see infrared IrDA 23 iron-on transfers ordering 90 printing 39 J jams, see paper jams JetSend 28 L labels paper
Index O online support, web sites 75 operating environment 81 Ordered Printing 12 ordering manuals 88 paper and other media 89–90 regional phone numbers 91–92 supplies 87 orientation 9, 12 OUT Tray 5 Extension 5 P paper adjusting paper guides 5 minimum printing margins 85 ordering 89–90 printing on different types 30 size, recommended 82 specifications 82 supported types 82, 89, 90 User Defined Size 82 weight, recommended 82 paper guides 5 paper jams, clearing 57, 62, 63 paper orientation landscape 9, 12,
Index print settings changing 8 current 8 factory 8 selecting 8 software 6 tabs 8 printer accessories 87 buttons 4 cable, parallel 53, 87 cable, USB 55, 60, 61, 87 calibration 14 cleaning 29 connections 56 driver updates, see printer software, updates drivers, see printer software Lights 4 maintenance 29 paper trays 82 parts 87 repair 77 settings 6 smudges on 29 software 6, 76 software updates 76 specifications 81 trays 5 Printer Properties dialog box Windows 3.1x 11 Windows 95, 98, 200, NT 4.
Index problems Automatic paper type 70 automatic two-sided printing 71–72 banner printing 68 blank page came out of printer 59 CD, not reading 51 didn’t use printer default settings 69 error writing to USB port 60 fax 59 flashing lights 62 help 50 infrared light flashing 64 infrared printing 73–74 ink streaks 46 installing printer software 52 jam 57, 62, 63 LPT1 error 60 missing lines or dots 46 no page came out 56, 57, 58 output 65, 66 page did not print 56, 57, 58 paper falls to the floor 70 paper jam 57,
Index size T U media 82 Scale to Fit 8 User Defined Paper Size 82 small media printing 35 software compatibility 81 software, see printer software specifications Automatic Two-Sided Printing Module 83 infrared printing 84 paper 82 printer 81–82 printing margins 85 speed, printing 81 Start Printing from Last Page 9 status, Print Cartridge Status light 4 streaking ink 47 stuck paper, see paper jams supplies 87 ordering 87 paper and other media 89 part names and numbers 87 system requirements 85 tablet bin