Always there to help you Register your product and get support at www.philips.
Contents 1 Important 2 2 2 8 Product information Specifications Maintenance 14 14 15 2 Your CD Soundmachine 4 4 4 4 9 Troubleshooting 15 3 Get started 6 6 7 7 4 Play 8 8 8 9 Safety Notice Introduction What's in the box Overview of the main unit Connect power Turn on Turn off Play a CD Play options Play from an external device 5 Listen to FM radio stations 10 10 10 10 10 11 6 Listen to DAB radio stations 11 11 11 12 12 12 7 Use system menus 13 13 13 Tune to FM radio stations Program FM
1 Important • • Safety • • • • • • • • • • • • 2 Read these instructions. Follow all instructions. Do not block any ventilation openings. Install in accordance with the manufacturer's instructions. Do not install near any heat sources such as radiators, heat registers, stoves, or other apparatus (including amplifiers) that produce heat. Protect the power cord from being walked on or pinched, particularly at plugs, convenience receptacles, and the point where they exit from the unit.
Disposal of your old product Your product is designed and manufactured with high quality materials and components, which can be recycled and reused. This symbol on a product means that the product is covered by European Directive 2012/19/EU. Inform yourself about the local separate collection system for electrical and electronic products. Follow local rules and never dispose of the product with normal household waste.
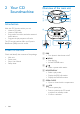
2 Your CD Soundmachine Overview of the main unit a e b f g h c d i Introduction With this CD Sound machine, you can: • Listen to FM radio; • Listen to DAB radio; • Enjoy audio from discs, and other external audio devices; • Program the play sequence of tracks. The CD sound machine offers you Dynamic Bass Boost (DBB) to enrich sound.
g • • • / Skip to the previous or next track. Search within a track. In radio mode, tune to a FM/DAB radio station. h PROG • Program the play sequence of tracks. i Display panel • Display current status. j FM antenna • Improve FM reception. k FM/DAB • Select FM/DAB band. l Source selector • Select a source. m + VOLUME • Adjust volume n AUDIO-IN • Connect an external audio device.
3 Get started Caution •• Use of controls or adjustments or performance of procedures other than herein may result in hazardous radiation exposure or other unsafe operation. AC~MAINS Always follow the instructions in this chapter in sequence. If you contact Philips, you will be asked for the model and serial number of your apparatus. The model number and serial number are on the bottom of your apparatus. Write the numbers here: Model No.
Turn on Switch the source selector on the product to RADIO/CD. Switch to standby mode • The product switches to standby mode automatically when there is no audio detected for over 15 minutes. • Press to wake up the product from standby mode. Turn off Switch the source selector on the main unit to OFF.
4 Play Play options Control play Play a CD In CD mode, you can control play through the following operations. Note / •• You cannot play CDs encoded with copyright Press:skip to the previous/next track protection technologies. •• When an audio-in cable is plugged, CD playback stops, and the unit switches to audio in mode automatically. •• Make sure that no external device is connected with the CD sound machine through AUDIO IN socket before you play a CD.
4 5 Repeat steps 3 to program more tracks. Press to play the programmed tracks. »» During play, [PROG] (program) is displayed. • twice. To erase the program, press Adjust sound During play, you can adjust volume and select the sound effects. Key +VOLUMEDBB Function Increase or decrease volume. Turn dynamic bass enhancement on or off. Play from an external device You can also listen to an external audio device through this product. 1 Switch the source selector to CD. »» AUX IN displays on the screen.
5 Listen to FM radio stations Program FM radio stations automatically Note •• You can program a maximum of 20 preset radio stations. Tune to FM radio stations Note •• For optimal reception, fully extend and adjust the position of the FM antenna. 1 Switch the source selector to RADIO and switch the band selector to FM. 2 3 Press / to tune to a radio station. Repeat step 3 to tune to more stations. • To store the current radio station, press PROG twice.
Adjust FM settings 1 In FM mode, press MENU to access FM menus. 2 Press / to toggle through the menus. • [SCAN SET]: Access the scan settings. • [SYSTEM]: Access system settings. Scan setting 1 Press OK to access the [SCAN SET] menu. 2 Press / to select an option: • [STRONG]: Search for strong stations only. • [ALL]: Search for all stations no matter whether the signal strength of a station is strong or weak. 3 Press OK to confirm the selection.
»» After the search is complete, the first stored radio station is broadcast automatically. 3 Press / to select a station, and then start listening. Use DAB menus 1 In DAB mode, press MENU to access the DAB menus. 2 Press / to toggle through the menus. • [FULL SCAN]:Scan for the DAB stations. • [MANUAL]: Tune to a station manually. • [DRC]:Enable or disable DRC. • [PRUNE]: Remove invalid stations • [SYSTEM]: Access system setting menu. 3 Press OK to enter the menu.
• 3 [DRC HIGH]: Maximum compensation applied. Press OK to confirm the selection. 7 Use system menus Remove invalid stations This option lists active stations and removes any stations that are in the list but have no service in your area. 1 2 3 Press OK to access the [PRUNE] menu. Press / to select an option. • [N]: Return to the previous menu. • [Y]: Remove invalid stations from the station list. Press OK to confirm the selection.
8 Product information notice. Specifications 2 x 1 W RMS 125 -16000 Hz, -3dB >55 dBA <1 % 650 mV RMS Disc Audio DAC Total Harmonic Distortion Frequency Response S/N Ratio 14 EN Mono, 26dB S/N Ratio <22 dBf Stereo, 46dB S/N Ratio Search Selectivity Total Harmonic Distortion Signal to Noise Ratio <43 dBf 50 KHz (FM) <3% >50 dBA General Amplifier Laser Type Disc Diameter Support Disc FM: 87.
Maintenance Clean the cabinet • Use a soft cloth slightly moistened with a mild detergent solution. Do not use a solution containing alcohol, spirits, ammonia or abrasives. Clean discs • When a disc becomes dirty, clean it with a cleaning cloth. Wipe the disc from the centre out. • Do not use solvents such as benzene, thinner, commercially available cleaners, or antistatic spray intended for analogue records. Clean the disc lens • After prolonged use, dirt or dust may accumulate at the disc lens.
16 EN
EN 17
Specifications are subject to change without notice 2014 © WOOX Innovations Limited. All rights reserved. Philips and the Philips’ Shield Emblem are registered trademarks of Koninklijke Philips N.V. and are used by WOOX Innovations Limited under license from Koninklijke Philips N.V. AZB500B_AZB500W_12_UM_V2.