Register your product and get support at www.philips.
Important notes for users in U.K. Mains plug This apparatus is fitted with an approved moulded plug. Should it become necessary to replace the main fuse, this must be replaced with a fuse of same value as indicated on the plug (example 10A). 1. Remove fuse cover and fuse. 2. The replacement fuse must comply with BS1362 and have the A.S.T.A. approval mark. If the fuse is lost, contact your dealer in order to verify the correct type. 3. Refit the fuse cover.
Výstraha! Tento přístroj pracuje s laserovým paprskem. Při nesprávné manipulaci s přístrojem (v rozporu s tímto návodem) můże dojít k nebezpečnému ozáření. Proto přístroj za chodu neotevírejte ani nesnímejte jeho kryty. Jakoukoli opravu vždy svěřte specializovanému servisu.
1 Important Safety and important notice Warning •• Risk of overheating! Never install the product in a confined •• •• •• •• •• •• space. Always leave a space of at least 4 inches around the product for ventilation. Ensure curtains or other objects never cover the ventilation slots on the product. Never place the product, remote control or batteries near naked flames or other heat sources, including direct sunlight. Only use this product indoors.
BONUSVIEW™ ‘BD LIVE’ and ‘BONUSVIEW’ are trademarks of Blu-ray Disc Association. ‘x.v.Colour’ is a trademark of Sony Corporation. CLASS 1 LASER PRODUCT BD-Live Connect this product to the movie studios website via the LAN port to access a variety of up-to-date content (e.g. refreshed previews and exclusive special features). You can also enjoy next generation possibilities, such as ringtone/wallpaper downloads, peer-to-peer interactions, live events and gaming activities.
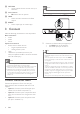
Product overview Main unit a • Turn on this product or switch to standby mode. b Disc compartment c • Open or close the disc compartment. d IR sensor • Point the remote control at the IR sensor. e Display panel f g • Start or resume play. • • Pause play. Move the paused picture one step forward. Front panel display Description LOADING UNSUPP BD HDMI ERR Loading a disc. The disc is not supported. Blu-ray disc is recognized. The HDMI video resolution is not supported by TV. Fast forward mode.
c TOP MENU • BD: Display the top menu. • DVD: Display the title menu. d • English Remote control Access the home menu. e DISC MENU / POP-UP MENU • BD: Access or exit the pop-up menu. • DVD: Access or exit the disc menu. f OK • Confirm an entry or selection. g h i j k l • Navigate through the menus. BACK • Return to a previous display menu. • • • • / Skip to the previous or next title, chapter, or track. / Search backward or forward. Mute volume (applicable only to certain Philips brand TVs).
v OPTIONS • Access options for the current activity or selection. w Color buttons • BD: Select tasks or options. x HDMI • Select the video resolution of HDMI output. Note •• You must connect this product directly to a TV. Option 1: Connect to the HDMI jack y REPEAT • Select repeat play or random play. 3 Connect Make the following connections to use this product.
Y Pb Option 3: Connect to the composite video jack Pr English Option 2: Connect to the component video jack AUDIO IN VIDEO IN AUDIO IN 1 1 2 Connect the component video cables (not supplied) to: • the Y Pb Pr jacks on this product. • the COMPONENT VIDEO input jacks on the TV. Connect the audio cables to: • the AUDIO L/R-AV OUTPUT jacks on this product. • the AUDIO input jacks on the TV. Tip •• The component video input jack on the TV might be labeled as Y Pb/Cb Pr/Cr or YUV.
1 Connect a coaxial cable (not supplied) to: • the COAXIAL jack on this product. • the COAXIAL/DIGITAL input jack on the device. Connect USB device A USB device provides an additional memory to enjoy software updates and BD-Live bonus content. Connect analogue stereo system AUDIO IN 1 Connect the USB device to the USB jack on this product. Note 1 Connect the audio cables to: • the AUDIO L/R-AV OUTPUT jacks on this product. • the AUDIO input jacks on the device.
Caution •• Risk of explosion! Keep batteries away from heat, sunshine or fire. Never discard batteries in fire. 1 2 3 Press and push the battery compartment to slide it open (see “1” in the illustration). Insert two AAA batteries with correct polarity (+/-) as indicated. Push and slide back the battery compartment (see “3” in the illustration). Navigate the menu 1 When a menu is displayed, press the buttons on the remote control to navigate. Button Action Move up or down. Move left or right.
Setup network To enjoy software updates of this product and BDLive bonus contents for certain Blu-ray discs, set up the network connection. One-touch play 1 Press the STANDBY button to turn on this product. »» The TV (if the TV supports one-touch play) automatically turns on and switches to the correct video-in channel. »» If a disc is loaded in this product, disc play automatically starts. Note •• Ensure that the network cable is properly connected and the router is switched on.
The structure of a disc content is generally divided as shown below. BD-video, DVD-video title 1 chapter 1 chapter 2 chapter 1 title 2 Button chapter 2 chapter 3 track 4 track 5 Audio CD track 1 track 2 track 3 MP3, Windows Media™ Audio, JPEG folder (group) 1 file 1 file 2 • file 1 folder (group) 2 file 2 file 3 [title/chapter] (title/chapter) refers to the contents on a BD/DVD. [track] (track) refers to the contents on an audio CD.
VCD/SVCD/DivX disc: • DISC MENU display the content of the disc. Tip •• If the PBC setting is off, the VCD/SVCD skips the menu and starts play from the first title. To display the menu before play, turn on the PBC setting (see “Adjust settings” > [Preference Setup] > [VCD PBC]). Select title/chapter 1 During play, press 2 3 OPTIONS. »» The play options menu is displayed. Select [Title] or [Chapter] in the menu, then press OK. Select the title or chapter number, then press OK.
Play automatically starts, or select a play option in the menu and press OK. • During play, you can press TOP MENU to display additional information, features or content stored in the disc. • During play, you can press POP-UP MENU to display the disc menu without interrupting disc play. Enjoy BONUSVIEW (Applicable only to a disc compatible with the BONUSVIEW or Picture-in-Picture feature) You can instantly view additional content (such as commentaries) in a small screen window.
Play MP3/WMA music MP3/WMA is a type of highly compressed audio file (files with .mp3, .wma extensions). 1 Insert a disc that contains the MP3/WMA music. 2 Press , select [Play Disc], then press OK. »» A contents menu is displayed. 3 4 Control photo play 1 Play a photo slideshow. 2 Use the remote control to control the play. Button Select a music folder, then press OK. Select a file to play, then press OK. • To return to the main menu, press BACK. Note Action Rotate a photo anti-clockwise/ clockwise.
English 6 Adjust settings Note •• If the setup option is grayed out, it means the setting cannot be changed at the current state. Video setup 1 2 3 Press . Select [Settings], then press OK. Select [Video Setup], then press . • • • • • [4:3 Letterbox] – For 4:3 screen TV: widescreen display with black bars on the top and bottom of the screen. [4:3 Panscan] – For 4:3 screen TV: full-height display with the trimmed sides. [16:9 Widescreen] – For wide-screen TV: display ratio 16:9.
[Auto] - Enjoy vivid images in over a billion colors on Deep Color enabled TV. [Off] - Output standard 8 bit color. • • [Component Video] Select a component video output resolution that is compatible with the TV display capability. • [480i/576i], [480p/576p], [720p], [1080i] Select a video resolution setting that is best supported by the TV. See the TV manual for details. Note •• If the setting is not compatible with the TV, a blank screen appears. Wait for 10 seconds for auto recovery.
1 2 3 Press . Select [Settings], then press OK. Select [Preference Setup], then press . 1) Press the Numeric buttons to enter the password or your last set password. If you forget the password, enter ‘0000’, then press OK. 2) Enter the new password. 3) Enter the same password again. 4) Move to [Confirm] in the menu and press OK. [Display Panel] Select a brightness level of the front panel display. • [Normal] - Normal brightness. • [Dim] - To dim display. 4 5 Select an option, then press OK.
[On] - Turn on EasyLink features. [Off] - Disable EasyLink features. • • • [One Touch Play] When you press the STANDBY button to turn on this product, the TV (if the TV supports onetouch play) automatically turns on and switches to the video-in channel. Disc play starts if there is a disc in this product. • [On] - Turn on one-touch play feature. • [Off] - Disable one-touch play feature.
•• This information is needed for you to check if a latest software version is available at the Philips website so that you can download and install on this product. [Restore Default Settings] Reset all the settings of this product to the factory settings, except for [Parental Control] setting. 7 Additional Information Update software For software updates to enhance performance, check the current software version of this product to compare with the latest software (if available) at the Philips website.
• • Component video output: 480/576i, 480/576p, 720p, 1080i • Y: 1 Vp-p (75 ohm) • Pb: 0.7 V-pp (75 ohm) • Pr: 0.7 V-pp (75 ohm) HDMI output 480p, 576p, 720p, 1080i, 1080p, 1080p24 8 Troubleshooting Warning •• Risk of electric shock. Never remove the casing of the product. Audio • 2 Channel analog output • Audio Front L&R : 2 Vrms (> 1 kohm) • Digital output: 0.5 Vp-p (75 ohm) • Coaxial • HDMI output • Sampling frequency: • MP3: 32 kHz, 44.1 kHz, 48 kHz • WMA: 44.
No audio output from the TV. • Ensure that the audio cables are connected to the audio input of the TV. • Assign the audio input of the TV to the corresponding video input. See the TV user manual for details. No audio output from the loudspeakers of the audio device (stereo system/amplifier/receiver). • Ensure that the audio cables are connected to the audio input of the audio device. • Turn on the audio device to its correct audio input source. No sound on HDMI connection.
Analogue sound can only be transmitted through two channels. L DivX Video-On-Demand This DivX Certified ® device must be registered in order to play DivX Video-on-Demand (VOD) content. To generate the registration code, locate the DivX VOD section in your device setup menu. Go to vod.divx.com with this code to complete the registration process and learn more about DivX video. Local storage This storage area is used as destination for storing additional contents from BD-Live enabled BDVideo.
Open Source Software This product contains the following open source software packages, which are subject to their respective licenses. 1. Zlib general purpose compression library See http://www.zlib.net/, and in particular http://www.zlib.net/zlib_license.html. /* zlib.h -- interface of the ‘zlib’ general purpose compression library version 1.2.3, July 18th, 2005 Copyright (C) 1995-2005 Jean-loup Gailly and Mark Adler This software is provided ‘as-is’, without any express or implied warranty.
3. IJG: JPEG software decoder This software is based in part on the work of the Independent JPEG Group. See http://www.ijg.org/, and in particular http://picasa.google.com/about/ijg.txt. Portions of the relevant license conditions are copied below. The authors make NO WARRANTY or representation, either express or implied, with respect to this software, its quality, accuracy, merchantability, or fitness for a particular purpose.
6. Redistributions of any form whatsoever must retain the following acknowledgment: “This product includes software developed by the OpenSSL Project for use in the OpenSSL Toolkit (http://www.openssl.org/)” THIS SOFTWARE IS PROVIDED BY THE OpenSSL PROJECT ``AS IS’’ AND ANY EXPRESSED OR IMPLIED WARRANTIES, INCLUDING, BUT NOT LIMITED TO, THE IMPLIED WARRANTIES OF MERCHANTABILITY AND FITNESS FOR A PARTICULAR PURPOSE ARE DISCLAIMED.
THIS SOFTWARE IS PROVIDED BY ERIC YOUNG ``AS IS’’ AND ANY EXPRESS OR IMPLIED WARRANTIES, INCLUDING, BUT NOT LIMITED TO, THE IMPLIED WARRANTIES OF MERCHANTABILITY AND FITNESS FOR A PARTICULAR PURPOSE ARE DISCLAIMED. IN NO EVENT SHALL THE AUTHOR OR CONTRIBUTORS BE LIABLE FOR ANY DIRECT, INDIRECT, INCIDENTAL, SPECIAL, EXEMPLARY, OR CONSEQUENTIAL DAMAGES (INCLUDING, BUT NOT LIMITED TO, PROCUREMENT OF SUBSTITUTE GOODS OR SERVICES; LOSS OF USE, DATA, OR PROFITS; OR BUSINESS INTERRUPTION).
NOTICE SOFTWARE END USER LICENSE AGREEMENT THIS SOFTWARE END USER LICENSE AGREEMENT (“THIS AGREEMENT”) IS A LEGAL AND BINDING AGREEMENT BETWEEN YOU (EITHER AN INDIVIDUAL OR ENTITY) AND PHILIPS CONSUMER LIFESTYLE B.V. A DUTCH LIMITED LIABILITY COMPANY, WITH ITS PRINCIPAL OFFICE AT HIGH TECH CAMPUS 37, 5656 AE EINDHOVEN, THE NETHERLANDS AND ITS SUBSIDIARY COMPANIES (INDIVIDUALLY AND COLLECTIVELY “PHILIPS”).
Secure Content. Microsoft may, in conjunction with such license, also download revocation lists onto your Device on behalf of Secure Content Owners, which may disable your Device’s ability to copy, store, display, transfer, and/or play Secure Content. Secure Content Owners may also require you to upgrade some of the WM-DRM components distributed with this Software (“WM-DRM Upgrades”) before accessing their content.
10. NO OTHER WARRANTIES. EXCEPT AS SET FORTH ABOVE, PHILIPS AND ITS LICENSORS DO NOT WARRANT THAT THE SOFTWARE WILL OPERATE ERROR FREE OR UNINTERRUPTED, OR WILL MEET YOUR REQUIREMENTS. YOU ASSUME ALL RESPONSIBILITIES FOR SELECTION OF THE SOFTWARE TO ACHIEVE YOUR INTENDED RESULTS, AND FOR THE INSTALLATION OF, USE OF, AND RESULTS OBTAINED FROM THE SOFTWARE.
© 2009 Koninklijke Philips Electronics N.V. All rights reserved. BDP3000_12_UM_V5.