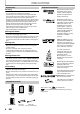
Register get support supportatat Register your your product product and get BDP7200 A BDP5010 BDP5012/F7 www.philips.com/welcome www.philips.
PRECAUTIONS Safety Instructions Model No.: The model and serial numbers of this unit may be found on the cabinet. You should record and retain those numbers for future reference. Serial No.: WARNING: TO REDUCE THE RISK OF FIRE OR ELECTRIC SHOCK, DO NOT EXPOSE THIS APPARATUS TO RAIN OR MOISTURE. APPARATUS SHALL NOT BE EXPOSED TO DRIPPING OR SPLASHING AND NO OBJECTS FILLED WITH LIQUIDS, SUCH AS VASES, SHALL BE PLACED ON THE APPARATUS.
PRECAUTIONS Connections LASER SAFETY This apparatus employs a laser. Only a qualified service person should remove the cover or attempt to service this apparatus, due to possible eye injury. CAUTION: Use of controls or adjustments or performance of procedures other than those specified herein may result in hazardous radiation exposure. CAUTION: Visible and invisible laser radiation when open and inter lock defeated. Do not stare into beam. LOCATION: Inside, near the deck mechanism.
PRECAUTIONS Maintenance Trademark Information Servicing Manufactured under license from Dolby Laboratories. “Dolby” and the double-D symbol are trademarks of Dolby Laboratories. • Please refer to relevant topics on “TROUBLESHOOTING” on page 47 before returning the product. • If you need to call a customer service representative, please know the model number and serial number of your product before you call. This information is displayed on the back of the product.
CONTENTS Introduction List of settings ............................................................ 32 Setups ......................................................................... 38 TV Shape .....................................................................................38 HDMI Video Resolution .........................................................38 HDMI Audio ...............................................................................39 Digital Out ........................................
FEATURES Watch movies in the highest picture quality available for your HDTV. The BDP5012 Blu-ray Disc player offers full high-definition video playback up to 1080p resolution for an amazing viewing experience. A highly detailed picture and increased sharpness delivers a more true-to-life picture. Blu-ray Disc You can enjoy Blu-ray Disc which is capable of storing five times more data than a conventional DVD.
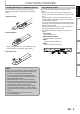
FUNCTIONAL OVERVIEW Introduction Front Panel 1 2 3* 4 5 6 7 8* 9 Connections * The unit can also be turned on by pressing these buttons. 1. Q (STANDBY-ON) button • Press to turn on the unit, or to turn the unit into the standby mode. (To completely shut down the unit, you must unplug the AC power cord). 2. Disc tray • Place a disc when opening the disc tray. 3. A (OPEN/CLOSE) button* • Press to open or close the disc tray. 4.
FUNCTIONAL OVERVIEW Remote Control 1 2 3 29 28 4 5 6 27 7 8 9 10* 11 26 25 24 12 13 23 22 14 21 15* 16 17 18 20 19 * The unit can also be turned on by pressing these buttons. 1. STANDBY-ON Q button • Press to turn on the unit, or to turn the unit into the standby mode. (To completely shut down the unit, you must unplug the AC power cord) 2. BONUSVIEW (PiP) button • Press to switch picture in picture feature on/off (only applicable to BD-video which supports the PiP (BONUSVIEW) function). 3.
FUNCTIONAL OVERVIEW Install the batteries (AAAx2) matching the polarity indicated inside battery compartment of the remote control. 1) Open the cover. 3) Close the cover. 30˚ 30˚ 23 feet (7 m) 16 feet (5 m) Function Setup 16 feet (5 m) Playback Make sure to match + and - on the batteries to the marks indicated in the battery compartment.
FUNCTIONAL OVERVIEW Front Panel Display 1 2 * Brightness of the display can be adjusted. Refer to “Front Panel Brightness” in “LIST OF SETTINGS” on page 35. 1. Displays playback status icon. Refer to the table below. 2. Displays various kinds of information such as title number, elapsed playing time, repeat type, menu type, etc.
FUNCTIONAL OVERVIEW Introduction Guide to On-Screen Display Home Menu When you turn on the unit, home menu will appear automatically. Otherwise, press [HOME ].
CONNECTIONS Connection to the TV 1 Choose the appropriate connection, then proceed to the corresponding instruction (A, B or C) on the next page. Best (Supports up to 1080i(*1), 1080p(*2), 1080p/24 resolution.) Your TV Video Audio HDMI cable HDMI IN High Definition TV Go To A No analog audio connection required. (*1) 1080i (*2) : Outputs the video data with frame rate of 30 frames per second. 1080p : Outputs the video data with frame rate of 60 frames per second.
CONNECTIONS Introduction 2 Connect the cables by following the descriptions below. HDMI Video / Audio Connection A Your TV FL SL C FR SR SW Connections VIDEO OUT Y L PB /CB OPTICAL COAXIAL DIGITAL OUT PCM/BITSTREAM R PR /CR COMPONENT VIDEO OUT AUDIO OUT 5.
CONNECTIONS HDMI Mode and Actual Output Signals Press [HDMI] to change the resolution of the video signal being output from the HDMI OUT. The video resolution changes as follows every time [HDMI] is pressed. Or change the setting in the “HDMI Video Resolution” in the settings menu.
CONNECTIONS Introduction Connection to an Audio System • When you change the connections, all devices should be turned off. • Refer to the manual accompanying external devices for more information.
CONNECTIONS Multi-Channel Analog Audio Connection AV receiver / amplifier with multi-channel audio input jacks. 5.1ch audio cable audio FL SL C this unit VIDEO OUT Y FL SL C FR SR SW L 5.1ch AUDIO OUT PB /CB OPTICAL COAXIAL PR /CR DIGITAL OUT PCM/BITSTREAM COMPONENT VIDEO OUT R AUDIO OUT FR SR SW 5.1ch AUDIO OUT LAN HDMI OUT To set up the speakers, refer to “Analog Audio” on page 35. Audio Output from Analog Out (5.
CONNECTIONS Introduction Network Connection with LAN • You can use a disc which offers BD-Live function by connecting the unit to the Internet. (For BD-Live information, please refer to page 29) Telecommunications equipment (modem, etc.) Connections Hub or broadband router WAN LAN LAN 5 4 3 2 1 Basic Setup LAN cable LAN cable Internet this unit FL SL C FR SR SW Playback VIDEO OUT Y LAN L PB /CB OPTICAL COAXIAL PR /CR DIGITAL OUT PCM/BITSTREAM COMPONENT VIDEO OUT R AUDIO OUT 5.
BEFORE YOU START After you have completed all the connections, you must find the viewing channel (external input channel) on your TV. Finding the Viewing Channel on Your TV 1 2 3 After you have made all the necessary connections, press [STANDBY-ON Q] to turn on the unit. Turn on your TV. Press the button on the TV’s remote control that accesses the external input channel. It may be labeled “SOURCE”, “AV” or “SELECT” (refer to your TV’s user manual).
INFORMATION ON PLAYBACK Introduction Information on Playback Before you start playing back a disc, read the following information. Playable files Playable Discs and Files Playable discs Logos Windows Media™ Audio JPEG DVD-RW/-R CD-RW/-R SD Memory Card (including SDHC) miniSD Card microSD Card • Official DivX® Certified product; Plays all versions of DivX® video (including DivX® 6) with standard playback of DivX® media files.
INFORMATION ON PLAYBACK Unplayable Discs and Files Hint for Disc Playback The following discs will not be played back in this unit. • CD-ROM • CD-I (compact disc-interactive) • DVD-RAM • VSD (video single disc) • DVD-audio • video CD • HD DVD • SVCD • unfinalized disc • BD-RE (ver.1.0) • BD-RE (ver.2.1) (Recorded in BDAV format) • BD-R (ver.1.1/1.2/1.3) (Recorded in BDAV format) • Super Audio CD - Only the sound on the CD layer can be heard.
INFORMATION ON PLAYBACK 1 Audio CD Track List Introduction Picture Mode File List Guide to File List 2 BD-Player | Disc Tray 1 2 Pictures 24 3 ..
BASIC PLAYBACK Playing Back a BD or a DVD 1 2 Insert a disc (refer to page 21 on how to insert a disc). Playback may start automatically. If not, press [PLAY B]. Some discs may show a title or a disc menu. In this case, refer to “Using the Title / Disc Menu” on page 26. To pause playback: Press [PAUSE F]. To return to the normal playback: Press [PLAY B]. To stop playback: Press [STOP C]. Playback will be in Resume-On-Stop mode, and the home menu will appear.
BASIC PLAYBACK How to Navigate through the Track/File List Others • Lower limit • Maximum file size of a picture : 2,560 x 1,900 dots (sub sampling is 4:4:4) : 5,120 x 3,840 dots (sub sampling is up to 4:2:2) : 32 x 32 dots : 5 MB Folder / File number limitations: • 999 folders (groups) and 9,999 files. • 255 folders (groups) and 999 tracks / files. EN Function Setup Resolution • Upper limit Playback • Sampling frequency : 32 kHz, 44.
BASIC PLAYBACK 1 2 Insert a disc (refer to page 21 on how to insert a disc). 4 • Home menu appears automatically. Select a group (folder) or track/file you want to play back. Then press [PLAY B] or [OK] to start playback. Refer to “How to Navigate through the Track/ File List” on page 23. To skip to the next track/file: Press [NEXT T]. To skip to the previous track/file: Press [PREV S]. With “Disc Tray” selected, press [OK]. Media filter screen will appear. • For audio CD, skip to step 4.
BASIC PLAYBACK SD Memory Card Follow step 4 in “Playing Back an Audio CD or a Disc with DivX®/ Windows Media™ Audio/JPEG Files” on page 23. With “SD Card” selected, press [OK]. Media filter screen will appear. Select the type of the file you want to play back in the media filter screen. Then press [OK] to display the file list. To remove the SD Memory Card: In stop mode, gently push in the SD Memory Card, then pull it out slowly.
BASIC PLAYBACK Playing Back a DivX® with DivX® External Subtitle Subtitles created by the user can be displayed during DivX® playback. 1) Follow steps 1 to 3 in “Playing Back an Audio CD or a Disc with DivX®/Windows Media™ Audio/JPEG Files” on page 23. 2) Highlight a file you want to play back, then press [GREEN]. Subtitle list will appear. Subtitle List 3dolby.avi Off SMI SRT SUB Cancel • “Subtitle” appears next to “Green” icon only when DivX® subtitle is available for the selected file.
SPECIAL PLAYBACK 1) In pause mode, press [PAUSE F] repeatedly. Every time you press [PAUSE F], playback will advance one step at a time. 2) Press [PLAY B] to return to the normal playback. Note • Only step by step forward is available. • For some DivX® files, fast forward/fast reverse may not function. During playback, you can zoom up the picture. 1) During playback, press [ZOOM] repeatedly. Every time you press [ZOOM], zoom factor will change. .
SPECIAL PLAYBACK Note Repeat Playback Available repeat function varies depending on the discs. 1) During playback, press [REPEAT] repeatedly to select the desired repeat function. REPEAT MODE Chapter Repeat The current chapter will be played back repeatedly. Title Repeat The current title will be played back repeatedly. Track Repeat The current track or file will be played back repeatedly. All Repeat All tracks in the media will be played back repeatedly.
SPECIAL PLAYBACK Title/Chapter Search Using [PREV S] / [NEXT T] Using [INFO 1) During playback, press [INFO Note ]. Disc Title 001/012 Chapter 001/023 Playing Time 00:01:31 Playback 2) Use [K / L] to select “Title” or “Chapter”. 3) Use [the Number buttons] or [s / B] to enter the title/chapter number. 4) Press [OK]. Playback will start from the beginning of the title/ chapter. 5) Press [INFO ] to remove the information display.
SPECIAL PLAYBACK Switching Subtitles Track Search Using [PREV S] / [NEXT T] 1) During playback, press [NEXT T] to skip the current track or file and move to the next. The track/file will move forward one at a time. To go back to the beginning of the current track/file press [PREV S]. Press it repeatedly to go to the previous track/file. The track/file will move backward one at a time. Time Search 1) During playback, press [INFO ]. Some BD and DVD may have subtitles in 1 or more languages.
SPECIAL PLAYBACK Some BD and DVD contain multiple audio streams. Those are often in different audio languages or audio formats. For BD, available audio varies depending on “Blu-ray Disc Audio” setting. Refer to page 34 for more information. “Primary” : Sets the audio for the primary video. “Secondary” : Sets the audio for the secondary video. 2) Use [K / L] to select your desired audio stream channel.
LIST OF SETTINGS In the settings menu, you can customize the various kinds of settings as you prefer. Refer to the following instruction to navigate through the settings menus. 1) Press [HOME ] to access the home menu. 2) Use [K / L] to highlight the “Settings”, then press [OK]. 3) Use [K / L] to highlight the “Advanced Setup”, then press [OK]. 4) Use [K / L] to move the highlight up and down in the list. Options of the highlighted item will be displayed in the list on the right whenever available.
LIST OF SETTINGS Menus/Options HDMI Video HDMI 1080p/24 Description Auto Off Auto Video Black Level On Off Off MPEG NR 3D NR Combo (3D + MPEG) Noise Reduction • Not available for BD-video. Reduces the noise of the playback picture. “Off”: Deactivates the Noise Reduction. “MPEG NR”: Reduces the block noise seen characteristically in the MPEG files. “3D NR”: Reduces the rough background noise so that you can feel the greater feeling of depth. “Combo (3D + MPEG)”: Activating both “MPEG NR” and “3D NR”.
LIST OF SETTINGS Category Menus/Options Night Mode On Off Down Sampling On Off Virtual Surround On Off Blu-ray Disc Audio Mix Audio Output Primary Audio Only HDMI Audio • This feature is available only when the display device is connected by an HDMI cable. • Refer to page 39 for more information. Digital Out • When HDMI cable is connected, make sure “HDMI Audio” setting is set to “Off” to change the “Digital Out” setting. • Refer to page 40 for more information.
LIST OF SETTINGS Menus/Options Front (L/R) Center Surround (L/R) Subwoofer Unit Front (L/R) Center Surround Others Angle Icon On Off Auto Standby On Off Sets the rating level for the disc playback. Front Panel Brightness Bright Dim Auto Screen Saver On Off Slide Show Slide Show Interval 5sec 10sec Slide Show Transition Cut In/Out Fade In/Out Sets the new password for the “Ratings Lock” setting.
LIST OF SETTINGS Category Others Menus/Options DivX® VOD Description This menu item provides you with the DivX® VOD registration code. The DivX® registration code is required when downloading the DivX® VOD files from the Internet. To learn more about DivX® VOD, visit www.divx.com/vod. Sets whether to utilize the EasyLink (HDMI CEC) function. EasyLink (HDMI CEC) function allows your PHILIPS brand EasyLink TV to act in conjunction with this unit or vice versa.
LIST OF SETTINGS Yes No Local Storage Player Yes No SD Card Yes No Network Settings Yes No Basic Setup Format SD Card Description Playback “Yes”: Resets all the settings, except for “Ratings Lock” and “Network Connection”, in “Settings” to the factory default. “No”: Does not perform the initialization. “Yes”: Re-format SD Card. “No”: Does not perform the initialization. “Yes”: Re-format local storage (Player) used for BD-Java. “No”: Does not perform the initialization.
SETUPS Actual Output Resolution by Media: TV Shape “Advanced HOME A “Settings” A A “Video Output” A “TV Shape” Setup” Use this feature to adjust the aspect ratio of the video source which is different from your TV’s ratio to fit your TV monitor without distorting the picture.
SETUPS Introduction HDMI Audio HOME A “Settings” A “Advanced Setup” A “Audio” A “HDMI Audio” Refer to the table below to see which setting you should choose. Media ª PCM 2ch PCM or Mute 2ch PCM or Mute Mute DTS DTS, PCM or Mute PCM or Mute Mute *1) Only the independent substream is decoded. *2) Only the Dolby Digital substream is decoded. *3) Only the core substream is decoded.
SETUPS Digital Out HOME A “Settings” A “Advanced Setup” A “Audio” A “Digital Out” Refer to the table below to see which setting you should choose.
SETUPS 2) Press [OK] repeatedly to change the setting. “Advanced “Analog HOME A “Settings” A A “Audio” A Setup” Audio” Setting Surround Front (L/R) Center Subwoofer (L/R) “Speaker A Setup” Set the speaker configuration to match the size/number of your speakers. Speaker Setup Speaker Distance S M A L L Speaker Level • If you press [RED], each speaker outputs the test tone for 2 seconds in rotation.
SETUPS 2-a) Enter 4 digit PIN code using [the Number buttons]. Enter new PIN. To cancel ratings lock temporarily Some discs allow you to cancel the ratings lock temporarily. With those discs, the message below will appear when you try to play them back. “Please enter your PIN to unblock content.” Follow the instruction which appears on the screen to cancel the ratings lock. After entering the PIN code, “Rating Level” appears. Select desired rating level, then press [OK]. • “4737” cannot be used.
SETUPS Set up the network connection settings in order to use the BD-Live function with a BD-Live disc. Connection Test “Advanced “Network “Connection A “Others” A A Setup” Connection” Test” After you made IP address/DNS settings or when a LAN cable is connected, always perform the connection test to check if the connection is correctly made. 1) Use [K / L] to highlight “Settings” in the home menu, then press [OK]. 3) Use [K / L] to highlight “Others”, then press [OK].
SETUPS If you select “Manual”, follow the following instruction to set the IP address and DNS. 4-a) IP address setting screen will appear. Enter IP address, subnet mask and default gateway with cursor buttons and number buttons. IP Address Setting IP Address Subnet Mask Default Gateway Clear OK • Enter the IP address number after checking the specifications of your router. • If the IP address number is unknown, check the IP address number of other devices. (e.g.
SETUPS Proxy Setting Proxy Port 0 Clear OK Proxy Address Proxy Port *************** ***** 5) Press [BACK U] to go back to the previous screen, or press [HOME ] to go back to the home menu. • Connection Speed You can set connection speed as your preference. (The default setting is “Auto”.) 2) Use [K / L] to highlight “Enable(Custom)”, then press [OK]. 3) Use [K / L] to highlight “Connection Speed”, then press [OK]. 4) Use [K / L] to highlight the desired setting, then press [OK].
SETUPS Software Upgrade Disc Upgrade HOME A“Settings” A “Advanced “Software “Disc A “Others” A A Setup” Upgrade” Upgrade” You can upgrade the software by using disc. 1) Follow steps 1) to 3) in “Connection Test” on page 43. 2) Use [K / L] to highlight “Software Upgrade”, then press [OK]. 3) Use [K / L] to highlight “Disc Upgrade”, then press [OK]. 4) Use [K / L] to highlight “Yes”, then press [OK]. 5) Disc tray will open automatically. • Insert the disc for software upgrade and then press [OPEN/CLOSE A].
TROUBLESHOOTING No audio / video signal on the display device via HDMI cable. No high-definition video signal on the TV. Cannot play back JPEG files from a disc. Cannot play back Windows Media™ Audio files from a disc. Cannot play back DivX® files from a disc. in the upper right hand corner of the screen. Cannot find a JPEG file. Cannot find a Windows Media™ Audio file. Error message appears when I select “Auto” in the “Player Menu”. Others GENERAL SD Memory Card cannot be read.
TROUBLESHOOTING GENERAL Problem Cannot connect to the network. Cannot connect to the network while my PC is connected to the network. The capacity of the SD Card decreased. MPEG-2 video and audio on the SD card cannot be played back. The contents of the card cannot be read. Cannot use the BD-Live function or download of data does not perform properly. Cannot play back BD-video(BDROM Profile 2.0). 48 EN Tip Check if the LAN cable connection is properly made. Turn on the modem or broadband router.
GLOSSARY DNS Server An electrical signal that directly represents sound. Compare this to digital audio which can be an electrical signal, but is an indirect representation of sound. See also “Digital Audio”. A server which translates Internet domain names into IP addresses. Aspect Ratio BD-Live Blu-ray Disc (BD) Chapter Dolby Digital Plus Dolby Digital Plus is the next generation digital audio compression technology developed as an extension to Dolby Digital. Blu-ray Disc supports 7.
GLOSSARY LAN (Local Area Network) Subnet Mask A group of computer networks covering a small area like a company, school or home. A mask which is used to determine what subnet an IP address belongs to. Local Storage Title A storage area of sub contents for playing virtual packages on BD-video. A collection of chapters on BD-video or DVD-video. See also “Chapter”. PCM (Pulse Code Modulation) Track The most common system of encoding digital audio, found on CD and DAT.
SPECIFICATIONS Introduction NTSC Color 120 V AC, 60 Hz 22 W (standby: 0.7 W) 17.2 x 2.5 x 11.9 inches (435 x 65 x 303 mm) 6.8 lbs. (3.
ONE (1) YEAR LIMITED WARRANTY WARRANTY COVERAGE: This warranty obligation is limited to the terms set forth below. WHO IS COVERED: This product is warranted to the original purchaser or the person receiving the product as a gift against defects in materials and workmanship as based on the date of original purchase (“Warranty Period”) from an Authorized Dealer. The original sales receipt showing the product name and the purchase date from an authorized retailer is considered such proof.
MEMO Introduction Connections Basic Setup Playback Function Setup Others 53 EN
MEMO 54 EN
MEMO Introduction Connections Basic Setup Playback Function Setup Others 55 EN
P&F USA, Inc. PO Box 430 Daleville, IN 47334-0430 Meet Philips at the Internet http://www.philips.com/welcome Philips and Philips Shield are used under license of Koninklijke Philips Electronics NV.