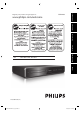
BDP7200 www.philips.com/welcome T ARRÊ ALTO Connections STOP Introduction Register your product and get support at Basic Setup Playback BLU-RAY DISC PLAYER Function Setup EN Others © 2008 P&F USA, Inc. E5H11UD-BDP7200_EN_v2.
PRECAUTIONS Return your Product Registration Card or register online at www.philips.com/welcome today to get the very most from your purchase. Registering your model with PHILIPS makes you eligible for all of the valuable benefits listed below, so don't miss out. Complete and return your Product Registration Card at once, or register online at www.philips.
PRECAUTIONS Read before operating equipment Basic Setup Playback Function Setup Others Do not compromise these design standards by applying excessive pull force to the front, or top, of the cabinet which could ultimately overturn the product. ● Also, do not endanger yourself, or children, by placing electronic equipment/toys on the top of the cabinet. Such items could unsuspectingly fall from the top of the set and cause product damage and/or personal injury. 18.
PRECAUTIONS Safety Precautions Warning: To prevent fire or shock hazard, do not expose this device to rain or moisture. Federal Communications Commission (FCC) Warning: Any unauthorized changes or modifications to this device void the user’s authority to operate it. Department of Health and Human Services (DHHS) Certification: Complies with 21 Center for Radiation (CFR) chapter 1 subchapter J applicable at time of manufacture. Laser Safety: This unit employs a laser.
PRECAUTIONS Moisture condensation may occur inside the unit when it is moved from a cold place to a warm place or after heating a cold room or under conditions of high humidity. Do not use this unit at least for 2 hours until its inside gets dry. Trademark Information Connections • Please refer to relevant topics on “TROUBLESHOOTING” on page 39 before returning the product.
CONTENTS Introduction Function Setup PRECAUTIONS . . . . . . . . . . . . . . . . . . . . . . . . . . . . . . . . . . . 2 FEATURES . . . . . . . . . . . . . . . . . . . . . . . . . . . . . . . . . . . . . . . 7 Features . . . . . . . . . . . . . . . . . . . . . . . . . . . . . . . . . . . . . . . . . . . .7 Product Info . . . . . . . . . . . . . . . . . . . . . . . . . . . . . . . . . . . . . . . .7 Symbols Used in this User Manual . . . . . . . . . . . . . . . . . . .7 FUNCTIONAL OVERVIEW . . . . . . . .
FEATURES Features HDMI 1080p/24 output (BD only) This unit is equipped with the feature which can provide the smooth movement in the playback of film originated material with the frame rate of 24 frames per second with progressive. (Available only when the display device is connected by an HDMI cable.) Refer to “HDMI 1080p/24” in the “LIST OF SETTINGS” on page 30. Product Info To specify for which media type each function is, we put the following symbols at the beginning of each item to operate.
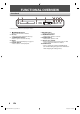
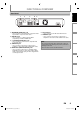
FUNCTIONAL OVERVIEW Front Panel 1 2 3* 4 5* 6 7 8 9 10 * The unit can also be turned on by pressing these buttons. 1. y(STANDBY-ON) button • Press to turn the unit on and off. 2. Disc tray • Place a disc when opening the disc tray. 3. A (OPEN/CLOSE) button* • Press to open or close the disc tray. 4. Display • Refer to “Front Panel Display” on page 12. 5. B (PLAY) button* • Press to start or resume playback. 8 6. C (STOP) button • Press to stop playback. 7.
FUNCTIONAL OVERVIEW 1 2 COMPONENT VIDEO OUT Y PR /CR 3 4 HDMI OUT 5.1ch AUDIO OUT FL SL C 5 AUDIO DIGITAL OUT OUT (PCM/BITSTREAM) L COAXIAL PB /CB FR SR SW OPTICAL R AC IN 7 6 6. AC IN Terminal • Use to connect to the AC outlet with AC cord. 7. VIDEO OUT jack • Use to connect a TV monitor, an AV receiver / amplifier or other device with an RCA video cable. Basic Setup Note • Do not touch the inner pins of the jacks on the rear panel.
FUNCTIONAL OVERVIEW Remote Control 1 2* 3 4 5 6 28 27 26 7 8 9 25 10 11* 12 24 13 22 23 14 15 21 16 17 18 20 19 * The unit can also be turned on by pressing these buttons. 1. y (STANDBY-ON) button • Press to turn the unit on and off. 2. OPEN/CLOSE A button* • Press to open or close the disc tray. 3. PIP button • Press to switch picture in picture feature on/off (only applicable to BD-video which supports the PIP function). 4. ZOOM button • Press to enlarge the picture on the screen. 5.
FUNCTIONAL OVERVIEW Installing the Batteries in the Remote Control Playback 30˚ 16 feet (5m) 30˚ 23 feet (7m) Basic Setup Make sure to match + and - on the batteries to the marks indicated in the battery compartment. 3)Close the cover. Connections 2)Insert batteries. Keep in mind the following when using the remote control: • Make sure that there are no obstacles between the remote control and the infrared sensor window on the unit.
FUNCTIONAL OVERVIEW Front Panel Display 1 2 * Brightness of the display can be adjusted. Refer to “Front Panel Brightness” in “LIST OF SETTINGS” on page 32. 1.Displays playback status icon. Refer to the table below. 2.Displays various kinds of information such as title number, elapsed playing time, repeat type, menu type, etc.
FUNCTIONAL OVERVIEW Introduction Guide to On-Screen Display Home Menu When you turn on the unit, home menu will appear automatically. Otherwise, press [HOME].
CONNECTIONS Connection to the TV • Make one of the following connections, depending on the capabilities of your existing device.
CONNECTIONS Press [OUTPUT] on the front panel to change the resolution of the video signal being output from the HDMI OUT. The video resolution changes as follows every time [OUTPUT] is pressed. Or change the setting in the “HDMI Video Resolution” in the settings menu.
CONNECTIONS Connection to an Audio System • When you change the connections, all devices should be turned off. • Refer to the manual accompanying external devices for more information. 2 Channel Analog Audio Connection stereo system Digital Audio Connection AV receiver/amplifier AUDIO IN R DIGITAL AUDIO INPUT COAXIAL audio L digital audio coaxial / optical input jacks analog audio input jacks digital audio coaxial cable RCA audio cable L Y HDMI OUT PR /CR 5.
BEFORE YOU START After you have completed all the connections, you must find the viewing channel (external input channel) on your TV. Introduction Finding the Viewing Channel on Your TV Connections Turn on your TV. Playback Press the button on the TV’s remote control that accesses the external input channel. It may be labeled “SOURCE”, “AV” or “SELECT” (refer to your TV’s user manual).
INFORMATION ON PLAYBACK Before you start playing back a disc, read the following information. Playable Discs and Files This unit is compatible to play back the following discs. To play back a disc, make sure that it meets the requirements for region codes and color systems as described below. You can play back discs that have the following logos. Other disc types are not guaranteed to play back.
INFORMATION ON PLAYBACK Description for Icons Hint for Disc Playback BD-video, DVD-video title 1 chapter 1 chapter 2 track 2 Audio CD track 3 title 2 chapter 2 chapter 3 track 4 track 5 [ ] : group(folder) icon ] : group(folder) return icon [ ] : music file icon [ ] : video file icon [ - “Folders” refers to the groups of files. - “Tracks” refers to the contents recorded on the audio CD.
INFORMATION ON PLAYBACK Video/Music Mode File List How to Insert a Disc e.g., MP3 mode 1) Press [OPEN/CLOSE A] to open the disc tray. 11 1 2 2) Place the disc on the disc tray with its label side facing up. BD-Player | Disc Tray | Music 10 9 MP3 File 3 MP3_1.mp3 3 MP3_2.mp3 8 MP3_3.mp3 MP3_4.mp3 MP3 0:00:13 MP3_5.mp3 MP3_3.mp3 4 MP3_6.mp3 7 Align the disc to the disc tray guide. MP3_7.mp3 Media Filter Page Up 6 Page Down * Make sure the disc is compatible with this unit.
BASIC PLAYBACK Playback may start automatically. Playback When you press [PLAY B] next time, the playback will start from the point where it has been stopped. Basic Setup If not, press [PLAY B]. Some discs may show a title or a disc menu. In such case, refer to “Using the Title / Disc Menu” on page 24. To pause playback: Press [PAUSE F]. To return to the normal playback: Press [PLAY B]. To stop playback: Press [STOP C].
BASIC PLAYBACK Playing Back an Audio CD or a Disc with DivX®/MP3/Windows Media™ Audio/JPEG Files Resolution • Upper limit : 2,560 x 1,900 dots (sub sampling is 4:4:4) : 5,120 x 3,840 dots (sub sampling is up to 4:2:2) • Lower limit : 32 x 32 dots • Maximum file size of a picture : 5 MB. Folder / File number limitations: • 999 folders(groups) and 9,999 files. • 999 folders(groups) and 999 tracks / files.
BASIC PLAYBACK BD-Player Disc Tray Video Possible Errors “This rental has { views left. Do you want to use one of your { views now?” Some DivX® VOD files are restricted with the limited playable times. You cannot play them back beyond the limit. “This player is not authorized to play this video.” You cannot play back the DivX® VOD files obtained with different registration codes on this unit.
BASIC PLAYBACK Playing Back a DivX® with DivX® External Subtitle Subtitles created by the user can be displayed during DivX® playback. 1) Follow steps 1 to 3 in “Playing Back an Audio CD or a Disc with DivX®/MP3 /Windows Media™ Audio/ JPEG Files” on page 22. 2) Highlight a file you want to play back, then press [Green]. Subtitle list will appear. Subtitle List 3dolby.
SPECIAL PLAYBACK 1) In pause mode, press [PAUSE F] repeatedly. Every time you press [PAUSE F], playback will advance one step at a time. 2) Press [PLAY B] to return to the normal playback. Note • Only step by step forward is available. Zoom Slow Forward Playback During playback, you can zoom up the picture. 1) During playback, press [ZOOM] repeatedly. Every time you press [ZOOM], Zoom factor will change. Basic Setup Note • For some DivX® files, fast forward/fast reverse may not function.
SPECIAL PLAYBACK Repeat Playback Slide Show Available repeat function varies depending the discs. 1) During playback, press [REPEAT] repeatedly to select the desired repeat function. REPEAT MODE Chapter Repeat The current chapter will be played back repeatedly. Title Repeat The current title will be played back repeatedly. Track Repeat The current track or file will be played back repeatedly. All Repeat All tracks in the media will be played back repeatedly.
SEARCH Using [PREV S] / [NEXT T] 1) During playback, press [INFO]. Disc Title 001/012 Chapter 001/023 Playing Time 00:01:31 To go back to the beginning of the current title or chapter, press [PREV S]. Press [PREV S] repeatedly to go to the previous title or chapter. The title or chapter may move backward one at a time. 2) Use [K / L] to select “Playing Time”. Using [INFO] e.g.; 3) Use [the Number buttons] to enter the time count you want to jump to. Basic Setup 1) During playback, press [INFO].
SELECTING THE FORMAT OF AUDIO AND VIDEO You can select the format of audio and video as you prefer depending on the contents of the disc you are playing back. Switching Subtitles Some video materials may have subtitles in one or more languages. For commercially available discs, the supported languages can be found on the disc case. Follow the steps below to switch the subtitle language during playback.
LIST OF SETTINGS Norsk Polski Português Русский suomi Svenska Türkçe Norsk Polski Português Русский suomi Svenska Türkçe Sets the subtitle language for BDvideo or DVD-video playback. Sets the language for disc menu. Others Norsk Polski Português Русский suomi Svenska Türkçe Sets the audio language for BDvideo or DVD-video playback. • If you select “Default”, the disc’s original language will be in effect.
LIST OF SETTINGS Category Video Output Menus HDMI 1080p/24 Options/Sub-Menus “Auto”: Outputs the picture in 1080/24p when it meets all the conditions listed below: • The video resolution and the frame rate of the material is 1080/24p (1080 progressive with 24 frames per second). • “HDMI Video Resolution” setting is set to “1080p”. • The display device supports the 24p (24 frames per second, progressive) output. “Off”: Outputs the picture in 60p.
LIST OF SETTINGS Menus Options/Sub-Menus Description On Off Compresses the range between soft and loud sounds. Down Sampling On Off Virtual Surround On Off Blu-ray Disc Audio Mix Audio Output Primary Audio Only Sets the sampling rate for outputting the PCM audio from the digital output (coaxial/ optical). “On”: Over 96kHz PCM audio will be down sampled at 48kHz. “Off”: For BD or DVD recorded in LPCM without copyright protection, 2-channel audio signals up to 96 kHz are output as LPCM signals.
Category Audio Menus Analog Audio • When HDMI cable is connected, make sure “HDMI Audio” setting is set to “Off” to change the “Analog Audio” setting. Options/Sub-Menus Speaker Setup • Refer to page 37 for more information. Front (L/R) Center Surround (L/R) Subwoofer Speaker Distance Unit Front (L/R) Center Surround Default Speaker Level Front (L) Center Front (R) Description Large/Small Large/Small/Off Large/Small/Off On/Off Sets the speaker configuration to suite the size/number of your speakers.
Category Options/Sub-Menus Description Yes No Local Storage Yes No “Yes”: Resets all the settings, except for “Parental”, in “Settings” to the factory default. “No”: Does not perform the initialization. “Yes”: Initializes (cleans up) the area used for BD-Java. “No”: Does not perform the Initialization. Advanced Setup Settings Basic Setup Sets whether to utilize the EasyLink (HDMI CEC) function. EasyLink (HDMI CEC) function allows your PHILIPS brand EasyLink TV to act in conjunction with this unit.
SETUPS Actual Output Resolution by Media: TV Shape HOME “Settings” “Advanced Setup” “Video Output” “TV Shape” Use this feature to adjust the aspect ratio of the video source which is different from your TV’s ratio to fit your TV monitor without distorting the picture.
SETUPS HOME ¨ “Settings” ¨ “Advanced Setup” ¨ “Audio” ¨ Introduction HDMI Audio “HDMI Audio” Refer to the table below to see which setting you should choose.
SETUPS Digital Out HOME “Settings” “Advanced Setup” “Audio” “Digital Out” Refer to the table below to see which setting you should choose.
SETUPS HOME “Settings” “Advanced Setup” “Audio” “Analog Audio” “Speaker Setup” Set the speaker configuration to suite the size/number of your speakers. Parental HOME Speaker Setup “Settings” “Advanced Setup” “Parental” Speaker Distance • If you press [Red], each speaker outputs the test tone for 2 seconds in rotation. You can move among the speakers as illustrated below: Front (L) Front (R) Center 1) With “Parental” selected in the “Advanced Setup” menu, press [OK].
SETUPS 3) After entering the PIN code, “Rating Level” appears. Select desired rating level then press [OK]. Rating Level New PIN All 8[Adult] 7 6 5 4 3 2 RATING EXPLANATIONS All • Parental Control is inactive; all discs can playback. 8 [Adult] • DVD software of any grades (adult/ general/children) can be played back. 7 • [NC-17] No one under 17 admitted. 6 • [R] Restricted; under 17 requires accompanying parent or adult guardian. 5 • [PGR] Parental Guidance Recommended.
TROUBLESHOOTING No audio / video signal on the display device via HDMI cable. No audio signal from the loudspeakers of the TV. No audio signal from the loudspeakers of the audio system. GENERAL Cannot play back Windows Media TM Audio files from a disc. Cannot play back DivX® files from a disc. Make sure that the disc was recorded in the UDF, ISO9660 or JOLIET format. Make sure that the bit rate of the MP3 files is between 112 and 320 kbps. Make sure that the sample rate of the MP3 files is 32kHz, 44.
GLOSSARY Analog Audio JPEG (joint photographic experts group) An electrical signal that directly represents sound. Compare this to digital audio which can be an electrical signal, but is an indirect representation of sound. See also “Digital Audio”. JPEG is a method of compressing still picture files. You can copy JPEG files on CD-RW/-R, DVD+RW/+R or DVD-RW/-R from a computer and play back the files on this unit. Aspect Ratio MP3 (MPEG audio layer 3) The width of a TV screen relative to its height.
SPECIFICATIONS L/R: 2Vrms (output impedance: more than 1kΩ) L/R/SL/SR/C: 2Vrms (output impedance: more than 1kΩ) SW: 1.15Vrms (output impedance: more than 1kΩ) 1Vp-p (75Ω) Y: 1Vp-p (75Ω) PB/CB: 700mVp-p (75Ω) Basic Setup Rear NTSC color 120V AC, 60Hz 30W (standby: 0.8W) 17.2 x 2.8 x 13.8 inches (435 x 70 x 348mm) 9.1 lbs. ( 4.
ONE (1) YEAR LIMITED WARRANTY WARRANTY COVERAGE: This warranty obligation is limited to the terms set forth below. WHO IS COVERED: This product is warranted to the original purchaser or the person receiving the product as a gift against defects in materials and workmanship as based on the date of original purchase (“Warranty Period”) from an Authorized Dealer. The original sales receipt showing the product name and the purchase date from an authorized retailer is considered such proof.
Introduction Connections Basic Setup Playback Function Setup Others 2008/09/18 13:55:36 E5H11UD-BDP7200_EN_v2.
P&F USA, Inc. PHILIPS CONSUMER ELECTRONICS P.O.Box 2248, Alpharetta, GA 30023 Meet Philips at the Internet http://www.philips.com/welcome BDP7200 CLASS 1 LASER PRODUCT Printed in China JpnCN-0825/F7-3 1VMN26093A ★★★ E5H11UD E5H11UD-BDP7200_EN_v2.