Register your product and get support at www.philips.
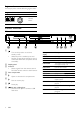
1 Important Safety and important notice 4 4 2 Your product Feature highlights Product overview 5 5 6 3 Connect Connect video/audio cables Route audio to other devices Connect USB device Connect network Connect power 8 8 9 10 10 11 4 Get started Prepare the remote control Find the correct viewing channel Use the Home menu Navigate the menu Select menu display language Setup network Use Philips EasyLink 11 11 11 11 11 12 12 12 5 Play Play a disc Play video Play music Play photo Play from USB devi
1 Important Safety and important notice Warning • Risk of overheating! Never install the product in a • • • • • • confined space. Always leave a space of at least 4 inches around the product for ventilation. Ensure curtains or other objects never cover the ventilation slots on the product. Never place the product, remote control or batteries near naked flames or other heat sources, including direct sunlight. Only use this product indoors. Keep this product away from water, moisture and liquid-filled objects.
DivX, DivX Ultra Certified, and associated logos are trademarks of DivX, Inc. and are used under license. Official DivX® Ultra Certified product. Plays all versions of DivX ® video (including DivX ® 6) with enhanced playback of DivX® media files and the DivX® Media Format. Plays DivX® video with menus, subtitles and audio tracks. Java and all other Java trademarks and logos are trademarks or registered trademarks of Sun Microsystems, Inc. in the United States and/or other countries.
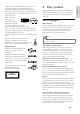
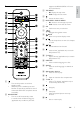
Region codes You can play discs with the following region codes. Region code DVD Country BD A Asia Pacific, Taiwan, Korea Product overview Main unit h a • • Turn on this product or switch to standby mode. When EasyLink is enabled, press and hold for at least three seconds to turn all connected HDMI CEC compliant devices to standby. b Display panel c IR sensor • Detect signals from the remote control. Point the remote control at the IR sensor. d Disc compartment e • Open or close the disc compartment.
English supports the BONUSVIEW or PictureIn-Picture feature). Remote control c TOP MENU • BD: Display the top menu. • DVD: Display the title menu. d • Access the home menu. e DISC MENU / POP-UP MENU • BD: Access or exit the pop-up menu. • DVD: Access or exit the disc menu. f OK • Confirm an entry or selection. g • h Navigate through the menus. BACK • Return to a previous display menu. i / • j Skip to the previous or next title, chapter, or track. / • Search backward or forward.
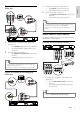
u • INFO Display the current status or the disc information. v OPTIONS • Access options for the current activity or selection. w Color buttons • BD: Select tasks or options. x HDMI • Select the video resolution of HDMI output. Connect video/audio cables Connect this product to TV to view disc play. Select the best video connection that the TV can support. • Option 1: Connect to the HDMI jack (for a HDMI, DVI or HDCP-compliant TV).
Y Pb 1 2 Pr AUDIO IN Connect a composite video cable to: • the VIDEO jack on this product. • the VIDEO input jack on the TV. Connect the audio cables to: • the AUDIO L/R-LINE OUT jacks on this product. • the AUDIO input jacks on the TV. Tip • The video input jack on the TV might be labeled as A/V IN, VIDEO IN, COMPOSITE or BASEBAND. • This type of connection provides standard picture quality.
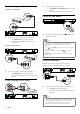
Connect to digital amplifier/receiver 1 Connect to coaxial jack Connect the audio cables to: • the AUDIO L/R-LINE OUT jacks on this product. • the AUDIO input jacks on the device. Connect USB device COAXIAL COAXIAL 1 1 Connect a coaxial cable (not supplied) to: • the COAXIAL jack on this product. • the COAXIAL/DIGITAL input jack on the device. Connect a USB device to the on this product.
Caution 2 Insert 2 AAA batteries with correct polarity (+/-) as indicated. Close the battery compartment. 3 Note • Risk of product damage! Ensure that the power supply • voltage corresponds to the voltage printed on the back of the unit. Before connecting the AC power cord, ensure you have completed all other connections. English Connect power • If you are not going to use the remote control for a long time, remove the batteries.
Select menu display language 6 Note • If this product is connected to a HDMI CEC compliant TV, skip this setting. It switches automatically to the same OSD menu language as per your TV setting (if the language set on TV is supported by this product). 1 2 3 In the Home menu, select [Settings] and press OK. Select [Preference Setup], then press . Select [Menu Language], then press . 7 Once connected, an IP address is obtained automatically.
Play video Play a disc Control video play 1 Play a title. 2 Use the remote control to control the play. Caution • Do not place any objects other than discs into the disc • Button compartment. Do not touch the disc optical lens inside the disc compartment. English 5 Play Action Pause play. Start or resume play. Stop play. 1 2 3 Press to open the disc compartment. Insert a disc with its label facing up. Press to close the disc compartment and start disc play.
Note Zoom in/out 1 During play, press OPTIONS. » The play options menu is displayed. • Some operations may not work with some discs. See the information accompanying the disc for details. 2 3 Display menu 4 BD-video disc • TOP MENU stop the video play and shows the disc menu. This feature is disc-dependent. • POP-UP MENU access to the BD-video disc menu without interrupting disc play. DVD-video disc • TOP MENU display the root menu of a disc.
3 Select [Subtitle Language] > [Shift Subtitle] in the menu, then press 2. Press the Navigation buttons (3 4) to shift the subtitle, then press OK. Tip • • • You can press SUBTITLE on the remote control to access Shift Subtitle feature. Subtitle Shift is not supported for DivX video with external subtitles. Subtitle Shift setting will be not retained after disc is removed.
Play music Play photo Control a track 1 Play a track. 2 Use the remote control to control the play. Play photo as slideshow Button Action Pause play. Start or resume play. Stop play. Skip to a previous/next track. / You can play JPEG photos (files with .jpeg or .jpg extensions). 1 Insert a disc or USB that contains the JPEG photos. 2 Press , select [Play Disc] or [USB], then press OK. » A contents menu is displayed. 3 Select a photo folder, then press OK to enter.
5 Select a duration, then press OK. Select [Slide Animation] in the menu, then press OK. Select a type of animation effect, then press OK. Play musical slideshow Note English 3 4 • If the device does not fit into the USB jack, connect it through a USB extension cable. • NTFS (New Technology File System) data format is not supported. • Philips does not guarantee 100% compatibility with all USB devices. Create a musical slideshow to play simultaneously MP3/WMA music files and JPEG photo files.
[TV Display] Select a display format: Note • If the setting is not compatible with your TV, a blank screen appears. Wait for 10 seconds for auto recovery, or press repeatedly the HDMI button until the picture appears. • [4:3 Letterbox] – For 4:3 screen TV: widescreen display with black bars on the top and bottom of the screen. [4:3 Panscan] – For 4:3 screen TV: full-height display with the trimmed sides. [16:9 Widescreen] – For wide-screen TV: display ratio 16:9.
English Note • Ensure that the audio format is supported by the disc and the connected audio device (amplifier/receiver). • When [Bitstream] is selected, interactive audio like button sound is muted. 4 5 Select an option, then press OK. Select a setting, then press OK. • To return to the previous menu, press BACK. • To exit the menu, press . [Night Mode] Make a loud sound level softer and a soft sound level louder to play the disc at a low volume, without disturbing other persons.
Preference Setup • 1 2 3 • Press . Select [Settings], then press OK. Select [Preference Setup], then press . [On] - Set the screen saver active after 10 minutes of inactivity (for example, in the pause or stop mode) [Off] - Disable screen saver mode. [Change Password] Set or change the password. 1) Press the Numeric buttons to enter the password or your last set password. If you forget the password, enter ‘0000’, then press OK. 2) Enter the new password. 3) Enter the same password again.
• To return to the previous menu, press BACK. To exit the menu, press . [EasyLink] This product supports Philips Easylink which uses the HDMI CEC (Consumer Electronics Control) protocol. You can use one single remote control to control all EasyLink-compliant devices that are connected through HDMI connectors. • [On] - Turn on EasyLink features. • [Off] - Disable EasyLink features.
[DivX® VOD Code] Display the DivX® registration code. Update software via USB 1 Go to www.philips.com/support to check if Tip • Use this product’s DivX registration code when you rent 2 or purchase video from www.divx.com/vod. The DivX videos rented or purchased through the DivX® VOD (Video On Demand) service can be played only on the device to which it is registered. 3 4 [Version Info.] Display the software version and the MAC address of this product.
HDMI category 2 cable Quick start guide User manual Video • Signal system: PAL / NTSC • Composite video output: 1 Vp-p (75 ohm) • Component video output: 480/576i, 480/576p, 720p, 1080i • Y: 1 Vp-p (75 ohm) • Pb: 0.7 V-pp (75 ohm) • Pr: 0.7 V-pp (75 ohm) • HDMI output 480p, 576p, 720p, 1080i, 1080p, 1080p24 Audio • 2 Channel analog output • Audio Front L + R : 2 Vrms (> 1 kohm) • 7.
No high-definition video signal on the TV. • Make sure that the disc contains highdefinition video. • Make sure that the TV supports highdefinition video. Sound No audio output from the TV. • Ensure that the audio cables are connected to the audio input of the TV. • Assign the audio input of the TV to the corresponding video input. See the TV user manual for details. No audio output from the loudspeakers of the audio device (home theater /amplifier/receiver).
A Dolby Digital A surround sound system developed by Dolby Laboratories that contains up to six channels of digital audio (front left and right, surround left and right, center and subwoofer.) Aspect ratio Aspect ratio refers to the length to height ratio of TV screens. The ratio of a standard TV is 4:3, while the ratio of a high-definition or wide TV is 16:9. The letter box allows you to enjoy a picture with a wider perspective on a standard 4:3 screen. DTS Digital Theatre Systems.
M MP3 A file format with a sound data compression system. MP3 is the abbreviation of Motion Picture Experts Group 1 (or MPEG-1) Audio Layer 3. With the MP3 format, one CD-R or CD-RW can contain about 10 times more data than a regular CD. P PBC Playback Control. A system where you navigate through a Video CD/Super VCD with on-screen menus that are recorded onto the disc. You can enjoy interactive playback and search. PCM Pulse Code Modulation. A digital audio encoding system.
Open Source Software This product contains the following open source software packages, which are subject to their respective licenses. 1. Zlib general purpose compression library See http://www.zlib.net/, and in particular http://www.zlib.net/zlib_license.html. /* zlib.h -- interface of the ‘zlib’ general purpose compression library version 1.2.3, July 18th, 2005 Copyright (C) 1995-2005 Jean-loup Gailly and Mark Adler This software is provided ‘as-is’, without any express or implied warranty.
3. IJG: JPEG software decoder This software is based in part on the work of the Independent JPEG Group. See http://www.ijg.org/, and in particular http://picasa.google.com/about/ijg.txt. Portions of the relevant license conditions are copied below. The authors make NO WARRANTY or representation, either express or implied, with respect to this software, its quality, accuracy, merchantability, or fitness for a particular purpose.
SHALL THE OpenSSL PROJECT OR ITS CONTRIBUTORS BE LIABLE FOR ANY DIRECT, INDIRECT, INCIDENTAL, SPECIAL, EXEMPLARY, OR CONSEQUENTIAL DAMAGES (INCLUDING, BUT NOT LIMITED TO, PROCUREMENT OF SUBSTITUTE GOODS OR SERVICES; LOSS OF USE, DATA, OR PROFITS; OR BUSINESS INTERRUPTION). HOWEVER CAUSED AND ON ANY THEORY OF LIABILITY, WHETHER IN CONTRACT, STRICT LIABILITY, OR TORT (INCLUDING NEGLIGENCE OR OTHERWISE) ARISING IN ANY WAY OUT OF THE USE OF THIS SOFTWARE, EVEN IF ADVISED OF THE POSSIBILITY OF SUCH DAMAGE.
NOTICE SOFTWARE END USER LICENSE AGREEMENT THIS SOFTWARE END USER LICENSE AGREEMENT (“THIS AGREEMENT”) IS A LEGAL AND BINDING AGREEMENT BETWEEN YOU (EITHER AN INDIVIDUAL OR ENTITY) AND PHILIPS CONSUMER ELECTRONICS B.V. A DUTCH LIMITED LIABILITY COMPANY (OWNERS OF MAGNAVOX), WITH ITS PRINCIPAL OFFICE AT GLASLAAN 2, 5616 LW EINDHOVEN, THE NETHERLANDS AND ITS SUBSIDIARY COMPANIES (INDIVIDUALLY AND COLLECTIVELY “PHILIPS”).
such license, also download revocation lists onto your Device on behalf of Secure Content Owners, which may disable your Device’s ability to copy, store, display, transfer, and/or play Secure Content. Secure Content Owners may also require you to upgrade some of the WM-DRM components distributed with this Software (“WM-DRM Upgrades”) before accessing their content.
10. NO OTHER WARRANTIES. EXCEPT AS SET FORTH ABOVE, PHILIPS AND ITS LICENSORS DO NOT WARRANT THAT THE SOFTWARE WILL OPERATE ERROR FREE OR UNINTERRUPTED, OR WILL MEET YOUR REQUIREMENTS. YOU ASSUME ALL RESPONSIBILITIES FOR SELECTION OF THE SOFTWARE TO ACHIEVE YOUR INTENDED RESULTS, AND FOR THE INSTALLATION OF, USE OF, AND RESULTS OBTAINED FROM THE SOFTWARE.
© 2009 Koninklijke Philips Electronics N.V. All rights reserved. BDP7500_98_UM_V2.