7885XL_DFU1.QXD 2/3/04 4:16 PM Page 1 7 Q UADRA SHAVING SYSTEM 7886XL 7885XL 6887XL 6886XL 6885XL Rechargeable Tripleheader Cordless/Cord Razor Downloaded from www.Manualslib.
7885XL_DFU1.QXD 2 Downloaded from www.Manualslib.
7885XL_DFU1.QXD 2/3/04 4:16 PM Page 3 (Black plate) 3 ENGLISH 4 7886XL, 7885XL, 6887XL, 6886XL, 6885XL ESPAÑOL 22 Downloaded from www.Manualslib.
7885XL_DFU1.QXD 4 2/3/04 4:16 PM Page 4 (Black plate) ENGLISH IMPORTANT SAFETY INSTRUCTIONS When using an electric razor, basic safety precautions should always be followed, including the following: Read all instructions before using this appliance. DANGER To reduce the risk of electric shock: 1. Do not reach for a razor that has fallen into water. Unplug immediately. 2. Do not use razor corded while bathing or in a shower. 3.
7885XL_DFU1.QXD 2/3/04 4:16 PM Page 5 (Black plate) ENGLISH 5 4. Keep the razor, cord and charging plug away from heated surfaces. 5. Never drop or insert any object into any opening. 6. Do not charge or plug in razor outdoors or operate where aerosol (spray) products are being used or where oxygen is being administered. 7. Do not use this razor with a damaged or broken comb, as facial injury may occur. 8. Always attach plug to razor first, then charging plug to outlet.
7885XL_DFU1.QXD 6 2/3/04 4:16 PM Page 6 (Black plate) ENGLISH 60-DAY MONEY-BACK GUARANTEE To enjoy the closest and most comfortable shave from your new Norelco Men’s Razor, the razor should be used exclusively for 3 weeks. This allows your hair and skin enough time to adapt to the Norelco Shaving System. If, after that period of time, you are not fully satisfied with your Norelco Men’s Razor, send the product back and we’ll refund you the full purchase price.
885XL_DFU1.QXD 2/3/04 4:16 PM Page 1 (Black plate) ENGLISH Table of Contents Features..........................................................8-9 LCD Display...............................................10-11 Charge Meter..................................................11 Charging ...................................................11-12 Put It To The Test & Shaving Tips................13 How To Shave With An Electric Razor...........................................14 Trimming......................
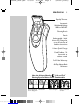
7885XL_DFU1.QXD 8 2/3/04 4:16 PM Page 2 (Black plate) ENGLISH Put It To The Test & Shaving Tips Quadra Shaving System Razor Head Assembly Protective Razor Head Cap Individually Floating Heads Razor Head Release Button • Hair Chamber captures shaven hair Electronic ON/OFF Button LCD Display • Shows remaining power level in batteries • Actual shaving “Minutes Left” Automatic Cleaning Indicator • Indicates razor heads should be cleaned under running water Downloaded from www.Manualslib.
7885XL_DFU1.QXD 2/3/04 4:16 PM Page 3 (Black plate) ENGLISH 9 Pop-Up Trimmer Automatic Worldwide Voltage 100V to 240V AC Cleaning Brush Pouch Rechargeable - Initial 4 hour Full Charge for up to 45 minutes of cordless shave time 1-Hour Quick Charge Cord/Cordless - To shave with or without a cord Full 2-Year Warranty 60-Day Money-Back Guarantee How the Unique Norelco Lift and Cut® Shaving System Makes Close Comfortable: Groove channels beard closer to cutting system Downloaded from www.Manualslib.
7885XL_DFU1.QXD 2/3/04 4:16 PM Page 4 (Black plate) 10 ENGLISH LCD Display The Display provides the following information: Indicator C◗ Charging As soon as you connect cord, the light in display area goes ON, the plug symbol appears and the minute indicator starts blinking. Charge Indicator C◗ Full When batteries have been fully charged,“FULL” scrolls across the display and light in display starts blinking. Left Indicator C◗ Minutes The number on the display shows remaining shaving time in minutes.
7885XL_DFU1.QXD 2/3/04 4:16 PM Page 5 (Black plate) ENGLISH 11 razor functions.To activate, press and hold the ON/OFF button in for a few seconds until all symbols appear on the display.You can interrupt the demonstration by pressing the ON/OFF button again. Cleaning Indicator C◗ The blinking faucet symbol reminds you that razor heads need to be cleaned and appears approximately once a week (in the case of normal use).
7885XL_DFU1.QXD 2/3/04 4:16 PM Page 6 (Black plate) 12 ENGLISH ◗ Charging or recharging at temperatures below 40ºF or higher than 95ºF adversely affects lifetime of batteries. ◗ Continuously recharging or continuously using as a corded razor will reduce life of batteries. ◗ You may also shave using the charging plug provided.This razor will not recharge while being used corded. ◗ Recharge only when plug symbol starts blinking. This symbol may appear when your razor is ON or OFF.
7885XL_DFU1.QXD 2/3/04 4:16 PM Page 7 (Black plate) ENGLISH 13 Recharging 1 First time charging requires 4 hours. After initial charge, recharging requires approximately 1 hour. 2 Disconnect the charging plug from outlet. Do not keep razor permanently plugged into outlet. ◗ Quick Charge When batteries are totally depleted, recharging the razor for approximately 6 minutes gives enough energy for a 3 minute cordless shave. Put It To The Test & Shaving Tips ◗ 21 Day Trial and Conversion Process.
7885XL_DFU1.QXD 2/3/04 4:16 PM Page 8 (Black plate) 14 ENGLISH How to Shave With An Electric Razor ◗ Use this razor for its intended household use as described in this manual. ◗ Shaving with a clean, dry face gives the best results. C 1 Turn razor ON. Shave against the direction of beard growth using both straight and circular movements. 2 Stretch your skin with your free hand so blades can lift and cut whiskers. Gently press razor to skin, so the floating heads can follow the contours of your face.
7885XL_DFU1.QXD 2/3/04 4:16 PM Page 9 (Black plate) ENGLISH 15 C 3 Hold Trimmer as shown and move in downward strokes with gentle pressure. 4 Close Trimmer by sliding Trimmer switch down. 5 Turn razor OFF. Cleaning Every Week: Razor Heads C ◗ The easiest and most hygienic way to clean the razor heads is to rinse them every week with hot water. Water from the tap should be on a hot setting but BE CAREFUL TO TEST WATER FIRST SO AS NOT TO BURN OR SCALD HANDS.
7885XL_DFU1.QXD 2/3/04 4:16 PM Page 10 (Black plate) 16 ENGLISH 4 Close the Razor Head Assembly and shake off excess water. C 5 Open Razor Head Assembly again and leave open to air dry. 6 You may also clean the hair chamber without water by using the supplied brush. Once A Month: Razor Heads ◗ Do not mix up the cutters and combs as the shaving performance may be adversely affected for several weeks before optimal shaving performance is restored.
7885XL_DFU1.QXD 2/3/04 4:16 PM Page 11 (Black plate) ENGLISH 17 C 6 Replace the set back into the Head Assembly in such a way that the sides with the little holes point to the middle of the shaving unit. ◗ Make sure that the two pointy edges of the head fit exactly into the recesses. 7 Repeat the process for the other two sets of cutters and combs. 8 Replace the frame. C 9 Press down and turn wheel clockwise until it locks into place. 10 Replace the Razor Head Assembly back on razor.
7885XL_DFU1.QXD 2/3/04 4:16 PM Page 12 (Black plate) 18 ENGLISH Every Six Months:Trimmer 1 Turn razor OFF. 2 Push Trimmer Slide Switch up to pop up Trimmer. C C 3 Clean Trimmer with the brush. 4 Lubricate the Trimmer teeth with Norelco Razor Lubricant (model AL80) or with one drop of mineral oil. 5 Close Trimmer by sliding Trimmer switch down. This razor has no other user-serviceable parts. Any other service should be performed by an Authorized Norelco Service Location. Downloaded from www.
7885XL_DFU1.QXD 2/3/04 4:16 PM Page 13 (Black plate) ENGLISH 19 Assistance For assistance or the Authorized Norelco Service Location nearest you, call toll free: 1-800-243-3050 or visit our website: www.norelco.com Authorized Norelco Service Location information is available 24 hours a day, 7 days a week. Accessories ◗ Replacement Heads Model HQ6 - For maximum razor performance, replace your Norelco Quadra razor once a year.
7885XL_DFU1.QXD 2/3/04 4:16 PM Page 14 (Black plate) 20 ENGLISH Storage ◗ Be sure Razor is turned off. Remove cord from outlet and Razor before storing in a safe, dry location where it will not be crushed, banged, or subject to damage. ◗ Do not wrap cord around Razor when storing. ◗ Store cord in a safe location where it will not be cut or damaged. ◗ Do not place or store Razor where it can fall or be pulled into a tub or sink, water or other liquid while plugged in.
7885XL_DFU1.QXD 2/3/04 4:16 PM Page 15 (Black plate) ENGLISH 21 FULL TWO YEAR WARRANTY Philips Electronics North America Corporation warrants each new Norelco Product, Model 7886XL, 7885XL, 6887XL, 6886XL, 6885XL (except cutters and combs) against defects in materials or workmanship for a period of two years from the date of purchase, and agrees to repair or replace any defective product without charge.
7885XL_DFU1.QXD 2/3/04 4:16 PM Page 16 (Black plate) 22 ESPAÑOL IMPORTANTES INSTRUCCIONES DE SEGURIDAD Cuando use una afeitadora eléctrica, debe seguir siempre las precauciones básicas incluyendo lo siguiente: Antes de usar el aparato lea todas las instrucciones. PELIGRO Para reducir el riesgo de choque eléctrico 1. No intente coger una afeitadora que se haya caido al agua. Desenchúfela inmediatamente. 2. No use una afeitadora con cable de red cuando esté bañándose o duchándose. 3.
7885XL_DFU1.QXD 2/3/04 4:16 PM Page 17 (Black plate) ESPAÑOL 23 si se ha caido al agua mientras estaba enchufada. Lleve la afeitadora a un Servicio de Asistencia Técnica de Norelco para ser examinada y reparada. 4. Mantenga la afeitadora el cable cargador de red lejos de superficies calientes. 5. No deje caer ni introduzca ningún objeto por ninguna abertura. 6.
7885XL_DFU1.QXD 2/3/04 4:16 PM Page 18 (Black plate) 24 ESPAÑOL 60 DIAS DE GARANTIA DE DEVOLUCIÓN DEL DINERO Para disfrutar de la afeitada mas cómoda y al ras de su nueva Afeitadora Norelco para Hombres, la afeitadora deberá ser usada como único sistema de afeitado durante 3 semanas. Ello proporcionará a su pelo y a su piel tiempo suficiente para adaptarse al Sistema de Afeitado Norelco.
7885XL_DFU1.QXD 2/3/04 4:16 PM Page 19 (Black plate) ESPAÑOL 25 Indice de Contenidos Características ........................................26-27 Pantalla LCD............................................28-29 Medidor De Carga........................................29 Carga...........................................................30-31 Recarga.............................................................31 Prueba y consejos de afeitado..............31-32 Cómo Afeitarse Con Una Afeitadora Eléctrica.....
7885XL_DFU1.QXD 2/3/04 4:16 PM Page 20 (Black plate) 26 ESPAÑOL Características Sistema de Afeitado Quadra Montaje del Cabezal de la Afeitadora Cubierta protectora del Cabezal de la Afeitadora Conjuntos Cortantes que flotan individualmente Botón de apertura del Cabezal de la Afeitadora • La Cámara del Pelo recoge el pelo afeitado. Botón electrónico encendido/apagdo. Pantalla LCD •Muestra el nivel de queda en baterías.
7885XL_DFU1.QXD 2/3/04 4:16 PM Page 21 (Black plate) ESPAÑOL 27 Cortapatillas Adaptación automática a cualquier voltaje de 100V a 240V CA Cepillo de limpieza Bolsa Recargable: Inicialmente carga completa durante 4 horas, lo que le proporcionará un tiempo de afeitado sin cable de hasta 45 minutos Carga Rápida de 1 Hora Con/sin cable de red.
7885XL_DFU1.QXD 2/3/04 4:16 PM Page 22 (Black plate) 28 ESPAÑOL Pantalla LCD La pantalla proporciona la siguiente información: de Carga C◗ Indicador Tan pronto como conecte el cable de red, la luz en el área de la pantalla se encenderá, el símbolo de una clavija aparecerá y el indicador de minutos empezará a parpadear.
7885XL_DFU1.QXD 2/3/04 4:16 PM Page 23 (Black plate) ESPAÑOL 29 programa de demostración de 1 minuto que recorrerá todas las funciones de la afeitadora. Para activarlo, presione y mantenga apretado el botón de encendido/apagado durante unos pocos segundos hasta que hayan aparecido todos los símbolos en la pantalla. Puede interrumpir la demostración volviendo a presionar el botón de encendido/apagado.
7885XL_DFU1.QXD 2/3/04 4:16 PM Page 24 (Black plate) 30 ESPAÑOL Carga ◗ El funcionamiento de las baterías es mejor si las recargan sólo cuando estén (casi) completamente descargadas. ◗ Cargar o recargar a temperaturas por debajo de 40°F y por encima de 95°F afecta desfavorablemente a la vida útil de las baterías. ◗ La recarga continua o el uso continuo de la afeitadora con cable de red reducirá la vida de las baterías. ◗ También puede afeitarse usando el cable cargador de red que se suministra.
7885XL_DFU1.QXD 2/3/04 4:16 PM Page 25 (Black plate) ESPAÑOL 31 2 La primera carga, o una recarga después de 1 mes (o más) sin usar la afeitadora, requerirá una carga completa durante 4 horas. Cuando las baterías estén completamente cargadas, la indicación “FULL” se desplazará a lo largo de la pantalla y la luz de la pantalla empezará a papadear. Recarga 1 La primera carga requiere 4 horas. Después de la carga inicial, la recarga requiere aproximadamente 1 hora. 2 Desenchufe el cable cargador de red.
7885XL_DFU1.QXD 2/3/04 4:16 PM Page 26 (Black plate) 32 ESPAÑOL ◗ Al principio puede que no obtenga un afeitado tan apurado como esperaba, o incluso es posible que su cara se irrite ligeramente. Esto es normal, ya que su barba y su piel necesitarán tiempo para adaptarse. Emplee 3 semanas y podrá disfrutar por completo de su nueva afeitadora.
7885XL_DFU1.QXD 2/3/04 4:16 PM Page 27 (Black plate) ESPAÑOL 33 apriete demasiado fuerte. Demasiada presión puede pellizcar conjuntos la piel con los cortantes. 3 Apague la afeitadora. C 4 Para proteger los conjuntos cortantes, ponga la tapa del cabezal afeitador en la Afeitadora. ◗ Para unos óptimos resultados en el afeitado, sustituya los conjuntos cortantes Quadra (Tipo HQ6) una vez al año. Cortapatillas Para recortar las patillas y el bigote 1 Ponga la afeitadora en marcha.
7885XL_DFU1.QXD 2/3/04 4:16 PM Page 28 (Black plate) 34 ESPAÑOL Limpieza Cada semana; Conjuntos cortantes C◗ La forma más fácil e higiénica de limpiar los conjuntos cortantes es enjuagándolos cada semana con agua caliente. El agua del grifo deberá estar caliente, pero TENGA CUIDADO Y PRUÉBELA ANTES PARA NO QUEMARSE LAS MANOS. ◗ Una limpieza regular garantiza los mejores resultados en el afeitado. ◗ También puede enjuagar rápidamente sus conjuntos cortantes después de cada uso.
7885XL_DFU1.QXD 2/3/04 4:16 PM Page 29 (Black plate) ESPAÑOL 35 de pelo usando el cepillo que se suministra. Una vez al mes: Conjuntos cortantes ◗ No mezcle las cuchillas y los protectores, ya que el funcionamiento en el afeitado puede verse adversamente afectado durante varias semanas antes de que se restablezca el óptimo funcionamiento en el afeitado. 1 Apague la afeitadora, desenchúfela el cable cargador de red y quite el cable de la afeitadora.
7885XL_DFU1.QXD 2/3/04 4:16 PM Page 30 (Black plate) 36 ESPAÑOL lados con los pequeños agujeros estén orientados hacia el centro de la unidad afeitadora. ◗ Asegúrese de que los dos bordes puntiagudos del protector encajen exactamente en los huecos. 7 Repita el proceso con los otros dos juegos de conjuntos cortantes. 8 Vuelva a poner el marco. C 9 Presione hacia abajo y gire la rueda en sentido horario hasta que quede fijada en su lugar.
7885XL_DFU1.QXD 2/3/04 4:16 PM Page 31 (Black plate) ESPAÑOL 37 Cada seis meses: Cortapatillas 1 Apague la afeitadora. 2 Para hacer salir el cortapatillas, presione hacia arriba el interruptor deslizante del cortapatillas. C C 3 Limpie el cortapatillas con el cepillo. 4 Lubrique el cortapatillas con Norelco Razor Lubricant (tipo AL80) o con una gota de aceite mineral. 5 Cierre el cortapatillas deslizando el interruptor del cortapatillas hacia abajo.
7885XL_DFU1.QXD 2/3/04 4:16 PM Page 32 (Black plate) 38 ESPAÑOL Accesorios ◗ Sustitución de los conjuntos cortantes Tipo HQ6 - Para la máxima eficacia de la afeitadora, sustituya sus conjuntos cortantes Quadra de Norelco una vez al año. ◗ Limpiadores para la afeitadora RC1776 - Norelco Razor Cleaner ◗ Lubricante para la afeitadora AL80 - Norelco Razor Lubricant ◗ Cable Adaptador para coche HQ8010 - Carga la afeitadora desde una batería de 12 V de su coche, camión, caravana, barco o tienda de campaña..
7885XL_DFU1.QXD 2/3/04 4:16 PM Page 33 (Black plate) ESPAÑOL 39 en donde no será cortada ni será dañada. ◗ No coloque o almacene la afeitadora en un lugar donde se pueda caer a la afeitadora o el lavabo, el agua o el otro líquido. ◗ Para proteger los conjuntos cortantes, ponga la tapa del cabezal afeitador en la Afeitadora. Cómo qyitar las Baterías ◗ Esta afeitadora Norelco lleva baterías recargables de Níquel-Cadmio que deben ser desechadas adecuadamente.
7885XL_DFU1.QXD 2/3/04 4:16 PM Page 34 (Black plate) 40 ESPAÑOL GARANTÍA COMPLETA DURANTE DOS AÑOS Philips Electronics North America Corporation garantiza cada nuevo producto Norelco Model 7886XL, 7885XL,6887XL, 6886XL, 6885XL (excepto cuchillas y protectores) contra defectos de los materiales o de fabricación durante un período de dos años desde la fecha de compra, y está de acuerdo en reparar o sustituir sin cargo cualquier producto defectuoso.