Always there to help you Register your product and get support at www.philips.
Contents 1 Important Safety 2 2 2 Your Micro Music System 3 3 3 4 5 3 Get started 7 7 7 7 8 8 8 Introduction What's in the box Overview of the main unit Overview of the remote control Connect speakers Connect FM antenna Connect power Prepare the remote control Set clock Turn on 4 Play 9 9 12 5 Adjust sound 15 15 15 15 6 Other features 16 16 16 16 17 17 7 Product information 18 18 19 19 Play in single mode Play in group mode Select a preset sound effect Adjust volume level Mute sound Set th
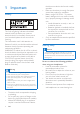
1 Important Safety This 'bolt of lightning' indicates uninsulated material within the device may cause an electrical shock. For the safety of everyone in your household, please do not remove the covering. The 'exclamation mark' calls attention to features for which you should read the enclosed literature closely to prevent operating and maintenance problems.
2 Your Micro Music System Congratulations on your purchase, and welcome to Philips! To fully benefit from the support that Philips offers, register your product at www.philips.com/welcome. Introduction With this unit, you can: • enjoy audio from discs, Bluetooth-enabled devices, USB storage devices, or other external devices; • listen to music everywhere in your home through a group of izzylink-compatible multiroom speakers (not supplied); • listen to FM radio stations.
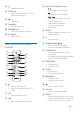
Overview of the main unit a bc de f p on m ghi l k j a GROUP button/indicator • Press and hold to group with another izzylink-compatible multiroom speaker. • Press to exit or return to a group. • Flashes green during grouping. • Turns solid white after successful grouping (for the master). • Turns solid green after successful grouping (for the slaves). • Flashes green when the unit acts as a slave and is looking for the master.
n • d Keys for basic playback control Headphone socket. o AUDIO IN • Audio input socket(3.5mm) for an external audio device. p • r SPEAKER OUT • Socket for speaker connection. s AC MAINS~ • Power socket. a b p c o d n m g l h k j i a Stop play or erase a program. / Skip to the previous or next title, chapter, track, or file. Search within a track/disc. Tune to a radio station. Adjust time. • • • e MODE • Select a repeat play mode, or play tracks randomly.
o FM/AUDIO IN • Press repeatedly to select the FM or AUDIO IN source. p 6 PAIRING Press to select the BT (Bluetooth) source. • In Bluetooth mode with two devices connected, press and hold for three seconds to disconnect the device that is not playing, and then enter pairing mode.
3 Get started Connect FM antenna Tip Caution •• Use of controls or adjustments or performance of procedures other than herein may result in hazardous laser exposure or other unsafe operation. Always follow the instructions in this chapter in sequence. •• For optimal reception, fully extend and adjust the position of the antenna. •• For better FM stereo reception, connect an outdoor FM antenna to the FM AERIAL socket. • Connect the supplied FM antenna to the FM AERIAL socket on back of the unit.
Prepare the remote control 6 Caution •• Risk of product damage! When the remote control is not used for long periods, remove the batteries. To insert the remote control battery: 1 2 3 Open the battery compartment. Insert the supplied AAA battery with correct polarity (+/-) as indicated. Press / to select 'SYNC ON' or 'SYNC OFF' and press CLOCK to confirm. »» If you have selected 'SYNC ON' , automatic clock synchronization starts when you listen to an RDS station that transmits time signals.
4 Play 1 2 Press USB to select the USB source. Insert a USB device into the socket. »» Playback starts automatically. If not, press . Play in single mode Single mode: Single mode means that the speaker is not grouped with any other izzylinkcompatible multiroom speakers. Instead, it is used as a standalone speaker. Play from disc Note •• Make sure that the disc contains playable audio content. 1 2 Press CD to select the DISC source.
Program tracks You can program a maximum of 20 tracks. 1 2 3 4 5 Stop play, and then press PROGRAM to activate programming mode. For MP3 tracks, press ALBUM/PRESET to select an album. Press / to select a track, and then press PROGRAM to confirm. Repeat steps 2-3 to program more tracks. Press to play the programmed tracks. • To erase the program, stop play, and then press . Play from Bluetooth-enabled devices Note •• Before pairing a device with this unit, read its user manual for Bluetooth compatibility.
To enjoy music through the speaker wirelessly, you need to pair your Bluetooth enabled device with the unit. Philips BM60 xxx 1 2 3 4 Press /PAIRING to select the Bluetooth source. »» [BT] (Bluetooth) is displayed. To disconnect the current Bluetooth-enabled device: • Deactivate Bluetooth on your device. »» The Bluetooth indicator flashes blue.
Store FM radio stations automatically Note •• You can store a maximum of 30 preset radio stations (FM). 1 2 3 4 5 1 2 In tuner mode, press PROGRAM for more than two seconds to activate automatic programming. »» [AUTO] is displayed. Press ALBUM/PRESET / to select a preset number. Press DISPLAY/RDS repeatedly to scroll through the following information (if available): »» Program service »» Radio text message »» Time Select stereo/mono broadcast Tune to an FM radio station.
Create a group Note •• You can only add slave speakers one by one. Each time when you add a slave speaker, first press and hold GROUP on the master speaker until the indicator on the button flashes and the speaker beeps. •• If the signal strength indicator on a slave speaker shows that the signal is poor, move it closer to the master speaker.
• Press any source key on a slave speaker to change it to be the master of the group. Note A Press GROUP on the master to enter single mode. »» The slaves keep looking for the master until timeout in 15 minutes. »» You can create a new group with the slaves or press GROUP on a slave to enter single mode. •• Pair your mobile device with the new master if you have not paired with it before. Press GROUP on the master again to resume group mode. B Press GROUP on a slave to switch to single mode.
5 Adjust sound The following operations are applicable to all supported media. Select a preset sound effect • Press SOUND repeatedly to select a preset sound effect. • Balance, Clear, Powerful, Warm, and Bright. Adjust volume level • • On the remote control, press +/repeatedly. On the main unit, rotate the volume knob. Mute sound • Press to mute or unmute the sound.
6 Other features Set the sleep timer • Set the alarm timer This unit can be used as an alarm clock. You can select DISC, USB, or TUNER as the alarm source. Note •• Make sure that you have set the clock correctly. 1 2 3 4 In standby mode, press and hold SLEEP/ TIMER for three seconds. Press / repeatedly to select an alarm source (DISC, USB,or TUNER) Press SLEEP/TIMER to confirm. »» The hour digits begin to blink. Repeat steps 2-3 to set the hour, minute, and adjust volume of the alarm.
1 2 • Plug a headphone (not supplied) into the socket. Update firmware 3 4 5 Warning •• Always connect the speaker to AC power for firmware upgrade. •• Never power off the speaker or unplug the USB mass storage device before completion of the firmware upgrade. 6 Note •• Make sure that the USB stick is FAT16/32 formatted. Enter the model number to find the latest firmware upgrade files available. www.philips.com/support AUDIO IN Listen through a headphone On your PC/Mac, go to www.philips.
7 Product information •• Product information is subject to change without prior notice. Amplifier Maximum 150W 40 Hz - 20 kHz; ±3 dB ≥ 75 dBA < 1% 1 V ± 100 mV RMS 22kohm Disc Laser Type Disc Diameter Support Disc Audio DAC Total Harmonic Distortion Frequency Response S/N Ratio Semiconductor 12 cm/8 cm CD-DA, CD-R, CDRW, MP3-CD 24 Bits/44.1 KHz <3% (1 KHz) 20 Hz - 20 kHz (44.1 KHz) ≥80 dBA USB USB Direct Version 18 EN 2.
USB playability information • • • Supported file format: MP3 (*.mp3) Supported MP3 bit rate: 32k-320kbps CBR and VBR. Supported USB file system: FAT12, FAT16, FAT32 (sector size: 512 bytes) Supported MP3 disc formats • • • • • ISO9660, Joliet Maximum title number: 128 (depending on file name length) Maximum album number: 99 Supported sampling frequencies: 32 kHz, 44.
8 Troubleshooting Warning •• Never remove the casing of this device. To keep the warranty valid, never try to repair the system yourself. If you encounter problems when using this device, check the following points before requesting service. If the problem remains unsolved, go to the Philips Web page (www. philips.com/support). When you contact Philips, make sure that the device is nearby and the model number and serial number are available.
•• •• This unit is not in pairing mode. This unit is already connected with another Bluetooth-enabled device. Disconnect that device and then try again. The paired mobile device connects and disconnects constantly. •• The Bluetooth reception is poor. Move the device closer to this unit or remove any obstacle between them. •• Some mobile phones may connect and disconnect constantly when you make or end calls. This does not indicate any malfunction of this unit.
9 Notice Any changes or modifications made to this device that are not expressly approved by Gibson Innovations may void the user’s authority to operate the equipment. Declaration of conformity Hereby, Gibson Innovations declares that this product is in compliance with the essential requirements and other relevant provisions of Directive 1999/5/EC. You can find the Declaration of Conformity on www.philips.com/ support.
Note •• The type plate is located on the back of the device. Written offer Gibson Innovations Limited hereby offers to deliver, upon request, a copy of the corresponding source code for the open source software packages used in this product for which such offer is requested by the respective licenses. This offer is valid up to three years after product purchase. To obtain source code, please contact open.source-gi@gibson.com.