Always there to help you Register your product and get support at www.philips.
1 Important Safety 2 Your micro system Introduction What's in the box Overview of the main unit Overview of the remote control 3 Connect Place the unit Connect speakers Connect video cables Connect an external audio device Connect power 4 Get started Prepare the remote control Set clock Turn on Find the correct viewing channel Select the correct TV system Change system menu language Turn on Progressive Scan 5 Play 2 2 4 4 4 5 6 8 8 8 8 9 10 11 11 11 12 12 12 12 13 14 Play from disc 14 Play from USB
1 Important Safety device has been damaged in any way, such as power-supply cord or plug is damaged, liquid has been spilled or objects have fallen into the device, the device has been exposed to rain or moisture, does not operate normally, or has been dropped. Important Safety Instructions Battery usage CAUTION – To prevent battery leakage which may result in bodily injury, property damage, or damage to the unit: • Follow all instructions. • • Heed all warnings.
Warning English •• Never remove the casing of this device. •• Never lubricate any part of this device. •• Never place this device on other electrical equipment. •• Keep this device away from direct sunlight, naked flames or heat. •• Never look into the laser beam inside this device. •• Ensure that you always have easy access to the power cord, plug, or adaptor to disconnect this device from the power.
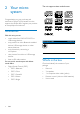
2 Your micro system The unit supports these media formats: Congratulations on your purchase, and welcome to Philips! To fully benefit from the support that Philips offers, register your product at www.philips.com/welcome. Introduction With this unit, you can: • watch video from DVD/VCD/SVCD, or USB storage devices. • enjoy audio from discs, Bluetooth-enabled devices, USB storage devices, or other external devices. • enjoy Karaoke by connecting a microphone.
English Overview of the main unit k j i a b c h d e g f a (power button/indicator and Bluetooth indicator) / i • Skip to the previous/next track. • Turn the unit on or off. • Press to tune to a radio station. • Switch to standby mode or Eco standby mode. • Press and hold to search for radio stations automatically. • Indicate the power/Bluetooth connection status. b SOURCE • Select a source: BT (Bluetooth), DISC, USB, FM, AUX. j VOLUME+/• Adjust volume.
e SUBTITLE/PRESET + ( AUDIO/PRESET -( ) Overview of the remote control )/ • Navigate through the menu. • Skip to the previous/next album. SUBTITLE ( station. a b c u • t • AUDIO ( • Set time. d s • Return to the previous display menu. r q p o g h i j k l ): Set the subtitle language. f e f ): Select a preset radio g +/• Adjust volume. / h • Skip to the previous or next title, chapter, track, or file.
• Start, pause, or resume play. • Stop play. • Mute or restore volume. English p q r SOUND • Enrich sound effect with Digital Sound Control (DSC). s OK • Confirm a selection. t SOURCE • Select a source: BT (Bluetooth), DISC, USB, FM, AUX. u EJECT • Press to open or close the disc compartment.
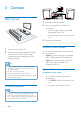
3 Connect Place the unit 1 2 3 1 2 Place the unit near the TV. Place the left and right speakers at equal distance from the TV and at an angle of approximately 45 degrees from the listening position. Note •• For optimal sound, use the supplied speakers only. •• Connect only speakers with impedance that is the same or higher than the supplied speakers. Refer to the Specifications section of this manual. 8 EN • Insert the right speaker wires to "R", left speaker wires to "L".
Connect an external audio device English TV You can route audio from an external audio device to this unit. If the external audio device has analog audio output sockets (such as your TV): L R LINE OUT Option 2: Connect through component video cables L Note R •• The progressive scan video quality is only available AUX IN when a progressive scan TV is connected. •• If your TV does not support progressive scan, you cannot view the picture.
• Connect a red/white-to-3.5mm audio cable (not supplied) to: • the AUDIO-IN (L and R) sockets on the back of the unit. • the headphone socket on the external audio player. Connect power Caution •• Risk of product damage! Ensure that the power supply voltage corresponds to the voltage printed on the back or the underside of the unit. •• Risk of electric shock! When you unplug the AC power cord, always pull the plug from the socket. Never pull the cord.
Set clock Caution 1 In standby mode, press and hold CLOCK SET on the remote control for more than two seconds. »» [24H] or [12H] hour format is displayed. 2 Press / (or +/-) to select [24H] or [12H] hour format, and then press CLOCK SET. »» The hour digits are displayed and begin to blink. 3 Press / (or +/-) to set hour, and then press CLOCK SET. »» The minute digits are displayed and begin to blink. 4 Repeat step 3 to set minute.
Turn on • Tip Press . »» The unit switches to the last selected source. •• The video-in channel is between the lowest and highest channels and may be called FRONT, A/V IN, VIDEO etc. See the TV user manual on how to select the correct input on the TV. Switch to standby mode • Press again to switch the unit to standby mode. »» The clock (if set) is displayed on the panel. To switch to ECO standby mode: • Press and hold for more than two seconds. »» The display panel is dimmed.
English Turn on Progressive Scan Progressive scan displays twice the number of frames per seconds than interlaced scanning (ordinary TV system). With nearly double the number of lines, progressive scan offers higher picture resolution and quality. Before you turn on this feature, make sure that: • the TV supports progressive scan signals. • you have connected the unit with the TV through component video. 1 2 Turn on the TV. 3 Switch the TV to the correct viewing channel for this unit.
5 Play Use the disc menu When you load a DVD/(S)VCD disc, a menu may be displayed on the TV screen. Press MENU to access or exit disc menu manually. For VCD with PlayBack Control (PBC) feature (version 2.0 only): With the PBC feature, you can play VCD interactively according to the menu screen. • Play from disc Caution •• Risk of product damage! Never play discs with accessories such as disc stabilizer rings or disc treatment sheets. •• Never put any objects other than discs into the disc compartment.
Play a slideshow with background music You can play DivX (Home Theater 3.1)/MP3/ JPEG picture files copied onto a CD-R/RW, recordable DVD, or USB storage device. This device can play MP3 files and JPEG photos simultaneously. 1 • 2 Note Select a source. Press SOURCE repeatedly to select the disc or USB source. Insert the USB storage device or disc. »» Play starts automatically. USB To play a specified file: 1 2 Press 3 4 To return to the previous menu, press .
Control play / / ( / / ) +/(mute) SOUND DISPLAY Select a folder. Fast backward/forward. Skip to the previous or next title/chapter/track/ file. Pause or resume play. Stop play. Increase or decrease volume. Mute or restore sound. Enrich sound effect with DSC: balanced, clear, powerful, warm, and bright. View playback information. Select tracks 1 2 3 Press one of any numeric buttons to activate the track select. »» The total track numbers display on the screen.
You can connect a microphone (not supplied) to sing along with a music source. Note •• Before you connect a microphone, set the microphone volume to the minimum level to prevent howling. 1 2 Insert a Karaoke disc. 3 4 Press 5 Play a Karaoke disc and sing along through the microphone. Connect a microphone to the MIC IN socket on the front panel. , and then select [Karaoke]. Turn on the microphone sound output (see “Adjust karaoke settings“).
Tip •• The unit can memorize up to 8 previously connected Bluetooth devices. To disconnect the Bluetooth-enabled device: • Deactivate Bluetooth on your device; or • Move the device beyond the communication range. To clear Bluetooth pairing history: • BTD2180 PIN 0000 1 Press SOURCE repeatedly to select the Bluetooth source. »» [BT] (Bluetooth) is displayed. »» The power/Bluetooth indicator flashes blue.
Tune to a radio station Tip •• Position the antenna as far as possible from TV, VCR, or other radiation source. •• For optimal reception, fully extend and adjust the position of the antenna. 1 Press SOURCE repeatedly to select the FM source. 2 Press and hold / ( / ) for more than two seconds. »» The radio tunes to a station with strong reception automatically. 3 Repeat step 2 to tune to more stations. To tune to a weak station: • / ) repeatedly until Press / ( you find optimal reception.
7 Other features Set the sleep timer • Set the alarm timer This unit can be used as an alarm clock. You can select CD, FM, or USB as alarm source. To set the sleep timer, in power-on mode, press SLEEP repeatedly to select a set period of time (in minutes). »» When the sleep timer is activated, is displayed. To deactivate sleep timer: • Note •• Make sure that you have set the clock correctly. 1 2 3 In standby mode, press and hold TIME for more than two seconds.
1 2 3 Press . Select the [Setup] page. Select a setting and press OK. • To return to the previous menu, press . • To exit the menu, press . Note Video setup On the [Video] page, you can set the following options: [TV System] Change this setting if the video is not displayed correctly. By default, this setting matches the most common setting for TVs in your country. • [Multi] - For TV that is compatible with both PAL and NTSC. • [NTSC] - For TV with NTSC color system.
Audio setup On the [Audio] page, you can set the following options: [Surround Mode] [Stereo] • • [LT/RT] [Sound Mode] Turn off or select your preferred sound mode. • [3D] • [Movie Mode] • [Music Mode] [Night Mode] Make loud sound level softer and soft sound level louder so that you can watch the DVD movies at a low volume, without disturbing others. • [On] – enjoy quiet viewing at night (DVDs only). • [Off] – enjoy surround sound with its full dynamic range.
English [DivX Subtitle] Select a character set that supports the DivX subtitle. Note •• Ensure that the subtitle file has the exact same file name as the movie file. If for example the file name of the movie is ‘Movie.avi’, and then you will need to name the text file ‘Movie.sub’ or ‘Movie.srt’. [Version Info] (Version Information) Display the software version of this device. [Default] Reset all the settings to factory default, except for the password and parental settings.
9 Product information Sensitivity - Mono, 26dB S/N Ratio - Stereo, 46dB S/N Ratio Search Selectivity Total Harmonic Distortion Signal to Noise Ratio Note <22 dBf <45 dBf <30 dBf <3% >45 dB •• Product information is subject to change without prior notice.
- Speaker Box (W x H x D) Weight - Main Unit - Speaker Box 180 x 121 x 239 mm 140 x 260 x 185 mm 1.6 kg 2.1 x 2 kg Supported disc formats USB playability information English Dimensions - Main Unit (W x H x D) Compatible USB devices: • USB flash memory (USB2.0 or USB1.1) • USB flash players (USB2.0 or USB1.
10 Troubleshooting Warning •• Never remove the casing of this device. To keep the warranty valid, never try to repair the system yourself. If you encounter problems when using this device, check the following points before requesting service. If the problem remains unsolved, go to the Philips Web page (www. philips.com/support). When you contact Philips, make sure that the device is nearby and the model number and serial number are available.
Due to Digital Rights issue, the DRMprotected video files cannot be played through an analog video connection (e.g. composite, component and scart). Transfer the video content onto the Disc Media and play these files. Audio or subtitle languages cannot be set •• The disc is not recorded with sound or subtitles in multiple languages. •• The audio or subtitle language setting is prohibited on the disc.
11 Notice Hereby, WOOX Innovations declares that this product is in compliance with the essential requirements and other relevant provisions of Directive 1999/5/EC. You can find the Declaration of Conformity on www.philips.com/ support. Any changes or modifications made to this device that are not expressly approved by WOOX Innovations may void the user’s authority to operate the equipment. Specifications are subject to change without notice.
English Manufactured under license from Dolby Laboratories. “Dolby” and the double-D symbol are trademarks of Dolby Laboratories. ‘DVD Video’ is a trademark of DVD Format/ Logo Licensing Corporation. ABOUT DIVX VIDEO: DivX® is a digital video format created by DivX, LLC, a subsidiary of Rovi Corporation. This is an official DivX Certified® device that plays DivX video. Visit divx.com for more information and software tools to convert your files into DivX videos.
2014 © WOOX Innovations Limited. All rights reserved. This product was brought to the market by WOOX Innovations Limited or one of its affiliates, further referred to in this document as WOOX Innovations, and is the manufacturer of the product. WOOX Innovations is the warrantor in relation to the product with which this booklet was packaged. Philips and the Philips Shield Emblem are registered trademarks of Koninklijke Philips N.V. BTD2180_UM_12_V3.