Always there to help you Register your product and get support at www.philips.
1 Important Safety 2 2 2 Your micro system 3 3 3 3 4 3 Get started 6 6 6 6 7 7 7 7 4 Play 8 8 8 9 9 9 9 Introduction What’s in the box Overview of the main unit Overview of the remote control Connect speakers Connect FM antenna Connect power Demonstrate the features Prepare the remote control Set clock Turn on Play from disc Play from USB Control play Skip to a track Program tracks Play from Bluetooth-enabled devices 5 Listen to the radio 11 11 11 11 11 11 6 Other features 12 12 12 12 Tune to
1 Important Safety • Make sure that there is enough free space around the product for ventilation. • Only use attachments or accessories specified by the manufacturer. • Battery usage CAUTION – To prevent battery leakage which may result in bodily injury, property damage, or damage to the product: • Install the batteries correctly, + and - as marked on the product. • Do not mix batteries (old and new or carbon and alkaline, etc.).
Congratulations on your purchase, and welcome to Philips! To fully benefit from the support that Philips offers, register your product at www.philips.com/welcome. Introduction With this unit, you can: • enjoy audio from discs, Bluetooth-enabled devices, USB storage devices, or other external devices; • listen to FM radio stations.
g SRC • Select a source: DISC, USB, TUNER, AUDIO IN, AUX, BT (Bluetooth). Overview of the remote control • Start, pause, or resume play. • In BT mode, press and hold for more than 3 seconds to enter pairing mode. a • Stop play or erase a program. • In standby mode, turn on/ off feature demonstration. / • Skip to previous/next track. • Search within a track from the disc, USB or BT mode. • Tune to a radio station. • Press and hold to tune to the next available radio station.
e OK o RDS/DISPLAY Confirm selection. • Select RDS broadcast information. • Switch between STEREO and MONO in tuner source. • Synchronize clock with RDS station. • Select display information during play. / • Adjust display brightness in standby mode. • Start or pause play. • In BT mode, press and hold for more than 3 seconds to enter pairing mode. • Stop play or erase a program. f • Skip to the previous/next track.
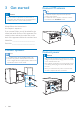
3 Get started Connect FM antenna Tip Caution •• Use of controls or adjustments or performance of procedures other than herein may result in hazardous radiation exposure or other unsafe operation. •• For optimal reception, fully extend and adjust the position of the antenna. •• For better FM stereo reception, connect an outdoor FM antenna to the FM AERIAL socket. Always follow the instructions in this chapter in sequence.
• In standby mode, press and hold on the front panel for more than 15 seconds to demonstrate features of this device. »» The features are displayed one by one across the display panel. • To turn off the demonstration, press on the front panel again. 3 4 press CLOCK to confirm. »» The hour digits are displayed and begin to blink. Repeat steps 2-3 to set the hour and minute. Note •• If no button is pressed in 90 seconds, the system exits clock setting mode automatically.
4 Play 2 Insert a USB device into the socket. »» Play starts automatically. If not, press . Play from disc 1 2 3 Press CD/FM to select the CD source. 4 Press to close the disc compartment. »» Play starts automatically. If not, press . Press USB to open the disc compartment. Insert a disc with the printed side facing upward. Charge your device DISC You can charge your device through the USB socket on this product with a USB cable (not supplied).
PRESET/ ALBUM / Select a folder. / REPEAT/ SHUFFLE VOL -/+ MUTE SOUND RDS/DISPLAY Select an audio file. Pause or resume play. Stop play. Select the repeat or random play mode.. Increase or decrease the volume. Mute or restore sound. Enrich sound effect with DSC: balanced, clear, powerful, warm, and bright. Select display information during play. Repeat steps 2-3 to program more tracks. Press to play the programmed tracks. »» During play, [PROG] (program) is displayed.
2 On your device that supports Advanced Audio Distribution Profile (A2DP), enable Bluetooth and search for Bluetooth devices that can be paired (refer to the user manual of the device). 3 Select ‘PHILIPS BTM5120‘ on your Bluetooth enabled device and if necessary input ‘0000’ as the pairing password. »» After successful pairing and connection, the Bluetooth indicator turns solid blue, and the unit beeps. 4 Play audio on the connected device.
Tune to a radio station Program radio stations manually 1 2 Tune to a radio station. 3 Press PROG to confirm. »» The preset number and the frequency of the preset station are displayed. 4 Repeat steps 2-3 to program more stations. Tip •• Position the antenna as far as possible from TV, or other radiation sources. •• For optimal reception, fully extend and adjust the position of the antenna. 1 Press CD/FM repeatedly to select the FM source. 2 Press and hold / for more than two seconds.
6 Other features Set the sleep timer • Set the alarm timer This unit can be used as an alarm clock. You can select CD, FM, or USB as the alarm source. Note •• Make sure that you have set the clock correctly. To set the sleep timer, in turn on mode, press SLEEP/TIMER repeatedly to select a set period of time (in minutes). »» When sleep timer is activated, is displayed. Otherwise, disappears. Listen to an external device You can listen to an external device through this unit with a 3.
English Listen through RCA cables L R 1 Press AUX/AUDIO IN repeatedly to select AUX source. 2 Connect RCA cables (red/white) (not supplied) between: 3 • the AUX IN (L/R) sockets on the unit, • and the audio output sockets on an external device. Start to play the device (see the device user manual).
7 Product information Note Bluetooth Bluetooth Version Bluetooth Frequency Band Bluetooth Range 2.1 + EDR (with multi-pairing) 2.4GHz ~ 2.48GHz ISM Band 10 m (free space) •• Product information is subject to change without prior notice. Tuner (FM) Tuner Tuning Range 87.
AC power Operation Power Consumption Eco Standby Power Consumption Dimensions 100-240V, 50/60Hz 35 W • Empty albums: an empty album is an album that does not contain MP3/WMA files, and will not be shown in the display. • Unsupported file formats are skipped. For example, word documents (.doc) or MP3 files with extension .dlf are ignored and not played. • WMA, AAC, WAV, PCM audio files • DRM protected WMA files (.wav, .m4a, .m4p, .mp4, .aac) WMA files in Lossless format <0.
8 Troubleshooting Warning •• Never remove the casing of this device. To keep the warranty valid, never try to repair the system yourself. If you encounter problems when using this device, check the following points before requesting service. If the problem remains unsolved, go to the Philips Web page (www. philips.com/support). When you contact Philips, make sure that the device is nearby and the model number and serial number are available.
English Bluetooth cannot be connected with this unit. •• The device does not support the profiles required for this unit. •• The Bluetooth function of the device is not enabled. Refer to the user manual of the device to find out how to enable the function. •• This unit is not in pairing mode. •• This unit is already connected with another Bluetooth-enabled device. Disconnect that device and then try again. The paired mobile device connects and disconnects constantly. •• The Bluetooth reception is poor.
9 Notice Any changes or modifications made to this device that are not expressly approved by WOOX Innovations may void the user’s authority to operate the equipment. Hereby, WOOX Innovations declares that this product is in compliance with the essential requirements and other relevant provisions of Directive 1999/5/ EC. You can find the Declaration of Conformity on www.philips.com/support.
Specifications are subject to change without notice. 2014 © WOOX Innovations Limited. All rights reserved. This product was brought to the market by WOOX Innovations Limited or one of its affiliates, further referred to in this document as WOOX Innovations, and is the manufacturer of the product. WOOX Innovations is the warrantor in relation to the product with which this booklet was packaged. Philips and the Philips Shield Emblem are registered trademarks of Koninklijke Philips N.V. BTM5120_UM_12_V1.