Register your product and get support at www.philips.
Turn MAX sound on/off Select preset equalizer Switch music listening zone Other sound settings 1 Important 4 4 4 Safety Notice 2 Your car audio system Introduction What’s in the box Overview of the main unit Overview of the remote control 3 Get started Install the car audio Install remote control battery Turn on Select country/region Set clock 4 Listen to radio Tune to a radio station Store radio stations in memory Tune to a preset station 6 6 6 7 8 18 18 18 18 8 Adjust system settings 19 19 19 19
1 Important Safety Read and understand all instructions before you use your apparatus. If damage $ " " the warranty does not apply. This apparatus is designed for negative ground (earth) 12 V DC operation only. % " " to a safe and comfortable level. Improper fuses can cause damage or & " " " consult a professional.
; " " $ notice. Trademarks are the property of Koninklijke Philips Electronics N.V. or their respective owners. Philips reserves the right to change products at any time without being obliged to adjust earlier supplies accordingly. Engl i s h Never dispose of your product with other household waste. Please inform yourself about the local rules on the separate collection of electrical and electronic products.
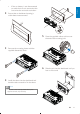
f ISO male connector 2 Your car audio system g Rubber cushion h Screw x 1 pc i Disassembly tools x 2 pcs G " " " " $ Z % " at www.philips.com/welcome.
a b c d e p f o n r a SOURCE Select audio source. b / c Press to answer or redial a call. Press to terminate call. / Return to previous menu. Press and hold to transfer call. m l k Engl i s h Overview of the main unit g j i h q d / Turn the unit on or off. G " " Mute or unmute sound. Rotate to adjust volume. e ZONE / MENU Select tuner band. Select MP3/WMA folder. Switch music listening zone. Access system menu.
f MP3 LINK Connect external audio device. g Unlock the panel. h USB socket. i 6281' Turn maximizing volume on or off. View clock. j DBB Turn Dynamic Bass Boost (DBB) sound on or off. Access to tuner auto store. k Play. Pause or resume play. Select preset radio station No.6. l REP / SHUF Repeat play. ; _ Select preset radio station No.3/4. m / Search for track/folder. Select preset radio station No.1/2. n / Tune for radio station.
Note on the power supply lead (yellow) Caution Use the controls only as stated in this user manual. Always follow the instructions in this chapter in sequence. ` " $ # model and serial number of your device. The model number and serial number are on the bottom of your device. Write the numbers here: Model No._____________________________ Serial No.
2 f Check the car’s wiring carefully and connect them to the supplied male connector.
2 ` " "" ! " bare wires do not touch each other. Engl i s h Ensure that car dashboard opening is within these measurements: 3m 53.5 mm 18 m m 5m mm 53mm 183 3 4 5 Place the supplied rubber cushion over the end of the mounting bolt. 6 Slide the unit into the dashboard until you hear a click sound. Remove the mounting sleeve with the supplied disassembly tools.
7 Reconnect the negative terminal of the car battery. Risk of product damage! When the remote " " " the batteries. Perchlorate Material - special handling may apply. See www.dtsc.ca.gov/hazardouswaste/ perchlorate. Attach the front panel 1 Attach the trim plate. Remove the protective tab to activate the remote control battery.
Press to turn the unit on. » [SELECT OPERATING REGION] is displayed. 2 Rotate 3 to select an option: [USA] (United States) [EUR] (Western Europe) [RUS] (Russia) [AUS] (Australia) [EAS] (Middle East) [ASI] L J [JAP] (Japan) [LAT] (Latin America) Press _ Rotate Press to set hour. " Rotate Press to set minute. " Set clock format 1 2 3 Tune to a radio station 1 Press SOURCE repeatedly to select radio mode.
1 Press and hold MENU repeatedly until [LOCAL] is displayed. 2 Rotate to select a setting: [LOCAL ON] (local on): only stations with strong signal can be broadcast. [LOCAL OFF] (local off): stations with strong and weak signals can be broadcast. 5 Use bluetooth devices & " " # if bluetooth connection is available on your phone or player.
» [FAILED] is displayed if connection is failed. Receive call 1 ` " " " number is displayed. Make a call Engl i s h » [CONNECTED] is displayed if connection is successful. 2 if the incoming call has no phone " [PHONE IN] is displayed. Press to answer/accept the call. Note % # " " " " bluetooth connection between the unit and the phone must be active. Terminate call Press and hold to terminate call.
6 Play audio files Play from USB Note Ensure that the USB device contains playable music. Insert the USB device 1 Slide the USB socket cover marked to the left. 2 Insert the USB device into the USB socket. » The unit starts to play from the USB device automatically. Remove the card 1 2 Press 3 Remove the card. to turn the unit off. Press the card until you hear a click. » The card is now disengaged.
1 2 3 2 Press . » The name of the current folder is displayed. Rotate to navigate through all folders. Press to access the selected folder. » % " " " from the selected folder automatically. Tip % # . Rotate to select a setting: [SHUF FLD]: start random play for all tracks in the current folder. [SHUF ALL]: start random play for all tracks. [SHUF OFF]: turn off random play.
7 Adjust sound Adjust volume Turn clockwise/counterclockwise to increase/ decrease volume. [FLAT] _ J [POP] (pop) [USER] (user) [TECHNO] (techno) [ROCK] (rock) [CLASSIC] (classic) [JAZZ] (jazz) [OPTIMAL] (optimal) Mute You can turn off the sound of your audio. = " . % " again. Turn Dynamic Bass Boost (DBB) on/off 1 Press DBB and the current setting is displayed: » [DBB ON] : the Dynamic Bass Boost (DBB) function is on.
BT mode 1 Press and hold MENU. 2 Press or repeatedly until [BT MODE] (bluetooth mode) is displayed. 3 Rotate [BT ON]: turn the bluetooth on. [BT OFF]: turn the bluetooth off. [BKO 20 S] : turn the screen off automatically 20 seconds after last operation. [BKO OFF] : never turn the screen off. Turn demo mode on/off 1 Press and hold MENU. 2 Press or repeatedly until [DEMO] is displayed. » The screen shows current demo mode setting.
3 Rotate to select a setting: [DANCE ON] : turn the spectrum on. [DANCE OFF] : turn the spectrum off. Reset You can reset the unit to its default setting. 1 2 Detach the front panel. Press the reset button by using a ballpoint pen or a similar tool. » Preset adjustments such as preset channels and sound adjustments are erased.
3 Replace the fuse. Engl i s h 9 Additional information Detach the front panel You can detach the front panel to deter theft. 1 2 3 4 Press to release the panel. Push the left side of the panel rightward. Pull the panel towards you to disengage it from the chassis. Store the panel in the supplied carry case to protect it from dirt or damage. Note ` " $ " be an internal malfunction. Consult your Philips dealer.
10 Product information Compatible USB devices: ;] _ H ;] with interface reading all speed > ?J ;] _ H ;] $ interface reading all speed support > ?J Memory cards (SD / SDHC) Note Product information is subject to change without prior notice.
Caution Never remove the casing of this device. % # $ " " the system yourself. If you encounter problems when using this # $ " " requesting service. If the problem remains " $ $$$ F J & " " ensure that your apparatus is nearby and the model number and serial number are available. No power or no sound. Car engine is not on. Turn the car engine on.
12 Glossary M MP3 L $ " " system. MP3 is the abbreviation of Motion Picture Experts Group 1 (or MPEG-1) Audio & " G=! CD-RW can contain about 10 times more data than a regular CD. S SD Secure Digital.
̻Ճሙ 1DPH RI WKH 3DUWV ఙർఙࠂྠ᠂ਾϾዼ +D]DUGRXV WR[LF 6XEVWDQFH ధ 3E /HDG ܌+J ᬄ &G ࡒ۴ &KURPLXP أᜌ৷Ъ أᜌفЪ 0HUFXU\ FDGPLXP 3%% 3%'( +RXVLQJ ທक़ 2 2 2 2 2 2 '9' &' ORDGHU '9' &' ܿދ ; 2 2 2 2 2 /&' 3DQHO ၅ࣚ૯ϴ ; ; 2 2 2 2 3:%V ϴቊࡵ ; 2 2 2 2 2 $FFHVVRULHV 5HPRWH FRQWURO FDEOHV ࡵڼIJီ३చĶ ჻ཐĶ৹ࢨཐij ; 2 2 2 2 2 %DWWHULHV LQ 5HPRWH ; 2 2 2 2 2 &RQWURO =Q& ီ३చԁ ¾ń њ൙ۂႹႹݡ༂ᇍᄡۂҊࡵෲႹबᇍҏਜᇓ֩ݧबᄡ6- 7 їም݃֩ཏဵၟ༳ 2
© 2011 Koninklijke Philips Electronics N.V. All rights reserved. CE151_IFU_00_V2.