Register your product and get support at www.philips.
7 Adjust system settings 1 Important 4 Safety Notice 4 4 2 Your car audio system Introduction What’s in the box Overview of the main unit Overview of the remote control 3 Get started Install the car audio Place the DAB antenna Install remote control battery Turn on Set clock 4 Listen to radio Select tuner region Select tuner sensitivity Listen to FM/AM radio Listen to Digital Audio Broadcasts (DAB) 5 Play audio files Play a disc Play from USB Search for an MP3/WMA track View play information Repeat p
1 Important Notice Safety • • • • • • • • • • • • Read and understand all instructions before you use your apparatus. If damage is caused by failure to follow instructions, the warranty does not apply. This apparatus is designed for negative ground (earth) 12 V DC operation only. To ensure safe driving, adjust the volume to a safe and comfortable level. Improper fuses can cause damage or fire. When you need to change the fuse, consult a professional.
This product complies with the radio interference requirements of the European Community. Environmental information All unnecessary packaging has been omitted. We have tried to make the packaging easy to separate into three materials: cardboard (box), polystyrene foam (buffer) and polyethylene (bags, protective foam sheet.) Your system consists of materials which can be recycled and reused if disassembled by a specialized company.
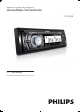
j Disassembly tools x 2 pcs k User manual l Quick start guide m DAB Antenna a c b d e i k j 6 h g f EN l
English Overview of the main unit a DBB • Turn on or off Dynamic Bass Boost (DBB) sound. b • c / • • • Navigate MP3/WMA folders. Select radio bands. Scroll up/down menu. Unlock the panel.
d / Switch the unit on or off. Confirm selection. Mute or unmute sound. Rotate to adjust volume. • Return to previous menu. s SOURCE • Select audio source. • Eject disc. t RESET • Restore default settings. • USB connector. e f g h MP3 LINK • Connect external audio device. i OPTIONS/CLOCK • Access option menu. • Display the DAB related information. • View clock. j 5+ • Select/Store preset radio station 1-10. • Select/Store preset DAB station 1-20. k SONG/4 • Search for track.
e 3 Get started English d AUDIO • Access audio setting menu. / • • • Tune to a radio station Skip track. Fast backward/forward playback f OK • Confirm selection. g MENU • Access system menu. h • • i /PWR/ Turn the unit on or off. Mute or restore volume. / • • • Select tuner band. Scroll up/down menu. Select MP3/WMA folder. Caution • Use the controls only as stated in this user manual. Always follow the instructions in this chapter in sequence.
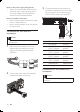
Note on the power supply lead (yellow) • When you connect other devices to this apparatus, ensure that the rating of the car circuit is higher than the total fuse value of all the connected devices. 3 FUSE Notes on speaker connection • Never connect speaker wires to the metal body or chassis of the car. • Never connect speaker wires with stripes to one another. Connect the antenna and amplifier as illustrated, if applicable.
Connect the antenna and amplifier as illustrated, if applicable.
Mount into the dashboard 1 If the car does not have an on-board drive or navigation computer, disconnect the negative terminal of the car battery. • If you disconnect the car battery in a car that has an on-board drive or navigation computer, the computer may lose its memory. • If the car battery is not disconnected, to avoid short-circuit, ensure that the bare wires do not touch each other.
7 Place the supplied rubber cushion over the end of the mounting bolt. Slide the unit into the dashboard until you hear a click sound. Attach the front panel 1 Attach the trim plate. 2 Insert the right side of the panel in the chassis until it is correctly engaged. 3 Press the left side of the panel until the mechanism locks it into place. English 6 m 5m Place the DAB antenna Warning • Make sure the antenna cable does not 8 Reconnect the negative terminal of the car battery.
you selected. The magnetic steel base will stick to any metallic surface. Note: Damage may be caused to the paintwork of the car if the antenna slides or rotates on the car surface. DAB / DAB+Antenna 4 Route the cable: Tuck the cable under weather strip of the door and run the cable through the passenger doorway or tailgate. Reserve enough slack in your cable to fit open doors or deck lids. Secure cables to avoid cable being pinched between hinges and the door.
1 Press to turn on the unit. • To turn off the unit, press 3 seconds. for over Set clock 1 2 Press MENU. 3 4 5 6 Turn Press or repeatedly until current time is displayed. Select tuner region You can select suitable country/region of the radio. 1 2 3 to set hour. Press to confirm. Turn to set minute. Press to confirm. View clock 1 English 4 Listen to radio Turn on Press and hold CLOCK until the clock is displayed. Press SOURCE to select radio mode. Press MENU repeatedly to select region.
3 Press or to tune to a radio station manually. » The radio station is broadcast. » To search for a radio station automatically, press or for over 3 seconds. Play with RDS The RDS (Radio Data System) function operates only in areas with FM stations broadcasting RDS signals. If you tune to an RDS station, an RDS icon and information about the presenter, station or program is displayed. Store radio stations in memory You can store up to 10 stations in each band.
Program type NEWS AFFAIRS 3 INFO 4 5 SPORT EDUCATE 6 DRAMA 7 CULTURE 8 9 SCIENCE VARIED 10 11 12 13 POP M ROCK M EASY M LIGHT M 14 15 CLASSICS OTHER M 16 17 18 WEATHER FINANCE CHILDREN 19 20 21 22 23 24 25 SOCIAL RELIGION PHONE IN TRAVEL LEISURE JAZZ COUNTRY Description News services Politics and current affairs Special information programs Sports Education and advanced training Radio plays and literature Culture, religion and society Science Entertainment programs Pop music Rock music Li
Receive traffic announcement If you do not want to miss traffic announcement when enjoying music, turn on the TA (Traffic Announcement) function. 1 2 Press MENU or OPTIONS. 3 Rotate to select a setting: • [TA ON]: When there is traffic announcement, the unit switches to the tuner mode (regardless of the current mode) and begins to broadcast the traffic conditions. When the traffic announcement is over, it returns to the previous mode. • [TA OFF]: Traffic announcement does not cut in. Press or displayed.
• New stations and services will be added in the DAB broadcast. To make new DAB stations and services available on your car audio, scan on a regular base. Tune to a preset station 1 Press 5+ and rotate number. 2 Press to select the preset to confirm the selection. Note Store DAB stations automatically 1 In DAB mode, press MENU to enter the menu options. 2 Press or repeatedly until [DAB STORE] displays. 3 Press to confirm.
Weak DAB signal Use DAB menu Select the switch over option when DAB signal is weak. 1 In DAB mode, press MENU to enter the menu options. 1 In the DAB mode, press MENU to enter the menu options. 2 Press or repeatedly until DAB antenna option displays. 2 Press or repeatedly until [WEAK DAB] displays. 3 3 Rotate to select an option.
Play from USB English 5 Play audio files Note Note • Ensure that the USB device contains playable music. • Ensure that the disc or device contains playable files. Insert the USB device Play a disc 1 Slide the USB socket cover marked to the left. 2 Insert the USB device into the USB socket. » The unit starts playing from the USB device automatically. Note • You cannot play CDs encoded with copyright protection technologies.
» The name of the current track is displayed. Shuffle play 2 Rotate to select another track in current folder You can play the tracks in random order: 3 Press to confirm. Search in other folder 1 Press FOLDER. » The name of the current folder is displayed. 2 3 4 5 Rotate Press Rotate Press 1 During play, press OPTIONS repeatedly until [RANDOM] displays. 2 Rotate to select a setting: • [RANDOM OFF]: Turn off random play. • [RANDOM FLD]: start random play for all tracks in the current folder.
You can also adjust the preset EQ/Audio settings. Adjust volume 1 Other sound settings Turn clockwise/anticlockwise to increase/decrease volume. 1 2 Press EQ/Audio for 3 seconds. 3 Rotate Mute You can turn off the sound of your audio. 1 During play, press . • To resume sound, press again. Turn DBB on/off 1 English 6 Adjust sound Press DBB. » The current DBB setting is displayed. » [DBB ON] : The Dynamic Bass Boost (DBB) function is on. » [DBB OFF] : The DBB function is off.
7 Adjust system settings Turn beep sound on/off Each time you press a button, the unit beeps. You can turn on or off this beep sound. 1 2 Press MENU. 3 Rotate to select a setting: • [BEEP ON]: Turn on the beep sound. • [BEEP OFF]: Turn off the beep sound. Press or repeatedly to until [BEEP] is displayed. 3 Rotate to toggle between the settings • [DIMMER Hi] (dimmer hi) • [DIMMER Lo] (dimmer low) Turn demo mode on/off 1 2 Press MENU.
English 8 Additional information Detach the front panel You can detach the front panel to deter theft. 1 2 Press to release the panel. Push the left side of the panel rightward. Note • If the new fuse gets damaged again, there may be an internal malfunction. Consult your Philips dealer. Remove the unit You can remove the unit from the dashboard. 1 2 3 Pull the panel towards you to disengage it from the chassis. 4 Store the panel in the supplied carry case to protect it from dirt or damage.
9 Product information Note • Product information is subject to change without prior notice. Power supply Fuse Suitable speaker impedance Maximum power output Continuous power output Pre-Amp output voltage Aux-in level Dimensions (W x H x D) Weight 12 V DC (11 V 16 V), negative ground 15 A 4-8 45 W x 4 channels 22 W x 4 RMS (4 10% T.H.D.) 2.5 V 500 mV 188 x 58 x 201 mm 1.47 kg Radio Frequency range FM 87.5 - 108.
Caution • Never remove the casing of this apparatus. To keep the warranty valid, never try to repair the system yourself. If you encounter problems when using this apparatus, check the following points before requesting service. No power or no sound. • Car engine is not on. Turn the car engine on. • Cable is not correctly connected. Check connections. • Fuse is burnt. Replace fuse. • Volume is too low. Adjust volume. • If the above solutions cannot help, press the RESET button.
11 Glossary M MP3 A file format with a sound data compression system. MP3 is the abbreviation of Motion Picture Experts Group 1 (or MPEG-1) Audio Layer 3. With the MP3 format, one CD-R or CD-RW can contain about 10 times more data than a regular CD. W WMA (Windows Media Audio) An audio format owned by Microsoft, is a part of Microsoft Windows Media technology. Includes Microsoft Digital Rights Management tools, Windows Media Video encoding technology, and Windows Media Audio encoding technology.
© 2011 Koninklijke Philips Electronics N.V. All rights reserved. CEM2000B_05_UM_V3.