Always there to help you Register your product and get support at www.philips.
1 Important Safety Notice 2 Your car audio system Introduction What's in the box Overview of the main unit 3 Install the car audio Connect wires Mount into the dashboard Attach the front panel 4 Get started For the first time use Set the time format Set the clock Turn on Switch music listening zone Mute the button beep 2 2 2 4 4 4 5 7 7 8 9 10 10 11 11 11 11 11 5 Listen to radio 12 12 12 12 13 6 Play from hard media 15 15 15 15 16 Tune to a radio station Store radio stations in memory Tune to a
1 Important Safety • • • • • • • • • • • • Read and understand all instructions before you use your apparatus. If damage is caused by failure to follow instructions, the warranty does not apply. This apparatus is designed for negative ground (earth) 12 V DC operation only. To ensure safe driving, adjust the volume to a safe and comfortable level. Improper fuses can cause damage or fire. When you need to change the fuse, consult a professional.
2013 © Koninklijke Philips Electronics N.V. All rights reserved. Environmental information Specifications are subject to change without notice. Trademarks are the property of Koninklijke Philips Electronics N.V. or their respective owners. Philips reserves the right to change products at any time without being obliged to adjust earlier supplies accordingly. All unnecessary packaging has been omitted.
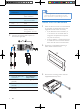
2 Your car audio system What's in the box Check and identify the contents of your package: a Main unit (with a sleeve) Congratulations on your purchase, and welcome to Philips! To fully benefit from the support that Philips offers, register your product at www.philips.com/welcome.
a b c q p o f d e n m l b c / • Tune for radio station. • Skip/search for track. • Fast backward/forward playback. • • • • Press to answer or redial a call. Press and hold to transfer call. /MENU Return to previous menu. Access system menu. j i h r s a k g d • • • • / Turn the unit on or off. Confirm selection. Mute or unmute sound. Rotate to adjust volume. e ZONE / • Select tuner band. • Select MP3/WMA folder. • Press and hold to switch music listening zone.
f g • Eject disc. • USB socket. h AUDIO IN • Connect external audio device. i / Turn on or off maximum sound feature. In any mode, press and hold to view clock. • j DBB/AS • Press to turn on or off Dynamic Bass Boost (DBB) sound. • In radio mode, press and hold to access to tuner auto store. • / • • l • • • m 6 o 6281' • k n SOURCE/DISPLAY • Press repeatedly to select source. • Display current status. • Press and hold to select the dimmer high or low.
Connect wires English 3 Install the car audio Caution •• Ensure that all loose leads are insulated with electrical tape. These instructions are for a typical installation. However, if your car has different requirements, make the corresponding adjustment. If you have any questions regarding installation kits, consult your Philips car audio dealer. Caution •• This unit is designed for negative ground (earth) 12 V Note •• Consult a professional to connect CEM2220BT as instructed below.
e ISO male connectors Red f Blue g White edged blue strip Black Yellow h i 2 Connect to Ignition key +12V DC when ON/ACC Motor/electric antenna relay control lead Amplifier relay control lead Ground To the +12V car battery which is energized at all times Tip •• The pin arrangement for the ISO connectors depends on the type of vehicle you drive. Be sure to make proper connections to prevent damage to the unit.
Install the sleeve into the dashboard and bend the tabs outward to fix the sleeve. 6 Slide the unit into the dashboard until you hear a click sound. 7 Reconnect the negative terminal of the car battery. English 4 Note •• If the unit is not fixed by sleeve but by the supplied screws, skip this step. 3m 53.5 mm 18 5 m Place the supplied rubber cushion over the end of the mounting bolt. Attach the front panel 1 Insert the notch on the front panel to the chassis on the main unit.
Detach the front panel 4 Get started Note Caution •• Before you detach the front panel, make sure that the system is turned off. 1 2 Press to release the front panel. Pull the front panel outwards to remove it. •• Use the controls only as stated in this user manual. Always follow the instructions in this chapter in sequence. If you contact Philips, you will be asked for the model and serial number of your apparatus. The model number and serial number are on the bottom of your apparatus.
Switch music listening zone 1 2 Philips’ innovative Zone technology enables driver or passengers to enjoy music with the best speakers balance and experience more vivid spacial effect as the artist is intended to create. You can switch the music listening zone from driver to passengers for the best speaker sound settings in car. 3 Press and hold MENU. Press or repeatedly until [CLOCK FORMAT] is displayed.
5 Listen to radio Select tuner sensitivity To receive more radio stations or only stations with strong signal, you can adjust the tuner sensitivity. Tune to a radio station 1 Press SOURCE repeatedly to select radio mode. 2 Press / repeatedly to select band: [FM1],[FM2], [FM3], [AM1], or [AM2]. 3 Press and hold or until the frequency digit is flashed. 4 Press or to tune to a radio station manually. »» The radio station is broadcast. To search for a radio station automatically, press or .
The RDS (Radio Data System) function operates only in areas with FM stations broadcasting RDS signals. If you tune to an RDS station, the station name are displayed. Turn on RDS Note •• The default setting for RDS is on. 1 2 3 Press and hold MENU. Press or displayed. repeatedly until [RDS] is Rotate to select [RDS ON]. »» The RDS function is turned on. Select program type Before tuning to RDS stations, you can select program type and let the unit search only for programs of the selected category.
Set region for AF tuning You can define AF tuning region: [REG ON] [REG OFF] 1 2 3 Only stations in current region can be tuned to automatically. All stations can be tuned to automatically. Press and hold MENU. Press or displayed. Rotate repeatedly until [REG] is to select a setting. Receive traffic announcement If you do not want to miss traffic announcement when enjoying music, turn on the TA (Traffic Announcement) function. 1 2 3 Press and hold MENU. Press or displayed.
You can use this system to listen to audios that are stored on a compatible disc or USB storage device. Play a disc Play from USB English 6 Play from hard media Note •• Ensure that the USB device contains playable music. Insert the USB device 1 Slide the USB socket cover marked the left. 2 Insert the USB device into the USB socket. »» The unit starts playing from the USB device automatically. Note •• You cannot play CDs encoded with copyright to protection technologies.
Button Function Press repeatedly to select a repeat mode: • [REP TRK] (repeat one track): play current track repeatedly. • [REP FLD] (repeat a folder): play all tracks in the current folder repeatedly. • [REP ALL] (repeat all tracks): play all tracks repeatedly. Press repeatedly to select a play mode: • [SHUF FLD]: start random play for all tracks in the current folder. • [SHUF ALL]: start random play for all tracks. • [SHUF OFF]: cancel shuffle play.
Tip •• You can also complete the reconnection on your English »» If the connection fails, [FAILED] is displayed on the LCD screen of this system. device. Disconnect a device 1 Press and hold MENU to access the system menu. 2 Press / repeatedly until [DISCONN] is displayed. 3 Press . »» [WAIT] is displayed with -, --, and --- blinking alternately until [DISCNN OK] scrolls. Tip •• You can also complete the disconnection on your device.
Redial the last called number 1 Press . »» [REDIAL] is displayed. 2 Press . again to confirm. »» [CALLING] is displayed. 8 Connect external sound source 1 Connect the external sound source to AUDIO IN socket with a 3.5 mm cable. When the system receives an incoming call, the phone number or [PHONE IN] is displayed. 2 Press SOURCE repeatedly until [AUDIO IN] is displayed. Press 3 Operate the external component (refer to the instructions supplied with the external component).
English 9 Adjust sound The following operations are applicable to all supported media. Button / / 6281' / DBB/AS Function Rotate to increase or decrease the volume level. Press to mute or restore sound. Press to enable or disable the maximum sound feature. Press to enable or disable the Dynamic Bass Boost (DBB) effect.
10 Adjust system settings 1 2 Press MENU to access system settings. 3 Rotate Press or repeatedly until one of the following settings scrolls. • [BEEP TONE], [DIMMER], [DEMO], [BLACK OUT], or [DANCE] to change the setting. [BEEP TONE] [DEMO] [BEEP ON] [BEEP OFF] [DIMMER HIGH] [DIMMER LOW] [DEMO ON] [BLACK OUT] [DEMO OFF] [BKO 10 S] [DIMMER] [BKO 20 S] [DANCE] 20 EN [BKO OFF] [DANCE ON] [DANCE OFF] Enable the beep sound of buttons. Disable the beep sound of buttons.
3 Insert a new fuse with the same specification (15A). English 11 Additional information Reset You can reset the unit to its default setting. 1 2 Detach the front panel. Press the reset button by using a ball-point pen or a similar tool. »» Preset adjustments such as preset channels and sound adjustments are erased. Note •• If the new fuse gets damaged again, there may be an internal malfunction. Consult your Philips dealer.
12 Product information Note •• Product information is subject to change without prior notice. Power supply Fuse Suitable speaker impedance Maximum power output Continuous power output Pre-Amp output voltage Aux-in level Dimensions (W x H x D) Weight 12 V DC (11 V - 16 V), negative ground 15 A 4-8 50 W x 4 21 W x 4 RMS (4 10% T.H.D.) 2.5V 500 mV 181.5 x 52 x 191.4 mm 1.47 kg Radio Frequency range - FM Frequency range - AM(MW) 87.5 - 108.
• • • Directory nesting up to a maximum of 8 levels Number of albums/folders: CD maximum 99, USB or memory maximum 99 Number of tracks/titles: CD maximum 999 (depending on number of album), USB or memory maximum 999 ID3 tag v2.0 or later Unsupported formats: • Empty albums: an empty album is an album that does not contain MP3/ WMA files, and is not be shown in the display. • Unsupported file formats are skipped. For example, Word documents (.doc) or MP3 files with extension .
•• Ensure that the CD is not encoded with copyright protection technologies. The CD skips tracks •• Ensure that the CD is not damaged or dirty. •• Ensure that random mode is deactivated. Disc cannot be ejected •• Press and hold . Preset stations lost. •• Battery cable is not correctly connected. Connect the battery cable to the terminal that is always live. Display show ERR-12 •• USB data error. Check the USB device.
English 14 Glossary M MP3 A file format with a sound data compression system. MP3 is the abbreviation of Motion Picture Experts Group 1 (or MPEG-1) Audio Layer 3. With the MP3 format, one CD-R or CD-RW can contain about 10 times more data than a regular CD. R RDS (Radio Data System) RDS tuners can automatically tune in stations according to the types of music (or talk) they broadcast.
Specifications are subject to change without notice © 2013 Koninklijke Philips Electronics N.V. All rights reserved. CEM2220BT_12_UM_V1.