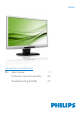
221S3U www.philips.
Table of Contents 1. Important.................................................1 1.1 Safety precautions and maintenance....1 1.2 Notational Descriptions..............................2 1.3 Disposal of product and packing material.................................................................3 2. Setting up the monitor..........................4 2.1 Installation............................................................4 2.2 Remove Base Stand and Base..................7 3. USB monitor operation..........
1. Important 1. Important This electronic user’s guide is intended for anyone who uses the Philips monitor. Take time to read this user manual before you use your monitor. It contains important information and notes regarding operating your monitor.
1. Important • Temperature: 0-40°C 32-95°F • Humidity: 20-80% RH Note Consult a service technician if the monitor does not operate normally, or you are not sure what procedure to take when the operating instructions given in this manual have been followed. Important information for Burn-in/Ghost image • • Always activate a moving screen saver program when you leave your monitor unattended. Always activate a periodic screen refresh application if your monitor will display unchanging static content.
1. Important Recycling Information for Customers 1.3 Disposal of product and packing material Your display is manufactured with high quality materials and components which can be recycled and reused. Waste Electrical and Electronic EquipmentWEEE To learn more about our recycling program please visit www.philips.com/about/sustainability/ recycling.
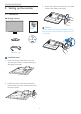
2. Setting up the monitor 3. Attach the monitor base stand to the base column then fasten base stand. 2. Setting up the monitor 2.1 Installation Package contents Register your product and get support at www.philips.com/welcome 221S3 U Quick Start Caution Do not release the height adjustment pin lock from the base column before the base stand is firmly fixed. 2012 Konin DisplayLink Driver DON’T P klijke s hilip E le o ctr nic l ht s hi Al na . V. N. s, rig re se rv ed .
2. Setting up the monitor Connecting to your laptop Note 1. You may have to re-boot your laptop in order to recognize the USB monitor correctly. 2 2. Many new laptops may be able to supply enough power with only 1x USB port, in that case you may wish to free up 1x USB port if required. If you find that the display flickers with 1xUSB connection, or does not light up, then please ensure that 2xUSB ports are utilized. 3 1 3 2 3.
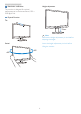
2. Setting up the monitor Resolution notification Height adjustment This monitor is designed for optimal performance at its native resolution, 1920 × 1080 @ 60 Hz. Physical Function Tilt 70mm Note Remove the height adjustment pin lock before adjusting the height. Swivel -65 Insert the height adjustment pin lock before lifting the monitor.
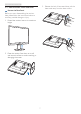
2. Setting up the monitor 3. Release the lock of base stand then pull the base stand away from the base column. 2.2 Remove Base Stand and Base Remove the Base Stand Before you start disassembling the monitor base, please follow the instructions below to avoid any possible damage or injury. 1. Extend the monitor base to its maximum height. 2. Place the monitor face down on a soft and smooth surface to avoid scratching or damaging the screen.
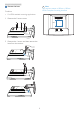
2. Setting up the monitor Remove the base Note This monitor accepts a 100mm x 100mm VESA-Compliant mounting interface. Condition: • For VESA standard mounting applications. 1. Remove the 8 screw covers. 100mm 100mm 2. Remove the 4 screws and then remove the base from the monitor.
3. USB monitor operation 3. USB monitor operation 3.1 Introduction USB monitor allows you to share the images between your laptop and the monitor by simply connecting USB cable to your laptop. No extra power cord or video cables are required, resulting in a simple, single cable, ultra low power connection between your laptop and monitor. 3.
3. USB monitor operation 3.3 How to control the display Windows 7 system On Windows 7, you can configure a DisplayLink device through the use of Windows Display Properties (WDP). WDP provides a simple method to attach, rotate, duplicate or extend screens as well as modify screen resolution. 1. To open WDP There are several ways to open WDP. A B C 1. Right-click on the desktop. 1. From Start menu > Devices 1. Right click on the DisplayLink and Printers. icon . 2.
3. USB monitor operation 2. Setting the Display Follow this procedure to set the display. To set the display 2.1. Open Screen Resolution. 2.2. Set the display options. Refer to the table below for details on each option. Menu Option Display Sub-menu Option Description Use the drop down list to select a display to be configured.
3. USB monitor operation 4. To show the DisplayLink Manager menu 4.1. From the taskbar, click the show hidden icons arrow to show all available icons. 4.2. Click the DisplayLink icon , menu appears with several options as below DisplayLink Manager Check for updates Optimize for Video Fit to TV... Advanced Configuration... Refer to the table below for details on each option: Menu DisplayLink Manager Check for updates Optimize for Video Description Opens the Windows display setting window.
3. USB monitor operation Windows Vista and Windows XP system When USB monitor is attached to your laptop with Windows Vista and Windows XP system, a DisplayLink icon appears in the taskbar. This provides the access to the DisplayLink Manager menu. To use the DisplayLink Manager menu 1. Click the DisplayLink icon on the taskbar. The menu appears as shown below. 2. Refer to the table below for details on each option.
3. USB monitor operation Menu Option Extend To Extend Set as Main Monitor Notebook Monitor Off Mirror Off Optimize for Video (Vista and Windows 7 Only) Fit to TV Sub-menu Option Right Left Above Below Description Extends the display to the right of the main display. Extends the display to the left of the main display. Extends the display above of the main display. Extends the display below the main display. Extends your desktop onto the secondary display. Sets the secondary display as the main display.
4. Technical Specifications 4. Technical Specifications Picture/Display Monitor Panel Type Backlight Panel Size Aspect Ratio Pixel Pitch Brightness Contrast Ratio (typ.) Response Time (typ.) Optimum Resolution Viewing Angle Display Colors Connectivity Video Signal Input Convenience Other Convenience Stand Tilt Swivel Height adjustment: Power Power Input On Mode Standby Mode Off Optional Power Adaptor TFT-LCD LED 21.5" (54.6cm) 16:9 0.2842 x 0.
4. Technical Specifications Operating Condition Temperature range (operation) Temperature range (Non-operation) Relative humidity Altitude MTBF Environmental ROHS Packaging Compliance and standards Regulatory Approvals Cabinet Color Finish 0°C to 40 °C -20°C to 60°C 20% to 80% Operation: + 12,000ft (3,658m) Non-operation: + 40,000ft (12,192m) 30,000hrs YES 100% recyclable CE Mark, FCC Class B, UL/cUL, GOST Black/Black, Silver/Black Texture Note 1. This data is subject to change without notice. Go to www.
5. Regulatory Infomation Federal Communications Commission (FCC) Notice (U.S. Only) 5. Regulatory Information This equipment has been tested and found to comply with the limits for a Class B digital device, pursuant to Part 15 of the FCC Rules. These limits are designed to provide reasonable protection against harmful interference in a residential installation.
5. Regulatory Infomation Use only RF shielded cable that was supplied with the monitor when connecting this monitor to a computer device. CET appareil produit, utilise et peut émettre des hyperfréquences qui, si l'appareil n'est pas installé et utilisé selon les consignes données, peuvent causer des interférences nuisibles aux communications radio. Cependant, rien ne peut garantir l'absence d'interférences dans le cadre d'une installation particulière.
5. Regulatory Infomation EN 55022 Compliance (Czech Republic Only) North Europe (Nordic Countries) Information Placering/Ventilation VARNING: FÖRSÄKRA DIG OM ATT HUVUDBRYTARE OCH UTTAG ÄR LÄTÅTKOMLIGA, NÄR DU STÄLLER DIN UTRUSTNING PÅPLATS. Placering/Ventilation ADVARSEL: S Ø R G V E D P L AC E R I N G E N F O R , AT NETLEDNINGENS STIK OG STIKKONTAKT ER NEMT TILGÆNGELIGE.
5. Regulatory Infomation Ergonomie Hinweis (nur Deutschland) Der von uns gelieferte Farbmonitor entspricht den in der "Verordnung über den Schutz vor Schäden durch Röntgenstrahlen" festgelegten Vorschriften. Auf der Rückwand des Gerätes befindet sich ein Aufkleber, der auf die Unbedenklichkeit der Inbetriebnahme hinweist, da die Vorschriften über die Bauart von Störstrahlern nach Anlage III ¤ 5 Abs. 4 der Röntgenverordnung erfüllt sind.
5. Regulatory Infomation China RoHS 环保使用期限 The People's Republic of China released a regulation called "Management Methods for Controlling Pollution by Electronic Information Products" or commonly referred to as China RoHS. All products including CRT and Monitor which are produced and sold for China market have to meet China RoHS request.
6. Customer care and warranty black pixel. Other combinations of lit and dark sub pixels appear as single pixels of other colors. 6. Customer care and warranty Types of Pixel Defects Pixel and sub pixel defects appear on the screen in different ways. There are two categories of pixel defects and several types of sub pixel defects within each category. 6.1 Philips’ Flat Panel Monitors Pixel Defect Policy Philips strives to deliver the highest quality products.
6. Customer care and warranty Proximity of Pixel Defects Note A red or blue bright dot must be more than 50 percent brighter than neighboring dots while a green bright dot is 30 percent brighter than neighboring dots. Because pixel and sub pixels defects of the same type that are near to one another may be more noticeable, Philips also specifies tolerances for the proximity of pixel defects. Black Dot Defects Black dot defects appear as pixels or sub pixels that are always dark or "off".
6. Customer care and warranty 6.2 Customer Care & Warranty For warranty coverage information and additional support requirement valid for your region, please visit www.philips.com/support website for details. You may also contact your local Philips Customer Care Center number listed below. Contact Information for WESTERN EUROPE region: Country ASC Consumer care number Price Germany Siemens I&S +49 01803 386 853 € 0.
6. Customer care and warranty Contact Information for CENTRAL AND EASTERN EUROPE region: Country Call center ASC Consumer care number Belarus NA IBA +375 17 217 3386 Bulgaria NA LAN Service +359 2 960 2360 Croatia NA Renoprom +385 1 333 0974 Estonia NA FUJITSU +372 6519900 Latvia NA “ServiceNet LV” Ltd. +371 7460399 Lithuania NA UAB "Servicenet" +370 7400088 Romania NA Blue Ridge Intl. +40 21 2101969 Serbia & Montenegro NA Kim Tec d.o.o.
6. Customer care and warranty Contact Information for APMEA region: Country Call center ASC Consumer care number Australia NA AGOS NETWORK PTY LTD 1300 360 386 New Zealand NA Visual Group Ltd. 0800 657447 Hong Kong / Macau NA Smart Pixels Technology Ltd. Hong Kong:Tel: +852 2619 9639 Macau:Tel: (853)-0800-987 India NA REDINGTON INDIA LTD Tel: 1 800 425 6396 SMS: PHILIPS to 56677 Indonesia NA PT.
7. Troubleshooting & FAQs Cannot play DVDs using the Third-Party DVD player program 7. Troubleshooting & FAQs • 7.1 Troubleshooting Visible signs of smoke or sparks This page deals with problems that can be corrected by a user. If the problem still persists after you have tried these solutions, contact Philips customer service representative.
7. Troubleshooting & FAQs Green, red, blue, dark, and white dots appears on the screen "atter-imaging" or "ghost imaging" will disappear gradually over a period of time after the power has been switched off. Always activate a moving screen saver program when you leave your monitor unattended. Always activate a periodic screen refresh application if your LCD monitor will display unchanging static content.
7. Troubleshooting & FAQs Q3: My monitor does not start up with my stand alone desktop PC. I cannot see anything with Desktop PC. 7.3 USB monitor FAQs Q1: My monitor is not recognized by my laptop OS. Ans.: Please note that the USB monitor not designed to work with DOS yet. It is meant to be used as a “secondary display”, therefore it must be used with a Laptop type of computer which has a permanent primary display attached to it.
2012 © Koninklijke Philips Electronics N.V. All rights reserved. Philips and the Philips Shield Emblem are registered trademarks of Koninklijke Philips Electronics N.V. and are used under license from Koninklijke Philips Electronics N.V. Specifications are subject to change without notice.