User Manual Manuel de l’utilisateur Guía del usuario 50PL9126D 50PL9220D www.philips.com/usasupport or call 1-888-PHILIPS (744-5477) while with your product (and Model / Serial number) Philips vous remercie de votre confiance. Besoin d'une aide rapide? Les Guide d'utilisation rapide et Manuel de l'utilisateur regorgent d'astuces destinées à simplifier l'utilisation de votre produit Philips.
How to make the optimal connection (only RF cable is provided, for the rest of the cables, please consult your consumer electronics dealer for availability) Comment réaliser une bonne connexion (seulement le câble RF est inclus, pour le reste des câbles, de faveur consultez avec son distributeur d’appareils électroniques) Cómo realizar la mejor conexión (solo el cable RF está incluído, para el resto de los cables, favor consulte con su distribuidor de aparatos electrónicos) Best Supérieure La mejor
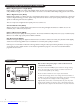
1 AE: Set-Top Box to TV FR: Boîtier de décodage vers téléviseur ES: De la caja superior o caja de cable al TV HDMI OR/OU/O Pb Y CABLE/ ANTENNA HDMI RF R VIDEO C Details refer to page 21. /Détails, consultez la page 21. /Para detalles, consulte la pag. 21. 2 AE: DVD Player/Recorder to TV FR: Lecteur DVD/Enregistreur DVD vers téléviseur ES: Del reproductor o grabador de DVD al TV HDMI Details refer to page 21. /Détails, consultez la page 21. /Para detalles, consulte la pag. 21.
3 AE: DVD Player or Recorder to TV FR: Lecteur DVD ou Enregistreur vers téléviseur ES: Del reproductor o grabador de DVD al TV Component Video Input /Entrée vidéo composant /Entrada de video componente Details refer to page 21. /Détails, consultez la page 21. /Para detalles, consulte la pag. 21. 4 AE: DVD Player/Recorder/VCR to TV FR: Lecteur DVD/Enregistreur DVD/Magnétoscope vers téléviseur ES: Del reproductor/grabador de DVD/VCR al TV S-Video /S-Vidéo /S-Video Details refer to page 22.
AE: DVD Player/Recorder/VCR to TV FR: Lecteur DVD/Enregistreur DVD/Magnétoscope vers le téléviseur ES: Del reproductor/grabador de DVD/VCR al TV Composite Audio-video /Audio-Vidéo composite /Audio-Video compuesto Details refer to page 22. /Détails, consultez la page 22. /Para detalles, consulte la pag. 22.
7 AE: Audio to Hi-fi System (Digital) FR: Audio vers chaîne haute fidélité (Numérique) ES: Audio al sistema Hi-fi (Digital) SPDIF Details refer to page 23. /Détails, consultez la page 23. /Para detalles, consulte la pag. 23. Downloaded from www.Manualslib.
Downloaded from www.Manualslib.
Downloaded from www.Manualslib.
Contents Care of the screen See Care and Cleaning, p. 29. R End of life directives Philips is paying a lot of attention to produce environmentally-friendly products in green focal areas. Your new TV contains materials which can be recycled and reused. At the end of its life specialized companies can dismantle the discarded TV to concentrate the reusable materials and to minimize the amount of materials to be disposed off. Please ensure you dispose off your old TV according to local regulations.
Guide to Digital Light Processing® and Digital TV What is Digital Light Processing® (DLP)? Digital Light Processing® is the world’s only all-digital display chip and a key ingredient in the best digital projectors available today. DLP® technology uses an optical semiconductor to recreate source material with fidelity analog systems cannot match.
Connections to the TV Your integrated digital TV automatically decodes and displays the four basic DTV picture resolution standards. - SDTV (Standard Definition TV) are broadcast as 480i (480-line interlaced) or 480p (480-line progressive scan) video. - HDTV (High-Definition TV) are broadcast either in the 1080i or 720p formats, always with a widescreen picture. Note: Progressive scan video (p) is more like that you see in a movie theater.
Cable box with S-Video, component video (YPbPr) or HDMI connectors See Connect Accessory Devices, p. 22-23. Via Antenna Via antenna you can watch whatever DTV programs being broadcast in your area for free. If you’re not sure what HDTV programming is available in your area, contact your local content provider or your local electronics store retailer. Broadcasters are in the middle of a transition from analog to digital TV.
Use of the remote control Note: For most buttons pressing a button once will activate the function. Pressing a second time will de-activate it. When a button enables multiple options, a small list will be shown. Press repeatedly to select the next item in the list. The list will be removed automatically after 6 seconds or press OK to remove immediately. POWER button FORMAT Press to turn on/off the TV from or to standby mode.
Control Buttons on the TV Should your remote be lost or broken you can still change some of the basic settings with the buttons on your TV. Press the power switch . to switch the TV on. Press: • the VOLUME + or − button to adjust the volume; • the CHANNEL ≤ or ≥ button to select the TV channels or sources. The MENU button can be used to summon the Settings menu without the remote control.
Installation Settings Installation Language Autoprogram Select the menu language 4 Language English Francais Weak channel installation 3 Espanol Software upgrade & Press the MENU button on the remote control. é Use the cursor down button to select Installation in the Settings menu. “ Use the cursor right button to enter the Installation menu. ‘ Select Language and enter the list of available languages with the cursor right button.
Digital Channel selection delay Due to the tuning complexity of subchannel digital programming, the time to select and view a digital channel may take slightly longer than what the viewer is normally accustomed to (as compared to analog channel programs). Digital channel broadcasts contain program and system data information that must be processed before the channel selection can be displayed. When you tune an audio-only digital subchannel, a display appears with the message Audio only.
To use the menus Introduction A lot of guiding instructions, help texts and messages will be displayed on your TV when using the menus or when trying to execute an action. Please, follow the instructions and read the help text which are being displayed on the specific item highlighted. The color buttons refer to different actions which may be executed depending on the activated device. Press the corresponding color button on the remote control to perform the required action.
Setup menu This menu is used to control the settings of special TV functions, features and accessory devices. Settings Settings 5 Setup 4 Preferences Source Clock Convergence TV Setup Installation Demo Exit The Preferences menu allows you to change settings that will be accessed only occasionally. The Source menu allows you to select a source. The Clock menu allows you to use your TV as a clock. This setup is necessary for the correct working of the Lock after feature.
Settings | Setup | Preferences Features preferences 3 Caption service Digital caption service Digital caption options Caption service CC-1 CC-2 CC-3 CC-4 T-1 T-2 T-3 T-4 8 You can choose the Closed captions service level to be displayed. & Select Caption service. é Press the cursor right button. “ Select the desired Caption service: • CC-1, CC-2, CC-3, CC-4 Dialogue (and descriptions) for the action on the captioned TV program shows on screen. Usually CC 1 is the most frequently used.
Menu preferences Settings | Setup Preferences 4 Picture/sound prefere... Features preferences Menu preferences On Screen display Menu preferences 3 OSD Show emergency al... Change PIN Reset AV settings Settings | Setup | Preferences Preferences 3 OSD Normal OSD Show emergency alerts Minimum This menu allows you to setup or to select some menu Change PIN related setting preferences.
Source Settings Setup 4 Source This menu allows you to identify the accessory devices you have connected to the external input/output. 6 AV 1 AV 2 AV 3 HDMI Side Analog Audio In Preferences Source Clock Convergence & Select Source in the Setup menu. é Press the cursor right button to enter the list of types of devices connected to the selected input. “ Select the accessory device with the cursor up/down buttons.
TV menu Press the MENU button on the remote control to display the Settings menu. The TV menu gives you an overview of the menus you can select. Note: Depending on the input signal, one or more menu items may not be selectable. Settings TV Setup Installation 5 Demo Exit TV Picture Sound Features Channels 4 4 Picture Auto picture Sound Contrast Features Brightness Channels Press the cursor right button to select Picture. Press the cursor right button again to enter the Picture menu.
DNR (Digital Noise Reduction) Settings | TV Picture Brightness Color Sharpness 13 DNR Off 50 Minimum 67 4 Color temperature Digital processing Dynamic contrast DNR Color enhancement 4 Medium Maximum Automatically filters out and reduces the image noise and improves picture quality when receiving weak video signals. & Press the cursor right button to enter the list. é Select Off, Minimum, Medium or Maximum according to the image noise. “ Press the cursor left button to return to the picture menu.
Sound mode Settings | TV Sound 9 25 Volume Balance 0 Sound mode Alternate audio Digital audio language Mono/stereo AVL Delta volume Sound mode This selects the modes for stereo or surround sound reproduction dependent on the broadcast signals or signals from external inputs received. 2 Stereo Virtual Dolby Surround Alternate audio (only selectable with analog broadcast signals) This gives you the possibility to swap between the Main and Second Audio Program (SAP) when it is available.
Channels menu Settings TV Picture Sound Features Channels 4 Channels 7 Lock after Channel lock TV ratings lock Movie ratings lock Preferred channels Region ratings lock Clear region ratings This menu can control special functions for the TV channels. & Select Channels in the TV settings menu with the cursor up/down. é Press the cursor right to enter the channels menu. “ Press the cursor up/down to select a channels menu item. Lock after Note: Lock after is only selectable if time is known.
When All has been selected, all items in the age-based and in the contents-based lists are locked. If, while All is selected, any other item, either an age-based or content-based item, is unselected, then All is automatically unselected.
Preferred channels Settings | TV Channels 7 Preferred channels Lock after Channel lock TV ratings lock Movie ratings lock Preferred channels Region ratings lock Clear region ratings x x x x x x x x 2 2.1 6 10 13 15 18 35.1 WCBS-DT MELCO You can browse through the TV channels with the - P + button. Only those channels which are in the preferred list, will be displayed. Settings/Setup/Preferences Features preferences Downloaded rating t...
Picture Formats The picture you received from the broadcaster or playback from DVDs may be in widescreen or conventional modes. Pictures in conventional mode will have black bars on the right and left of the screen. Select Picture format & Press FORMAT button to display a list of available display formats (depending on the receiving signal). This lets you choose the display format of your preference.
Connect Accessory Devices Using HDMI 1 Set Top Box to TV A Connect RF cable from wall to input at back of the cable box. B Connect cable box to TV using HDMI cable. Note: If the accessory device has DVI output only, use a DVI to HDMI adapter cable to connect to the HDMI connector. You need to also connect the audio cable to L and R AUDIO jacks. Next, go to Menu=>Setup=>Source=>Analog Audio In=> and select HDMI. C Press AV button to select HDMI external channel.
4 DVD Player/DVD Recorder/VCR to TV Using S-Video A Connect S-Video cable to S-Video input on back of TV and S-Video output on the back of DVD/VCR player or recorder. B Connect audio cables (red/white) to audio AV inputs on back of TV and Audio outputs on back of DVD/VCR player or recorder. C Turn on TV and DVD/VCR player or recorder. Press AV button on the remote control until AV3 appears on TV screen.
7 Audio to Hi-Fi System (Digital) Using SPDIF A Connect audio cable from the SPDIF jack on the rear of the TV to the DIGITAL IN jack on the rear of the hi-fi system. Tip:SPDIF (Sony and Philips Digital Interconnect Format) is highly recommended for high quality digital sound output. To select connected devices and audio and video functions Select Connected Devices & Press the AV button repeatedly or select Source in the Settings menu (see p.
Multimedia browser Note: This is primarily for service only! It may work with certain memory devices but not with most camera devices. Multimedia browser lets you display pictures or play audio files stored on a USB device. The Multimedia browser application is invoked from the My Content menu (press the MY CONTENT button) by selecting the USB device and pressing the cursor right.
USBDevice1 USBDevice1 Press the OK button to play or pause. USBDevice1 London2005 Multimedia Browser menu & Insert a USB device. é Select the USB device under Multimedia with the cursor up/down. The Multimedia browser will allow the user to browse content stored on the inserted USB device. “ Press the cursor right. The 2-panel browser will be shown with the left panel containing the content types (Music, Picture). The right panel will display the content that is available of the selected content type.
Troubleshooting Tips Check this List of Symptoms and Suggested Steps To Take before requesting Service. You may be able to solve the problem yourself. If you face problems connecting the TV to external devices, please refer to the User Guide of the external device or call their service centers for help. Charges for TV installation and adjustments of customer controls are not covered under your warranty. SYMPTOMS Hookup SUGGESTED STEPS TO TAKE Can't get external audio equipment to work with TV. 1.
SYMPTOMS SUGGESTED STEPS TO TAKE General Temperature indicator is RED Turn off the TV set and allow it to cool down. If symptom continues, contact the nearest service center. General Lamp indicator is RED Lamp has failed. Contact the nearest service center. General TV is not responding to Remote Control Ensure the batteries are inserted into the remote control according to the illustration in the battery compartment. Refer to page 4.
Glossary Active Control Active Control is a unique, intelligent and proactive control system. It ensures that the viewing experience is always optimal by automatically compensating and changing ambient light condition. Aspect Ratio The ratio between the width and height of the TV picture on the screen. In a normal TV set the aspect ratio is 4 to 3 (4:3). The new aspect ratio in HDTV is 16:9 which resembles the aspect ratio in a movie theatre (Widescreen).
Care and Cleaning • To avoid possible shock hazard, be sure the TV is unplugged from the electrical outlet before cleaning. • Regularly dust the TV with a dry, non-scratching duster to keep the TV clean. • When cleaning the TV, take care not to scratch or damage the screen surface. Avoid wearing jewelry when cleaning the TV. Do not use household cleaners. Wipe the front screen with a clean cloth dampened with water. Use even, easy, vertical strokes when cleaning.
Specifications 50PL9126 / 50PL9220 PICTURE / DISPLAY Aspect ratio 16 : 9 Display screen type DLP® Projection TV Picture Enhancement Pixel Plus, Progressive Scan, 3D combfilter, Black stretch, Active Control, Auto Picture (5 modes), Digital Noise Reduction (DNR) SOUND Output Power (RMS) 2 x 10W Sound Enhancement Auto Volume Leveller, Virtual Dolby Sound System AutoSound (4 modes) CONVENIENCE Ease of installation Auto Program Ease of use Channel list Remote control type RCLU024 Remote contr
Annex 1 - Philips TV software upgrade with portable memory Introduction Philips offers software upgrade capability for your TV using USB portable memory. After you have completed a software upgrade, your TV will typically perform better. What improvements are made depends on the upgrade software you are using as well as the software your TV contained before the upgrade. You can execute the software upgrade procedure yourself.
Automatic software upgrade procedure Settings | Installation Upgrade busy... Software id: For automatic software upgrade, the “autorun.upg” file should be copy to the root of the USB portable memory TL32E-234 Loading Done Validating Done Programming & Power off your TV and remove all memory devices. é Insert the USB portable memory that contains the downloaded software upgrade. “ Switch on your TV with the power switch . at the right side of the TV.
PHILIPS LIMITED WARRANTY ONE (1) YEAR WARRANTY COVERAGE: PHILIPS warranty obligation is limited to the terms set forth below. WHO IS COVERED: Philips warrants the product to the original purchaser or the person receiving the product as a gift against defects in materials and workmanship as based on the date of original purchase (“Warranty Period”) from an Authorized Dealer. The original sales receipt showing the product name and the purchase date from an authorized retailer is considered such proof.
3139 125 37314 Downloaded from www.Manualslib.