Always there to help you Register your product and get support at www.philips.
1 Important safety instructions 3 2 Your phone 4 4 5 6 6 What is in the box Overview of the phone Overview of the base station Display icons 3 Get started Connect the base station Insert the supplied batteries Configure your phone (country dependent) Change the remote access PIN code Charge the handset Check the battery level What is standby mode? Check the signal strength Switch the handset on or off 4 Calls Make a call Answer a call End a call Adjust the earpiece/speaker volume Mute the microphone
11 Alarm clock 25 25 25 12 Telephone answering machine 26 26 26 26 26 27 28 29 13 Services 31 31 31 31 31 32 32 32 32 33 33 35 14 Technical data 36 15 Notice 37 37 37 37 Set the alarm Turn off the alarm Turn the answering machine on or off Set the answering machine language Set the answer mode Announcements Incoming messages Set the ring delay Remote access Call list type Auto conference Network type Auto prefix Select the recall duration Dial mode Auto clock Register additional handsets Unregis
Power requirements • This product requires an electrical supply of 100-240 volts AC. In case of power failure, the communication can be lost. • The voltage on the network is classified as TNV-3 (Telecommunication Network Voltages), as defined in the standard EN 60950. Warning •• The Electrical network is classified as hazardous. The only way to power down the charger is to unplug the power supply from the electrical outlet. Ensure that the electrical outlet is always easily accessible.
2 Your phone Congratulations on your purchase and welcome to Philips! To fully benefit from the support that Philips offers, register your product at www.philips. com/welcome. Power adapter** What is in the box Line cord* Guarantee Handset** 4XLFN VWDUW JXLGH Short user manual Note Base station (D400) •• * In some countries, you have to connect the line adapter to the line cord, then plug the line cord to the telephone socket.
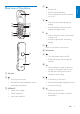
d a • End the call. • Exit the menu/operation. • Press and hold to switch the handset on or off. • Press to enter a space during text editing. • Press and hold to lock/unlock the keypad in standby mode. • Press and hold to enter a pause when making a call. • Switch to upper/lower case during editing. English Overview of the phone e m l k b c d j e f g i h 6 g Mute or unmute the microphone. h Microphone n o i Turn the speaker phone on/off.
m MENU/OK c • Access the main menu. • Confirm selection. • Enter the options menu. • Select the function displayed on the handset screen directly above the key. n Loudspeaker • Delete the current playback message. • Press and hold to delete all old messages. d / Decrease/increase the speaker volume. e / Skip backward/forward during playback. o Battery door f Overview of the base station a Stop messages playback. • Press to find handsets.
English It indicates an outgoing call in the redial list. It flashes when there is a new missed call or when browsing the unread missed calls in call log. It remains steadily on when browsing the read missed calls in call log. It flashes when receiving incoming call. It remains steadily on when you are in a call. The speaker is on. The ringer is off. The silent mode is set and within active period (the phone does not ring).
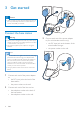
3 Get started Caution •• Make sure that you have read the safety instructions in the 'Important safety instructions' section before you connect and install your handset. Connect the base station Warning •• Risk of product damage! Ensure that the power supply voltage corresponds to the voltage printed on the back or the underside of the phone. •• Use only the supplied power adapter to charge the batteries.
2 Configure your phone (country dependent) English Insert the supplied batteries 1 1 When using your phone for the first time, you see a welcome message. 2 Press MENU/OK. Set the country/language Select your country/language, then press MENU/OK to confirm. »» The country/language setting is saved. Note 3 •• The country/language setting option is country dependent. If no welcome message is displayed, it means the country/language setting is preset for your country.
4 5 Press the numeric buttons to enter the time. • If the time is in 12-hour format, press / to select [am] or [pm] (Country dependent). Check the battery level Press MENU/OK to confirm. Change the remote access PIN code Note •• The default answering machine remote access PIN code is 0000 and it is important to change it to ensure the security. 1 2 Press MENU/OK. 3 Enter the old PIN, then press MENU/OK to confirm. 4 5 Select [Answ.
English Check the signal strength The number of bars indicates the connection status between the handset and base station. The more bars are shown, the better the connection is. • Make sure the handset is connected to the base station before you make or receive calls and carry out the phone functions and features. • If you hear warning tones when you are on the phone, the handset is almost out of battery or the handset is out of range. Charge the battery or move the handset nearer to the base station.
4 Calls Note •• The talk time of your current call is displayed on the call timer. •• If you hear warning tones, the phone is almost out of Note battery or out of range. Charge the battery or move the phone close to the base station. •• When the power fails, the phone cannot access emergency services. Tip Answer a call •• Check the signal strength before you make a call or when you are in a call. (see 'Check the signal strength' on page 11) When there is an incoming call, the phone rings.
Press / to adjust the volume during a call. »» The earpiece/speaker volume is adjusted and the phone is back to the call screen. Mute the microphone 1 Press during a call. »» The handset displays [Mute on]. »» The caller cannot hear you, but you can still hear his voice. 2 Press again to unmute the microphone. »» You can now communicate with the caller. Turn the speaker on or off Press . Make a second call Note •• This service is network dependent. 1 Press during a call.
5 Intercom and conference calls An intercom call is a call to another handset that shares the same base station. A conference call involves a conversation between you, another handset user and the outside callers. Switch between calls Press and hold to switch between the outside call and the intercom call. Transfer a call Note •• If the base station only has 2 registered handsets, press and hold Make a call to another handset 1 Press and hold during a call.
Press on the selected handset. »» The intercom is established. 4 Select [Conference]. »» You are now in a 3-way conference call with an external call and a selected handset. 5 Press English 3 to end the conference call. Note •• Press to join an ongoing conference with another handset if [Services] > [Conference] is set to [Auto]. During the conference call 1 Press and hold to put the external call on hold and go back to the internal call. »» The external call is put on hold.
6 Text and numbers You can enter text and numbers for handset name, phonebook records, and other menu items. Enter text and numbers 1 Press once or several times on the alphanumeric key to enter the selected character. 2 Press REDIAL/C to delete a character. Press and hold REDIAL/C to delete all characters. Press and to move the cursor left and right. 3 Press to add a space. Note •• For information on key mapping of characters and numbers, see the chapter 'Appendix'.
This phone has a phonebook that stores up to 100 records. You can access the phonebook from the handset. Each record can have a name up to 16 characters long and a number up to 24 digits long. There are 2 direct access memories (keys and ). Depending on your country, keys and are preset to the voice mail number and information service number of your service provider respectively. When you press and hold on the key in standby mode , the saved phone number is dialed automatically.
3 Enter the name, then press MENU/OK to confirm. Delete all records 4 Enter the number, then press MENU/OK to confirm. »» Your new record is saved. 1 2 Press MENU/OK. 3 Press MENU/OK to confirm. »» All records (except the 2 direct access memory records) are deleted. Tip •• Press and hold to insert a pause. •• Press once or several times on the alphanumeric key to enter the selected character. •• Press REDIAL/C to delete the character. Press to move the cursor left and right.
The call log stores the call history of all missed or received calls. The incoming call history includes the name and number of the caller, call time and date. This feature is available if you have registered to the caller ID service with your service provider. Your phone can store up to 50 call records. The call log icon on the handset flashes to remind you of any unanswered calls. If the caller allows the display of his identity, you can view his name or number.
Delete a call record 1 Press . »» The incoming call log is displayed. 2 Select a record, then press MENU/OK to confirm. 3 Select [Delete], then press MENU/OK to confirm. »» The handset displays a confirmation requests. 4 Press MENU/OK to confirm. »» The record is deleted. Delete all call records 1 Press . »» The incoming call log is displayed. 2 Press MENU/OK to enter the options menu. 3 Select [Delete all], then press MENU/OK to confirm. »» The handset displays a confirmation requests.
The redial list stores the call history of dialed calls. It includes the names and/or numbers you have called. This phone can store up to 20 redial records. Delete a redial record 1 Press REDIAL/C to enter the list of dialed calls. 2 Select a record, then press MENU/OK to confirm. 3 Select [Delete], then press MENU/OK to confirm. »» The handset displays a confirmation request. 4 Press MENU/OK to confirm. »» The record is deleted. View the redial records Press REDIAL/C.
10 Phone settings 1 2 Press MENU/OK. You can customize the settings to make it your own phone. 3 Select [On/off], then press MENU/OK to confirm. »» The setting is saved. 4 Select [Start & end], then press MENU/ OK to confirm. 5 Set the time, then press MENU/OK to confirm. »» The setting is saved. »» is displayed. Sound settings Set the handset's ringtone volume You can select among 5 ringtone volume levels or [Off]. 1 2 Press MENU/OK. 3 Select a volume level, then press MENU/ OK to confirm.
3 Battery tone is the sound made when the battery is low and needs recharging. 1 2 3 Press MENU/OK. Select [Phone setup] > [Sounds] > [Battery tone], then press MENU/OK to confirm. Select [On]/[Off], then press MENU/OK to confirm. »» The setting is saved. Set the sound profile Select [On]/[Off], and press MENU/OK to confirm. »» The setting is saved. »» ECO is displayed in standby mode. Note •• When ECO mode is set to [On], the connection range between the handset and the base station can be reduced.
ECO mode [Off] ECO+ mode [Off] Handset icon display [Off] [On] is displayed only after the ECO+ mode is activated during standby mode . [On] [Off] [On] [On] and are off. is displayed. is displayed and changed to when the ECO+ mode is activated in standby mode. Name the handset The name of the handset can be up to 14 characters. It is displayed on the handset screen in standby mode. 1 2 Press MENU/OK. 3 Enter or edit the name. To erase a character, press REDIAL/C.
English 11 Alarm clock Your phone has a built-in alarm clock. Check the information below to set your alarm clock. Set the alarm 1 2 Press MENU/OK. 3 Select [On once] or [On daily], then press MENU/OK to confirm. 4 Enter an alarm time, then press MENU/ OK to confirm. »» The alarm is set and is displayed on the screen. Select [Alarm], then press MENU/OK to confirm. Tip •• Press / to switch between [am]/[pm] (Country dependent).
12 Telephone answering machine Set the answering machine language Note •• This feature only applies to models with multiplelanguage support. Note •• Available only for D405. Your phone includes a telephone answering machine that records unanswered calls when it is on. You can access the answering machine remotely and change the settings through the answering machine menu on the handset. The button on the base station lights up when the answering machine is on.
Record an announcement 1 2 English The maximum length of the announcement you can record is 3 minutes. The newly recorded announcement automatically replaces the old one. Note •• You can no longer listen to the announcement when you pick up an incoming call. Press MENU/OK. Restore the default announcement Select [Answ. Machine] > [Announcement], then press MENU/OK to confirm. 1 2 Press MENU/OK. 3 Select [Record also]or [Answer only], then press MENU/OK to confirm.
Listen to the incoming messages Delete all old incoming messages You can listen to the incoming messages in the sequence they are recorded. From the base Press and hold on the base station in standby mode. »» All old messages are permanently deleted. From the handset • To start/stop listening, press . • To adjust the volume, press / • To play the previous message/replay the current message, press . • To play the next message, press • To delete the current message, press . . .
you are recommended to set the ring delay to [Toll saver] mode. This is a cost effective way to manage your messages. When there are new messages, the answering machine picks up the call after 3 rings; When there is no messages, it picks up the call after 5 rings. Access the answering machine remotely 1 Make a call to your home number with a touch tone phone. 2 3 Enter # when you hear the announcement. Enter your PIN code.
Behavior of the LED display on the base station The table below shows you the current status with different LED display behavior on the base station. LED display Steady on Message status • There is no new message and the memory is not full. • The handset is switched on. Flashing • Enter the paging mode • There is a new message and the memory is not full. • There is an incoming call. • Recording an incoming message/announcement. • Message playback.
Network type English 13 Services Note The phone supports a number of features that help you handle and manage the calls. Call list type You can set whether you can view all incoming calls or missed calls from this menu. •• This is a country dependent feature. It only applies to models with network type support. 1 2 Press MENU/OK. 3 Select a network type, then press MENU/ OK. »» The setting is saved. Select the call list type 1 2 Press MENU/OK.
Note 3 •• To enter a pause, press and hold . •• If the prefix number is set and the detect number is left empty, the prefix number is added to all outgoing calls. Note •• The feature is unavailable if the dialed number starts with * and #. Select a dial mode, then press MENU/OK to confirm. »» The setting is saved. •• If your phone is in pulse dial mode, press during a call for temporary tone mode. Digits entered for this call are then sent out as tone signals.
Manual registration 3 Enter the system PIN. (The preset PIN is 0000). Press REDIAL/C to remove the number. 4 Select the handset number to be unregistered. 5 Press MENU/OK to confirm. »» The handset is unregistered. If auto registration fails, register your handset manually to the base station. 1 2 Press MENU/OK on the handset. 3 Press and hold 5 seconds. 4 Enter the system PIN. Press REDIAL/C to make corrections. Then press MENU/OK to confirm the PIN.
3 Select [Activate]/[Deactivate], then press MENU/OK to confirm. Call back service 4 Enter the telephone number. »» The setting is saved . The call back service notifies you when a party you have tried to call becomes available. You can cancel this service from the menu after you have activated it from the service provider. Cancel the call back service Edit the activation/deactivation code You can edit the prefix and suffix to the call forward codes. 1 2 Press MENU/OK.
English Restore default settings You can reset your phone settings to the original factory settings. 1 2 Press MENU/OK. 3 Press MENU/OK to confirm. »» All settings are reset. Select [Services] > [Reset], then press MENU/OK to confirm. »» The handset displays a confirmation request.
14 Technical data General specification and features • Talk time: 16 hours • Standby time: 250 hours • Range indoor: 50 meters • Range outdoor: 300 meters • Phonebook list with 100 entries • Redial list with 20 entries • Call log with 50 entries • Answering machine with up to 25 minutes recording time • Caller identification standard support: FSK, DTMF Battery • Philips: 2 x AAA Ni-MH 1.
Declaration of conformity Hereby Philips Consumer Lifestyle, declares that the D400/D405 is in compliance with the essential requirements and other relevant provisions of Directive 1999/5/EC. You can find the Declaration of Conformity on www.p4c. philips.com. This product has been designed, tested and manufactured according the European R&TTE directive 1999/5/EC.
Your product contains batteries covered by the European Directive 2006/66/EC, which cannot be disposed with normal household waste. Please inform yourself about the local rules on separate collection of batteries because correct disposal helps to prevent negative consequences for the environmental and human health. When this logo is attached to a product, it means a financial contribution has been paid to the associated national recovery and recycling system.
No signal bar is displayed on the screen. •• The handset is out of range. Move it closer to the base station. •• If the handset displays [Register your Handset], put the handset on the base until the signal bar appears. Tip •• For further information, see the chapter 'Services', section 'Register additional handsets'. If I fail to pair (register) the additional handsets to the base station, what do I do? Your base memory is full. Unregister the unused handsets and try again.
No display •• Make sure the batteries are charged. •• Make sure there is power and the phone is connected. Bad audio (crackles, echo, etc.) •• The handset is nearly out of range. Move it closer to the base station. •• The phone receives interference from the nearby electrical appliances. Move the base station away from them. •• The phone is at a location with thick walls. Move the base away from them. The handset does not ring. Make sure the handset ringtone is turned on. The caller ID does not display.
Text and number input tables Key 0 1 2 3 4 5 6 7 8 9 Key 0 1 2 3 4 5 6 7 8 9 Upper case characters (for English/ French/German/Italian/Turkish/ Portuguese/Spanish/Dutch/Danish/ Finnish/Norwegian/ Swedish/Romanian/ Polish/Czech/Hungarian/Slovakian/ Slovenian/Croatian/ Lithuanian/Estonian/ Latvian/Bulgaria) Space . 0 , / : ; " ' ! ¡ ? ¿ * + - % \^ ~| 1 @ _ # = < > ( ) & € £ $ ¥[ ] { } ¤ § ...
Key 0 1 2 3 4 5 6 7 8 9 42 Lower case characters (for Serbian) Space .
A additional handsets alarm announcements answer a call answering machine answering machine language auto clock auto conference auto prefix E ECO mode ECO+ mode 32 25 26 12 26 26 32 31 31 B base station installation overview battery C call back service call forward service call log call return caller ID calling charging conference call contacts D date setting default settings delete messages dial mode display icons disposal 8 6 9, 10, 36 34 33 19 34 12, 19 12 10 13, 14, 31 17 9, 32 35 28 32 6 37
P phone settings phonebook PIN answering machine registration power adapter 22 17, 19, 21 10, 29 33 36 R recall time 32 redial 21 register/unregister 32, 33 remote access to the answering machine 29 ring delay 28 ringtone 22 S safety save a number signal strength silent mode sounds docking keytone sound profile speaker phone standby mode T text entry time setting transfer call troubleshooting/FAQ two calls/call on hold V volume adjustment 44 EN 3 19 11 22 22 22 23 13 10 16, 41 32 14 39 13 13
Specifications are subject to change without notice © 2013 Koninklijke Philips Electronics N.V. All rights reserved. D400-405_UM_05_EN_V1.