DC199 Docking Entertainment System User manual pg001-021_DC199_05-Eng 1 2007.5.
Important notes for users in the U.K. Mains plug This apparatus is fitted with an approved 13 Amp plug. To change a fuse in this type of plug, proceed as follows: 1 2 Remove fuse cover and fuse. 3 Refit the fuse cover. Fit new fuse, which should be a BS1362 3Amp, A.S.T.A. or BSI approved type. If the fitted plug is not suitable for your socket outlets, it should be cut off and an appropriate plug fitted in its place. If the mains plug contains a fuse, it should have a value of 3 Amp.
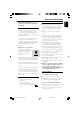
Front panel view 1 2 3 4 5 6 7 Top panel view 8 ^ % $ # 9 0 ! @ 3 pg001-021_DC199_05-Eng 3 2007.5.
Contents English Clock/Sleep Timer General Information Environmental Information ................................ Supplied accessories ............................................ Safety Information ................................................ Hearing Safety ....................................................... 5 5 5 5 Clock setting ....................................................... 15 Setting the Alarm Time ...................................... 15 Stopping the alarm ........................
This product complies with the radio interference requirements of the European Community. Environmental Information All unnecessary packaging has been omitted. We have tried to make the packaging easy to separate into three materials: cardboard (box), polystyrene foam (buffer) and polyethylene (bags, protective foam sheet). Your system consists of materials which can be recycled and reused if disassembled by a specialized company.
Preparations English FM wire antenna AC power adaptor Rear connections B Antenna Connection The type plate is located at the rear of the system. For users in the U.K.: please follow the instructions on page 2. A Power ● Before connecting the AC power adaptor to the wall outlet, ensure that all other connections have been made. WARNING! – For optimal performance, use only the original AC power adaptor. – Never make or change connections with the power switched on.
D English Preparations Before using the remote control Optional connections The optional equipment and connecting cords are not supplied. Refer to the operating instructions of the connected equipment for details. Pull out the plastic protective sheet. Connecting a USB device or memory card By connecting a USB mass storage device (including USB flash memory, USB flash players or memory cards) to the system, you can enjoy the device's stored music through the powerful speakers of system.
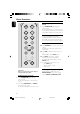
Controls (illustrations on page 3) English @ REPEAT ALARM Main unit – – 1 IR – remote sensor 2 ÉÅ – (iPod/USB) starts or interrupts playback. 3 S/ T iPod/ USB .......... fast searches back and forward within a track (press and hold). ................................. skips to the beginning of a current/previous/next track. CLOCK ............... adjusts the hours for the clock/ alarm function. TUNER ............... tunes to lower/ higher FM frequency. stops an active alarm for a 9 minute interval.
5S 1 % 2 $ 3 4 5 # @ / T iPod/USB.....fast searches back and forward within a track (press and hold). ................................. skips to the beginning of a current/previous/next track. CLOCK ............... adjusts the hours for the clock/ alarm function. TUNER ............... tunes to lower/ higher FM frequency. – – – 6 7 7 ! /4 (USB) skips to the beginning of a previous/ subsequent album. adjusts the minutes for the clock/alarm function. selects a preset radio station.
Basic Functions English Switching the system to standby mode ● Press STANDBY-ON B (or B on the remote control). ➜ The volume level (up to a maximum volume level of 12), last selected mode, source and tuner presets will be retained in the system's memory. Power Saving Automatic Standby As a power-saving feature, the system automatically switches to standby 15 minutes after a USB connected device has reached the end of the last track and no control is operated.
2 English USB playback functions To return to normal playback, press the REPEAT/SHUFF until oFF displayed. ● You can also press 9 to stop playback and cancel your play mode. Note: – The Repeat and Shuffle functions cannot be combined. Programming track numbers Program in the STOP position to select and store up to 20 tracks in the memory. 1 Press PROG/CLOCK on the remote control to enter the programming mode. ➜ Pr 01 appears and PROG flashes. 2 Press S/T to select your desired track number.
Radio Reception English Programming radio stations You can store up to a total of 20 radio stations in the memory. Automatic programming Automatic programming will start at preset number 1 and all your former presets will be overridden. ● Press PROG/ CLOCK for more than 3 seconds to activate programming. ➜ All available stations are programmed. Manual programming 1 Tuning to radio stations 1 2 3 Press TUNER to select the tuner source. Hold S/T and then release the button.
English External Sources Playing a USB mass storage device Compatible USB mass storage devices You can use: – USB flash memory (USB 2.0 or USB1.1) – USB flash players (USB 2.0 or USB1.1) – memory cards (requires an additional card reader) Using a non-USB device 1 2 Connect the audio out terminals of the external equipment (TV, VCR, Laser Disc player, DVD player or CD Recorder) to the AUX IN socket of your system. Press USB/AUX to select external equipment.
External Sources English Supported formats: – USB or memory file format FAT12, FAT16, FAT32 (sector size: 512-4096 bytes) – MP3 bit rate (data rate): 32-320 Kbps and variable bit rate – WMA v9 or earlier – Directory nesting up to a maximum of 8 levels – Number of albums/ folders: maximum 99 – Number of tracks/titles: maximum 400 – ID3 tag v2.
➜ The alarm activated icon appears. ➜ The alarm clock digits flash. ➜ "Error" appears briefly if you have not set the clock time. 2 3 4 5 Press ALBUM/PRESET 3 4 to set the minutes. Press S/T to set the hours. Press iPod, TUNER or USB/AUX to select the sound source. Press ALARM to confirm your alarm setting. ➜ The display returns to the clock time. Notes: The TUNER mode is the default source if: – Your USB device contains no MP3 or WMA files. – You forgot to connect a USB device.
Clock/Sleep Timer English Note: – If you press SLEEP again, this will change your sleep time period to the next shorter preset option. To deactivate the sleep timer ● Press SLEEP repeatedly until "0FF" is displayed, or press STANDBY ON 2. 16 pg001-021_DC199_05-Eng 16 2007.5.
Compatible iPod players ● Most Apple iPod models with 30-pin dock connectors as follows: 20GB, 40GB, 20/30GB Photo, 40/60GB Photo, 30GB Video, 60GB Video, 80GB Video, Mini, Nano and Nano 2nd generation. Selecting the correct dock adaptor ● 8 iPod dock adaptors of different type, as indicated at the back of the adaptor, are included to fit the following iPod: 20GB, 40GB, 20/30GB Photo, 40/60GB Photo, 30GB Video, 60GB Video, 80GB Video, Mini, Nano and Nano 2nd generation.
Specifications English AMPLIFIER Output power ........................................................................ .................. 2 x 7.5W (satellite), 15W (sub-woofer) Signal-to-noise ratio ....................................... ≥ 70 dBA Frequency response ...... 50 Hz – 20 KHz, ± 3 dB Input sensitivity AUX ....................... 0.5 V (max. 2 V) Impedance loudspeakers .................................................. ...............................
WARNING Under no circumstances should you try to repair the system yourself, as this will invalidate the warranty. Do not open the system as there is a risk of electric shock. If a fault occurs, first check the points listed below before taking the system for repair. If you are unable to remedy a problem by following these hints, consult your dealer or Philips for help. Problem Solution “NO USb” is displayed. ✔ Insert a a USB device. Radio reception is poor.
Meet Philips at the Internet http://www.philips.com English DC199 Printed in China pg001-021_DC199_05-Eng 20 PDCC-Jaon-0720 2007.5.