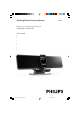
DC910 Docking Entertainment System Register your product and get support at www.philips.
Important notes for users in the U.K. Mains plug This apparatus is fitted with an approved 13 Amp plug. To change a fuse in this type of plug proceed as follows: 1 2 Remove fuse cover and fuse. 3 Refit the fuse cover. Fix new fuse which should be a BS1362 3 Amp, A.S.T.A. or BSI approved type. If the fitted plug is not suitable for your socket outlets, it should be cut off and an appropriate plug fitted in its place. If the mains plug contains a fuse, this should have a value of 3 Amp.
General Information USB/Card Supplied accessories ............................................ 4 Environmental information ................................ 4 Safety Information ............................................ 4~5 Hearing Safety ....................................................... 5 Using a USB mass storage device/SD/MMC memory card ................................................ 12~13 Using playback features ..............................
General Information English Congratulations on your purchase and welcome to Philips! To fully benefit from the support that Philips offers, register your product at www.philips.com/welcome. This product complies with the radio interference requirements of the European Community. Supplied accessories – remote control with 1 CR2025 battery – 3 X iPod dock adaptors – 1 X certified AC/DC adapter (Input: 100- 240V~, 50/60Hz 1.4 A, 2.5A; manufacturer : Philips; Output: 24V model No.
● The mechanical parts of the set contain selflubricating bearings and must not be oiled or lubricated. ● Batteries (battery pack or batteries installed) shall not be exposed to excessive heat such as sunshine, fire or the like. ● When the system is switched to Standby mode, it is still consuming some power. Listen for reasonable periods of time: ● Prolonged exposure to sound, even at normally "safe" levels, can also cause hearing loss.
Preparations English POWERFUL BASS POWERFUL BASS Connections B Antenna Connection The type plate is located at the bottom of the system. For users in the U.K.: please follow the instructions on page 2. A Power ● Before connecting the AC power adaptor to the wall outlet, ensure that all other connections have been made. ● DC jack is located at the bottom panel of the set.
1 2 OR for the devices with USB cables: Insert one plug of the USB cable (not supplied) to the socket on the set. Using Remote Control IMPORTANT! – Before using the remote control, remove the insulation plastic tab as shown in the picture below. – If the remote control does not function correctly or the operating range is reduced, replace the battery with a new (CR2025) battery. Insert the other plug of the USB cable to the USB output terminal of the USB device.
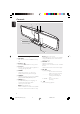
Controls English 3 2 1 98 4 5 6 7 Controls on the system 1 SD / MMC – is the slot used to insert an SD/MMC memory card. 2 USB port – jack for the external USB mass storage device. 3 iPod dock – is used to dock your iPod player for playback or recharging through this system. – 7 VOLUME +/– – – for USB/CARD/iPod ................................. fast searches back and forward within a track (press and hold). .................................
VOL +/$ 1 # – – – adjusts the volume level. adjusts the hours and minutes for the clock/timer function. switches between 12 hour and 24 hour dispaly. 0 PROG/SET TIME @ – – – (for USB/CARD) programs tracks. (for TUNER) programs radio stations. sets the clock function. ! AUX 2 3 4 ! 0 5 9 6 7 8 – selects AUX mode. @ ÉÅ – – starts or interrupts playback. confirms a selection (for iPod menu operation only). TUNING +/for TUNER ........ tunes to radio stations (down/up). .......................
Basic Functions English ➜ The display displays clock time, or --: -- is displayed if clock time is not set. ➜ The volume level (up to a maximum volume level of 12), interactive sound settings, last selected mode (ECO Power Standby or normal standby), source and tuner presets will be retained in the player's memory. Switching the system to Eco Power Standby mode ● Press and hold POWER for more than 2 seconds. ➜ The backlight will go blank.
Programming radio stations You can store up to a total of 40 radio stations (40 FM) in the memory. Automatic programming Autostore automatically starts programming radio stations from preset 1. Any previous presets e.g. manually programmed will be erased. ● Press PROG on the remote control for more than two seconds to activate programming. ➜ All available stations are programmed.
USB/Card English Using a USB mass storage device/SD/MMC memory card By connecting a USB mass storage device or SD/ MMC memory card to the Hi-Fi system, you can enjoy the device's or card’s stored music through the powerful speakers of Hi-Fi system. Playing a USB mass storage device/SD/ MMC memory card Compatible mass storage devices/cards With the Hi-Fi system, you can use: – USB flash memory (USB 2.0 or USB1.1) – USB flash players (USB 2.0 or USB1.
– For DRM protected WMA files, use Windows Media Player 10 (or later) for conversion. Visit www.microsoft.com for details about Windows Media Player and WM DRM (Windows Media Digital Rights Management). How to transfer music files from PC to a USB mass storage device/SD/MMC memory card By dragging and dropping music files, you can easily transfer your favorite music from PC to a USB mass storage device/SD/MMC memory card.
USB/Card English Different play modes: SHUFFLE and REPEAT You can select and change the various play modes before or during playback. The REPEAT modes can also be combined with PROGRAMME. SHUF ................ all the audio files are played in random order REP ALL ........... repeats all the audio files/ programme REP ...................
Playing Apple iPod using DC910 The set is equipped with a dock for iPod. By connecting Apple iPod to the set, you can listen to the sound of the docked iPod through the powerful speakers of the Hi-Fi system and view the iPod video (if available). English DOCK for iPod Playing Apple iPod 1 Correctly place the iPod in the dock. 2 Press repeatedly SOURCE on the main unit to select iPod mode (or iPod on the remote control) . 3 4 Power on your iPod.
AUX English Listening to an external source This feature allows you to listen to music from the external equipment through the powerful speakers of the Hi-Fi system. 1 Use an Aux-in cable (supplied) to connect the AUX 1 or AUX 2 jack (3.5mm, located on the bottom panel) to an AUDIO OUT or headphone jack on an external device (such as TV, Laser Disc player, DVD player or CD recorder). 2 Press SOURCE on the system repeatedly (or AUX on the remote control) to select “AUX 1” or “AUX 2”.
6 Press VOLUME +/- on the system (or VOL +/- on the remote control) to set the minutes. 7 Press PROG/SET TIME on the remote control to confirm the time. English Clock/Timer Timer setting ● The system can be used as an alarm clock, whereby the TUNER (FM)/iPod/USB/CARD (SD/MMC) is switched on at a set time (one time operation). The clock time needs to be set first before the timer can be used.
Clock/Timer English Sleep timer setting The sleep timer enables the system to switch off by itself after a set period of time. 1 In power on mode, press SLEEP on the remote control repeatedly to select a preset time. ➜ The selections are as follows (time in minutes): 120 ™ 90 ™ 60 ™ 45 ™ 30 ™ 15 ™ OFF ™ 120 … ➜ "SLEEP XX" is displayed. "XX" is the time in minutes. ➜ "SLEEP" is displayed if the sleep time you have selected is not 0FF.
AMPLIFIER Output power ....................................... 2 x 15 W RMS Signal-to-noise ratio ....................................... ≥ 70 dBA Frequency response ...... 20 Hz – 20 KHz, ± 3 dB Input sensitivity AUX ....................... 0.5 V (max. 2 V) Impedance loudspeakers ......................................... 4 Ω GENERAL INFORMATION AC Power ................................. 100 – 240 V, 50/60 Hz Dimensions (w x h x d)...500 x 165 x 120.7 (mm) Weight ...........................................
Troubleshooting English WARNING Under no circumstances should you try to repair the system yourself, as this will invalidate the warranty. Do not open the system as there is a risk of electric shock. If a fault occurs, first check the points listed below before taking the system for repair. If you are unable to remedy a problem by following these hints, consult your dealer or Philips for help. Problem Solution ✔ If the signal is too weak, adjust the antenna.
pg001-023_DC910_05_Eng 21 4/30/08, 14:04
English Meet Philips at the Internet http://www.philips.