Register your product and get support at www.philips.
Contents 1 Important Important Safety Instructions Know these safety symbols Hearing Safety 2 Your Micro System Introduction What's in the box Overview of the main unit Overview of the remote control 3 Get started Placement Prepare FM antenna Prepare the remote control Connect power Set clock Store FM radio stations automatically Turn on 4 Play Play disc Play from USB Play from iPod/iPhone Play options Adjust sound Display different information 6 6 7 7 8 8 8 8 9 11 11 11 11 11 12 12 12 13 13 13 13 14 15
Register online at www.philips.com/welcome today to get the very most from your purchase. Register online at www.philips.
PHILIPS LIMITED WARRANTY ONE (1) YEAR WARRANTY COVERAGE: PHILIPS warranty obligation is limited to the terms set forth below. WHO IS COVERED: Philips warrants the product to the original purchaser or the person receiving the product as a gift against defects in materials and workmanship as based on the date of original purchase (“Warranty Period”) from an Authorized Dealer. The original sales receipt showing the product name and the purchase date from an authorized retailer is considered such proof.
1 Important l Use only with the cart, stand, tripod, ( ! ( ( manufacturer or sold with the apparatus. When a cart is used, use caution when moving the cart/apparatus combination to avoid injury from tip-over. Important Safety Instructions a Read these instructions. b Keep these instructions. c Heed all warnings. d Follow all instructions. e Do not use this apparatus near water. f Clean only with dry cloth. g Do not block any ventilation openings.
considerations. For disposal or recycling information, please contact your local authorities or the Electronic Industries Alliance: www.eiae.org. s Where the plug of the Direct Plug-in Adapter is used as the disconnect device, the disconnect device shall remain readily operable. Know these safety symbols This 'bolt of lightning' indicates uninsulated material within your unit may cause an electrical shock. For the safety of everyone in your household, please do not remove product covering.
2 Your Micro System Overview of the main unit ab c de f g Congratulations on your purchase, and $ ! ; < = " ! support that Philips offers, register your product at www.philips.com/welcome.
f VOLUME + / Adjust volume. g Overview of the remote control Open or close the disk tray. h Disc tray i DOCK for iPod/iPhone j Display panel Show play information. k MP3-LINK Connect an external audio device. a b c CD s FM PRESET/ALBUM r l Connect USB device. Headphone socket. q d OK m MP 3 LINK n FM ANT Improve FM reception. e o DC IN Connect power.
c CD Select CD source. d / Skip to the previous or next track. Search within a track or disc. Tune to radio stations. Adjust time. n REPEAT/SHUFFLE Play a track or all tracks repeatedly. Play tracks in current album repeatedly. Play tracks randomly. o MENU/ Access iPod/iPhone menu. Stop play or erase a program. e USB/MP3 LINK Select USB or MP3 link source. p DOCK Select iPod/iPhone source. f RDS/DISPLAY Show time and play information. Have no RDS function.
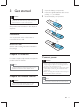
3 Get started Caution 1 2 Open the battery compartment. 3 Close the battery compartment. Insert the supplied batteries with correct polarity (+/-) as indicated. Use of controls or adjustments or performance of a procedures other than herein may result in hazardous radiation exposure or other unsafe operation. Always follow the instructions in this chapter in % * b Placement ? @ mount the unit on a wall.
Connect the power adapter to: the DC IN socket on the main unit. the wall socket. Store FM radio stations automatically When the unit turns to FM tuner mode, and no radio stations are stored, the unit begins to store FM radio stations automatically. Set clock 1 In standby mode, press and hold CLOCK SET on the remote control for two seconds. » [SET CLOCK] (set clock) scrolls on the display, then the 12/24 hour format blinks. 2 Press / format. 3 Press CLOCK SET !* » The hour digits blink.
4 Play Play from iPod/iPhone You can enjoy audio from iPod/iPhone through this unit. Play disc 1 2 3 4 Press to open the disc tray. Insert a disc with the printed side facing up. Press to close the disc tray. Press CD on the remote control to select the disc source. » [Reading] (reading) blinks for a moment, then CD starts playing automatically. If not, press . Play from USB Compatible iPod/iPhone The unit supports the following iPod and iPhone models: Made for.
Listen to the iPod/iPhone ` { 1 Make sure that the iPod/iPhone is loaded correctly. 1 2 Press SOURCE repeatedly or DOCK on the remote control to select iPod/iPhone source. 3 Play tracks in the iPod/iPhone. To pause/resume play, press . To skip to a track, press / . To search during play, press and hold / , then release to resume normal play. To go back to the previous iPod/ iPhone menu, press MENU. To scroll through the menu, press / . ! & OK.
4 Press / repeatedly to select a track, then press PROG !* 5 6 Repeat steps 3 to 4 to program more tracks. To play the programmed tracks, press » During play, [PROG] (program) is displayed. To erase the program, press playback is stopped. . when Adjust sound During play, you can adjust volume and select sound effects.
5 Listen to FM radio Tune to FM radio stations Program FM radio stations manually 1 2 In tuner mode, tune to an FM radio station. 3 Press / number. 4 5 Press PROG [ Note Position the antenna as far as possible from TV, VCR, or 1 2 other radiation source. Ensure that you have connected and fully extended the supplied FM antenna. Press FM to select FM tuner mode. Press and hold / for 3 seconds. » [SEARCH] (search) is displayed. Press PROG to activate programming mode.
6 Other features Tip If CD/USB/iPod source is selected, but no disc is inserted or no USB/ipod/iPhone connected, the unit switches to the tuner source automatically. Set the alarm timer This unit can be used as an alarm timer. You can select CD, FM tuner, iPod/iPhone, or USB as alarm source. Note Make sure that you have set the clock correctly. Note Make sure that you have set the clock correctly. 1 In standby mode, press and hold TIMER until [SET TIMER] (set timer) scrolls on the display.
7 Product information Note Product information is subject to change without prior Sensitivity - Mono, 26dB S/N Ratio - Stereo, 46dB S/N Ratio Search selectivity Total harmonic distortion Signal to noise ratio Number of presets <22 dBf <50 dBf >28 dBf <3% >50 dB 20 notice. General information AC power & * Max. Output Power ~ % = Signal to Noise Ratio MP3 Link Input 15 W RMS 80 Hz - 16 kHz, ± 3 dB 0.
File name in Unicode UTF8 (maximum length: 16 bytes) Unsupported formats: Empty albums: an empty album is an album that does not contain MP3/ & " $ display. ! * For example, Word documents (.doc) ; $ * ignored and not played. >& & ;> {*$ J& *! & .m4p, .mp4, .
8 Troubleshooting Warning Never remove the casing of this device. To keep the warranty valid, never try to repair the system yourself. If you encounter problems when using this device, check the following points before % [ J * " ! ! unsolved, go to the Philips Web page (www.philips.com/support). When you contact Philips, make sure that the device is nearby and the model number and serial number are available.
9 Notice Please visit www.recycle.philips.com for additional information on a recycling center in your area. = [ ! ! device that are not expressly approved by Philips Consumer Lifestyle may void the user’s = % ! * Environmental information All unnecessary packaging has been omitted. We have tried to make the packaging easy to separate into three materials: cardboard (box), polystyrene foam (buffer) and polyethylene (bags, protective foam sheet.
Philips Consumer Lifestyle A division of Philips Electronics North America Corporation P.O. Box 10313 Stamford, CT 06904 Phone: 1-888-PHILIPS (744-5477) Meet Philips at the Internet http://www.philips.com/welcome Specifications are subject to change without notice © 2012 Koninklijke Philips Electronics N.V. All rights reserved. DCM2055_37_UM_V1.