Doc_DSR300.
Doc_DSR300.qxd 29/11/04 13:18 Page 2 Safety instructions English All the safety and operating instructions should be read and understood before operating the receiver. For best results: - Position your receiver away from radiators or other heat sources. - Leave a space of at least 3 cm around the receiver for ventilation, making sure that the ventilation holes are not obstructed.
Doc_DSR300.qxd 29/11/04 13:18 Page 3 Quick installation guide Satellite Dish Antenna English Connecting to a TV and a VCR/DVD player using SCART Support to AC outlet Satellite Receiver Cable or Off-air Antenna TV set VCR/DVD IN FROM ANT OUT TO ANT EXT 1 SCART EXT 2 Note: for best DVD/VCR viewing, connect the DVD/VCR SCART EXT 1 directly to a SCART of the TV set.
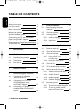
Doc_DSR300.qxd 29/11/04 13:18 Page 4 TABLE OF CONTENTS English Safety instructions 2 For best results 2 Mains connection 2 Meaning of symbols 2 Quick installation guide 3 Connecting to a TV and a VCR/DVD player using SCART Support 3 5 First installation 15 5.1 Menu language and port selection 15 5.2 Channel scanning 16 5.3 Scanning failure 16 5.3.1 Antenna Setting 17 5.3.
6.7.3 6.7.4 29/11/04 13:18 Page 5 To delete a running timer while watching digital TV or listening to digital radio 21 To delete a running timer set while the receiver was in standby 21 7 Menu 22 7.1 General information 22 7.1.1 Basics about menu navigation 22 7.1.2 Cancel/Store changes 7.2 7.3 7.5 26 7.5.1 Recording timer 27 7.5.2 Reminder 28 7.5.3 Sleep timer 28 7.6 Setup menu 28 7.6.1 Time Setting 28 7.6.2 System Setting 29 7.6.3 Remote Control setting 29 7.
Doc_DSR300.qxd 1 29/11/04 13:18 Page 6 Introduction English Thank you for buying this product from Philips and congratulations! The Philips Digital Satellite Receiver allows you to view a wide variety of free-to-air satellite channels with the best digital picture and sound quality.
Doc_DSR300.qxd 13:18 Page 7 Product description 2.1 Unpacking the product Unpack the receiver and check to make sure that all of the following items are included in the package: - 1 x Remote Control Unit 1 x User Manual 2 x AA batteries 1 x SCART Cable 1 x Power Cord. 1 x Warranty booklet Plastic bags can be dangerous. Keep the bag away from babies and children to prevent suffocation. The symbol on the packaging and User Manual means that the materials are recyclable.
Doc_DSR300.qxd 2.2 29/11/04 13:18 Page 8 Front panel English Q WE R 1 STANDBY button: ........................ Switch the receiver OFF. 2 Red LED indicator: ........................ Display receiver status (see status indicator table). 3 Green LED indicator: 4 Remote control receiver window. ..................... Display receiver status (see status indicator table).
Doc_DSR300.qxd 13:18 Page 9 Rear panel English 2.3 29/11/04 Q W E 1 LNB IN (*): ............................. 2 RF OUT (*): ............................ 3 VCR (*): 4 SERIAL (*): 5 TV (*): 6 L/R AUDIO OUT (*): 7 DIGITAL OPTICAL OUT (*): 8 230V~50Hz 20W max (**): ................................. R T Y U I Connect the coaxial cable from the satellite dish antenna. Refer to chapter 5 for recommended connection diagrams.
Doc_DSR300.qxd 3 29/11/04 13:18 Page 10 Remote control Standby - Standby V English Mute - Audio mute RED, GREEN,YELLOW, BLUE FAV - Toggle between favourite lists SUBTITLE - Temporarily starts/stops or change Audio Subtitling I-II - Temporary update of audio language and selection of audio mode (blue) resp.
29/11/04 13:18 Page 11 English Doc_DSR300.qxd Do not dispose of the batteries with your household waste. The Philips batteries supplied with your receiver’s remote do not contain heavy metals such as Mercury or Lead Cadmium. Nevertheless, in many countries, exhausted batteries cannot be disposed of with your household waste. Please enquire about the local regulations concerning the disposal of used batteries.
Doc_DSR300.qxd 4 29/11/04 13:18 Page 12 Connecting your receiver English There are several ways you can connect and incorporate your digital receiver into your existing audio/video equipment set-up. Warning! Before starting to connect: - Unplug all equipment (TV set as well as the VCR and/or DVD if required) from the mains. - Do not connect your digital receiver to mains supply now.
Doc_DSR300.qxd 13:19 Page 13 Connecting to a TV and a VCR/DVD player using the SCART Support English 4.2 29/11/04 Satellite Dish Antenna to AC outlet Satellite Receiver Cable or Off-air Antenna TV set IN FROM ANT OUT TO ANT VCR/DVD EXT 1 EXT 2 SCART Note: for best DVD/VCR viewing, connect the DVD/VCR SCART EXT 1 directly to the TV SCART.
Doc_DSR300.qxd 4.3 29/11/04 13:19 Page 14 Connecting to a Digital Amplifier/Home Theatre/HiFi system English to AC outlet Satellite Receiver A B Audio equipment Analogue input AUDIO L R Digital input Analogue connection (A) Connect the L/R audio output sockets to the relevant L/R audio input sockets of your audio equipment using a double CINCH cable (not supplied). Consult the user manual of your audio equipment to choose the proper analogue audio inputs.
Doc_DSR300.qxd 5 29/11/04 13:19 Page 15 First installation 5.1 English Requirements for fast and successful start-up are as follows: - you already have a satellite antenna installed; - your antenna is correctly pointed at the applicable satellite transponders (Astra, Hotbird, Eutelsat, …); - your receiver is connected to the antenna,TV set and other equipment according to the diagrams in chapter 4. Switch ON the receiver and TV set.The welcome screen appears.
Doc_DSR300.qxd 29/11/04 13:19 Page 16 5.2 Channel scanning English During the scanning process, the following information is reported on screen: - the number of TV and Radio channels detected, - the scanning progress, indicated as a percentage, - the strength of the signal and the quality of reception. Note: if you press during the scanning process, you interrupt the scanning and return to the Easy installation screen.
Doc_DSR300.qxd 5.3.1 29/11/04 13:19 Page 17 Antenna Setting 5.3.2 English - To continue, press .The Antenna Setting screen appears to help you with the installation process and to adjust your settings if needed. - Choose a satellite for the applicable port and enter the LNB type (universal by default) and LNB frequencies.You can test the signal by pressing the key of the remote control. - Press to start scanning again.
Doc_DSR300.qxd 6 29/11/04 13:19 Page 18 General Viewing Function English This section describes the basic functions available while watching satellite TV or listening to satellite Radio. For general menu navigation information, see Basics about menu navigation. 6.1 Receiver wake up Your receiver is in standby.To wake it up, press any of the following on the remote control: - numerical keys, - /. Note: the Standby button can only be used to switch the receiver off. 6.
Doc_DSR300.qxd 13:19 Page 19 Using the channel list - For a complete overview of the available channels while watching satellite TV or listening to satellite radio, press on the remote control. A channel list is displayed on the left-hand side of the screen. Note: if you press , the channel list disappears. - To select a channel, scroll up or down this channel list, and then press to watch it. 6.
Doc_DSR300.qxd 29/11/04 13:19 Page 20 6.6.2 Audio Control English - To access audio settings, select the Setup menu from the main menu, then select System Setting.The System Setting screen appears. - Select Audio Output. Default Audio Output setting is Stereo. - Select the desired value (Left, Right, Mono, or Stereo) and press to save your changes and exit the screen. 6.6.3 Audio language To select your preferred audio language: - Select System Setting from the main menu.
29/11/04 13:19 Page 21 - Press the colour key to set a recording timer on the selected programme. Alternatively, press the colour key to set a reminder on the programme. - Enter your PIN code if necessary, and then set the timer type as appropriate. By default, other settings correspond to the selected programme. - Press to confirm and exit the screen. 6.7.
Doc_DSR300.qxd 7 29/11/04 13:19 Page 22 Menu English 7.1 General information The Menu gives access to all the functions of your receiver: o Guide o Channel Manager o Parental Control o Timer Manager o Set-up Menu o Installation. 7.1.1 Basics about menu navigation While watching TV or listening to the radio: - Press
Doc_DSR300.qxd 29/11/04 13:19 Page 23 English To view EPG data: - Press on your remote control when watching a channel, or select the Guide item from the Menu and press . - Highlight the name of the programme for which you want more detailed information. - Press the key of the remote control once to get extended information (programme description) and once again to close it. - Press to view the corresponding channel.
Doc_DSR300.qxd 29/11/04 13:19 Page 24 7.3.1 Channel Pool English Select Channel POOL and press to access the Channel Pool screen. In this screen, you can: o delete channels from the channel list, o move channels to a different position in the list, o lock channels, o sort channels. 7.3.1.1 To delete channels from the Channel Pool The Delete feature is used to permanently delete a channel. - Press the colour key of the remote control to enable the feature.
Doc_DSR300.qxd 29/11/04 13:19 Page 25 English - Select the channel you want to lock by pressing . The selected channel is marked with this . Press again to cancel selection.You are prompted to confirm the changes when you exit the screen. Note: you can only use this function once you have set up your Pin Code in the Parental Control part of the Setup Menu. 7.3.1.4 To sort channels in the pool The Sort feature is used to sort channels.
Doc_DSR300.qxd 29/11/04 13:19 Page 26 7.4 Parental Control English Parental Control is used to: - Block access to your receiver and its Menu; - Specify a parental rate to protect access to programmes using a PIN code in case the parental rate transmitted with such programmes is higher than the rate you set; - Enable channel lock using a Pin Code in order to prevent children from watching these channels. You must enter your 4-digit Pin Code to access the various settings. 7.4.
Doc_DSR300.qxd 29/11/04 13:19 Page 27 7.5.1 English To be able to record a digital channel using a VCR or DVD recorder, you must set both your recorder and receiver: - You must set a timer on your receiver. - You must also enable recording on the VCR or DVD recorder (refer to the VCR or DVD recorder user manual). Recording timer Select the Record Timer item from the Timer sub-menu or press the key of the to access the remote control to access Recorder screen.
Doc_DSR300.qxd 29/11/04 13:19 Page 28 7.5.2 Reminder English When you set a reminder for a particular programme, the receiver sends a warning at the start of that programme and switches automatically to the right channel if you accept the reminder message. Select the Reminder item from the Timer sub-menu to access the Reminder screen. To activate a reminder: - Set the values of the reminder parameters using the arrow keys or numerical keys as appropriate. - Press to confirm.
Doc_DSR300.qxd 29/11/04 13:19 Page 29 English which the selected value is valid are displayed at the bottom of the screen. - Press to store the selected value and go back to the previous screen or to cancel and the screen. In case the information supplied by the satellite is not correct, the Time Setting screen is used to set the actual date and time using the arrow or numerical keys of the remote control as appropriate. 7.6.
Doc_DSR300.qxd 29/11/04 13:19 Page 30 English To change the setting of your receiver: - Press
Doc_DSR300.qxd 7.7 29/11/04 13:19 Page 31 Installation English The Installation sub-menu includes the following items: o Antenna Setting o Add Service o Signal Test o Product Identifier o Factory Default o Software Update. 7.7.1 Antenna Setting This feature is used to set the antenna settings. - Select Antenna Setting from the Installation menu to access the Antenna Setting screen. Note: access to this menu can be protected by Pin Code.
Doc_DSR300.qxd 29/11/04 13:19 Page 32 7.7.2 Add Service English This feature is used to search for new channels. - Select Add Service from the Installation menu to access the Add Service screen. - Select values for the following: • Port: up to 4 ports Note: this item is used to configure the DiSEqC option for multiple LNBs. • Satellite: select the appropriate satellite using arrow keys. • Transponder: select a transponder to perform a search for this particular transponder.
Doc_DSR300.qxd 29/11/04 13:19 Page 33 English • LNB Freq. 2: set automatically according to the satellite and LNB Type selected. • Frequency: frequency value corresponding to the selected transponder or entered manually using numerical keys. • Symbol Rate: symbol rate value corresponding to the selected transponder or entered manually using numerical keys.
Doc_DSR300.
29/11/04 13:19 Page 35 English Doc_DSR300.
Doc_DSR300.qxd 9 29/11/04 13:19 Page 36 Troubleshooting English Please be aware that new software may change the functionality of your receiver. Should you experience any difficulties with the operation of the receiver, please consult the relevant section of this manual, including this Troubleshooting section. If the problem cannot be solved, call your dealer or a customer service adviser. Symptom The display on the front panel does not light up.
29/11/04 13:19 Symptom Intermittent reception. Page 37 Cause Remedy Faulty connections Check all connections and cable. Incorrect dish pointing Adjust the dish pointing. Fasten the antenna securely. TV SCART output format not set to RGB Change the setting of the TV SCART item to RGB from the System Setting menu. TV SCART not connected to the RGB-capable SCART socket of your TV set. Refer to your TV User Manual. Inappropriate TV SCART Use the SCART cable supplied with your receiver.
Doc_DSR300.qxd 29/11/04 13:19 Page 40 © Koninklijke Philips Electronics N.V. 2004 All rights reserved www.philips.