
User Manual


INSTALLATION
9
The mains socket-outlet shall be installed
near the equipment and shall be easily
accessible.
1
Before connecting the speakers
, insert
the supplied CD-ROM into the CD-ROM
drive.
If AUTOPLAY is not enabled on the
CD-ROM:
2 Select the icon “MY COMPUTER” and double
click.
3 Select the icon for your CD-ROM drive and
double click.
4 Run “
WELCOME.EXE” and proceed to step 5.
If AUTOPLAY is enabled on the CD-ROM:
5 Push the installed “PLUG WORKS” software
suite.
6 Follow the on-screen instructions.
7 Reboot the system as requested.
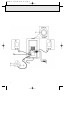
Setting up the speakers
8 Connect the satellite speakers and remote
control to the subwoofer.
9 Connect the subwoofer power cord to the
wall socket
(the voltage mentioned on the
label of the subwoofer must match the local
power voltage)
.
10 Connect the USB cable to the USB port on
the computer.
Note: After plugging in the USB cable for
the first time, it will take about 1
minute for the system to install the
drivers (it will run in the background,
please do not switch off your system
during this period).
You must connect the audio in of the subwoofer
with the sound card/analog device.
Use the following procedure if a soundcard is
installed on your Windows 98 system. This
should enable audio playback via the USB.
1 Choose the
START button in the task bar.
2 Point to
SETTINGS and choose CONTROL
PANEL
.
3 Double-click the
MULTIMEDIA icon.
4 Select the
AUDIO tab.
5 Under
PREFERRED DEVICE, select DSS330
USB AUDIO.
6 Select the
USE ONLY PREFERRED DEVICE
check box on the bottom of the tab.
7 Choose the
OK button.
Note: For more information read the readme.txt
on the CD ROM.
Windows 98 Digital Audio Playback
Analog Audio Playback
Installing the Speaker System
English
DSS330/17 26/4/99 10:52 am Page 9