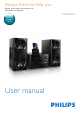
Always there to help you Register your product and get support at www.philips.
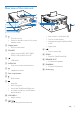
Contents 1 Safety and Notice Safety Notice 2 2 3 2 Your Docking Entertainment System 4 Introduction What's in the box Overview of the main unit Overview of the remote control 3 Get started Connect FM antenna Connect speakers Connect power Prepare the remote control Set clock Store radio stations automatically Turn on 4 Play Play from disc Play iPod/iPhone/iPad Play from USB Play from a Bluetooth device 5 Play options Pause/resume play Stop play Skip to a track Search within a track Select repeat/shu
1 Safety and Notice • • • Read and understand all instructions before you use this product. If damage is caused by failure to follow the instructions, the warranty does not apply. Safety Safety Do not insert warped or cracked discs into the disc compartment. Remove the discs from the disc compartment if you are not using the product for an extended period of time. Only use microfiber cloth to clean the product.
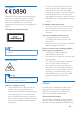
Compliance Hereby, WOOX Innovations declares that this product is in compliance with the essential requirements and other relevant provisions of Directive 1999/5/EC. You can find the Declaration of Conformity on www.philips.com/ support. This apparatus includes this label: Note •• The type plate is located on the bottom of the apparatus. Hearing safety Warning • Sound can be deceiving. Over time your hearing 'comfort level' adapts to higher volumes of sound.
polystyrene foam (buffer) and polyethylene (bags, protective foam sheet.) Your system consists of materials which can be recycled and reused if disassembled by a specialized company. Please observe the local regulations regarding the disposal of packaging materials, exhausted batteries and old equipment. 2 Your Docking Entertainment System Congratulations on your purchase, and welcome to Philips! To fully benefit from the support that Philips offers, register your product at www.philips.com/welcome.
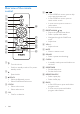
Overview of the main unit m l k j i a h b g n o p c d e f a • • b Display panel • Show current status. c SOURCE • Select a source: DISC, FM TUNER, DOCK, USB, AUDIO IN or BT. d • USB socket. e AUDIO IN • Connect an external audio device. f • • • • Turn the unit on. Switch to standby mode or Eco power standby mode. Headphone socket. l • Search within a track/disc/USB. Tune to a radio station. Navigate through iPod/iPhone/iPad menu. Adjust time. • Start or pause play.
Overview of the remote control f a b DOCK c d FM CD AUDIO IN PRESET/ALBUM USB r e f g MENU VOL h DISPLAY RDS SHUFFLE i MUTE REPEAT SOUND CLOCK PROG TIMER j k q p o n m SLEEP l / In Disc/USB/Dock source, press to skip to the previous/next track. • In Disc/USB/Dock source, press to search within a track. • In tuner source, press to tune to a radio station. • Set clock and timer. • g PRESET/ALBUM / • Skip to the previous/next album. • Select a preset radio station.
o RDS/DISPLAY • Select RDS broadcast information. • Synchronize clock with RDS station. • Select display information during play. • Adjust display brightness in standby mode. p • Start or pause play. q MENU/ • Access the iPod/iPhone/iPad menu. • Stop play or erase a program. r USB/AUDIO IN • Select the USB source. • Select an external audio device source.
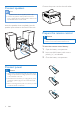
Connect speakers Connect the power cord to the wall outlet. Note •• For optimal sound, use the supplied speakers only. •• Connect only speakers with impedance that is the same or higher than the supplied speakers. Refer to the Specifications section of this manual. Insert the speaker wires completely into the speaker input sockets on the back of the unit. Prepare the remote control Caution •• Risk of explosion! Keep batteries away from heat, sunshine, or fire. Never discard batteries in fire.
3 Note •• If you are not going to use the remote control for a long time, remove the battery. •• Batteries contain chemical substances, so they should be disposed of properly. Turn on Set clock 1 In standby mode, press and hold CLOCK for more than two seconds to activate the clock setting mode. »» The 12 hour or 24 hour format is displayed. 2 Press / to select 12 hour or 24 hour format, and then press CLOCK. »» The hour digits are displayed and begin to blink.
4 Play Load the iPod/iPhone/iPad Insert the iPod/iPhone/iPad in the dock. Play from disc 1 Press CD/FM on the remote control repeatedly to select CD source. 2 Insert a disc into the disc compartment with the printed side facing up. »» The file starts playing automatically. If not, press . • Press to take the disc out of the disc tray. Listen to the iPod/iPhone/iPad Note •• Make sure that your iPod/iPhone/iPad has been loaded securely.
Charge the iPod/iPhone/iPad When the unit is connected to power, the docked iPod/iPhone/iPad begins to charge automatically. Remove the iPod/iPhone/iPad Pull the iPod/iPhone/iPad out of the dock. Play from USB Note •• Ensure that the USB device contains playable audio content. 1 Press CD/FM repeatedly on the remote control or press SOURCE repeatedly on the main unit to select the USB source. 2 Insert the USB device into the (USB) socket on the back of the unit.
5 Play options • • 2 Pause/resume play During play, press to pause/resume play. REP ALB: all tracks in this album are played repeatedly. SHUF: all tracks are played randomly. To resume normal play, press REPEAT/SHUFFLE until no option is displayed. Program tracks You can program a maximum of 20 tracks. Stop play 1 Skip to a track In CD/USB mode, at the stop position, press PROG to activate the program mode. »» [PROG] (program) blinks on the display. 2 For CD: For MP3 tracks, press album.
6 Listen to the radio Tune to a radio station Program radio stations manually 1 2 Tune to a radio station. 3 Press / to allocate a number (1 to 20) to this radio station, and then press PROG to confirm. »» The preset number and the frequency of the preset station are displayed. 4 Repeat the above steps to program other stations. Tip •• For optimal FM reception, fully extend and adjust the position of the FM antenna. 1 Press CD/FM repeatedly to select the tuner source.
7 Adjust sound 8 Other features Adjust volume Set the sleep timer During play, press VOL +/- to increase/decrease the volume. This docking system can switch to standby automatically after a set period of time. 1 Select a preset sound effect During play, press SOUND repeatedly to select: • [BALANCED] (balanced) • [CLEAR] (clear) • [POWERFUL] (powerful) • [WARM] (WARM) • [BRIGHT] (bright) Mute sound During play, press To deactivate sleep timer 1 to mute or restore sound.
»» The minute digits are displayed and begin to blink. 5 6 Press / to set the minute. Press SLEEP/TIMER to confirm. »» The alarm timer is set and activated. Note •• Product information is subject to change without prior Note •• To exit the alarm timer setting without storing, press MENU/ 9 Product information notice. . Activate and deactivate the alarm timer In standby mode, press SLEEP/TIMER repeatedly to activate or deactivate the alarm timer.
Sensitivity <22 dBf - Mono, 26dB S/N Ratio <43 dBf - Stereo, 46dB S/N Ratio Search Selectivity Total Harmonic Distortion Signal to Noise Ratio <28 dBf <3% >50 dB Speakers Speaker Impedance Speaker Driver Sensitivity 6 ohm + 12 ohm x 2 4" woofer x 2 + 20mm tweeter 83 dB/m/W General information AC power Operation Power Consumption ECO Standby Power Consumption USB Direct Load of USB Dimensions - Main Unit (W x H x D) Weight 100 - 240 V, 50/60 Hz 58 W < 0.5 W Version 2.0/1.
10 Troubleshooting Warning •• Never remove the casing of this apparatus. To keep the warranty valid, never try to repair the system yourself. If you encounter problems when using this unit, check the following points before requesting service. If the problem remains unsolved, go to the Philips web site (www.philips.com/support). When you contact Philips, ensure that the unit is nearby and the model number and serial number are available.
Music playback unavailable after successful connection •• The Bluetooth-enabled device is incompatible with the unit. Bluetooth-enabled device connection error •• The device does not support the profiles required for the unit. •• The unit already connected with another Bluetooth-enabled device. Disconnect that device or all other connected devices and then try again. The paired mobile phone connects and disconnects constantly •• The Bluetooth reception is poor.
EN 19
Specifications are subject to change without notice 2014 © WOOX Innovations Limited. All rights reserved. Philips and the Philips’ Shield Emblem are registered trademarks of Koninklijke Philips N.V. and are used by WOOX Innovations Limited under license from Koninklijke Philips N.V. DTM3170_12_UM_V2.