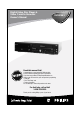
Digital Video Disc Player & Video Cassette Recorder Owner’s Manual DV900VHS Read this manual first! Congratulations on purchasing this Philips product. We’ve included everything you need to get started. If you have any problems, Philips Representatives can help you get the most from your new product by explaining: • Hookups, • First Time Setup, and • Feature Operation. Do not attempt to return this product to the store.
Return your Warranty Registration card today to ensure you receive all the benefits you’re entitled to. Once your PHILIPS purchase is registered, you’re eligible to receive all the privileges of owning a PHILIPS product. So complete and return the Warranty Registration Card enclosed with your purchase at once. And take advantage of these important benefits.
Safety and General Information 3 Safety Precautions Warning: To prevent fire or shock hazard, do not expose this equipment to rain or moisture. Federal Communications Commission (FCC) Warning: Any unauthorized changes or modifications to this equipment void the user’s authority to operate it. Department of Health and Human Services (DHHS) Certification: Complies with 21 Center for Radiation (CFR) chapter 1 subchapter J applicable at time of manufacture. Laser Safety This unit employs a laser.
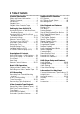
Table of Contents General Information Safety and General Information Table of Contents . . . . . . . . . . Introduction . . . . . . . . . . . . . . Playable Discs . . . . . . . . . . . . . Playable Video Cassette Tapes . . . . . . . . . . . . . . . . . . . . . . . . . . . . . . .3 .4 .5 .6 .7 Setting Up Your DVD/VCR Hookups Without a Cable Box/Direct Broadcast System . . . . . . . . . . . . . . .8-9 Hookups With a Cable Box/Direct Broadcast System . . . . . . . . . . . . .10-11 Optional Hookups .
Introduction 5 Welcome! This DVD/VCR combines a Digital Video Disc (DVD) Player and a Hi-Fi Video Cassette Recorder (VCR) into one unit, allowing you to play DVDs, Audio Compact Discs (Audio CDs), and video cassette tapes from one piece of equipment. The DVD Player of this DVD/VCR will allow you to enjoy better picture quality, clearer sound, and endless playback features available on DVDs.
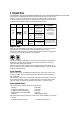
Playable Discs This DVD/VCR will play Digital Video Discs (DVDs) and Audio CDs. In order to play a DVD or Audio CD on this DVD/VCR, make sure the Disc meets the requirements for Region Codes and Color Systems as described on this page. Also, the Discs should be labelled with the following logos and should meet these standards. Disc Type Logo Digital Video Disc Audio CD Contents Disc Size 12 cm Approx. 4 hours (single-sided) Approx. 8 hours (double-sided) 8 cm Approx.
Playable Video Cassette Tapes 7 Playable Video Cassette Tapes This DVD/VCR is equipped with a High Quality (HQ) system and is compatible with existing Video Home System (VHS) equipment. Philips Consumer Electronics recommends that you use only video cassette tapes which are labeled with the mark. The use of other tapes may result in poor picture quality and excessive deposits on the video heads, which may not be covered by the warranty if damage occurs.
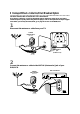
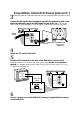
Hookups Without a Cable Box/Direct Broadcast System The basic antenna/cable to DVD/VCR to TV is shown below. If you have a Cable Box or a Direct Broadcast System, please see pages 10-11. For better sound and picture quality when using the DVD player, refer to the Optional Hookups on pages 12-14. After you hook up the DVD/VCR, go to page 16 to turn on the DVD/VCR. 1 Disconnect the antenna or cable from your TV.
Hookups Without a Cable Box/Direct Broadcast System (cont’d) 9 3 Connect the RF coaxial cable (supplied) to the ANT-IN (Antenna In) Jack on the back of the DVD/VCR and to the ANTENNA IN Jack on the TV. (You may use either a snap-on type (supplied) or screw-on type of coaxial cable, whichever you prefer.) Cr ANT-IN Antenna or Cable 75 ANT CAB / LE 75‰ ANT / CABLE ANT-OUT CH3 CH4 RF coaxial cable ANTENNA IN Jack (on back of TV) example only 4 5 Plug in the TV and the DVD/VCR.
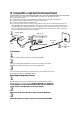
Hookups With a Cable Box/Direct Broadcast System There are two ways to connect your Cable Box/DBS to the DVD/VCR. With this connection: ● You may view any channel. ● You must select channels at the Cable Box/DBS. Channels cannot be changed at the DVD/VCR. ● You may not view a channel other than the one you are recording. ● You may not program channels at the DVD/VCR. ● You can only program a timer recording for one channel at a time.
Hookups With a Cable Box/Direct Broadcast System (cont’d) 11 With this connection: ● You may watch one channel while recording another. ● You may not record scrambled channels. DVD/VCR 1 IN ANT-IN L AUDIO R 2 DVD/VCR OUT DVD/VCR AUDIO OUT Cable Signal 75 ANT CAB / LE L ANT-OUT VIDEO Cable Box/DBS R IN OUT CH3 CH4 RF coaxial cable RF coaxial cable 3 TV’s ANTENNA IN Jack Connections 1 Connect a Cable signal to the DVD/VCR’s ANT-IN (Antenna In) Jack.
Optional Hookups You may connect the DVD/VCR several different ways, depending on your existing equipment and your preferences for sound and picture quality. To determine which hookup is best for you, examine the options on the following pages, then see which best matches your situation. Before you hook up the DVD/VCR, remember: ● Connect the DVD/VCR directly to a TV. If you connect the DVD/VCR to a VCR, then connect the VCR to the TV, the picture may be distorted by the copyright protection system.
Optional Hookups (cont’d) 13 Connecting to a TV and a Stereo TV has Component Video In Jacks ● Set DOLBY DIGITAL and DTS to OFF on the DVD/VCR. Details are on pages 68-69. If you play a DVD when the settings are wrong, the sound will be distorted or you may damage the speakers.
Optional Hookups (cont’d) Connecting to a Dolby Digital Decoder, DTS Decoder, or Amplifier Some Discs are recorded in a 5.1 channel Dolby Digital Surround or Digital Theater System (DTS) Surround format. These Discs will sound best if you connect the DVD/VCR to a Dolby Digital or DTS Decoder. ● You will need a coaxial digital audio cable or an audio optical cable (not supplied). See Helpful Hints below. ● If you use the OPTICAL jack, remove the protective cap.
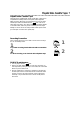
Remote Control Setup 15 Putting Batteries in the Remote Control 1 Remove the battery compartment lid on the bottom of the remote control by pressing the tab, then lifting the lid. 1 2 Place two AA batteries inside the battery compartment with their + and – ends aligned as indicated. 3 2 Replace the battery compartment lid. Using the Remote Control ● ● Point the remote control at the DVD/VCR’s remote sensor (see page 26) when using the remote control to operate the DVD/VCR.
Turning on Your DVD/VCR Before turning on your DVD/VCR, make sure batteries are in the remote control and the DVD/VCR and TV are connected correctly. ● You can not program channels if you are using a Cable Box or a Direct Broadcast System. 1 2 1 Press the VCR button, then press the POWER button. “HELLO” will appear briefly on the front of the DVD/VCR. The VCR light, the VCR/TV light, and the POWER light will appear on the front of the DVD/VCR. Turn on the TV.
Automatic Channel Setup 17 Although your DVD/VCR may automatically memorize the channels you receive when you turn it on for the first time, this function lets you set up the channels again. ● Before you begin, place the DVD/VCR in VCR mode. Press the DVD/VCR OUTPUT button so that the green VCR light appears on the front of the DVD/VCR. Press the VCR/TV button so that the VCR/TV light appears on the front of the DVD/VCR.
Automatic Channel Setup (cont’d) Adding/Deleting Channels ● Before you begin, place the DVD/VCR in VCR mode. Press the DVD/VCR OUTPUT button so that the green VCR light appears on the front of the DVD/VCR. Press the VCR/TV button so that the VCR/TV light appears on the front of the DVD/VCR. POWER 1 TIMER SET DVD/VCR OUTPUT VCR/TV Press the VCR button, then press the MENU button. SELECT op CHOOSE B → PROGRAM VCR SET UP TUNER SET UP SET CLOCK MEMORY VCR DVD 2-5 PLAY REW 1 F.
Automatic Channel Setup (cont’d) 19 Reviewing Memorized Channels ● Before you begin, place the DVD/VCR in VCR mode. Press the DVD/VCR OUTPUT button so that the green VCR light appears on the front of the DVD/VCR. Press the VCR/TV button so that the VCR/TV light appears on the front of the DVD/VCR. 1 POWER Press the VCR button, then press the MENU button. SELECT op CHOOSE B → PROGRAM VCR SET UP TUNER SET UP SET CLOCK TIMER SET DVD/VCR OUTPUT VCR/TV VCR DVD 2-3 PLAY REW F.
Setting the Clock Follow the steps below to set the clock for the VCR. Make sure: ● The DVD/VCR is on and the VCR/TV light appears on the display panel. (If it does not, press the VCR/TV button once.) ● You make each entry within 60 seconds of the previous entry. ● Before you begin, place the DVD/VCR in VCR mode. Press the DVD/VCR OUTPUT button so that the green VCR light appears on the front of the DVD/VCR. Press the VCR/TV button so that the VCR/TV light appears on the front of the DVD/VCR.
Daylight-Savings Time 21 You may program the DVD/VCR so the VCR clock will automatically move forward one hour in April and turn back one hour in October. Daylight-Savings Time is set to ON when you receive your DVD/VCR. Turn Daylight-Savings Time ON or OFF by following the steps below. Before you begin: ● Make sure the clock is set. ● Before you begin, place the DVD/VCR in VCR mode. Press the DVD/VCR OUTPUT button so that the green VCR light appears on the front of the DVD/VCR.
Language Selection (VCR) Follow the steps below to change the language of the VCR onscreen displays and menus. ● Before you begin, place the DVD/VCR in VCR mode. Press the DVD/VCR OUTPUT button so that the green VCR light appears on the front of the DVD/VCR. Press the VCR/TV button so that the VCR/TV light appears on the front of the DVD/VCR. POWER 1 TIMER SET DVD/VCR OUTPUT VCR/TV Press the VCR button, then press the MENU button.
On-Screen Status Displays (VCR) 23 A status display will appear when you press the DISPLAY/STATUS/EXIT button or certain function buttons. The contents of the status display will vary. To choose the status display mode, follow the steps below. ● Before you begin, place the DVD/VCR in VCR mode. Press the DVD/VCR OUTPUT button so that the green VCR light appears on the front of the DVD/VCR. Press the VCR/TV button so that Receiving and Recording Mode the VCR/TV light appears on the front of the DVD/VCR.
DVD/VCR Display - DVD Features Display Messages about current DVD operations appear here. See Display Messages below. DVD Light (red) This light appears when the DVD/VCR is in DVD mode. You can only watch DVDs when the DVD light is on. To make the DVD light come on, press the OUTPUT button on the front of the DVD/VCR. POWER OPEN/CLOSE VIDEO TIMER SET OUTPUT DVD L VCR CHANNEL VCR/TV CST.IN STOP PLAY Disc loading tray Insert a Disc here. STOP/EJECT REW PLAY F.
DVD/VCR Display - VCR Features 25 Cassette Compartment Insert a tape here. POWER OPEN/CLOSE VIDEO TIMER SET OUTPUT DVD L VCR CHANNEL VCR/TV CST.IN STOP PLAY STOP/EJECT REW PLAY F.FWD AUDIO R RECORD POWER VIDEO TIMER SET L VCR CHANNEL VCR/TV CST.IN STOP/EJECT VCR Light (Green) This light appears when the DVD/VCR is in VCR mode.You can only watch tapes when the VCR light is on. To make the VCR light come on, press the OUTPUT button on the front of the DVD/VCR. REW PLAY F.
Front Panel POWER Button Press to turn the power on and off. TIMER SET Button Press to put the DVD/VCR into standby mode for a timer recording. Details are on page 38. CHANNEL Buttons In VCR mode, press to change channels at the DVD/VCR. Or, press to adjust the tracking of a tape during normal playback or slow motion playback. Also, press to remove vertical jitter in a Still picture. Details are on page 45. RECORD Button Press once to start a recording. Press repeatedly to start a One-Touch Recording.
Rear Panel 27 ANT-IN (Antenna In) Jack Connect your antenna or cable here. Details are on pages 8-14. AUDIO IN Jacks Connect audio cables coming from the audio out jacks of a camcorder, another VCR, or an audio source here. Details are on page 40. DVD/VCR AUDIO OUT Jacks Connect the supplied audio cables here and to the Audio In jacks of a television or other audio equipment. Details are on pages 12-14.
Remote Control Buttons DVD/VCR OUTPUT Button Press to select DVD mode or VCR mode. The DVD light will appear on the front of the DVD/VCR when it is in DVD mode. The VCR light will appear on the front of the DVD/VCR when it is in VCR mode. For video tape playback, also make sure the VCR/TV light is on. Details are on page 32. POWER Button Press to turn the power on and off. “HELLO” appears briefly on the display panel as the DVD/VCR turns on. “BYE” appears briefly as the DVD/VCR turns off.
Remote Control Buttons (cont’d) 29 MEMORY Button Press to memorize a tape position at which the real-time counter was set to 0:00:00. Details are on page 42. TIMER SET Button Press to put the DVD/VCR in standby mode so a timer recording can occur. Details are on pages 36-38. POWER VCR/TV Button Use to select the signal that your TV receives.
Remote Control Buttons (cont’d) SLOW Button During tape playback, press to view the picture in slow motion. Press again to resume normal playback. Details are on page 44. PAUSE Button DVD mode ● Press to pause Disc playback. Details are on page 52. Press repeatedly to advance the DVD picture step by step (or one frame at a time). Details are on page 53. VCR mode ● While recording, press to temporarily stop the recording (pause). Press a second time to resume normal recording. Details are on page 33.
Remote Control Buttons (cont’d) 31 VCR Button Press before using the remote control for VCR features. PLAY Button Press to begin Disc or tape playback. Press to select an item in the VCR menu. POWER TIMER SET F.FWD (Fast Forward) Button DVD mode ● Press to fast forward the Disc. Details are on page 54. Press the PAUSE button, then press the F.FWD button to begin slow motion playback. Press the F.FWD button repeatedly to change the forward speed of slow motion. Details are on page 53.
Playing a Video Cassette Tape 1 2 VCR Read and follow the steps below to play a tape. 1 Turn on the TV and set it to channel 3 or 4, whichever channel the CH3/CH4 switch on the back of the DVD/VCR is set to. Or, if you connected the DVD/VCR to the TV using audio and video cables, select the correct audio and video in channel at the TV. Details are on page 12. 2 Insert a tape in the cassette compartment of the DVD/VCR. The POWER,VCR, VCR/TV and CST. IN lights will appear on the front of the DVD/VCR.
Recording on a Video Cassette Tape 33 1 2 VCR Read and follow the steps below to record a television program onto a video cassette tape. Before you begin, make sure the DVD/VCR is in VCR mode. Press the DVD/VCR OUTPUT button so that the green VCR light appears on the front of the DVD/VCR. 1 Turn on the TV and set it to channel 3 or 4, whichever channel the CH3/CH4 switch on the back of the DVD/VCR is set to.
Recording One Channel/Watching Another VCR ● Before you begin, place the DVD/VCR in VCR mode. Press the DVD/VCR OUTPUT button so that the green VCR light appears on the front of the DVD/VCR. Press the VCR/TV button so that the VCR/TV light appears on the front of the DVD/VCR. 1 2&5 POWER Press the VCR button, then press the RECORD button to start a recording of the current TV channel. Details are on page 33. 2 Press the VCR/TV button to put the DVD/VCR in TV position.
One-Touch Recording 35 VCR The One-Touch Recording (OTR) feature allows you to set an immediate timed recording 30 minutes to eight hours long. Before you begin: ● Set up the TV channels at the DVD/VCR. Details are on page 17. ● Select a recording speed (SP, SLP) with the SPEED button. ● Put a tape in the cassette compartment of the DVD/VCR. Make sure the tape’s record tab is intact and the tape is long enough to record the program(s).
Timer Recording VCR Follow the steps below to program your DVD/VCR to record TV programs while you’re away from home. The DVD/VCR will turn itself on, record, and turn itself off automatically. Before you begin: ● Set up the TV channels at the DVD/VCR.Details are on page 17. ● Set the clock. If the clock is not set, CLOCK MUST BE SET will appear on the TV screen briefly, followed by the VCR menu. Follow the directions on page 20 to set the VCR’s clock.
Timer Recording (cont’d) 37 4 Use the Number buttons (1-8) to select a slot in which to store the timer recording. There are eight slots. Numbers for open slots will flash on the screen. NOTE: If you enter a number for a slot that has already been used to store a timer recording, PREVIOUSLY SET PROGRAM will appear on the screen briefly. Information about the program in that slot will appear on the screen. If this happens, press the DISPLAY/STATUS/EXIT button, then select another number.
Timer Recording (cont’d) 8 11 Press the Number 1 button to record in SP speed or the Number 2 button to record in SLP speed. (See the chart below.) You cannot use the SPEED button at this time. POWER ONE TIME PROGRAM PROGRAM 1 CHANNEL 10 TIME ON 09:30 PM TIME OFF 11:00 PM REC SPEED SLP SP=1 SLP=2 TIMER SET DVD/VCR OUTPUT VCR/TV MEMORY VCR DVD PLAY TO CORRECT PUSH CLEAR TO END PUSH EXIT REW F.
Timer Recording (cont’d) 39 Checking or Cancelling Timer Recordings ● Before you begin, place the DVD/VCR in VCR mode. Press the DVD/VCR OUTPUT button so that the VCR light appears on the front of the DVD/VCR. 2-4 POWER 1 Press the PLAY button or the STOP button to select PROGRAM REVIEW, then press the F.FWD button. The timer recording information for the program in the lowest numbered slot will appear on the screen. If no timer recordings are set, nothing will happen when you press the F.FWD button.
Rerecording (Tape Duplication) VCR The instructions on this page show you how to copy tapes. The illustration uses two DVD/VCRs. Different VCRs may operate differently. To duplicate a tape, make the connections shown, then follow steps 1-7. 1. Audio cables from DVD/VCR AUDIO OUT Jacks of DVD/VCR 1 to AUDIO IN Jacks of DVD/ VCR 2 DVD/VCR 1 Playing unit 2. Video cable from DVD/VCR VIDEO OUT Jack of DVD/VCR 1 to VIDEO IN Jack of DVD/VCR 2 1 2 3 DVD/VCR 2 Recording unit 3.
Repeat Play (Video Cassette Tapes) 41 VCR 1 ● Before you begin, place the DVD/VCR in VCR mode. Press the DVD/VCR OUTPUT button so that the green VCR light appears on the front of the DVD/VCR. POWER 1 TIMER SET DVD/VCR OUTPUT VCR/TV MEMORY VCR DVD Press the VCR button, then press the MENU button. PLAY SELECT op CHOOSE B REW → PROGRAM VCR SET UP TUNER SET UP SET CLOCK F.
Real-Time Counter Memory VCR Follow the steps below to reset the real-time counter to zero at a tape location you want to refer to later. ● Before you begin, place the DVD/VCR in VCR mode. Press the DVD/VCR OUTPUT button so that the green VCR light appears on the front of the DVD/VCR. POWER TIMER SET DVD/VCR OUTPUT VCR/TV 1 MEMORY VCR DVD Press the VCR button, then play, fast forward, or rewind a tape to the location that you would like to refer to later. Press the STOP button to stop the tape.
Time Search 43 VCR Follow the steps below to program the DVD/VCR to search forward or backward on a tape a specific length of time. There must be a tape in the DVD/VCR. ● Before you begin, place the DVD/VCR in VCR mode. Press the DVD/VCR OUTPUT button so that the green VCR light appears on the front of the DVD/VCR. Press the VCR/TV button so that the VCR/TV light appears on the front of the DVD/VCR. 1 Press the VCR button, then press the SEARCH MODE/TIME SEARCH button.
Special Effects Playback VCR Before trying the features on this page, make sure the DVD/VCR is in VCR mode. ● Before you begin, place the DVD/VCR in VCR mode. Press the DVD/VCR OUTPUT button so that the green VCR light appears on the front of the DVD/VCR. Press the VCR/TV button so that the VCR/TV light appears on the front of the DVD/VCR. Forward and Reverse Searching (SP/LP/SLP) 1 POWER TIMER SET DVD/VCR OUTPUT VCR/TV MEMORY VCR DVD PLAY REW F.
Automatic Operation Features 45 VCR The following tape playback features are available in VCR mode. Automatic Playback When you put a tape in the DVD/VCR, the power will come on automatically. If the tape’s record tab is missing, playback will begin. If a timer recording is set, and the TIMER SET light is flashing, the power will not come on automatically when you insert a tape with the record tab intact.
MTS (Multi-Channel Television Sound) System VCR Your DVD/VCR can play recordings broadcast in Hi-Fi (high fidelity) stereo, which produces a crisp, clear sound from two sources. Your DVD/VCR also can play tapes recorded in a second audio (usually, that means your program is recorded in a second language). Of course, your DVD/VCR will play tapes recorded in monaural (single-source) sound as well.
MTS (Multi-Channel Television Sound) System (cont’d) 47 VCR ● 2-3 Before you begin, place the DVD/VCR in VCR mode. Press the DVD/VCR OUTPUT button so that the green VCR light appears on the front of the DVD/VCR. Press the VCR/TV button so that the VCR/TV light appears on the front of the DVD/VCR. 1 Press the VCR button, then press the MENU button.
Hi-Fi Stereo Sound System VCR Multi-Channel Television Sound system broadcasts are automatically recorded in Hi-Fi stereo sound. To play in Hi-Fi stereo the tapes recorded in Hi-Fi stereo, however, you’ll need to follow steps 1-5. ● Before you begin, place the DVD/VCR in VCR mode. Press the DVD/VCR OUTPUT button so that the green VCR light appears on the front of the DVD/VCR. Press the VCR/TV button so that the VCR/TV light appears on the front of the DVD/VCR.
Blue Background 49 VCR If you want the TV screen to be solid blue when a weak signal is received, set BLUE BACKGROUND to ON. The screen will be blue and the sound will be muted. Or, if you want to receive the weak signal, set BLUE BACKGROUND to OFF. When you select a channel that is receiving a weak signal, you will see and hear the static in the TV programming. The channel number will not appear on the screen when you select a weak channel. To set BLUE BACKGROUND to ON or OFF, follow these steps.
Playing a Disc DVD AUDIO CD Playing a DVD or an Audio CD Before you begin... Turn on the power of the TV, amplifier and any other equipment connected to the DVD/VCR. Make sure the TV and the stereo or amplifier (if applicable) are set to the correct channel. Details are on pages 8-14. 1 Press the POWER button to turn on the DVD/VCR. “HELLO” will appear briefly on the display panel. 2 Press the DVD/VCR OUTPUT button so that the red DVD light appears on the front of the DVD/VCR.
Disc Menus 51 DVD Using the DVD Menus Some DVDs contain menus that describe the contents of the Disc or allow you to customize Disc playback. For example, the menu may offer choices for subtitle languages, director’s commentary, or soundtrack playback. To use the DVD menu and select playback features, follow these steps. ● To access the DVD’s Main Menu... 1 VCR DVD PLAY REW F.FWD STOP RECORD CHANNEL SKIP PAUSE Before you begin, place the DVD/VCR in DVD mode.
Pausing Playback DVD AUDIO CD Pausing Playback ● Pausing Playback... Before you begin, place the DVD/VCR in DVD mode. Press the DVD/VCR OUTPUT button so that the red DVD light appears on the front of the DVD/VCR. POWER TIMER SET DVD/VCR OUTPUT VCR/TV 1 During disc playback, press the DVD button, then press the PAUSE button on the remote control. Playback will pause and the sound will be muted. 1 MEMORY VCR DVD PLAY REW F.
Step by Step Playback 53 DVD ● Before you begin, place the DVD/VCR in DVD mode. Press the DVD/VCR OUTPUT button so that the red DVD light appears on the front of the DVD/VCR. 1 POWER TIMER SET DVD/VCR OUTPUT VCR/TV Press the DVD button, then press the PAUSE button to pause playback. The sound will be muted. 1 MEMORY VCR DVD 3 PLAY REW F.
Fast Forward/Reverse Search DVD ● AUDIO CD Before you begin, place the DVD/VCR in DVD mode. Press the DVD/VCR OUTPUT button so that the red DVD light appears on the front of the DVD/VCR. 1 POWER During playback, press the DVD button, then press the F.FWD button or the REW button on the remote control. ● On a DVD, pressing the F.FWD or REW button repeatedly will forward or reverse the picture at twice, eight times, or 32 times the normal playback speed. Sound will be muted during searching.
Track Playback 55 AUDIO CD Starting Playback at a Specific Track There are three ways to begin playback on an Audio CD at a specific Track. You may use the Number buttons, the SEARCH MODE button, or the SKIP H G buttons. For details, read the information below. ● Before you begin, place the DVD/VCR in DVD mode. Press the DVD/VCR OUTPUT button so that the red DVD light appears on the front of the DVD/VCR.
Title/Chapter Playback DVD Starting Playback at a Specific Title/Chapter A-B There are two ways to begin DVD playback at a specific Title or Chapter. You may use the Number buttons or the SEARCH MODE button. ● Before you begin, place the DVD/VCR in DVD mode. Press the DVD/VCR OUTPUT button so that the red DVD light appears on the front of the DVD/VCR.
Specific Time Playback 57 DVD AUDIO CD Starting Playback at a Specific Disc Time ● Before you begin, place the DVD/VCR in DVD mode. Press the DVD/VCR OUTPUT button so that the red DVD light appears on the front of the DVD/VCR. 1 POWER TIMER SET DVD/VCR OUTPUT VCR/TV Press the DVD button, then press the SEARCH MODE button repeatedly (three times for DVDs or two times for Audio CDs). 1 MEMORY VCR DVD PLAY REW SEARCH/TIME F.
Repeat Playback (Discs) ● Before you begin, place the DVD/VCR in DVD mode. Press the DVD/VCR OUTPUT button so that the red DVD light appears on the front of the DVD/VCR. 1 Press the DVD button, then press the REPEAT button repeatedly until the repeat mode you want appears in the top left corner of the TV screen. POWER TIMER SET DVD/VCR OUTPUT VCR/TV DVD Repeatedly pressing the REPEAT button during playback lets you choose REPEAT CHAPTER, REPEAT TITLE, or REPEAT OFF.
A-B Repeat Playback 59 DVD AUDIO CD You can play a section of an Audio CD or DVD repeatedly. Follow these steps to set up the section that you want to play over and over. ● 1 Before you begin, place the DVD/VCR in DVD mode. Press the DVD/VCR OUTPUT button so that the red DVD light appears on the front of the DVD/VCR. 1 2 Press the DVD button. POWER Press the A-B REPEAT button to set the starting point (A). DVD/VCR OUTPUT VCR/TV 2 MEMORY VCR DVD PLAY REW F.
Programmed Playback AUDIO CD You may determine the order in which Tracks will play. The order that you set is called the Program. To set up programmed playback, follow these steps. ● Before you begin, place the DVD/VCR in DVD mode. Press the DVD/VCR OUTPUT button so that the red DVD light appears on the front of the DVD/VCR. 1 POWER TIMER SET DVD/VCR OUTPUT VCR/TV 1 VCR DVD PLAY REW While playback is stopped, press the DVD button, then press the MODE button. The program screen will appear. F.
Random Playback 61 AUDIO CD You may play the Tracks of an Audio CD in Random order instead of the order in which they are recorded (1,2,3...). To set up Random Playback, follow these steps. ● Before you begin, place the DVD/VCR in DVD mode. Press the DVD/VCR OUTPUT button so that the red DVD light appears on the front of the DVD/VCR. POWER TIMER SET DVD/VCR OUTPUT VCR/TV 1 MEMORY VCR DVD PLAY REW F.
Audio Language/Sound Mode The DVD/VCR allows you to select a Language for DVDs or a Sound Mode for Audio CDs. Before you begin, put the DVD/VCR in DVD mode. ● Press the DVD/VCR OUTPUT button so that the red DVD light appears on the front of the DVD/VCR. POWER 1 DVD/VCR OUTPUT VCR/TV 1 DVD Language TIMER SET MEMORY VCR DVD PLAY REW F.FWD STOP Press the DVD button, then press the AUDIO button during playback, then press the o/p buttons to select the desired language.
Subtitle Language 63 DVD The DVD/VCR allows you to select a language for subtitles from those available on the disc. ● Before you begin, place the DVD/VCR in DVD mode. Press the DVD/VCR OUTPUT button so that the red DVD light appears on the front of the DVD/VCR. POWER DVD/VCR OUTPUT VCR/TV 1 1 MEMORY VCR DVD PLAY REW F.FWD STOP RECORD CHANNEL Press the DVD button, then press the SUBTITLE button during playback. The subtitle menu will appear on the TV screen.
Camera Angles DVD Some DVDs contain scenes that were recorded from different angles. You may select a camera angle with the DVD/VCR. ● Before you begin, place the DVD/VCR in DVD mode. Press the DVD/VCR OUTPUT button so that the red DVD light appears on the front of the DVD/VCR. POWER 1 TIMER SET DVD/VCR OUTPUT VCR/TV Press the DVD button, then press the ANGLE button during playback. 1 MEMORY VCR DVD PLAY REW 2 F.
Status Display (Discs) 65 DVD AUDIO CD Accessing the Status Display You can check the information about the current Disc by pressing the DISPLAY button on the remote control. ● Before you begin, place the DVD/VCR in DVD mode. Press the DVD/VCR OUTPUT button so that the red DVD light appears on the front of the DVD/VCR. 1 POWER TIMER SET DVD/VCR OUTPUT VCR/TV Press the DVD button, then press the DISPLAY/STATUS/ EXIT button repeatedly to access or remove the status displays.
Parental Lock Levels Parental Lock allows you to block viewing of DVDs that have ratings that exceed your selections. To set the levels, follow the steps below. ● Before you begin, place the DVD/VCR in DVD mode. Press the DVD/VCR OUTPUT button so that the red DVD light appears on the front of the DVD/VCR. 1 While playback is stopped, press the DVD button, then press the SETUP button. The setup screen will appear. POWER 1 Exit 2 Press the Number 4 button to select LOCK.
Parental Lock Password 67 You can change the password as often as you like. To do so, follow these steps. ● Before you begin, place the DVD/VCR in DVD mode. Press the DVD/VCR OUTPUT button so that the red DVD light appears on the front of the DVD/VCR. 3,5 1 POWER While playback is stopped, press the DVD button, then press the SETUP button. The setup screen will appear. SETUP 1. LANGUAGE 2. VIDEO 3. AUDIO 4. LOCK 5. OTHERS Enter / Exit 2 Press the Number 4 button to select LOCK.
Audio Settings ● Before you begin, place the DVD/VCR in DVD mode. Press the DVD/VCR OUTPUT button so that the red DVD light appears on the front of the DVD/VCR. 1 2-3 While playback is stopped, press the DVD button, then press the SETUP button. The setup screen will appear. POWER TIMER SET SETUP 1. LANGUAGE 2. VIDEO 3. AUDIO 4. LOCK 5. OTHERS Enter DVD/VCR OUTPUT VCR/TV / 1 Exit MEMORY VCR DVD PLAY REW 2 F.FWD STOP RECORD CHANNEL Press the Number 3 button to select AUDIO.
Audio Settings (cont’d) 69 4 To change the PCM, DOLBY DIGITAL, or DTS settings, press the corresponding Number button to select the desired item, then press the Number button to choose the setting (i.e. ON or OFF). SETUP/AUDIO PCM 1. 48kHz 2. 96kHz Enter, Back Exit • Audio signals are converted to 48 kHz/16 bit signals when playing a DVD recorded with high sound quality (48 kHz/20 bit/24 bit, 96 kHz). • Sound is reproduced at 96 kHz if a DVD is recorded with high sound quality.
Language Settings ● Before you begin, place the DVD/VCR in DVD mode. Press the DVD/VCR OUTPUT button so that the red DVD light appears on the front of the DVD/VCR. DVD 1 While playback is stopped, press the DVD button, then press the SETUP button. The setup screen appears. POWER TIMER SET DVD/VCR OUTPUT VCR/TV MEMORY SETUP 1 1. LANGUAGE 2. VIDEO 3. AUDIO 4. LOCK 5. OTHERS VCR DVD PLAY REW Enter / 2 SKIP SETUP/LANGUAGE 1. AUDIO 2. SUBTITLE 3. DISC MENU 4.
Language Settings (cont’d) 71 4 Press a Number button to select a setting. ● If OTHER is selected on the AUDIO, SUBTITLE or DISC MENU screen, the COUNTRY CODE screen will appear. Press four Number buttons to enter the country code you desire, then press the ENTER button. Refer to the list on page 72. The codes are listed alphabetically, according to language. ● You can only select other languages for AUDIO, SUBTITLE, and DISC MENU if the language is available on the Disc.
Language Settings (cont’d) Language Country Code Language 4748 4747 4752 6563 4759 4764 5471 4765 4771 4772 4860 4847 5167 4860 5072 4854 4855 4864 4853 5971 4851 C-E Cambodian Catalan Chinese (CHI) Corsican Croatian Czech Danish Dutch (DUT) English (ENG) Esperanto Estonian 5759 4947 7254 4961 5464 4965 5047 6058 5160 5161 5166 F-H Faroese Fiji Finnish French (FRE) Frisian Gaelic (Scots) Galician Georgian German (GER) Greek Greenlandic Guarani Gujarati Hausa Hebrew Hindi Hungarian Language Countr
Video Settings 73 ● Before you begin, place the DVD/VCR in DVD mode. Press the DVD/VCR OUTPUT button so that the red DVD light appears on the front of the DVD/VCR. 1 POWER When playback is stopped, press the DVD button, then press the SETUP button. The setup screen will appear. 1. LANGUAGE 2. VIDEO 3. AUDIO 4. LOCK 5. OTHERS DVD/VCR OUTPUT VCR/TV 1 SETUP TIMER SET MEMORY VCR DVD PLAY REW F.FWD STOP RECORD CHANNEL Enter / Exit SKIP 2 PAUSE Press the Number 2 button to select VIDEO.
Other Menu Settings ● Before you begin, place the DVD/VCR in DVD mode. Press the DVD/VCR OUTPUT button so that the red DVD light appears on the front of the DVD/VCR. 1 When disc playback is stopped, press the DVD button, then press the SETUP button. The setup screen will appear. POWER TIMER SET DVD/VCR OUTPUT VCR/TV SETUP 1 1. LANGUAGE 2. VIDEO 3. AUDIO 4. LOCK 5. OTHERS MEMORY VCR DVD PLAY REW F.FWD STOP Enter / Exit 2 SKIP PAUSE Press the Number 5 button to select OTHERS.
Care and Maintenance / Specifications 75 Care and Maintenance Specifications Cleaning the DVD/VCR • Wipe the front panel and other exterior surfaces of the DVD/VCR with a soft, slightly damp cloth. • Never use a solvent, thinner, benzene or alcohol to clean the DVD/VCR. Do not spray insecticide liquid near the DVD/VCR. Such chemicals may discolor the surface or damage the DVD/VCR.
Helpful Hints If you are having problems with your product, check this list of problems and possible solutions before requesting service. You may be able to solve the problem yourself. If you need to call a customer service representative, please know the model number and serial number of your product before you call. This information is displayed on the back of the product. Also, please take a moment to identify the problem you are having, and be prepared to explain this to the representative.
Helpful Hints (cont’d) 77 No sound • Connect the audio cables firmly. Make sure the cables are connected to the AUDIO IN jacks on the TV or audio equipment. Details are on pages 12-14. • Check the audio settings of the DVD/VCR. Details are on pages 62 and 68-69. • Turn on the power of the audio equipment and make sure it is set to the correct channel, usually Auxiliary IN. Refer to the owner’s manual of the audio equipment for details. • Check the audio settings of the Disc.
Helpful Hints (cont’d) Power Failure • Timer recordings, the clock setting, the language selection, and channel setup may be lost if the power fails for more than one minute. Follow the steps on pages 16 and 20. Then, see pages 36-38 to reprogram your timer recordings. A TV program cannot be recorded. • Put the DVD/VCR in VCR mode. Press the DVD/VCR OUTPUT button so that the green VCR light appears on the front of the DVD/VCR.
Helpful Hints (cont’d) 79 Tape cannot be removed. • Make sure the power plug is completely connected to a power outlet. • You have set a timer recording. Press the TIMER SET button to temporarily cancel standby mode. Then, press the STOP/EJECT button on the DVD/VCR to eject the tape. Be sure to insert a tape and press the TIMER SET button to put the DVD/VCR in standby mode for the timer recording. • Unplug the DVD/VCR power cord for five minutes.
Limited Warranty Digital Video Disc Player / Video Cassette Recorder Combination 90 days Free Exchange / 91 days–One Year Reduced-Cost Exchange WHO IS COVERED? You must have proof of the date of purchase to exchange your product. A sales receipt or other document showing the date that you purchased the product is considered such proof. MAKE SURE YOU KEEP... Please keep your sales receipt or other document showing proof of date of purchase. Attach it to the owner’s manual and keep both nearby.
Limited Warranty (cont’d) 81 EXCHANGE INSTRUCTIONS If your product is defective, you may be able to exchange it at the store from which it was purchased. Most stores display a Return Policy. If not, ask the manager or sales associate how many days you have to exchange a product with them. After the store’s return period has expired, or if the store does not have an exchange program, you may exchange the product with Philips if you have your original sales receipt.
Glossary AUDIO IN/OUT Jacks: jacks located on the front and back of the DVD/VCR which are used to receive audio from another source (IN) or to send audio to another system (OUT). Automatic Channel Setup: process in which the DVD/VCR memorizes all available TV channels. Then, when you press the CHANNEL o/p buttons, you only scan through channels you receive. Bands: settings that allow you to tune channels. • Antenna – VHF (very high frequency; channels 2-13) and UHF (ultra high frequency; channels 14-69).
Index 83 ac power cord . . . . . . . . . . . . . . . . .27 accessories . . . . . . . . . . . . . . . . . . . .84 angle button . . . . . . . . . . . . . . . .31, 64 ant-in (antenna in) jack . . . . . .8-14, 27 ant-out (antenna out) jack . . .9-11, 27 arrow buttons . . . . . . . . . . . . . . . . .31 audio button . . . . . . . . . . . . . . .31, 62 audio cd . . . . . . . . . . . . . . . . . . . . . . .6 audio in/out jacks . . .12-13, 27, 40, 46 automatic playback . . . . . . . . . . . . . . . . . . . .
SUPPLIED ACCESSORIES The following items are supplied with your DVD/VCR; they are provided to help you use or set up your DVD/VCR. Remote Control 4835 218 37301 Two AA Batteries 4835 138 17012 Audio and Video Cables 4835 321 17148 RF Coaxial Cable, 75 ohm 4835 323 27011 OPTIONAL ACCESSORIES The following additional items are not provided with your DVD/VCR, but they are designed for use with your new DVD/VCR.