Important Note DK S Advarsel: Laserrudstråling ved åbning når sikkerhesafbrydere er ude af funktion. Undgå u tsættelse for stråling. Klass 1 laserapparat Varning! Om apparaten används på annat sätt än i denna bruksanvisning specificerats, kann användaren utsättas för laserstrålning, som översjruder gränsen för läserklass 1. Bemærk: Netafbryderen POWER er sekundært indkoblet og afbryder ikke strømmen fra nette.
English 25 56 Español Italiano Español ----------------------------------------------- Svenska---------------------------------------------- 65 82 Dansk------------------------------------------------ 85 109 Suomi----------------------------------------------- 105 134 Português------------------------------------------ 125 160 Norge----------------------------------------------- 145 185 Polski----------------------------------------------- 165 210 Suomi Português Norge Polski TÜRKÇE
General Information English Since it is usual for DVD movies to be released at different times in different regions of the world, all players have region codes and discs can have an optional region code. If you load a disc of a different region code to your player, you will see the region code notice on the screen. The disc will not playback, and should be unloaded. 2 Manufactured under license from Dolby Laboratories. “Dolby” and the double-D symbol are trademarks of Dolby Laboratories.
Introduction Setup menu Environmental Information ....................................6 Supplied accessories ..............................................6 Safety Information ...................................................6 Symbols Used in this Booklet ...............................6 Basic operation ........................................19 General Setup menu ...............................19 OSD language .........................................................19 Program .........................
English Introduction Thank you for purchasing this Philips DVD player. This Owner’s Manual explains the basic operation of this DVD player. Environmental Information All unnecessary packaging has been omitted. We have tried to make the packaging easy to separate into three materials: cardboard (box), polystyrene foam (buffer) and polyethylene (bags, protective foam sheet). Your DVD player consists of materials which can be recycled and reused if disassembled by a specialized company.
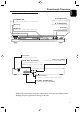
Front and Rear Panels STANDBY-ON – switches DVD ON or to standby mode / OPEN/CLOSE – opens/closes the disc tray B PLAY/PAUSE – star ts/interrupts playback Disc Tray 9 STOP – stops playback DISPLAY – shows the current status of the player KARAOKE DVD625K DVD VIDEO PLAYER STOP STANDBY-ON PLAY/PAUSE OPEN/CLOSE Mains Cord – connect to power outlet AUDIO OUT (Left/Right) – connect to AUDIO inputs of an amplifier, receiver or stereo system Video out (CVBS) – connect to a TV with CVBS inputs Coaxial o
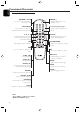
Functional Overview English Remote Control RETURN / TITLE – go back to previous menu / show title menu DISC MENU – access menu of a DVD disc /switch PBC on/off for VCD disc 1 2 3 4 – select an item in the menu/ fast forward/backward, slow forward/backward OK – acknowledge menu selection S – go to a previous chapter or track STOP ( 9 ) – stops playback PLAY ( B ) – star ts playback PAUSE ( ; ) – pause playback temporarily / frame-by-frame playback REPEAT – repeat chapter, track, title, disc REPEAT (A-B) –
If your TV is not equipped with a SCART input, you can select the following connection: Basic Connections ● Please refer to the instruction manuals of your TV, VCR, Stereo System or other devices as necessary to make the best connections. ● Make one of the following connections, depending on the capabilities of your existing equipment. 1 2 If your TV has a CVBS Video input connector, Connect the CVBS VIDEO OUT on the DVD player to the CVBS VIDEO IN.
English Preparation Connecting to Optional Equipment ● A digital component with a built-in MPEG 2 or Dolby Digital™ decoder allows you to enjoy the surround sound while producing the effect of being in a movie theater or a concert hall. ● The player outputs the surround sound signals from the DIGITAL OUT COAXIAL connectors. If your receiver has a MPEG 2 or Dolby Digital™ decoder, 1 Connect the COAXIAL DIGITAL AUDIO OUT of the DVD player to the COAXIAL DIGITAL AUDIO IN on your receiver.
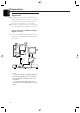
Inserting batteries into the Remote Control 3 Switching On 1 2 3 4 + + 2 Open the battery cover by pressing in the tab, then lift off the cover. Insert batteries with the correct polarity as indicated by the + and - symbols inside the battery compartment. Close the cover. - 1 - English Preparation Be sure that the DVD player has been correctly connected to the TV and audio equipment. Switch on the TV and DVD player. Set the TV to the correct Video In channel. (eg.
English Operation Slow Motion Basic Playback 1 2 3 4 Press STANDBY-ON on the front panel to turn on the DVD player. Press OPEN/CLOSE on the front panel to open disc loading tray. Place the chosen disc in the tray, with the label facing up. Press OPEN/CLOSE again to close the tray. ➜ After recognizing the disc, the player begins to playback automatically DVD 1 2 3 To get a slow motion effect during playback, press 3 or 4. Press 3 or 4 again, you can get different playback forward/backward speeds.
Repeat OSD (On-Screen Display) DVD ● ● ● ● ● ● ● Repeat chapter/title/disc To repeat the current chapter, press REPEAT. To repeat the current title, press REPEAT a second time. To repeat the whole disc, press REPEAT a third time. To exit REPEAT mode, press REPEAT again. VCD CD Repeat track/disc With PBC OFF, To repeat the current track, press REPEAT. To repeat the entire disc, press REPEAT a second time. To exit Repeat mode, press REPEAT again.
English Operation Special DVD Features Playing a Title DVD A DVD disc may have one or more titles. This depends on the content (a movie, video clips, a drama series, etc.) on the disc. 0 After you load a disc, information about the content shows on the screen waiting for your selection. You can also press the TITLE key on the remote control to turn back to the title menu during playback. ➜ Press the appropriate numerical key or 341 2 keys on the remote control to highlight your selection.
Preview Function 2 0 Press the PREVIEW key to enter previewing menu. 0 Press 34 key to highlight TRACK DIGEST, DISC INTERVAL or TRACK INTERVAL. 0 Press OK key to open one option. 0 After you enter the menu of any digest type, ➜ To quit preview function: Press 341 2 to highlight EXIT and press OK to confirm. ➜ To return to the previewing menu for selecting the other digest type: Press 341 2 to highlight MENU and press OK to confirm.
English Picture CD & MP3 Playback 0 0 0 0 0 0 0 0 This player can playback JPEG format pictures and MP3 files on a personally recorded CD-R/RW disc or commercial CD, and is compatible with Kodak Picture CD. Playback pictures or songs one by one automatically. Album and track selection. Repeat (disc / album / track / picture). Select any music or pictures from the disc to playback them together. Maximum number of files within one folder is 500 Maximum files Programmable is 100.
3 4 5 Press OK or PLAY key to add the selected file from the left column to the right column. ➜ The maximum is 100 files. Press STOP key to remove the programed file from the right column. Highlight one file of the right column and press OK key, then the programed files will start playing back. Special JPEG Features Function Introduction Playback with multi-angles When displaying one picture on TV screen 0 Press the 3 4 1 2 key to get different effects. 3 key: Flip the picture vertically.
English Setup Menu Basic Operation 1 2 3 4 5 Press SYSTEM MENU in the STOP mode to enter the Setup Menu. Press the OK key to go to the next level submenu or confirm your selection. Press the 1 2 keys to enter the submenu or return to the previous menu. Press the 34 keys to highlight the desired menu. Press SYSTEM MENU to quit the setup menu. ➜ When you quit the setup menu, the settings will be stored in the player’s memory even if the player is switched to power off.
1 2 Quit the program playback In the PROGRAM menu, Press the 1 234 keys to move the cursor to the EXIT button. Press the OK key to quit this menu. 1 2 3 Stop the program playback 0 During playback of the programmed tracks, press STOP key. Then after you press PLAY key, the DVD player will resume normal playback. Press the 34 keys to highlight DISC LOCK in the GENERAL SETUP menu. Enter its submenu by pressing the 2 key. ➜ LOCK: Lock the disc being played. ➜ UNLOCK: unlock the disc.
English Setup Menu Analog Audio Setup menu D.R.C. (Dynamic Range Compression) This menu contains setup options for your analog audio output, such as DOWNMIX, D.R.C. (Dynamic Range Compression) etc. which makes the DVD player reproduce high quality surround sound. 1 2 3 Press SYSTEM MENU. Press the 34 keys to highlight the ANALOG OUTPUT SETUP. Press OK to confirm. DOWNMIX 1 2 3 4 5 The DVD player will compress the dynamic range of its sound output for late-night listening.
LPCM Output Digital Output 1 2 3 4 5 Press the 34 keys to highlight DIGITAL OUTPUT. Enter its submenu by pressing the 2 key. Press the 34 keys to highlight the selected item. ➜ ALL: Original digital signal is output. ➜ PCM ONLY: If your receiver is PCMcompatible, or your receiver can not decode MPEG-2, Dolby Digital, or DTS audio, choose this option. Press OK. Press the 1 key and return to the DIGITAL OUTPUT SETUP menu.
English Setup Menu TV Display Video Setup menu There are items included in VIDEO SETUP menu such as TV TYPE, VIDEO OUTPUT, TV DISPLAY, TV MODE, SMART PICTURE, COLOR SETTING. 16:9 4:3 Letter Box 1 2 3 4 4:3 Pan Scan Press STOP. Press SYSTEM MENU to enter the menu. Highlight VIDEO SETUP by pressing the 34 keys. Press OK. Select the aspect ratio of the TV to be connected. 16:9 ➜ when you connect a wide-screen TV to the DVD player. 4:3 LETTERBOX ➜ when you connect a normal TV to the DVD player.
Smart Picture Color Setting In this menu, you can choose a picture setting from a fixed set of ideal predefined picture settings. In this menu you can personalize the picture color by adjusting brightness, contrast, hue and saturation. Press the 34 keys to highlight COLOR SETTING in the VIDEO SETUP menu. Press OK to open its submenu. 1 2 Brightness 1 2 3 4 5 Press the 34 keys to highlight SMART PICTURE in the VIDEO SETUP menu. Press the 2 key to highlight the item of the submenu.
English Setup Menu 1 2 3 4 1 2 3 4 1 2 3 4 Contrast Press the 34 keys to highlight CONTRAST in the COLOR SETTING menu. Press the 2 key to open the level bar. ➜ Display at the bottom of the screen. Press the 2 1 keys to increase and decrease the contrast level. Press the 34 or OK key to return to the COLOR SETTING menu. Hue Press the 34 keys to highlight HUE in the COLOR SETTING menu. Press the 2 key to open the level bar. ➜ Display at the bottom of the screen.
Subtitle language DVD discs are available with multi-subtitle languages. Use this option to select the preferred default subtitle language. 1 2 3 1 2 3 4 5 Press the 34 keys to highlight SUBTITLE. Enter the submenu by pressing the 2 key. Move the cursor by pressing the 34 keys to highlight the selected option. Press OK. Press 1 key to return to the PREFERENCE menu. 4 If you choose OTHERS in AUDIO, SUBTITLE or DISC MENU menu, You can select other languages.
English Setup Menu Default Setup Parental Control DVD Movies on DVDs may contain scenes which are not suitable for children. Therefore, discs may contain ‘Parental Control’ information which applies to the complete disc or to certain scenes on the disc. These scenes are rated from 1 to 8, and alternative, more suitable scenes are available on the disc. Ratings are country dependent.
PLAYBACK SYSTEM AUDIO PERFORMANCE DVD Video Video CD & SVCD CD PICTURE CD MP3-CD CD-R, CD-RW DVD+R, DVD+RW DA Converter 24bit Signal-Noise (1KHz) 100dB Dynamic range(1KHz) >90dB DVD fs 96 kHz 4Hz- 44kHz fs 48 kHz 4Hz- 22kHz SVCD fs 48 kHz 4Hz- 22kHz fs 44.1kHz 4Hz- 20kHz CD/VCD fs 44.1kHz 4Hz- 20kHz VIDEO PERFORMANCE CVBS RGB (SCART) 1Vpp --- 75Ω 0.
English Troubleshooting WARNING Under no circumstances should you try to repair the system yourself, as this will invalidate the warranty. Do not open the system as there is a risk of electric shock. If a fault occurs, first check the points listed below before taking the system for repair. If you are unable to remedy a problem by following these hints, consult your dealer or service center.