DVD Video player DVD941 Toll Free Help Line Ligne d'assistance en service libre Linea de ayuada telefónica sin cargo 800-531-0039 1
Return your Warranty Registration card today to ensure you receive all the benefits you’re entitled to. • Once your Philips purchase is registered, you’re eligible to receive all the privileges of owning a Philips product. • So complete and return the Warranty Registration Card enclosed with your purchase at once. And take advantage of these important benefits.
English Index Fr a nçais English -------------------------------------------------------- 7 Français ------------------------------------------------------ 26 E s p añ o l Español ------------------------------------------------------ 48 LASER SAFETY This unit employs a laser. Due to possible eye injury, only a qualified ser vice person should remove the cover or attempt to ser vice this device.
General Information WARNING CAUTION RISK OF ELECTRIC SHOCK DO NOT OPEN CAUTION: TO REDUCE THE RISK OF ELECTRIC SHOCK, DO NOT REMOVE COVER (OR BACK). NO USER-SERVICEABLE PARTS INSIDE. REFER SERVICING TO QUALIFIED SERVICE PERSONNEL. This symbol warns the user that uninsulated voltage within the unit may have sufficient magnitude to cause electric shock. Therefore, it is dangerous to make any kind of contact with any inside part of this unit.
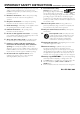
IMPORTANT SAFETY INSTRUCTIONS – Read before operating equipment This product was designed and manufactured to meet strict quality and safety standards.There are, however, some installation and operation precautions which you should be particularly aware of. 9. Do not defeat the safety purpose of the polarized or grounding-type plug. A polarized plug AC Polarized Plug has two blades with one wider than the other. A grounding type plug has two blades and a third grounding prong.
LIMITED WARRANTY DVD VIDEO PLAYER 90 Days Free Labor One Year Exchange Warranty on Parts This product must be carried in for repair. WHO IS COVERED? MAKE SURE YOU KEEP... You must have proof of purchase to receive warranty service. A sales receipt or other document showing that you purchased the product is considered proof of purchase. Please keep your sales receipt or other document showing proof of purchase. Attach it to this owner’s manual and keep both nearby.
Contents English Introduction Philips DVD-Video Introduction ------------------------- 8 Unpacking ---------------------------------------------------- 8 Remote Control battery installation -------------------- 8 Safety Information ------------------------------------------ 8 Cleaning Discs ---------------------------------------------- 8 Functional overview Front panel and Display ----------------------------------- 9 Remote control -------------------------------------------- 10 Rear panel -------------
Introduction English Philips DVD-Video Introduction Remote control battery installation Your Philips DVD-Video player will play digital video discs conforming to the universal DVD-Video standard. With it, you will be able to enjoy full-length movies with true cinema picture quality, as well as stereo or multi-channel sound (depending on the disc and your playback setup).
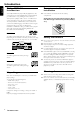
Functional Overview English Front panel and Display POWER ON/OFF – switches the player to ON or OFF SOUND – select Stereo, Dolby Surround, 3D Sound(TruSurround) or multi-channel STANDBY INDICATOR – lights red when the player is in Standby mode ST EASY JOG – controls Fast Forward/Rewind/Previous/ Next and Slow motion in various steps DISPLAY – shows the current status of the player 9 STOP – stops video/audio playback 2; PLAY/PAUSE – star ts or interrupts playback DVD941 DVD/VIDEO CD/CD PLAYER POWER ON
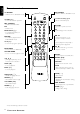
DVD ON/OFF – switches DVD to ON/OFF mode TV ON/OFF – switches TV to ON/OFF mode DVD TV PBC (ON/OFF) – activate/deactivate PBC 2 2 ON/OFF ON/OFF + DISC / LOCK - FTS 1 2 3 4 5 6 7 8 0 MENU RETURN É Q O – search backward* / go to previous chapter or track MENU OK PLAY ; – pause playback temporarily / frame-by-frame playback á R P – search forward* / go to next chapter or track É Ç SYSTEM MENU – access or remove player’s menu OK – acknowledge menu selection SYSTEM STOP DISC M
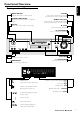
English Rear panel MAINS (AC) – connect to power source OPTICAL (Digital audio out jack) – connect to digital (optical) equipment COAXIAL (Digital audio out jack) – connect to digital (coaxial) equipment Y CB CR – connect to TV with Y C B C R inputs S-VIDEO OUT (Y/C) – connect to TV with S-Video (Y/C) inputs VIDEO OUT (CVBS) – connect to TV with CVBS video inputs SURROUND CENTER FRONT DIGITAL AUDIO OUT PCM/MPEG2/AC-3/DTS L L R MAINS R L 1 R 2 CVBS OPTICAL COAXIAL SURROUND SUB WF FRONT S-
Preparation English General notes ¶ ¶ ¶ Depending on your TV and other equipment you wish to connect, there are various ways you could connect the player. Please refer to the manuals of your TV, VCR, Stereo System or other devices as necessary to make the best connections. For better sound reproduction, connect the player’s audio out jacks to the audio in jacks of your amplifier, receiver, stereo or audio/video equipment. See ‘Connecting to optional equipment’.
Analog connection to a multi-channel A/V receiver with 6 Channel connectors This DVD player contains a multi-channel decoder. This enables playback of DVDs recorded in Multi-channel Surround without the need for an optional decoder. NTSC/PAL Settings You can switch the NTSC/PAL setting of the DVD player to match the video signal of your TV. This setting only affects the television’s on-screen display that shows the stop and setup modes. You may select either NTSC or PAL.
English Menu bar/Status window Personal Preferences V W X Y Z } a b c d e f g h You can set your own personal preferences on the player. Personal Preferences Title/Track Chapter/Index Audio language Subtitle language Angle Zoom Color Settings (Smart Picture) Video Program Sound Picture by Picture Slow motion Fast motion Time search General operation: ¶ ¶ ¶ ¶ Press SYSTEM MENU on the remote control. Select V in the menu bar. ➜ The Personal Preferences menu appears.
– Speaker settings You can select one of five predefined sets of color settings or define one set (Personal) yourself. Allows you to select speaker settings including volume balance and delay time and to test the speaker settings. Speaker settings are only active on the Analog MultiChannel Output. (See appendix) English – Color settings (Y CB CR connection only) – Personal color (Y CB CR connection only) Allows you to fine-tune saturation, brightness and contrast of the selected color settings.
Operation General features 1 Press OPEN/CLOSE on the front of the player to open the Note: – Unless stated, all operations described are based on remote control use. Some operations can be carried out using the menu bar on the screen. disc tray. 2 Load your chosen disc in the tray, label side up (also when a double sided DVD is inserted). 3 Press OPEN/CLOSE again to close the tray.
É ¶ ¶ ¶ É PLAY ë ë T-C To repeat a sequence in a title: Press REPEAT A-B at your chosen starting point. ➜ A- appears briefly on the screen. Press REPEAT A-B again at your chosen end point. ➜ A-B REPEAT appears briefly on the display, and the repeat sequence begins(A-B REPEAT is displayed on the front panel of the player). To exit the sequence, press REPEAT A-B. A-B ¶ á You can also step forward by pressing ; repeatedly on the remote control.
Å English Zoom í á ë i T-C REPEAT REPEAT SHUFFLE SCAN The Zoom function allows you to enlarge Ö the video image and to move through the enlarged image. Select a (ZOOM). Press w/v to activate the ZOOM function and select the required zoom factor: 1.33, 2 or 4. ➜ The player will go into Pause mode. ➜ The selected zoom factor appears below the Zoom icon in the menu bar and ‘Press OK to pan’ appears below the menu bar. ➜ The picture will change accordingly. Press OK to confirm the selection.
Special VCD Features Checking the contents of DVD-Video discs: Menus Playback Control (PBC) DVDs may contain menus to access special features. To use the disc menu, press the appropriate numerical key; or, use the w, v, u, t keys to highlight your selection, then press OK. Title menus ¶ ¶ Press DISC MENU. ➜ If the current title has a menu, the menu will appear on the screen. Otherwise, the disc menu will be displayed.
Å English Moving to another track í á ë i ¶ ¶ ¶ FTS Program á SUBTITLE ANGLE TTL/CHAP AUDIO T-C REPEAT REPEAT SHUFFLE SCAN Press P or O briefly during playback to Ö go to the next track or to return to the beginning of the current track. Press O twice briefly to step back to the previous track. To go directly to any track, enter the track number using the numerical keys (0-9).
Access Control English Access control; child lock (DVD and VCD) Activating/deactivating the child lock 1 When disc playback is stopped, select ACCESS ¶ 2 3 4 5 6 7 8 CONTROL in the features menu using the w/v keys. Alternatively, you can press DISC LOCK on the remote control if the child lock has been activated. Enter a 4-digit code of your own choice. Enter the code a second time. Move to “CHILD LOCK” using the w/v keys. Move to LOCK/UNLOCK using the u key. Select LOCK using the w/v keys.
English Activating/Deactivating Parental Control 1 When disc playback is stopped, select ACCESS 2 3 4 5 CONTROL in the features menu using the w/v keys. Enter your 4-digit code. If necessary, enter the code a second time. Move to Parental Level using the w/v keys. Move to VALUE ADJUSTMENT (1-8) using the u key. Then use the w/v keys or the numerical keys on the remote control to select a rating from 1 to 8 for the disc inserted. Rating 0 (displayed as ‘– –’): Parental Control is not activated.
Before Requesting Service English If it appears that the DVD-Video player is faulty, first consult this checklist. It may be that something has been overlooked. Under no circumstances should you attempt to repair the system yourself; this will invalidate the warranty. Look for the specific symptom(s). Then perform only the actions listed to remedy the specific symptom(s). Symptom Remedy No power – Make sure the mains cord (AC) is properly connected.
Appendix English Speaker Settings Delay times 6 Channel settings Front speaker L (Large): When the front speakers can reproduce low frequency signals below 120Hz S (Small): When the front speakers cannot produce low frequency signals below 120Hz The DVD player is set to reproduce correctly synchronized Digital Surround Sound in a listening area where the surround speakers are about 150cm nearer to the listening position than the front speakers, and the center speaker is in line with the front speakers.
PLAYBACK SYSTEM DVD-Video Video CD CD (CD-R and CD-RW) DVD+RW OPTICAL READOUT SYSTEM Lasertype Semiconductor AlGaAs Numerical Aperture 0.60 (DVD) 0.45 (VCD/CD) Wavelength 650 nm (DVD) 780 nm (VCD/CD) DVD DISC FORMAT Medium Diameter Playing time (12cm) VIDEO FORMAT DA Converter Signal handling Digital Compression Optical Disc 12cm (8cm) One layer Dual layer Two side Single layer Two side Dual layer Headphone 2.15 h* 4 h* 4.