Digital Video Disc Player Owner's Manual DVDQ35 Important! Return your Warranty Registration Card within 10 days. See why inside. Read this manual first! Congratulations on purchasing this Philips product. We’ve included everything you need to get started. If you have any problems, Philips Representatives can help you get the most from your new product by explaining: • Hookups, • First Time Setup, and • Feature Operation. Do not attempt to return this product to the store.
Return your Warranty Registration card today to ensure you receive all the benefits you’re entitled to. Once your PHILIPS purchase is registered, you’re eligible to receive all the privileges of owning a PHILIPS product. So complete and return the Warranty Registration Card enclosed with your purchase at once. And take advantage of these important benefits.
Contents 3 Getting Started Contents Safety Information Introduction Playable Discs General Information Hookups 3 4-5 6 7 8 9-14 Quick Disc Playback Quick Disc Playback 15 DVD Player Controls Remote Control Buttons Front Panel Rear Panel 16 17 18 Disc Playback and Features Title/Disc Menus, Chapter/Track Selection Slow Motion, Fast Forward and Fast Reverse Still Picture/Frame-by-Frame Playback,Time Search Zoom, Camera Angle Repeat, Repeat A-B DVD Audio Language DVD Subtitle Language DVD Disc Menu Langu
Safety Information Safety Precautions Warning: To prevent fire or shock hazard, do not expose this equipment to rain or moisture. Federal Communications Commission (FCC) Warning: Any unauthorized changes or modifications to this equipment void the user’s authority to operate it. Laser Safety This unit employs a laser. Only a qualified service person should remove the cover or attempt to service this device, due to possible eye injury.
Safety Information (cont’d) 5 IMPORTANT SAFETY INSTRUCTIONS 1. Read instructions. Read all the safety and operating instructions before operating the product. 2. Retain instructions. Keep the safety and operating instructions for future reference. 3. Heed warnings. Adhere to all warnings on the product and in the operating instructions. 4. Follow instructions. Follow all operating and use instructions. 5. Cleaning – Unplug this product from the wall outlet before cleaning.
Introduction Welcome! This Digital Video Disc Player will allow you to enjoy better picture quality, clearer sound, and endless playback features on Digital Video Discs (DVDs). Expanding technology allows you to add options to your viewing - watch a director’s cut of a movie, listen to the producer’s comments, or play your favorite scene repeatedly. Hear a movie in different languages, or listen only to the soundtrack.
Playable Discs 7 Playable Discs This DVD Player will play various types of Discs. Look for these logos on your Discs to determine whether the Disc will play on the Philips DVD Player. DVD (Digital Video Disc) Audio CD (Compact Disc Digital Audio) Video CD Super Video CD CD-R (CD-Recordable) Recordable CD-RW (CD-Rewritable) ReWritable Region Codes and Color Systems DVDs must meet the requirements for Region Codes and Color Systems before you can use them with the DVD Player.
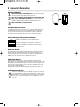
General Information Battery Installation 1 2 3 Remove the battery compartment lid on the rear of the remote control by pressing in the tab, then lifting off the lid. Place two AA batteries inside the battery compartment with their + and – ends aligned as marked. Do not mix old and new batteries or different types of batteries (standard, alkaline, etc.). Replace the battery compartment lid.
Hookups 9 Determining the best possible connection... The capabilities of your existing equipment, especially your TV, will determine your connection possibilities. However, the following guidelines describe which options provide the best picture and sound quality. .... Component Video or Progressive Scan Video provides the best picture quality. Details are on page 12. ... S-Video provides excellent picture quality. Details are on page 11. ..
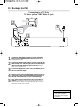
Hookups (cont’d) Connecting to a TV Only TV has a yellow CVBS Video In jack 2 Back of TV (example only) RIGHT AUDIO IN LEFT AUDIO IN S-VIDEO IN 3 RIGHT AUDIO IN LEFT AUDIO IN VIDEO IN 1 Y Pb Pr 1 2 Connect the yellow VIDEO (VIDEO OUT) jack of the DVD Player to the corresponding VIDEO IN jack on your TV. Use the supplied video cable. 3 4 5 Connect the supplied AC power cord to the MAINS jack on the rear of the DVD Player.
Hookups (cont’d) 11 Connecting to a TV Only TV has an S-Video In Jack 2 Back of TV (example only) RIGHT AUDIO IN LEFT AUDIO IN S-VIDEO IN RIGHT AUDIO IN LEFT AUDIO IN S-VIDEO IN 3 1 Y Pb Pr 1 2 Connect an S-Video cable (not supplied) to the S-VIDEO (VIDEO OUT) jack of the DVD Player and to the TV’s SVIDEO In jack. 3 4 5 Connect the supplied AC power cord to the MAINS jack on the rear of the DVD Player.
Hookups (cont’d) Connecting to a TV Only TV has Component Video In Jacks (green, blue, and red) 2 Back of TV (example only) RIGHT AUDIO IN LEFT AUDIO IN Pr/Cr Pb/Cb Y RIGHT AUDIO IN LEFT AUDIO IN 3 Pr/Cr Pb/Cb Y 1 Y Pb Pr 1 Connect the DVD Player’s green, blue, and red Y Pb Pr (VIDEO OUT) jacks to the corresponding COMPONENT VIDEO IN jacks on the TV. Use component video cable (not supplied) and match the cable colors to the jack colors when possible.
Hookups (cont’d) 13 Connecting to a TV and a two-channel Stereo (Stereo has Dolby Pro Logic or right/left Audio In jacks) 2 Back of TV (example only) Stereo (example only) VIDEO IN 3 RIGHT AUDIO IN VIDEO IN LEFT AUDIO IN Y 1 PB Pr 1 2 Connect the supplied video cable to the yellow VIDEO (VIDEO OUT) jack of the DVD Player and to the TV’s VIDEO IN jack. 3 Connect the supplied AC power cord to the MAINS jack on the rear of the DVD Player.
Hookups (cont’d) Connecting to a TV and a Stereo Receiver (Stereo has Digital Theater Systems (DTS), Dolby DigitalTM or MPEG2) Stereo Receiver (example only) Back of TV (example only) 1 VIDEO IN 3 COAXIAL DIGITAL AUDIO IN VIDEO IN Y 2 PB Pr 1 Connect either the COAXIAL or OPTICAL jack of the DVD Player to the corresponding DIGITAL AUDIO IN jack on your Stereo. You only need one connection. Use an appropriate digital audio cable (not supplied).
Quick Disc Playback 15 DVD AUDIO CD VIDEO CD 2-3 1 There are many playback features and options available on Discs. After familiarizing yourself with the DVD Player, see pages 19 and following to try additional playback features. 1 Press the POWER ON/OFF button on the front of the DVD Player to turn on the Player. Turn on your TV. Set it to the correct Video In channel. You should see the DVD screen saver on the TV (if no Disc is in the Player).
Remote Control Buttons Number Buttons Press to select numbered items in a menu. During playback, press the Number buttons to select a Chapter (within the current Title) or Track for playback, then press OK. Details are on page 19. Press and hold the Number 1 button for two seconds (or until OPEN or CLOSE appears on the display panel) to open or close the disc tray. RETURN/TITLE Button Press to go back to a previous menu. Press during DVD playback to return to the Disc’s Title menu.
Front Panel 17 POWER ON/OFF button Press to turn the DVD Player on or off.The button is depressed (or pressed down) when the power is on. The button is released when the power is completely off.To turn on the DVD Player using the POWER 2 button on the remote control, the POWER ON/OFF button on the Player must be depressed. OPEN/CLOSE button Press to open or close the Disc tray.You also can open or close the disc tray by pressing and holding the Number 1 button on the remote control for two seconds.
Rear Panel AUDIO OUT jacks Connect the supplied audio cables here and to the AUDIO IN jacks on your TV or Stereo. Details are on pages 10-13. There are two sets of AUDIO OUT jacks in case you want to connect the DVD Player to additional equipment. For example, you can use one set of AUDIO OUT jacks for the connection to the TV, and use the second pair of AUDIO OUT jacks to connect to a Stereo. Make sure you connect a Right and a Left AUDIO OUT jack to each piece of equipment.
Title/Disc Menus, Chapter/Track Selection 19 DVD Title/Disc menus 1 2 Press DISC MENU during DVD playback. The main Disc menu (or Root menu) will appear.The menu may list camera angles, spoken language and subtitle options, and Chapters for the Title. Or, if the current Title has a specific Title menu, press the RETURN/TITLE button to access the Title menu. Title menus are not available on all Discs. 1 1 Press 341 2 to select items in the menu, then press OK.
Slow Motion, Fast Forward and Fast Reverse DVD VIDEO CD Slow Motion 1 During Disc playback, press 3 repeatedly to play the disc at 1/2, 1/4, 1/6, or 1/8 the normal speed. SF 2X, SF 4X, SF 6X, or SF 8X will appear on the TV screen. SF represents Slow Forward. Or, press 4 repeatedly to play a DVD backward at 1/2, 1/4, or 1/8 the normal speed. SR 2X, SR 4X, or SR 8X will appear on the TV screen. SR represents Slow Reverse. The sound will be mute during slow motion playback.
Still Picture/Frame-by-Frame Playback,Time Search 21 DVD VIDEO CD Still Picture/Frame-by-Frame Playback 1 2 3 To pause a DVD or Video CD picture, press PAUSE k on the remote control during playback. Press PAUSE k repeatedly to advance the still picture one frame at a time. Press PLAY 2 to resume regular playback. 1,2 3 DVD VIDEO CD AUDIO CD Time Search 1 3 1, 4 2 Press the DISPLAY button during playback. Current playback information will appear at the top of the screen.
Zoom, Camera Angle DVD VIDEO CD Zoom Zooming lets you enlarge the video image during playback and scan through the enlarged image. 1 Press ZOOM repeatedly during Disc playback to choose ZOOM X2 or ZOOM X4. ZOOM X2 or Z00M X4 will appear in the top left corner of the TV screen briefly.The picture will be twice (ZOOM X2) or four (ZOOM X4) times as large.
Repeat, Repeat A-B 23 DVD VIDEO CD AUDIO CD Repeat You may play a Chapter,Track,Title or entire Disc repeatedly. 1 During Disc playback, press REPEAT repeatedly to choose a Repeat option. Depending on the type of Disc, you may choose to play the Chapter (CHAPTER REPEAT ON),Track (REP-ONE),Title (TITLE REPEAT ON), or Disc (REP-ALL) repeatedly. 2 To cancel repeat playback, repeatedly press REPEAT until REPEAT OFF appears in the top left corner of the TV screen.
DVD Audio Language DVD Some DVDs are recorded in multiple languages; some may have extra audio options such as a director’s commentary or a music soundtrack.You can choose the language or the soundtrack that you want to hear by adjusting AUDIO in the DVD Player’s PREFERENCES PAGE.To do so, follow the steps below. Or, the easiest way to choose a different audio language or soundtrack is to press the AUDIO button on the remote control repeatedly during DVD playback.
DVD Subtitle Language 25 DVD Some DVDs include subtitles. Choose the language you want for available subtitles by adjusting SUBTITLE in the DVD Player’s PREFERENCES PAGE. To do so, follow the steps below. Or, the easiest way to choose subtitles is to press the SUBTITLE button on the remote control repeatedly during DVD playback.The subtitles will appear in the language you select. 1 2 3 4 Press STOP twice to stop DVD playback. 2,6 Press SYSTEM MENU.
DVD Disc Menu Language DVD DVDs have a Disc menu that allows you to choose options such as Audio Language, Subtitles, or other special features. Features vary among DVDs, so the Disc menus are different for every DVD. Some DVD Disc menus may be available in multiple languages.To choose a language for a Disc menu using the DVD Player’s PREFERENCES PAGE, follow the steps below. 1 2 3 4 2,6 Press STOP twice to stop DVD playback. Press SYSTEM MENU. Press 4 repeatedly to select PREFERENCES, then press OK.
Parental Controls Password 27 DVD Parental Controls limits viewing of DVDs.When a DVD has been Locked or if a DVD has a movie rating that exceeds the Parental Level you select, a viewer must enter a password before viewing the DVD.To set your password, follow the steps below. To adjust the PARENTAL level so DVDs cannot play if they exceed that level, see page 29. To prevent specific DVDs from playing, regardless of how you set the PARENTAL level, see page 28.
Parental Controls Disc Lock Not all DVDs are rated or coded by the Disc maker.You can specifically lock or unlock a DVD, regardless of its rating. If you lock a specific DVD, you must enter your Password before you can watch the DVD. Password details are on page 27. 1 2 3 Press SYSTEM MENU. GENERAL SETUP will be selected. Press OK. 1,5 DISC LOCK will be selected. Press 2.
Parental Controls Levels 29 You can set the DVD Player to block or allow DVD playback according to the movie rating of the DVD. If someone tries to play a DVD that has a rating that exceeds the level you selected, they must know your password. You must enter the password before the DVD will play. Password details are on page 27. Not all DVDs conform to the levels you select, as not all DVDs are coded or protected by the DVD manufacturer.
Programmed Playback AUDIO CD VIDEO CD You may play Tracks in an order you specify instead of playing the Tracks in normal order (1, 2, 3, etc.).The order in which you set the Tracks to play is a Program. For example, if you want to set up an Audio CD so Track 12 will play first, put Track 12 in Program position number one (1). To set up a Program, follow these steps. 1 2 3 1 Press SYSTEM MENU. GENERAL SETUP will be selected. Press OK. Press 4 to select PROGRAM, then press 2 to select ON.
Preview 31 VIDEO CD If you are not sure of the contents of a Video CD or its Tracks, use the Preview features to see the content of the Tracks.This feature may not be available with all Video CDs. 1 While playback is stopped, press PREVIEW. The following menu will appear. 1. INTRO 2. DISC 2 2 3. TRACK 4. EXIT Press the corresponding Number button on the remote control to select INTRO, DISC,TRACK, or EXIT, then press OK.
Smart Navigator, JPEG and MP3 Features Smart Navigator This DVD Player can play some Compact Disc-Recordable (CD-R) discs that you record on your computer.These CD-Rs may contain pictures in a JPEG format or audio files/tracks in an MP3 format. For example, you may have photographic film developed by a retailer that places the pictures on a CD-R for you.These pictures may be in JPEG format. Or, you may copy or download MP3 music files from certain legal Internet sites, then copy those files onto a CD-R.
TV Display 33 You may set the DVD Player to display video in one of three formats: Letterbox, Pan & Scan, or Wide.To choose a format, follow these steps. 1 2 3 4 Press SYSTEM MENU. Press 4 repeatedly to select SETUP VIDEO OUTPUT, then press OK. 1,5 Press 4 repeatedly to select TV DISPLAY, then press 2. Press 34 to select NORMAL/PS, NORMAL/LB, or WIDE, then press OK. • Select NORMAL/PS (pan & scan) if you want both sides of the picture to be trimmed or formatted to fit your TV screen.
Picture Brightness,Video Output Picture Brightness Just as you can adjust your picture on your TV, you can adjust the brightness of the picture from Discs playing on the DVD Player by following these steps. 1 2 3 4 Press SYSTEM MENU. Press 4 repeatedly to select SETUP VIDEO OUTPUT, then press OK. 1,5 Press 4 repeatedly to select BRIGHTNESS, then press 2. Press 4or 3 to adjust the brightness of the picture.
Progressive Scan, Picture Source 35 Progressive Scan The Player’s Y Pb Pr VIDEO OUT jacks can send Progressive Scan Video or Component/Interlaced Video.Activate or deactivate Progressive Scan Video or Component/Interlaced Video as follows. 1 2 3 4 Press SYSTEM MENU. Press 4 repeatedly to select SETUP VIDEO OUTPUT, then press OK. 1,5 Press 4 repeatedly to select PROSCAN (Progressive Scan), then press 2. Press 4 or 3 to select ON or OFF, then press OK. ON activates Progressive Scan video.
TV Type TV Type DVDs are recorded according to a color system, the most common of which are NTSC and PAL. NTSC is the most common in the United States.Your TV also operates according to a color system. This DVD Player is compatible with NTSC and PAL. However, in order for a DVD to play on this DVD Player, the color system of the DVD, the TV, and the DVD Player should match.
Speaker Setup, 3D Sound 37 Speaker Setup Adjust DOWNMIX according to how you connected the DVD Player to your TV and/or Stereo. Balance the volume during playback by adjusting Dynamic Range Control (D.R.C.). 1 2 3 4 Press SYSTEM MENU. Press 4 to select SPEAKER SETUP, then press OK. 1,5 Press 3 or 4 to select DOWNMIX or D.R.C., then press 2 and follow step 4 according to your choice. • If you selected DOWNMIX, press 3 or 4 to select LT/RT (left/right) or STEREO, then press OK.
SPDIF, LPCM 96K Setup SPDIF Setup SPDIF is the Sony Philips Digital Interface, or a method of transferring digital audio. If you connected the DVD Player to a Stereo using the OPTICAL or COAXIAL jack as shown on page 14, you need to adjust the SPDIF OUT setting as described below. If you are not using the OPTICAL or COAXIAL jack, no adjustment is necessary. 1 2 3 4 Press SYSTEM MENU. 1,5 Press 4 repeatedly to select SPDIF SETUP, then press OK. SPDIF OUT will be selected. Press 2.
DVD Player On-Screen Display Language 39 You can set the DVD Player’s Setup menus and on-screen messages to appear in English French, or Spanish. English, French, and Spanish are the only three languages available.This language selection will not affect the languages of DVD Disc or Title menus or any audio or subtitle languages.To change the DVD Player’s Setup menu language, follow these steps. 1 2 3 Press SYSTEM MENU. 1,5 GENERAL SETUP will be selected. Press OK.
Display Dim, Screen Saver Display Dim You can adjust the brightness of the display panel on the front of the DVD Player. Choose the setting that best enables you to see the display information from a distance. Or, you may want to disable the display completely so it is always dark. Follow the steps below to adjust the brightness of the display panel according to your preference. 1 2 3 Press SYSTEM MENU. 1,5 GENERAL SETUP will be selected. Press OK. Press 4 repeatedly to select VFD DIM, then press 2.
DVD Player Defaults 41 To restore the original settings of the DVD Player, follow the steps below. 1 2 3 4 Press STOP 9 twice to stop Disc playback completely. Press SYSTEM MENU. Press 4 repeatedly to select PREFERENCES, then press OK. 2,5 Press 4 repeatedly to select DEFAULTS, then press 2 to select RESET, then press OK. The original settings of the DVD Player will be restored.
Helpful Hints If you are having problems with your product, check this list of problems and possible solutions before requesting service.You may be able to solve the problem yourself. If you need to call a customer service representative, please know the model number and serial number of your product before you call.This information is on the rear of the product. Also, please take a moment to identify the problem you are having, and be prepared to explain this to the representative.
Helpful Hints (cont'd) 43 Disc will not play. • Make sure the Disc label is facing up. If you are playing a two-sided Disc, make sure the side you want to play is facing up. Details are on page 15. • Check the Parental Controls. Details are on pages 27-29. • Check the Region Code of the DVD.The DVD must be coded for All regions or Region 1 in order to play on this DVD Player. Details are on page 7. • See if the Disc is defective by trying another Disc. Make sure the Disc is not scratched or warped.
Glossary Analog: Sound that has not been turned into numbers. Analog sound varies, while digital sound has specific numerical values. Analog sound is available when you use the red and white audio jacks on your equipment. These jacks send audio through two channels, the left and right. AUDIO OUT Jacks: Jacks on the rear of the DVD Player that send audio to another system (TV, Stereo Receiver, etc.). CD: Compact Disc (or CDDA, Compact Disc Digital Audio). Chapter: A part of a Title.
Specifications 45 PLAYABLE DISCS Audio CD CD Recordable (CD-R) CD Rewritable (CD-RW) DVD-Video MP3-CD Picture CD (JPEG files) Super Video CD Video CD TV STANDARD Number of lines Playback AUDIO PERFORMANCE DA Converter 24 bit Signal to Noise (1kHz) 90dB Dynamic range (1kHz) 80dB DVD fs 96 kHz fs 48 kHz Super Video CD fs 48 kHz fs 44.1 kHz Video CD/Audio CD fs 44.1 kHz PAL/50Hz 625 Multistandard NTSC/60Hz 525 (PAL/NTSC) VIDEO PERFORMANCE VIDEO OUT 1Vpp---75Ω S-VIDEO OUT Y: 1.00Vpp---75Ω C: 0.
Limited Warranty Digital Video Disc Player 90 days Free Product Exchange / 91 days–One Year Reduced-Cost Exchange WHO IS COVERED? You must have proof of the date of purchase to exchange your product. A sales receipt or other document showing the date that you purchased the product is considered such proof. WHAT IS COVERED? Warranty coverage begins the day you buy your product. For 90 days thereafter, you may exchange the defective product for a free new or renewed product through Philips.
Limited Warranty (cont’d) 47 EXCHANGE INSTRUCTIONS To exchange your product with Philips (per the warranty conditions stated previously), remember: • If you exchange the product within 90 days of the original purchase, there is no cost to you.* • If you exchange the product more than 90 days after but less than one year after the day of original purchase, contact Philips at 1-800-531-0039 to determine the preset cost for exchange.
Information Index AC power cord............................................................................... 18 ANGLE button............................................................................16, 22 Arrow K L s B buttons................................................16, 19-20 AUDIO button...........................................................................16, 24 Audio CD program......................................................................... 30 AUDIO OUT (left/right) jacks......