How_To_Nero_6_Code2473-4.
How_To_Nero_6_Code2473-4.
How_To_Nero_6_Code2473-4.
How_To_Nero_6_Code2473-4.
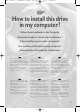
How_To_Nero_6_Code2473-4.qxd 09-02-2005 07:22 Pagina 5 How to install this drive in my computer? Einbau dieses Laufwerks in den Computer Comment installer ce lecteur dans l’ordinateur ? Come installare questa unità sul computer Hoe installeer ik dit station in mijn computer? ¿Cómo instalar esta unidad en el ordenador? UK The next pages show how to install your new DVD-ReWriter in the PC.
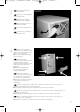
How_To_Nero_6_Code2473-4.qxd 09-02-2005 07:22 Pagina 6 UK Turn your computer off. D Schalten Sie Ihren Computer aus. F Éteignez l’ordinateur. I Spegnere il computer. NL E Schakel de computer uit. Apague el ordenador. UK Touch a unpainted metal part (eg. your heating or an unpainted part of your computer case) to avoid any damage to your computer by electrostatic discharge. D Berühren Sie ein unbemaltes Metallteil (z.B.
How_To_Nero_6_Code2473-4.qxd 3 09-02-2005 07:22 Pagina 7 UK Disconnect the power cable from the PC. D Ziehen Sie das Netzkabel vom Computer ab. F Débranchez le câble d’alimentation de l’ordinateur. I Disconnettere il cavo di alimentazione dal PC. NL Trek de netstekker uit de PC. E Desconecte el cable de alimentación del PC. 4 UK Open your computer. You may have to unleash screws which are mostly located at the back of your computer.
How_To_Nero_6_Code2473-4.qxd 09-02-2005 07:22 Pagina 8 UK Take off the cover of the computer. Nehmen Sie die Abdeckung des Computers ab. D 5 F Retirez le capot de l’ordinateur. I Togliere il coperchio del computer. NL Verwijder de kast van de computer. E Quite la carcasa del ordenador. UK If you have no other or you replace an old drive, you will have to choose the MASTER setting. D Wenn Sie kein anderes haben oder ein altes Laufwerk austauschen, müssen Sie die Einstellung MASTER wählen.
How_To_Nero_6_Code2473-4.qxd 7 09-02-2005 07:22 Pagina 9 UK If you add a drive, the new drive will be SLAVE. D Wenn Sie ein Laufwerk hinzufügen, wird das neue Laufwerk der SLAVE sein. F Si vous ajoutez un lecteur, le nouveau doit être configuré en mode esclave (SLAVE). I Aggiungendo un'unità, è necessario impostarla su SLAVE. NL Als u dit nieuwe station als extra station toevoegt, kies dan de instelling SLAVE. E 8 Cuando añada una nueva unidad, se configurará como SLAVE.
How_To_Nero_6_Code2473-4.qxd 09-02-2005 07:22 Pagina 10 UK Choose master or slave for the jumper, as chosen in steps 6 or 7. 9 Wählen Sie für den Jumper Master oder Slave, gemäß der Beschreibung in Schritt 6 oder 7. D F Placez le cavalier sur la position maître ou esclave selon l’option choisie aux étapes 6 et 7. I Impostare il cavallotto su master o slave, secondo la configurazione specificata ai passi 6 o 7.
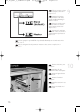
How_To_Nero_6_Code2473-4.qxd 11 09-02-2005 07:22 Pagina 11 UK Find the IDE-cable which may look like this example: A: Coloured line. B: Notch and closed hole. C: Pin1. D Suchen Sie das IDE-Kabel, das möglicherweise wie in diesem Beispiel aussieht: A: Farbige Leitung. B: Kerbe und geschlossenes Loch. C: Pin1. F Identifiez le câble IDE.
How_To_Nero_6_Code2473-4.qxd 09-02-2005 07:22 Pagina 12 UK Find a free power cable like this example. Please note the edges of the connector. 13 D Suchen Sie ein freies Stromversorgungskabel, das häufig wie in diesem Beispiel gezeigt aussieht. Die Kanten des Anschlusses sind abgerundet. F Recherchez un câble d’alimentation disponible, comme dans cet exemple. Notez la position des bords du connecteur. I Individuare un cavo di alimentazione disponibile, come quello nell'esempio.
How_To_Nero_6_Code2473-4.qxd 15 09-02-2005 07:22 Pagina 13 UK Secure the drive with the screws (if possible on both sides). D Befestigen Sie das Laufwerk mit den Schrauben (wenn möglich an beiden Seiten). F Fixez l’appareil à l’aide des vis (si possible des deux côtés). I Fissare l'unità con le viti (se possibile su entrambi i lati). N Schroef het station vast (zo mogelijk aan beide zijden). E Asegure la unidad con los tornillos (si es posible en ambos lados).
How_To_Nero_6_Code2473-4.qxd 09-02-2005 07:22 Pagina 14 UK Put the screws (if there were any) back in. Plug the power cable back in. If you disconnected other cables, put these back in too. 17 D Drehen Sie die Schrauben (wenn da welche waren) wieder ein. Stecken Sie das Netzkabel wieder ein. Wenn Sie weitere Kabel abgezogen haben, stecken Sie diese ebenfalls wieder ein. F Resserrez la ou les vis, le cas échéant. Rebranchez le cordon d’alimentation.
How_To_Nero_6_Code2473-4.qxd 19 09-02-2005 07:22 Pagina 15 UK Insert the Nero disc when Windows is loaded. D Legen Sie die Nero CD ein, wenn Windows geladen ist. F Insérez le disque Nero une fois que Windows a démarré. I Inserire il disco Nero dopo il caricamento di Windows. NL Plaats de Nero-disc nadat Windows is gestart. E Coloque el disco de Nero cuando se inicie Windows. 20 UK Choose "Install Suite". D Wählen Sie "Install Suite". auf dem Bildschirm. F Choisissez "Install Suite".
How_To_Nero_6_Code2473-4.qxd 09-02-2005 07:22 Pagina 16 UK Take the box in which your drive came, and find the model number. On this example it is "DVDRW228". Note it here for later reference. D Suchen Sie auf dem Verpackungskarton für Ihr Laufwerk nach der Modellnummer. In diesem Beispiel lautet die Nummer "DVDRW228". Notieren Sie sich die Modellnummer für spätere Zwecke. F Recherchez le numéro du modèle sur la boîte du lecteur. Dans cet exemple, il s’agit de "DVDRW228".
How_To_Nero_6_Code2473-4.qxd 22 09-02-2005 07:22 Pagina 17 UK At the end, you will need to reboot your computer. Congratulations. Your Philips drive is now ready for use. How to use it and what software applications you need to perform your tasks, is described in the next chapters of this User Manual. D Zum Abschluss müssen Sie Ihren Computer neu booten. Gratulation. Ihr Philips-Laufwerk ist jetzt einsatzbereit.
How_To_Nero_6_Code2473-4.qxd P 09-02-2005 07:22 Pagina 18 Como instalar esta unidade no computador Em relação às imagens correspondentes, leia o texto que começa na página 6. 1 2 3 4 5 6 7 8 9 10 11 Desligue o computador. Para evitar descargas electroestáticas que possam danificar o computador, toque numa parte metálica sem pintura (por exemplo, no radiador ou numa parte da caixa do computador que não esteja pintada). Desligue o cabo de alimentação do PC. Abra o computador.
How_To_Nero_6_Code2473-4.qxd N 09-02-2005 07:22 Pagina 19 Installere brenneren i datamaskinen Når det gjelder de bildene som hører til, henviser vi til teksten som begynner på side 6. 1 2 3 4 5 6 7 8 9 10 11 Slå av datamaskinen din. Berør en umalt metalldel (f.eks. en radiator eller en umalt del av huset til datamaskinen) for å unngå at maskinen din tar skade av eventuelle elektrostatiske utladninger. Koble strømkabelen fra PCen din. Åpne datamaskinen din. Det kan hende du må løsne noen skruer.
How_To_Nero_6_Code2473-4.qxd S 09-02-2005 07:22 Pagina 20 Gör så här för att installera enheten i datorn För bilder, se texten som börjar på sidan 6. 1 2 3 4 5 6 Stäng av datorn. Rör vid en omålad metalldel (t.ex. ett värmeelement eller en omålad del av datorhöljet) för att undvika att datorn skadas av statisk elektricitet. Dra ut nätsladden från datorn. Öppna datorn. Du kan behöva lossa skruvar, oftast på datorns baksida. ➤ Mer information finns i datorns handbok. Avlägsna datorns hölje.
How_To_Nero_6_Code2473-4.qxd DK 09-02-2005 07:22 Pagina 21 Sådan installeres dette drev i computeren For tilsvarende billeder, se venligst teksten på side 6. 1 2 3 4 5 6 7 8 9 10 11 Sluk computeren. Berør en ikke malet metaldel (f.eks. en radiator eller et ikke malet sted på computerens kabinet) for at undgå skade på computeren på grund af elektrostatisk udladning. Træk netledningen ud af pc’en. Åbn computeren. Muligvis skal du løsne nogle skruer. Disse findes i reglen på computerens bagside.
How_To_Nero_6_Code2473-4.qxd SF 09-02-2005 07:22 Pagina 22 Levyaseman asentaminen tietokoneeseen Katso vastaavat kuvat sivulta 6 alkavasta tekstistä. 1 2 3 4 5 6 7 8 9 10 11 Sammuta tietokone. Kosketa jotain maalaamatonta metalliesinettä (esimerkiksi tietokonekotelon kirkasta metalliosaa), jotta mahdollinen sähköstaattinen purkaus ei vahingoittaisi tietokonetta. Kytke virtajohto irti tietokoneesta. Avaa tietokoneen kotelo.
How_To_Nero_6_Code2473-4.qxd PL 09-02-2005 07:22 Pagina 23 Jak zainstalować ten napęd w komputerze Odpowiednie rysunki znajdują się w tekście rozpoczynającym się na stronie 6. 1 2 3 4 5 6 7 8 9 10 11 Wyłącz komputer. Dotknij niemalowanego, metalowego elementu (np. kaloryfera lub niemalowanej części obudowy komputera), aby uniknąć uszkodzenia komputera przez wyładowanie elektrostatyczne. Odłącz kabel zasilający od komputera. Otwórz komputer.
How_To_Nero_6_Code2473-4.qxd RU 09-02-2005 07:22 Pagina 24 Порядок установки накопителя в компьютер Для просмотра соответствующих рисунков перейдите к тексту на странице 6 и далее. 1 Выключите компьютер. 2 Дотроньтесь до неокрашенной металлической поверхности (например, до батареи или неокрашенного участка корпуса компьютера), чтобы не повредить ПК электростатическим разрядом. 3 Отсоедините от ПК шнур питания. 4 Откройте корпус компьютера.
How_To_Nero_6_Code2473-4.qxd TR 09-02-2005 07:22 Pagina 25 Bilgisayarıma bu sürücü nasıl yüklenir? İlgili resimler için lütfen 6. sayfadan başlayan metne bakın. 1 2 3 4 5 6 7 8 9 10 11 Bilgisayarı kapatın. Elektrostatik boşalmanın bilgisayarınız zarar vermemesi için, boyalı olmayan metal bir bölüme dokunun (örneğin ısıtıcınız ya da bilgisayarınızın kasasının boyalı olmayan bir parçası). Güç kablosunu bilgisayardan çıkarın. Bilgisayarınız açın.
How_To_Nero_6_Code2473-4.
How_To_Nero_6_Code2473-4.
How_To_Nero_6_Code2473-4.qxd 09-02-2005 07:22 Pagina 28 UK Start "Nero StartSmart" from the desktop. D Starten Sie "Nero StartSmart" von Ihrer Oberfläche aus. 1 F Lancez "Nero StartSmart" depuis le bureau. I Aprire "Nero StartSmart" dal desktop. NL Start "Nero StartSmart" vanaf het bureaublad. E Inicie "Nero StartSmart" desde el escritorio. UK Connect your camera to the computer and switch it on. Verbinden Sie Ihre Kamera mit dem Computer und schalten Sie sie ein.
How_To_Nero_6_Code2473-4.qxd 3 09-02-2005 07:22 Pagina 29 UK Choose "Photo and video" and click "Capture video". D Wählen Sie "Photo und Video" und klicken Sie auf "Video aufnehmen". F Choisissez "Photo et vidéo" puis cliquez sur "Capturer une vidéo". I Selezionare "Foto e video" e fare clic su "Cattura video". NL Kies "Foto en video" en klik op "Video vastleggen" E Seleccione "Foto y vídeo" y haga clic en "Capturar vídeo". 4 UK Choose your DVCamcorder and use the buttons to control your DV-camera.
How_To_Nero_6_Code2473-4.qxd 09-02-2005 07:22 Pagina 30 UK During capturing, you will see the progress here. Während der Aufnahme sehen Sie hier den Fortschritt. D 5 F La progression de l’acquisition est affichée ici. I Durante la cattura qui viene visualizzata la sua progressione. NL Tijdens het opnemen ziet u hier de voortgang. E Durante la captura, verá el progreso de la misma aquí. UK When all video sequences are captured, click "Next".
How_To_Nero_6_Code2473-4.qxd 7 09-02-2005 07:22 Pagina 31 UK Choose "Make DVD with captured video" and "DVDVideo". D Wählen Sie "DVD mit aufgenommenen Videodaten erstellen" und "DVD-Video". F Choisissez "Créer un DVD avec la vidéo capturée" et "DVDVidéo". I Selezionare "Crea DVD con video acquisito" e "DVDVideo". NL Kies "DVD met vastgelegde video maken" en dan "DVD-Video". E Seleccione "Crear DVD con vídeo capturado" y "DVDVídeo".
How_To_Nero_6_Code2473-4.
How_To_Nero_6_Code2473-4.
How_To_Nero_6_Code2473-4.qxd 09-02-2005 07:22 Pagina 34 UK Start "Nero StartSmart" from the desktop. D Starten Sie "Nero StartSmart" von Ihrer Oberfläche aus. 1 F Lancez "Nero StartSmart" depuis le bureau. I Aprire "Nero StartSmart" dal desktop. NL Start "Nero StartSmart" vanaf het bureaublad. E Inicie "Nero StartSmart" desde el escritorio. UK Choose "Photo and video" and "Make DVDVideo". D Wählen Sie "Foto und Video" und "Eigenes DVDVideo erstellen".
How_To_Nero_6_Code2473-4.qxd 3 UK 09-02-2005 07:22 Pagina 35 Choose "Add Video files". D Wählen Sie "VideoDateien hinzufügen". F Choisissez "Ajouter des fichiers vidéo". I Selezionare "Aggiungi file video" NL Kies "Videobestanden toevoegen". E Seleccione "Añadir archivos de vídeo" 4 UK Choose the files you want to add and click "Open". D Wählen Sie die hinzuzufügenden Dateien und klicken Sie auf "Öffnen". F Sélectionnez les fichiers à ajouter puis cliquez sur "Ouvrir".
How_To_Nero_6_Code2473-4.qxd 09-02-2005 07:22 Pagina 36 UK The movies you loaded are shown here.You can edit them by choosing "Edit Movie". 5 Hier werden die geladenen Filme gezeigt. Sie können sie editieren, indem Sie "Film bearbeiten" wählen. D F Les films que vous venez de charger sont répertoriés ici. Vous pouvez les monter en choisissant "Editer le film". I Qui sono visualizzati i filmati caricati. E' possibile modificarli selezionando "Modifica Filmato".
How_To_Nero_6_Code2473-4.qxd 7 09-02-2005 07:22 Pagina 37 UK You can also trim the recorded video. When done, choose "Next". D Sie können das aufgezeichnete Videomaterial auch schneiden. Wenn Sie fertig sind, wählen Sie "Weiter". F Vous pouvez également couper la vidéo enregistrée. Lorsque vous avez terminé, choisissez "Suivant". I E' anche possibile tagliare il video registrato. Al termine, fare clic su "Avanti". NL Ook kunt u de opgenomen video verfraaien. Klik op "Volgende" zodra u tevreden bent.
How_To_Nero_6_Code2473-4.qxd 09-02-2005 07:22 Pagina 38 UK Enter the title in the “Header” field and click “Edit menu” to change the layout and background of the disc menu. 9 D Geben Sie den Titel in das Feld “Kopfzeile” ein und klicken Sie auf “Menübearbeiten“, um das Layout und den Hintergrund des DiscMenüs zu ändern. F Saisissez le titre dans le champ « En-tête » et cliquez sur « Editiz le menu » pour modifier la mise en page et l’arrière-plan du menu disque.
How_To_Nero_6_Code2473-4.qxd 11 09-02-2005 07:22 Pagina 39 UK You can preview the finished movie by pressing on the thumbnails. When done, choose "Next". D Wenn Sie auf die Thumbnail-Symbole klicken, sehen Sie eine Vorschau des fertiggestellten Films. Wenn Sie fertig sind, wählen Sie "Weiter". F Vous pouvez afficher un aperçu du film en appuyant sur les miniatures. Lorsque vous avez terminé, choisissez "Suivant". I Selezionando le miniature è possibile visualizzare un'anteprima del filmato realizzato.
How_To_Nero_6_Code2473-4.qxd 09-02-2005 07:22 Pagina 40 UK NeroVision Express is transcoding and burning your disc. NeroVision Express transcodiert und brennt Ihre Disk. 13 D F NeroVision Express procède au transcodage et à la gravure de votre disque. I NeroVision Express è in fase di trascodifica e scrittura del disco. NL NeroVision Express zet de informatie om en brandt die op de disc. E NeroVision Express está transcodificando y grabando el disco.
How_To_Nero_6_Code2473-4.qxd 09-02-2005 07:22 Pagina 41 How to copy a disc? Eine Disk kopieren Comment copier un disque? Come copiare un dischi? Hoe kopieer ik een disc? ¿Cómo copiar un disco? UK This manual shows an example of how to copy a disc. This product is for personal use only. Unauthorized duplication and distribution of copyrighted materials is a violation of copyright law. I Questo manuale contiene informazioni su come copiare un dischi.
How_To_Nero_6_Code2473-4.qxd 09-02-2005 07:22 Pagina 42 UK Start "Nero StartSmart" from the desktop. D Starten Sie "Nero StartSmart" von Ihrer Oberfläche aus. 1 F Lancez "Nero StartSmart" depuis le bureau. I Aprire "Nero StartSmart" dal desktop. NL Start "Nero StartSmart" vanaf het bureaublad. E Inicie "Nero StartSmart" desde el escritorio. UK Choose "Copy and Backup" and click "Copy CD" or "Copy DVD". Wählen Sie "Kopieren und Sichern" und klicken Sie auf "CD kopieren" oder "DVD kopieren".
How_To_Nero_6_Code2473-4.qxd 3 09-02-2005 07:22 Pagina 43 UK Choose the source drive and insert the source disc in this drive. D Wählen Sie das Quelllaufwerk und legen Sie die QuellDisk in dieses Laufwerk ein. F Choisissez le disque source puis insérez-le dans le lecteur source. I Selezionare lettore sorgente ed inserire il disco di origini in questa unità. NL Kies het bronstation en leg de bronschijf in dat station. E Seleccione la unidad origen y coloque el disco de origen en esta unidad.
How_To_Nero_6_Code2473-4.qxd 09-02-2005 07:23 Pagina 44 UK If possible, you may mark the checkbox "Quick copy" if your source drive is fast enough. Otherwise, unmark the checkbox. Click "Burn". 5 D Wenn Ihr Quelllaufwerk schnell genug ist, können Sie bei Bedarf das Kästchen "Direktkopie" ankreuzen. Andernfalls löschen Sie das Kreuz oder Häkchen in dem Kästchen. Klicken Sie auf "Kopieren". F Si votre lecteur source est suffisamment rapide, vous pouvez cocher l’option "Copie rapide".
How_To_Nero_6_Code2473-4.qxd 7 09-02-2005 07:23 Pagina 45 UK "Nero" will now burn your disc. D "Nero" wird jetzt Ihre Disk brennen. F "Nero" grave alors votre disque. I "Nero" inizierà a scrivere sul disco. NL "Nero" zal nu uw CD branden. E "Nero" grabará ahora el disco. 8 UK Congratulations, your disc has been written successfully. Click "OK". You may exit the application now. D Herzlichen Glückwunsch – Ihre Disk wurde erfolgreich erstellt. Klicken Sie auf "OK".
How_To_Nero_6_Code2473-4.
How_To_Nero_6_Code2473-4.qxd 09-02-2005 07:23 Pagina 47 How to make a Data disc? Eine Daten-Disk erstellen Comment créer un disque de données ? Come creare un dischi di dati? Hoe maak ik zelf een data-disc? ¿Cómo crear un disco de datos ? UK This manual shows you an example of how to make a Data disc. This product is for personal use only. Unauthorized duplication and distribution of copyrighted materials is a violation of copyright law.
How_To_Nero_6_Code2473-4.qxd 09-02-2005 07:23 Pagina 48 UK Start "Nero StartSmart" from the desktop. D Starten Sie "Nero StartSmart" von Ihrer Oberfläche aus. 1 F Lancez "Nero StartSmart" depuis le bureau. I Aprire "Nero StartSmart" dal desktop. NL Start "Nero StartSmart" vanaf het bureaublad. E Inicie "Nero StartSmart" desde el escritorio. UK Choose "Data" and click "Make a data CD" or "Make a data DVD". Wählen Sie "Daten" und klicken Sie auf "Daten CD erstellen" oder "Daten DVD erstellen".
How_To_Nero_6_Code2473-4.qxd 3 UK 07:23 Pagina 49 Click "Add". D Klicken Sie auf "Hinzufügen". F Cliquez sur "Ajouter". I Fare clic su "Aggiungi". NL E 4 09-02-2005 Klik op "Toevoegen". Haga clic en "Añadir". UK Choose the files to burn and click "Add". D Wählen Sie die zu brennenden Dateien und klicken Sie auf "Hinzufügen". F Choisissez les fichiers à graver puis cliquez sur "Ajouter". I Selezionare i file da scrivere e fare clic su "Aggiungi".
How_To_Nero_6_Code2473-4.qxd 09-02-2005 07:23 Pagina 50 UK When all files are added, click "Finished". D Wenn alle Dateien hinzugefügt sind, klicken Sie auf "Fertig". 5 F Une fois tous les fichiers ajoutés, cliquez sur "Terminé". I Dopo aver aggiunto tutti i file, fare clic su "Finito". NL Klik op "Voltooid" als alle bestanden zijn toegevoegd. E Una vez añadidos todos los archivos, haga clic en "Finalizado". UK D Klicken Sie auf "Weiter". F Cliquez sur "Suivant". I Fare clic su "Avanti".
How_To_Nero_6_Code2473-4.qxd 7 09-02-2005 07:23 Pagina 51 UK Choose the drive you use for burning and click "Burn". D Wählen Sie das Laufwerk zum Brennen der Disk und klicken Sie auf "Brennen". F Choisissez le lecteur à utiliser pour la gravure puis cliquez sur "Graver". I Selezionare l'unità da utilizzare per la scrittura e fare clic su "Scrivi". NL Kies de recorder waarmee u de disc wilt branden en klik op "Branden". E Seleccione la unidad para la grabación y haga clic en "Grabar".
How_To_Nero_6_Code2473-4.qxd 09-02-2005 07:23 Pagina 52 UK "Nero" will now burn your disc. D "Nero" wird jetzt Ihre Disk brennen. 9 F "Nero" grave alors votre disque. I "Nero" inizierà a scrivere sul disco. NL "Nero" zal nu uw disc branden. E "Nero" grabará ahora el disco. UK Congratulations, your disc has been written successfully. Click "OK". You may exit the application now. D Herzlichen Glückwunsch – Ihre Disk wurde erfolgreich erstellt. Klicken Sie auf "OK".
How_To_Nero_6_Code2473-4.qxd 09-02-2005 07:23 Pagina 53 How to make an Audio disc? Erstellen einer Audio-Disk Comment créer un disque audio ? Come creare un dischi Audio? Hoe maak ik zelf een muziek-disc? ¿Cómo crear un disco de audio? UK This manual shows you an example of how to make an Audio disc which can be played in any CD-Player This product is for personal use only. Unauthorized duplication and distribution of copyrighted materials is a violation of copyright law.
How_To_Nero_6_Code2473-4.qxd 09-02-2005 07:23 Pagina 54 UK Start "Nero StartSmart" from the desktop. D Starten Sie "Nero StartSmart" von Ihrer Oberfläche aus. 1 F Lancez "Nero StartSmart" depuis le bureau. I Aprire "Nero StartSmart" dal desktop. NL Start "Nero StartSmart" vanaf het bureaublad. E Inicie "Nero StartSmart" desde el escritorio. UK Choose "Audio" and "Make Audio CD". D Wählen Sie "Audio" oder "Audio CD erstellen". F Choisissez "Audio" puis "Créer un CD audio".
How_To_Nero_6_Code2473-4.qxd 3 UK 07:23 Pagina 55 Click "Add". D Klicken Sie auf "Hinzufügen". F Cliquez sur "Ajouter". I Fare clic su "Aggiungi". NL E 4 09-02-2005 Klik op "Toevoegen". Haga clic en "Añadir". UK Select the audio files (*.wav) you want to have on your new audio disc and click "Add". D Wählen Sie die AudioDateien (*.wav), die Sie auf Ihrer neuen Audio-Disk wünschen, und klicken Sie auf "Hinzufügen". F Sélectionnez les fichiers audio (*.
How_To_Nero_6_Code2473-4.qxd 09-02-2005 07:23 Pagina 56 UK When all files are added, click "Finished". D Wenn alle Dateien hinzugefügt sind, klicken Sie auf "Fertig". 5 F Une fois tous les fichiers ajoutés, cliquez sur "Terminé". I Dopo aver aggiunto tutti i file, fare clic su "Finito". NL Klik op "Voltooid" als alle bestanden zijn toegevoegd. E Una vez añadidos todos los archivos, haga clic en "Finalizado". UK D Klicken Sie auf "Weiter". F Cliquez sur "Suivant". I Fare clic su "Avanti".
How_To_Nero_6_Code2473-4.qxd 7 09-02-2005 07:23 Pagina 57 UK Choose your recorder and click "Burn". D Wählen Sie Ihren Recorder und klicken Sie auf "Brennen". F Choisissez le périphérique d'enregistrement puis cliquez sur "Graver". I Selezionare il recorder e fare clic su "Scrivi". NL Kies uw recorder en klik op "Branden". E Seleccione su grabadora y haga clic en "Grabar". 8 UK D Insert an empty disc. Legen Sie eine leere Disk ein. F Insérez un disque vierge. I Inserire un disco vuoto.
How_To_Nero_6_Code2473-4.qxd 09-02-2005 07:23 Pagina 58 UK "Nero" will now burn your disc. D "Nero" wird jetzt Ihre Disk brennen. 9 F "Nero" grave alors votre disque. I "Nero" inizierà a scrivere sul disco. NL "Nero" zal nu uw disc branden. E "Nero" grabará ahora el disco. UK Congratulations, your disc has been written successfully. Click "OK". You may exit the application now. D Herzlichen Glückwunsch – Ihre Disk wurde erfolgreich erstellt. Klicken Sie auf "OK".
How_To_Nero_6_Code2473-4.
How_To_Nero_6_Code2473-4.qxd 09-02-2005 07:23 Pagina 60 1 UK Insert the Nero disc again, and click "exit". D Legen Sie die Nero Disk wieder ein und klicken Sie auf "Exit". F Réinsérez le disque Nero et cliquez sur "Quitter". I Inserire nuovamente il disco Nero e fare clic su "esci". NL E Leg de Nero-CD weer in de lade en klik op "Sluiten". Vuelva a colocar el disco de Nero y haga clic en "salir".
How_To_Nero_6_Code2473-4.qxd 09-02-2005 07:23 Pagina 61 3 UK Click with the right mouse button on the "Nero" icon (A) and choose "Explore" (B). D Klicken Sie mit der rechten Maustaste auf das Symbol "Nero" (A) und wählen Sie "Explore" (B). F Cliquez avec le bouton droit sur l’icône "Nero" (A) et choisissez "Explorer" (B). I Fare un clic destro sull'icona "Nero" (A) e selezionare "Esplora" (B). NL E Klik met de rechtermuisknop op het pictogram "Nero" (A) en daarna op "Verkennen" (B).
How_To_Nero_6_Code2473-4.
How_To_Nero_6_Code2473-4.
How_To_Nero_6_Code2473-4.
How_To_Nero_6_Code2473-4.
How_To_Nero_6_Code2473-4.qxd 09-02-2005 07:23 Pagina 66 Safety Precautions UK D F I NL E 66 WARNING Plastic bags can be dangerous. To avoid danger of suffocation, keep this bag away from babies and small children. ATTENTION Pour eviter danger d’etouffement tenir ce sachet loin de la portee des enfants. ACHTUNG Um Erstickungsgefahr zu vermeiden bitte diesen Beutel von Kindern fernhalten. ATENCION Para evitar el peligro de asfixia no dejar este saco al alcance de los niños.
How_To_Nero_6_Code2473-4.qxd 09-02-2005 07:23 Pagina 67 Safety Precautions USA/Canada:This player is for use only with IBM compatible UL listed Personal Computers or Macintosh UL listed workstations, weighing less than 18 kg. LASER SAFETY This unit employs a laser. Do not remove the cover or attempt to service this device when connected due to the possibility of eye damage. LASER-SICHERHEIT In das Gerät ist ein Laser eingebaut.
How_To_Nero_6_Code2473-4.qxd 09-02-2005 07:23 Pagina 68 Additional information available at our website: www.philips.com/support Specifications subject to change without notice. All dimensions shown are approximate. © 2005 Koninklijke Philips Electronics N.V. All rights reserved. Reproduction, copying, usage, modifying, hiring, renting, public performance, transmission and/or broadcasting in whole or part is prohibited without the written consent of Philips Electronics N.V. 9305 125 2473.