DVD VIDEO PLAYER 01-41_dvp1013_37_eng1.
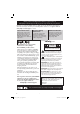
Return your Product Registration Card or register online at www.philips.com/usasupport today to get the very most from your purchase. Registering your model with PHILIPS makes you eligible for all of the valuable benefits listed below, so don't miss out. Complete and return your Product Registration Card at once, or register online at www.philips.
English Class II equipment symbol This symbol indicates that the unit has a double insulation system 3 01-41_dvp1013_37_eng1.
English ATTENTION L’utilisation des commandes ou réglages ou le non-respect des procédures ci-incluses peuvent se traduire par une exposition dangereuse à l’irradiation. ATENCIÓN El uso de mando o ajustes o la ejecucción de métodos que no sean los aquí descritos puede ocasionar peligro de exposición a radiación. Canada WARNING To reduce the risk of fire or electric shock, do not expose this equipment to rain or moisture.
Español --------------------------------------- 78 Français Français -------------------------------------- 42 Español English ------------------------------------------6 English Index This product incorporates copyright protection technology that is protected by method claims of certain U.S. patents and other intellectual property rights owned by Macrovision Corporation and other rights owners.
General Information English Environmental Information Laser Safety All unnecessary packaging has been omitted. The packaging has been made easy to separate into two materials; cardboard (box) and polyethylene (bags, protective foam sheet). This unit employs a laser. Due to possible eye injury, only a qualified service person should remove the cover or attempt to service this device. NOTE: Pictures shown maybe different between countries.
English Language Code 7 01-41_dvp1013_37_eng1.
Contents English Care and Safety Information Setup .......................................................................................................................................................... 10 Cleaning discs .......................................................................................................................................... 10 General Information Accessories supplied .......................................................................................................
Special DVD Features ................................................................................................... 27 Playing a Title ........................................................................................................................................... 27 Changing the Audio Language ............................................................................................................. 27 Subtitles...............................................................................
Care and Safety Information English DANGER! High voltage! Do not open the device. You run the risk of getting an electric shock. The machine does not contain any user-serviceable parts. Please leave all maintenance work to qualified personnel. Cleaning discs Some problems occur because the disc inside the player is dirty (frozen picture, sound disruptions, picture distortions). To avoid these problems, discs should be cleaned on a regular basis.
Accessories supplied This DVD player is designed to support the Region Management System. Check the regional code number on the disc package. If the number does not match the player’s region number (see table below), the player may be unable to playback the disc.
Connections English Connecting to television COMPONENT VIDEO IN AUDIO IN S-VIDEO IN COMPONENT VIDEO IN V (Pr/Cr) AUDIO IN S-VIDEO IN U (Pb/Cb) V (Pr/Cr) VIDEO IN Y COMPONENT VIDEO IN S-VIDEO IN V (Pr/Cr) U (Pb/Cb) VIDEO IN Y COMPONENT VIDEO IN AUDIO OUT S-VIDEO IN U (Pb/Cb) V (Pr/Cr) VIDEO IN Y AUDIO OUT U (Pb/Cb) VIDEO IN Y 2 1 IMPORTANT! – You only need to make one video connection from the following options, depending on the capabilities of your television.
English Connections (continued) ANT IN RF coaxial cable to TV Back of2 RF Modulator (example only) ANT IN TO TV AUDIO IN R L VIDEO IN CH3 CH4 ANT IN 4 3 1 IMPORTANT! – If your television only has a single Antenna In jack (or labeled as 75 ohm or RF In,) you will need an RF modulator in order to view the DVD playback on the television. See your electronics retailer or contact Philips for details on RF modulator availability and operations.
Connections (continued) English Connecting the power cord COMPONENT VIDEO IN AUDIO OUT S-VIDEO IN V (Pr/Cr) ~ AC MAINS U (Pb/Cb) VIDEO IN Y After everything is connected properly, plug in the AC power cord to the power outlet. Never make or change any connections with the power switched on. TIPS: Before making or changing any connections, make sure that all the devices are disconnected from the power outlet. 14 01-41_dvp1013_37_eng1.
Connecting to a stereo system English Optional connections Connecting to a digital AV receiver AV Receiver STEREO AUDIO IN DIGITAL AUDIO IN DIGITAL Stereo system has right/ left Audio In jacks Receiver has a PCM, Dolby Digital or MPEG decoder A Select one of the video connections (CVBS VIDEO IN or COMPONENT VIDEO IN) depending on the options available on your television.
Product Overview English Front and Rear panels PLAY/PAUSE u – Starts or pauses playback. OPEN/CLOSE ç – Opens or closes the disc tray. Disc Tray IR Sensor – Point the remote control towards this sensor STANDBY ON 2 – Turns on the player or switches to standby mode STOP – Stops playback ON LED – LED lights up when the power is on. PLAY LED – LED lights up during playback.
English Product Overview (continued) Remote Control 2 – To switch the DVD player to standby mode or ON DISC MENU – Enters or exits the disc contents menu – Switches on or off the playback control mode (for VCD 2.
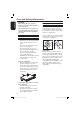
Getting Started English Step 1 : Inserting Batteries Step 2 : Finding your viewing channel A Press STANDBY-ON 2 on the DVD player to turn it on. A Open the battery compartment. B Insert two batteries type R03 or AAA, following the indications (+ –) inside the compartment. C Close the cover. CAUTION! – Remove batteries if they are exhausted or if the remote is not to be used for a long time. – Do not use old and new or different types of batteries in combination.
Step 3 : Setting up Progressive Scan feature G Select { On }, then press OK to confirm. The menu will appear on the TV. ACTIVATING PROGRESSIVE SCAN: 1. ENSURE YOUR TV HAS PROGRESSIVE SCAN. (for Progressive Scan TV only) The progressive scan displays twice the number of frames per seconds than interlaced scanning (ordinary normal TV system). With nearly double the number of lines, progressive scan offers higher picture resolution and quality. Before you start...
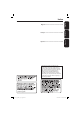
Getting Started (continued) English Step 4 : TV color system The color system of the DVD player, disc and TV should match in order for the disc to play. General Audio Video Preference - - Video Setup Page - TY Type NTSC TV Display Progressive Closed Captions Sharpness Brightness Contrast Colo A Press SETUP. B Press X to select { Video Setup Page }. C Press S T repeatedly to select { TV Type }. { NTSC } Select this if the connected TV has the NTSC color system.
Step 5 : Setting the language The language options are different depending on your country or region. It may not correspond to the illustrations shown on the user manual. On-screen display (OSD) language Select this to change the language of this DVD player screen display menu. The menu language (on-screen display) for the system will remain as you set it. Audio, Subtitle and Disc menu languages You can choose your preferred language or sound track from audio, subtitles and disc menu languages.
Playback from Disc English IMPORTANT! – If the inhibit icon appears on the TV screen when a button is pressed, it means the function is not available on the current disc or at the current time. – DVD discs and players are designed with regional restrictions. Before playing a disc, make sure the disc is for the same zone as your player.
Starting disc playback A Turn on the TV to the correct program number for the DVD player (e.g. ‘EXT’, ‘0’, ‘AV’). B Press STANDBY-ON 2 to turn on the DVD player. C Press OPEN/CLOSE ç on the front of the DVD player. You can also hold down the STOP button on the remote control to open and close the disc tray. D Place a disc into the disc tray with the label facing up, then press OPEN/ CLOSE ç. For double-sided discs, load the side which you want to play facing up. E Playback may start automatically.
Playback Features (continued) English Operations for video playback Using the Disc Menu Depending on the disc, a menu may appear on the TV screen once you load in the disc. To select a playback feature or item Use S T W X keys or numeric keypad (0-9) on the remote, then press OK to start playback. To access or remove the menu Press DISC MENU on the remote. Zooming in This function allows you to enlarge the picture on the TV screen and to pan through the enlarged picture.
Selecting various repeat functions Repeat play mode The repeat play options vary depending on the disc type. A While playing a disc, press REPEAT continuously to choose a repeat options. For DVD – Chapter (currently playing chapter) – Title (currently playing title) – All (entire disc) – Off (cancel) For JPEG In STOP mode, – Repeat One (currently playing file) – Repeat Folder (current folder) – Folder (playing all files in one folder once) – Single (currently playing file once).
Playback Features (continued) English Viewing the disc playback information Using the OSD menu This function displays disc information on the TV screen during playback. A During playback, press DISPLAY repeatedly on the remote control. The available disc information appears on the TV screen.
Special DVD Features English Playback Features (continued) Special VCD and SVCD Feature Playing a Title A Press DISC MENU. The disc title menu appears on the TV screen. B Use S T W X keys or alphanumeric keypad 0-9 to select a play option. C Press OK key to confirm. Changing the Audio Language For DVD Press AUDIO repeatedly to select different audio languages.
Playback Features (continued) English Playing MP3/WMA/JPEG/ Kodak Picture CD This DVD player can playback MP3, WMA, JPEG and picture CD files on a personally recorded CD-R/RW disc and commercial CD. Playback selection During playback, you can; Press PREV í / NEXT ë to select the previous/next track/file in the current folder. Press PLAY/PAUSE u repeatedly to pause/resume playback. IMPORTANT! You have to turn on your TV and set to the correct Video In channel. (See page 18 ‘Finding your viewing channel’).
This DVD Player setup is carried out via the TV, enabling you to customize the DVD player to suit your particular requirement. OSD Language This menu contains various language options for the language displayed on the screen. For details, see page 21. Using the General setup menu Sleep Sleep function allows you to turn off the DVD player automatically after a preset time. A Press SETUP on the remote control. The system setup menu appears.
DVD Menu Options (continued) English Using the Audio setup menu A Press SETUP on the remote control. The system setup menu appears. General -- Audio Audio Setup Page Video Preference - - Downmix Digital Audio B Press W X to select { Audio Setup Page }. C Press S T to select an item, then press X to access. Example: { Downmix } The options for the selected item appears. If the selection in the menu is greyed out, that means the feature is not available or not possible to change at the current state.
Digital Output Set the Digital Output according to your optional audio equipment connection. { All } Select this if the connected device has a built-in multichannel decoder that supports one of the multichannel audio format (Dolby Digital, MPEG-2). { PCM Only } Select this if the connected device is not capable of decoding multichannel audio. The DVD player will convert the Dolby Digital and MPEG-2 multichannel signals to PCM (Pulse Code Modulation). { SPDIF Off } To deactivate the digital audio output.
DVD Menu Options (continued) English TV Type This menu contains the options for selecting the color system that matches the connected TV. For details, see page 20. Setting the TV Display The picture shape can be adjusted to fit your TV and the format must be available on the playback disc. Otherwise, the TV display will not affect the picture during playback. A In ‘Video Setup Page’, press S T to select { TV Display }, then press X.
Sharpness You can personalize your picture color by adjusting sharpness. A In ‘Video Setup Page’, press S T to select { Sharpness }, then press X. { High } Choose high to make the picture’s edge sharper. { Medium } Choose medium to get a standard picture. { Low } Choose low to make the picture's edge softer. English DVD Menu Options (continued) Using the Preference setup menu A Press STOP Ç twice to stop playback, (if any), then press SETUP on the remote control. The system setup menu appears.
DVD Menu Options (continued) English Subtitle/Audio/Disc Menu These menus contains various language options for audio, subtitle and disc menu which may be recorded on the DVD. For details, see page 21. Parental Depending on the DVD, you may be asked to change the parental level while playing the disc. The rating levels are from 1 to 8 and are country dependent. You can prohibit the playing of certain discs that are not suitable for your children, or have certain discs played with alternative scenes.
Changing the Password You need to enter your six-digit password to play a prohibited disc or if prompted for a password. The same default password is used for Parental. A In ‘Preference Page’, press S T to select { Password }, then press X to select { Change }. B Press OK and the menu appears on the TV screen. General Audio Video Restoring to the original settings Setting the { Default } function will reset all options and your personal settings to the factory defaults, except your Parental.
Others English Software upgrade Periodically Philips will issue software upgrade to enhance your user experience. IMPORTANT! – Power supply must not be interrupted during upgrade! To check the current software version of this DVD player; A Press OPEN/CLOSE ç on the DVD player to open the disc tray. The disc tray will open. B Press numeric keypad ‘55’ on the remote control. The file name of the software installed in the DVD player appears on the TV screen.
TV STANDARD Number of lines Playback (NTSC/60Hz) 525 (NTSC) VIDEO PERFORMANCE Video DAC 12 bit, 108 MHz YPbPr 0.7 Vpp ~ 75 ohm Video Output 1Vpp ~ 75 ohm VIDEO FORMAT Digital MPEG 2 for DVD,SVCD Compression MPEG 1 for VCD DVD 50Hz Horiz. resolution 720 pixels Vertical resolution 576 lines 60Hz 720 pixels 480 lines VCD 50Hz Horiz. resolution 352 pixels Vertical resolution 288 lines 60Hz 352 pixels 240 lines AUDIO FORMAT Digital MPEG/ AC-3/ PCM MP3(ISO 9660) compressed Digital 16, 20, 24 bits fs, 44.
Troubleshooting English WARNING Under no circumstances should you try to repair the system yourself, as this will invalidate the warranty. Do not open the system as there is a risk of electric shock. If a fault occurs, first check the points listed below before taking the system for repair. If you are unable to remedy a problem by following these hints, consult your dealer or Philips for help. Problem Solution No power. – Press STANDBY-ON button on the front of the DVD player to turn on the system.
Problem Solution The aspect ratio of the screen cannot be changed. – The aspect ratio is fixed on the DVD disc. – Depending on the TV, it may not be possible to change the aspect ratio. Not able to select some items in the setup/system menu. – Press STOP button twice before selecting the setup/ system menu. – Depending on the disc availability, some menu items cannot be selected. The DVD player does not start playback. – Insert a readable disc with the playback side facing down.
Glossary English Analog: Sound that has not been turned into numbers. Analog sound varies, while digital sound has specific numerical values. These jacks send audio through two channels, the left and right. Aspect ratio: The ratio of vertical and horizontal sizes of a displayed image. The horizontal vs. vertical ratio of conventional TVs. is 4:3, and that of widescreens is 16:9. AUDIO OUT Jacks: Jacks on the back of the DVD System that send audio to another system (TV, Stereo, etc.).
WARRANTY COVERAGE: PHILIPS warranty obligation is limited to the terms set forth below. WHO IS COVERED: Philips warrants the product to the original purchaser or the person receiving the product as a gift against defects in materials and workmanship as based on the date of original purchase (“Warranty Period”) from an Authorized Dealer. The original sales receipt showing the product name and the purchase date from an authorized retailer is considered such proof.