DIGITAL VIDEO DISC PLAYER & VIDEO CASSETTE RECORDER DVP315OV/37 User manual Philips vous remercie de votre _ d'une Thank you for choosing Philips. Need Gracias par escoger Philips. conf!ance. help fast? aide ayuda in reed iata? rapide? Read your Quick Start Guide and/or Owner's Manual first for quick tips that make using your Philips product more enjoyable.
Registering your model with PHILIPS makes you eligible for all of the valuable benefits listed below, so don't miss out. Complete and return your Product Registration Card at once, or register online at www.philips.com/usasupport to ensure: Know these PHILIPS safety symbols Congratulations on your purchase, and welcome to the "[amily!" Dear PHILIPS product owner: Thank you for your confidence in PHILIPS. You've selected one of the best-built, bestbacked products available today.
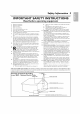
IMPORTANT SAFETY Read before INSTRUCTIONS operating 1. Read these instructions. B. 2. 3. 4. Keep these instructions. Heed all warnings. Follow all instructions. C. D. 5. 6. 7. Do not use this apparatus near water. Clean only with a dry cloth. Do not block any of the venflation openings. with the nlanulacturers instructions. 8. Do not install near any heat sources such as radiators, heat registers, stoves, or other apparatus (including amplifiers) that produce heat. 9.
Safety Information o®®®®®m moooeQeeeooooo®ooo®®®®®m Safety Precautions Warning: moisture. To prevent (cont'd) moooQQeeeooooooooo®®®®®m moooQQeeeooooooooo®®®®®m fire or shock hazard, do not expose this equipment moooQQeeeooooooooo®®®®®m to rain or Federal Communications Commission (FCC)Warning: Any unauthorized changes or modifications to this equipment void the user's authority to operate it. • Do not stand the unit up vertically. Install the unit in a horizontal and stable position.
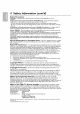
General Information Safety Information ......................... Table of Contents ........................... Introduction ................................ 3-4 5 6 Playable Discs andVideo Cassettes .............. 7 AdditionalVCR Features Multi-ChannelTelevisionSound/Hi-Fi Stereo ...... Disc Playback Features Menus, Playback Control (PBC) Function ........ Fast Forward/Reverse Search ................. Initial DVD/VCR Setup Hookups ............................... Remote Control Setup ..........
Welcome? This DVD/VCR combines a DigitalVideo Disc (DVD) player and a Hi-FiVideo Cassette Recorder (VCR) into one unit, letting you play DVDs,Audio Compact Discs (Audio CDs), andVideo Cassettes on one piece of equipment. Read this owner's manual carefully to learn how to use the features listed below.
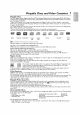
Playable oooo®o®®®m moooQeeeeooooooooo®®®®®m Playable Discs and Video Cassettes moooQQeeeooooooooo®®®®®m moooQQeeeooooooooo®®®®®m 7 moooQQeeeooooooooo®®®®®m moo_ Discs The DVD player will play Digital Video Discs (DVDs); finalized Digital Video Discs Rewritable (DVD+RW);Video Compact Discs (VCDs);Audio Compact Discs (CDs); finalized Compact Discs Recordable (CD-R) and Compact Discs Rewritable (CD-RW).
Hookups Determining the best possible connection... Your hookup will be determined primarily by your existing equipment, especially your T_.These guidelines describe which options have the best picture and sound quality.You will not use all the jacks on the DVD/VCR. If yourTV only has an RF-style jack, usually labelled Antenna In, RF In or 75 ohm, use the ANT-OUT jack of the DVD/VCR to connect to theTV.This hookup provides both audio and video in a single cable.
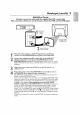
Hookups (cont'd) DVD/VCR to TV only connection using only the supplied black RF coaxial cable will let you use the features of both theVCR and the DVD player. Simplest This connection Antenna Cable or TV signa[ In Jack (on back of TV) example only Black coaxia[ cable RF (suppJied) Disconnect the antenna or CableTV signal from yourTV and connect it to the ANT-IN (Antenna In) jack of your DVD/VCR. 2 Connect (Antenna ANTENNA labelled TV assistance.
Hookups o®®®®®m (cont'd) moooQQeeeooooooooo®®®®®e moeoQQeoe®oooooooo®o®®®m DVD/VCR This connection to Cable moooQQeeeooooooooo®®®®®m Box or Satellite moooQQeeeooooooooo®®®®®m Receiver Using only basic RF coaxial cables will let you use the features of both theVCR mOOOQQ. and TV and the DVD player.
Hookups oooo®®®®®m moooQQeeeooooooooo®®®®®e DVD/VCR This connection moooQoeeeooooo®ooo®®®®®m to Cable moooQQeeeoooo®®ooo®®®®®m Box or Satellite Receiver (cont'd) moQoQQeeeooooooooo®®®®®m 11 moo. and TV Using only basic RF coaxial cables will let you use the features of both theVCR and the DVD player.
Hookups o®®®®®m (cont'd) moooQeeeo®oooooooo®®®®®m DVD/VCR to aTV moooQQeeeooooooooo®®®®®m that mooeQQeeeooooo®ooo®®®®®m has Audio/Video, moooQQeeeooooooooo®®®®®m ComponentVideo or S-Video mOOOQQ_ In jacks B_cl< of TV AUDIO iN ¢0MPONENT1 _ B Audio Cables Antenna or Cable TV VIDEO IN Signal _:oANT-IN Jack Back of TV Connect the antenna or Cable TV signal to the ANT-IN jack of your DVD/VCR.
Hookups (cont'd • eeeeoooooe eeeeeeeeeeeeeeeeeeoooooe eeeeeeeeeeeeeeeeeeoooooe OVD/VCR eeeeeeeeeeeeeeeeeeoooooe to aTV eeeeeeeeeeeeeeeeeeoooooe and a Stereo Antenna/Cable TV Signal 3 Connect the antenna or CableTV jack of your DVD/VCR. signal to the ANT-IN (Antenna In) white ConnectDVD/VCR the supplied AUDIOred OUT and white jacks on audio the cables DVD/VCR to theand redto and the red and white AUDIO IN jacks on the Stereo. Hatch the cable colors to the jack colors.
Hookups o®®®®®m (cont'd) moooQQeeeoo®®ooooo®®®®®m DVD/VCR moooQQeeeooooooooo®®®®®m to aTV moooQQeee®®ooo®ooo®®®®®m moooQQeee®oooooooo®®®®®m and to a Stereo that is Dolby Digital-compatible Using Digital Audio connections Antenna/Cable TV Signal Back of TV (example Connect the antenna of your DVD/VCR.
Remote oooo®®®®®m mooQQQeeeooooo®ooo®®®®®m Putting Batteries mo®oQQeeeoooo®oooo®®®®®m in the Remote Control Setup moooQQeeeooooooooo®®®®®m moooQQeeeooooooooo®®®®®m 15 moo_ Control Remove the battery compartment lid on the bottom of the remote control by pressing the tab, then lifting the lid. compartment Place two AA batteries with their + inside and - the endsbattery aligned as indicated. Replace Using the the battery Remote compartment lid.
First-time DVD/VCR Setup Before turning on your DVD/VCR, make sure batteries are in the remote control and the DVD/VCR and TV are connected correctly. You cannot program channels if you are using a Cable Box or a Satellite Receiver. These menus may not appear on the DVD/VCR. if you have already Turn on the TV. Set it to channel Turn on the TV. turned 3 or 4 or its 2 AUDIO/VIDEO IN channel, depending on how you connected the DVD/VCR to aTV. 2 PressVCR, then press STANDBY-ON © .
Video Cassette Playback oooo®®®®®m moooQQeeeooooooooo®®®®®m moooQQeeeooooooooo®®®®®m moooQQeeeooooooooo®®®®®m moooQQeeeooooooooo®®®®®m 17 moo_ Read and follow the steps below to play a tape. Turn on theTV. Set it to channel 3 or 4 or its Turn on the TV. AUDIO/VIDEO IN channel. This depends on how you connected the DVD/VCR to aTV. Details are on pages 8-14. 2 With the DVD/VCR power off, insert a tape in the cassette compartment of the DVD/VCR.VCR light will appear on the front of the DVD/VCR.
Disc Playback Before you begin, turn on the TV, Stereo connected to the applicable) are set to the correct Details DVD/VCR. are on pages Nake and other equipment sure the TV and the Stereo (if channel. 8-14. 000 O@O®" 000®" 0000 REPEAT REPEAT AOD_O Press STANDBY-ON Press DVD DVD/VCR. so DVD © to turn on the light appears DVD/VCR.
Display Panel VCR light This light appears when the DVD/VCR is inVCR mode.You can only watch videotapes or access VCR features and TV channels when VCR light is on.To makeVCR light come on, pressVCR on the remote control or SOURCE on the front of the DVD/VCR. DVD light This light appears when the DVD/VCR is in DVD mode.You can only watch DVDs when DVD light is on.To make DVD light come on, press SOURCE on the front of the DVD/VCR or DVD on the remote.
= e®®®®®= Front Panel, Rear Panel and Remote =ooeeeeeeooooooeee®®®®®= Front =oooeeeeeooooooeee®®®®®= Control =oooeeeeeooooooeee®®®®®= =oooee_ Panel Remote STANDBY-ON AUDIO Sensor,_ © Button _CHANNEL _ and ViDE REW _?_t°n (VC !) _ _ -_'_ __ Button (DVD) -_,,-_o J i " " Button (VCR) PLAYI_ Buttons _ RECtoOn (VC R) _ I I (VCR) _ _ AV _OPEN/CLOSE - r.rvvu PP" I_utton _V_.
Channel Setup • olllllllll iiiiIIooooooooolllllllll iiiiIIooooooooolllllllll iiiiIIooooooooolllllllll iiiiIIooooooooolllllllll 21 iii Although your DVD/VCR may automatically memorize the channels you receive when you turn it on for the first time, you can set up the channels again. SEARCH OOOO I_TIMER PROGRAMMING AUTO REPEAT [OFF] CHANNEL SET UP CLOCK SET LANGUAGE SELECT AUDIO OUT TV STEREO [ON] SAP 2-3- Press • or • to select CHANNEL Then, press I_. SET UP.
Clock (VCR) PressVCR, then press DISC/VCR MENU so MENU appears. If the clock has never been set, the CLOCK SET menu may appear when you press DISC/VCR MENU. If so, follow the instructions from step 3 on this page. Press • or • to select CLOCK SET.Then, press While the MONTH space is flashing, press • until the month appears.Then, press I_. M\O NT H DAY 9 3 / .... / 2o9° YEAR EAM/PM CLOCK SET While the DAY space is flashing, press • the day appears.Then, press I_.
Language (VCR) • OOOOOOBBBm mIllOOOOOOOOOOOOOOOOBBBm mIllOOOOOOOOOOOOOOOOBBBm mIllOOOOOOOOOOOOOOOOBBBm mIllOOOOOOOOOOOOOOOOBBBm Follow the steps below to change the language of theVCR on-screen displays and menus.
Videotape Recording Read and follow the steps below to record a television program onto a videotape. ,_ Before you begin, make sure the DVD/VCR is in VCR mode. PressVCR soVCR light appears on the front of the DVD/VCR. Turn on the TV. DVD/VCR. Insert a tape in the Turn on theTV and set it to channel 3 or 4 or the Video In channel. If you connected the DVD/VCR to the TV using the supplied audio and video cables, select your TV'sVideo In channel. Details are on page 12.
Recording One ChannellWatching PressVCR, then currentTV channel. PressVCR/TV position. once TheVCR DVD/VCR's Use theTV you want press RECORD remote to watch to record 25 the Details are on page 24. to put light will display • Another the DVD/VCR disappear from in TV the panel. control to select the channel at the TV. To return to the channel remote control to return being recorded, use the TV to channel 03 or 04 at the TV. Details are on page 9.
One-Touch Recording One-Touch Recording (OTR) lets you set a timed recording 30 minutes to 8 hours long of the currentTV channel. Before you begin: _ Place the DVD/VCR in VCR mode. Press VCR so VCR light appears on the front of the DVD/VCR. ¢_Select a recording speed (SP,SLP) with SPEED. _ Put a videotape in the cassette compartment. Make sure the tape's record tab is intact and the tape is long enough to record the program(s).
Rerecording oooo®®®®®e moooQQeoeooooooooo®®®®®m moooQQeeeoooo®oooo®®®®®m These instructions show you how to copy videotapes.The Camcorders may operate differently. 1. Audio cables from AUDIO of DVD/VCR 1 toAUDIO (Tape Duplication) moooQQeee®oooooooo®®®®®m 27 eeeoQQeee®®ooooooo®®®®®m illustration uses two DVD/VCRs. OtherVCRs moo_ or OUT jacks (red and white) IN jacks of DVD/VCR 2 DVD/VCR 1 Playing unit 2.
o®®®®®m Timer Recording moooQQeee®oooooooo®®®®®m moooQQeee®®ooo®ooo®®®®®m mooeQQeeeooooooooo®®®®®m Follow the steps below to program theVCR of the DVD/VCR to record TV programs while you're away from home. Before you begin: ¢_Set up the TV channels at the DVD/VCR. Details are on page 21. _ Set the clock. Details are on page 22. _; Put a tape in the cassette compartment of the DVD/VCR. Make sure the tape's record tab is intact and the tape is long enough to record the program(s).
Timer Recording (cont'd) 29 @ If you are recording from other equipment, select L1 or L2.To determine L1 or L2, refer to the Helpful Hints. @ If you are using a Cable Box/Satellite Receiver, select the Cable Box/Satellite Receiver output channel (03 or 04). Then, at the Cable Box/Satellite Receiver, select the channel you want to record. Leave the Cable Box/Satellite Receiver on for the timer recording. Details are on page 10. Press • or • to select a recording tape speed.
DVD to Videotape Duplication Follow the steps below to copy a DVD to a videotape. This will be possible only if the DVD is not copy protected. Before you begin: _ Put a videotape in the cassette compartment. Make sure the tape's record tab is intact and the tape is long enough to record the DVD. _ Put the DVD you want to copy in the disc tray. _ PressVCR soVCR light appears on the front of the DVDIVCR. _ Turn on the TV and set it to channel 3, 4 or its Video Input.
Repeat Follow the steps below to play a videotape PressVCR, appears. then Playback repeatedly. press DISC/VCR MENU OOO O@O®" OOO®" 0000 RE_T so MENU SUS_T_ RETURN Press • or • to select AUTO REPEAT. Press I_ so ON appears next to AUTO REPEAT. Tape playback will begin immediately.AUTO REPEATI_ will appear on theTV screen briefly. (If you are fast forwarding or rewinding the tape, press CLEAR!RESETto remove the menu,then press PLAY _ I_ to begin tape playback.
Time Search Follow the steps below to search forward or backward on a tape a specific length of rime.There must be a tape in the cassette compartment. PressVCR, then press SEARCH SEARCH screen appears. TIME until theTIME ...... ©@©®, ©©©®, OOOO SEARCH SU_TIT£E ZOOM RETURN TITLE DFSC'VCA 2 3 Within 30 seconds, press • or • until your desired length of time appears. Or, press and hold • or • until you reach the desired length of time.
Special Effects Playback oooo®®®®®e ÷ moeoQooeeoo®®o®oooo®®®®m moeoQQeeeo®®®ooooo®®®®®m moooQQeeo®oooooooo®®®®om moooQQeeeo®®®ooooo®o®®®m 33 moo_ Before you begin, pressVCR soVCR light appears on the front of the DVDNCR. Forward and Reverse Searching (SP/LP/SLP) Super High Speed Searching (LP/SLP) / During tape playback, press and release I_1_ or _1_1. A fast forward or reverse picture search will begin. Press I_1_ or _1_1, then press again. The search speed will increase.
Multi-Channel oo®®®®m moooQQeeeo®ooooooo®®®®®m Television Sound / Hi-Fi Stereo moeoQQeeeooo®o®ooo®®®®®e moooQQeeeooooooooo®®®®®m moQQQQeee®®®®ooooo®®®®®m eOOOQQ_ Your DVD/VCR can play tapes recorded in Hi-Fi (high fidelity) stereo, which produces a crisp, clear sound from the left and right audio channels.Your DVD/VCR also can play tapes recorded in a second audio (usually, that means your program is recorded in a second language).
Menus, Playback DVD Control (PBC) Function 35 Disc Menus Some DVDs contain menus that describe the contents of the disc or allow you to customize disc playback. For example, the menu may offer choices for subtitle languages, director's commentary or Sound track playback.To use the DVD menu and select playback features, follow these steps. Press DVD to put the DVD/VCR in DVD mode. DVD light will appear on the front of the DVD/VCR. Press DISC/VCR MENU.
Press DVD to put the DVD/VCR in DVD mode. DVD light will appear on the front of the DVD/VCR. 2 During playback, press SEARCH I_1_ or _ on the remote control. _ During DVD playback, pressing SEARCH I_1_ or 44 will forward or reverse the picture at approximately 2, 8, 20, 50 or 100 times the normal speed.The speed may vary depending on the disc.l_l_ 1,1N_ 2,1_1_ 3,1_1_ 4 or I_1_ 5 will appear briefly on the TV screen to indicate forward searching.
Title/Chapter Title/Chapter Playback, During DVD chapter) or TT playback, (for title) appears press SEARCH on the TV.The until number CH (for of available titles or chapters will appear at the right ( /4, for example). Enter the title or chapter number 12/17 O0 0@0®, 000®, 0000 the STOP pLAy PAUSE I J Time using Number buttons. The title or chapter will play. @ To select a single-digit [rack number when there are more than 10 tracks, press OK to play the track.
Track Playback There are three ways to play a specificVideo CD (without PBC), Audio CD, MP3,Windows Media TM Audio or JPEG track: Use the Number buttons, the SEARCH button or SKIP I_I/CH • and SKIP I_/CH •. _-÷ Before you begin, press DVD so DVD light appears on the front of the DVD/VCR. 0 ..u0o0 0000 Using the Number Press the Number Buttons buttons to enter a track number. @@@ DISC'VC_ SYSTEM Playbackwill start at the selected track.
Paused and Step-by-Step Playback, Resume On 39 Paused and Step-by-Step Playback Press DVD to put the DVD/VCR in DVD mode. DVD light will appear on the front of the DVD/VCR. 2 3 During disc playback, press PAUSE I I. Playback will pause and the sound will be mute. ,_ Pressing PAUSE II once during Dual Playback will pause a JPEG file only. Pressing PAUSE II one more time will pause an MP3 playback.
Repeat, A-B Repeat Repeat SEA_C_ Press DVD to put the DVD/VCR in DVD mode. DVD light will appear on the front of the DVD/VCR. 2 MODE DISPLAY 000 SUBTffLE _£TU£N During DVD, Video CD (without PBC), Audio CD, MP3, Windows Media TM Audio or JPEG playback, press REPEAT until the repeat mode you want appears on theTV.
UseMarkers to remember yourfavoriteplaces ona DVD,Video CD (without PBC) or Audio CD. m Before you begin, place the DVD/VCR in DVD mode. Press DVD so DVD light appears on the front of the DVD/VCR. Play the disc to within 30 seconds of the point at which you want to set the Marker. Press MARKER. The Markers will appear at the top of the TV screen. Example: DVD STOP pLAy PAUSE Within 30 seconds, press I_ to beneath select athe Marker (1-10).Make sure : : 4 or appears number.
Subtitles, Camera Angles Subtitles The DVD/VCR allows you to select a language for subtitles during playback.You may select only languages that are available on the DVD. SEARCH MODE DISP_¥ OOO REPEAT REPEAT AUDIO Press DVD to put the DVD/VCR in DVD mode. DVD light will appear on the front of the DVD/VCR. 2 o®............. RETURN During playback, press SUBTITLE repeatedly to select a subtitle language. The number of available languages appears at the right of the subtitle display.
Audio Language, Stereo Sound Mode Audio Language You can select a language for DVDs during playback if multiple languages are available. Press DVD to put the DVDIVCR in DVD mode. DVD light will appear on the front of the DVDIVCR. 2 During DVD playback, press AUDIO repeatedly to choose one of the available languages. Audio display appears at the top of theTV screen, and the new audio will be heard.The display will disappear after about 5 seconds.
Slow Motion Press PAUSE 2 II during DVD orVideo CD playback. SEARCH MODE Press I_1_ or _1_1. Slow motion playback will begin. Press I_1_ or _ repeatedly during slow motion playback to play a DVD forward or backward at approximately 1/16, 1/8 or 1/2 the normal speed. Reverse slow motion is not available on aVideo CD. An I1_ 1 (1/16), I1_ 2 (1/8) or I1_ 3 (1/2) will appear briefly on the TV screen to indicate slow forward playbacl<.
ProgramlRandom Playback Program 45 Playback You may determine the order in which Audio CD, Windows Media TM Audio or JPEG tracks will play. Random MP3, Playback _EPEAT REPEAT AOD_O ©@©®, ©©©®, 0000 You may play the tracks of an Audio CD in Random order instead of the order in which they are recorded (1,2,3...).You can also use this feature for lP3,Windows Media TM Audio and JPEG tracks. _UBT_TLE ZOOM _TU_N Press DVD to put the DVD/VCR in DVD mode.
/VIP3/Windows Media TMAudio/JPEG Playback The DVD/VCR will play MP3,Windows Media TM Audio andJPEG files that you record and finalize on a CD-R (Compact Disc-Recordable) or CD-RW (Compact Disc-Rewritable). These discs may contain pictures in a JPEG format or audio tracks in an HP3 orWindows HediaTMAudio format. For example,you may have photographic film developed by a retailer that places the pictures on a CD-R for you.These pictures may be in JPEG format.
Dual Playback This feature lets you play NP3 and JPEG files simultaneously. Available only when DUAL PLAYBACK is ON. See pages 58-59 on how to set the DUAL PLAYBACK ON or OFE Press DVD to put the DVD/VCR in DVD mode. DVD light will appear on the front of the DVD/VCR. Press DISC/VCR MENU playback. A file list will appear.
DVD On-Screen Displays Displays Press DVD to put the DVD/VCR in DVD mode. DVD light will appear on the front of the DVD/VCR. Press DISPLAY displays during 2°3 O@O®" DVD repeatedly playback. to see the following SUBTITLE ZOOM ANGLE SKIP/OH o ®, ] CH (chapter): -Current chapter number/ total chapters Elapsed playing time of the current chapter; remaining playing time of the current chapter DISCNCR TT (title): total titles STOP TFMERS_ .
On-Screen Displays (cont'd) 49 Press DVD to put the DVD/VCR in DVD mode. DVD light will appear on the front of the DVD/VCR. Press DISPLAY information During JPEG until the current track or file appears.
Black Level Adjust Black Level to brighten the DVD orVideo CD picture. Press DVD to put the DVD/VCR in DVD mode. DVD light will appear on the front of the DVD/VCR. MODE the orVideo Black Level shows in press the top lee During so DVD CDicon playback, corner of the TV screen. Black Level is not available for a PAL DVD. Virtual Surround is available ON repeatedly to choosepress ON 4,1_ or OFF. ON brightens Within 10 seconds, or OK the dark parts of the picture.
Language 51 You can select differen[ languages for the Audio or Subtitles of DVDs, as well as languages for DVD disc menus and the setup menus of the DVD player. Press DVD to put the DVD/VCR in DVD mode. DVD light will appear on the front of the DVD/VCR. SEARCH MODE D_SP_¥ OOO O@O®" OOO®, OOOO REPEAT REPEAT AUDIO SUBTITLE ZOOM SYSTEM/MENU.The QUICK press SETUP screen While playback is stopped, appears.
Language (cont'd) Instructions continued from the previous page. Press • or • to select a language, then press OK. The language lists may continue on multiple screens. Press • or • to move to the other screens. ÷ If you select OTHER for AUDIO, SUBTITLE, or DISC MENU, press four Number buttons to enter the code for the language you desire. Use one of the Language Codes listed below.The language or language code you select will appear in the Language menu beside AUDIO, SUBTITLE, or DISC MENU.
Display 53 You may adjust the TV Aspect ratio and Still Mode clarity, and Progressive Scan compatibility. Press DVD to put the DVD/VCR in DVD mode. DVD light will appear on the front of the DVD/VCR. When SYSTEM/MENU. playback appear. isThe stopped, QUICK press SETUP screen will l 3 Press _1 or I_ to select CUSTOM the menu, then press OK. Press _1 or I_ to select press OK. _ at the top of (DISPLAY), then PHILIPS 5 Press • or • to select an item, then press OK.
Display (cont'd) Instructions continued from the previous page. ÷ If you selected STILL MODE, press • or • to select a setting, then press OK. This determines the qualityof an imagein still mode.AUTO is the default setting. If you select FIELD, still images will be stabilized but coarse due to the small amount of data. If you select FRAME, the images will be highly defined due to the simultaneous output of two fields.
Audio • eeeeoooooe eeeeeeeeeeeeeeeeeeoooooe eeeeeeeeeeeeeeeeeeoooooe eeeeeeeeeeeeeeeooooooooe eeeeeeeeeeeeeeeeeeoooooe 55 eee* Change Audio settings based on other equipment you connected to the DVD player or according to your disc sound features.These setting only affect the Audio from the DVD player of the DVD/VCR. Press DVD to put the DVD/VCR in DVD mode. DVD light will appear on the front of the DVD/VCR. SYSTEM/MENU. While playback appear.
Parental Password Parental Controls prevents viewing of DVDs that exceed your rating limits.This feature will not limit viewing if the DVD is not rated or coded. Check your DVDs and settings before letting children access the DVD/VCR.You will need a password to change the Parental settings or to play a blocked disc. Follow these steps to change your password. Press DVD to put the DVD/VCR in DVD mode. light will appear on the front of the DVD/VCR. 2 DVD While playback is stopped, press SYSTEM/MENU.
Followthesestepsto settheratinglevel for your DVDs. DVDs whose ratings exceed the level you set will not play. Press DVD DVD to put light will the appear DVD/VCR on the front in DVD of the mode. SEARCH REPOT 2 While The playback QUICK _ is stopped, SETUP press MODE D_SP_¥ 000 O®O®" 000®" 0000 DVD/VCR. SYSTEM/MENU. screen appears. REPEAT AUDIO SUbTIlE ZOOM ANa_ RETURN TIT_E _EA_,_E_ S_IP/_ _LOW ENGUSH ]_ ASPEOT 4 _ LETTERB0× ................................
You may adjust the Angle Icon,Automatic Dual Playback and Slide Show settings. Power Off, Press DVD to put the DVD/VCR in DVD mode. DVD light will appear on the front of the DVD/VCR. 2 While playback SYSTEM/MENU. is stopped, press The QUICK SETUP screen appears. 1' / Pressmenu, the _1 or then I_ to press select OK. CUSTOM at the top of / Press 4 or I_ to select press OK.
Others (cont'd) ÷ If you selected repeatedly ON. AUTO to choose Choose ON ON POWER if you want there is no activity minutes. OFF, or OFEThe press default 59 OK setting is the player to turn off when at the player or its remote for 30 \ AUTO POWER OFF ÷ If you selected DUAL PLAYBACK, press OK to choose ON or OFF. This feature lets you play MP3 and JPEG files simultaneously. \ ...........................................................................................................
Glossary AUDIO IN/OUT lacks: jacks on the front and back of the DVD/VCR that receive audio from another source (IN) or send audio to another system (OUT).These jacks are red (right) and white (left). Automatic Channel Setup: process in which the VCR memorizes all availableTV channels.Then,when you press SKIP I_I/CH • or SKIPI_I/CH • inVCR mode, you only scan through channelsyou receive. Bands: settings that allow you to tune channels.
Helpful Hints 61 If you are having problems with your product, check this list of problems and possible solutions before requesting service.You may be able to solve the problem yourself. If you need to call a customer service representative, please know the model number and serial number of your product before you call.This information is displayed on the back of the product. Also, please take a moment to identify the problem you are having,and be prepared to explain this to the representative.
Helpful Hints (cont'd) You cannot change the camera angle of a DVD. • The DVD might not contain segments recorded from different camera angles.Seeif multiple anglesare availableby referring to the disc case or DVD disc menu. Details are on page 42. You cannot change the audio or subtitle language of a DVD. • The DVD does not contain audio or subtitles in the desired language.Not all DVDs containaudio or subtitles in multiple languages.
Helpful • OOOOOOBBBm mIllOOOOOOOOOOOOOOOOBBBm mIllOOOOOOOOOOOOOOOOBBBm Hints (cont'd) mIllOOOOOOOOOOOOOOOOBBBm mIllOOOOOOOOOOOOOOOOBBBm 63 mllo You cannot insert a video cassette. • Insert the tape, window side up,with the record tab facing you. • Make sure a tape isn't already in theVCR by pressing STOP/EJECTI1_A (VCR) on the front of the DVD/VCR. • Gently push on the center of the tape when putting it in theVCR. Never force the tape into theVCR.
Care and Maintenance Cleaning the DVD/VCR • Wipe the front panel and other exterior surfaces of the DVD/VCR with a soft, slightly damp cloth. • Never use a solvent, thinner, benzene or alcohol to clean the DVD/VCR. Do not spray insecticide liquid near the DVD/VCR. Such chemicals may discolor the surface or damage the DVD/VCR. Cleaning a Disc • Use a soft, dry cloth to wipe the disc. • Wipe the disc in a straight line from the center to the edge. Never wipe the disc in a circular motion.
Limited Warranty WARRANTY COVERAGE: PHILIPS warranty below. WHO obligation is limited co the terms set forth IS COVERED: Philips warrants the product to the original purchaser or the person receiving the product as a gift against defects in materials and workmanship as based on the date of original purchase ("Warranty Period") fl'om an Authorized Dealer. The original sales receipt showing the product name and the purchase date fl'om an authorized retailer is considered such proof.
Information Index ac power cord ................. 20 angle button ................ 20, 42 angle icon .................. 42, 58 ant-in (antenna in) jack ...... 9-14, 20 ant-out (antenna out) jack . . .9-11,20 arrow buttons ................. 20 audio button ................ 20, 43 audio inlout jacks ....... 12-13, 20, 27 audio settings .................. 55 auto power off .............. 58-59 auto repeat ................... 31 automatic tape playback ................ tape rewind, eject .............