DVDVIDEO VIDEOPLAYER PLAYER DVD DVP3166 Thank you for choosing Philips. Need help fast? Read your User’s Manual first for quick tips that make using your Philips product more enjoyable. If you have read your instructions and still need assistance, you may access our online help at www.philips.com/support 01-51_dvp3166_94_eng1.
This product incorporates copyright protection technology that is protected by method claims of certain U.S. patents and other intellectual property rights owned by Macrovision Corporation and other rights owners. Use of this copyright protection technology must be authorized by Macrovision Corporation, and is intended for home and other limited viewing uses only unless otherwise authorized by Macrovision Corporation. Reverse engineering or disassembly is prohibited. 2 01-51_dvp3166_94_eng1.
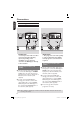
English ------------------------------------------6 01-51_dvp3166_94_eng1.
General Information English Environmental Information Laser Safety All unnecessary packaging has been omitted. The packaging has been made easy to separate into two materials; cardboard (box) and polyethylene (bags, protective foam sheet). This unit employs a laser. Due to possible eye injury, only a qualified service person should remove the cover or attempt to service this device. NOTE: Pictures shown maybe different between countries.
English Language Code 5 01-51_dvp3166_94_eng1.
Contents English Care and Safety Information Setup ....................................................................................................................................................................... 8 Cleaning discs ....................................................................................................................................................... 8 General Information Accessories supplied ...............................................................................
Viewing Audio CD playback information ............................................................................27 Disc Go To / Track Go To / Track Selection .............................................................................................27 Special DVD Features.............................................................................................................27 Playing a Title ............................................................................................................
Care and Safety Information English DANGER! High voltage! Do not open the device. You run the risk of getting an electric shock. The machine does not contain any user-serviceable parts. Please leave all maintenance work to qualified personnel. Cleaning discs Some problems occur because the disc inside the player is dirty (frozen picture, sound disruptions, picture distortions). To avoid these problems, discs should be cleaned on a regular basis.
Accessories supplied Composite video cable (yellow) and Audio cables (white, red) English General Information Region codes This DVD player is designed to support the Region Management System. Check the regional code number on the disc package. If the number does not match the player’s region number (see table below), the player may be unable to playback the disc. Tips: – It may not be possible to play CD-R/RW or DVD-R/RW in all cases due to the type of disc or condition of the recording.
Connections English Connecting to television COMPONENT VIDEO IN S-VIDEO IN COMPONENT VIDEO IN V (Pr/Cr) S-VIDEO IN AUDIO IN V (Pr/Cr) U (Pb/Cb) VIDEO IN Y COMPONENT VIDEO IN S-VIDEO IN V (Pr/Cr) AUDIO IN U (Pb/Cb) VIDEO IN Y COMPONENT VIDEO IN AUDIO OUT S-VIDEO IN V (Pr/Cr) U (Pb/Cb) AUDIO OUT VIDEO IN U (Pb/Cb) VIDEO IN Y Y 1 TV OUT COMPONENT VIDEO OUT 2 1 DIGITAL OUT FRONT L REAR L COAXIAL FRONT R REAR R SUBWOOFER CENTER AUDIO OUT IMPORTANT! – You only need to make on
English Connections (continued) ANT IN RF coaxial cable to TV 2 Back of RF Modulator (example only) ANT IN TO TV AUDIO IN R L VIDEO IN CH3 CH4 ANT IN 1 4 TV OUT COMPONENT VIDEO OUT 3 DIGITAL OUT FRONT L REAR L COAXIAL FRONT R REAR R SUBWOOFER CENTER AUDIO OUT IMPORTANT! – If your television only has a single Antenna In jack (or labeled as 75 ohm or RF In,) you will need an RF modulator in order to view the DVD playback on the television.
Connections (continued) English Connecting the power cord Connecting to a Multi Channel Receiver Receiver TV OUT COMPONENT VIDEO OUT DIGITAL OUT COAXIAL After everything is connected properly, plug in the AC power cord to the power outlet. Never make or change any connections with the power switched on. When no disc is loaded, press STANDBY-ON on the DVD player front panel. “– – –” may appear on the display panel.
Connecting to an stereo system English Optional connections Connecting to a digital AV receiver STEREO AV Receiver AUDIO IN AUDIO IN DIGITAL TV OUT COMPONENT VIDEO OUT DIGITAL DIGITAL OUT FRONT L REAR L COAXIAL FRONT R REAR R SUBWOOFER CENTER AUDIO OUT Stereo system has right/ left Audio In jacks TV OUT COMPONENT VIDEO OUT DIGITAL OUT FRONT L REAR L COAXIAL FRONT R REAR R SUBWOOFER CENTER AUDIO OUT Receiver has a PCM, Dolby Digital or MPEG decoder A Select one of the video conne
Optional connections (continued) English Connecting a USB Flash Drive or USB mass storage device USB extension cable (Optional accessory - not supplied) Using USB port You can only view the content of following supported USB devices through this DVD player. A Connect the supported USB device directly to the USB port on the front panel (as shown on the above illustration). B Press USB button on the remote control in order to view the files stored in the supported USB device.
English Product Overview Front and Rear Panels STANDBY-ON 2 – Turns on the player or switches to standby mode USB Port – Input of the supported USB device STOP – Stops playback Disc Tray OPEN/CLOSE ç – Opens or closes the disc tray. PLAY/PAUSE u – Starts or pauses playback. Display panel – Shows information about the current status of the DVD player.
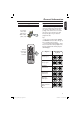
Product Overview (continued) English Remote Control DISC MENU – Enters or exits the disc contents menu – Switches on or off the playback control mode (for VCD 2.
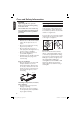
Step 1 : Inserting Batteries Step 2 : Finding your viewing channel English Getting Started A Press STANDBY-ON 2 on the DVD player to turn it on. A Open the battery compartment. B Insert two batteries type R03 or AAA, following the indications (+ –) inside the compartment. C Close the cover. CAUTION! – Remove batteries if they are exhausted or if the remote is not to be used for a long time. – Do not use old and new or different types of batteries in combination.
Getting Started (continued) English Step 3 : Setting up Progressive Scan feature (for Progressive Scan TV only) The progressive scan displays twice the number of frames per seconds than interlaced scanning (ordinary normal TV system). With nearly double the number of lines, progressive scan offers higher picture resolution and quality. Before you start... – Ensure that you have connected this DVD player to a progressive scan TV using the Y Pb Pr connection (see page 10).
Step 4 : Selecting the matching color system The color system of the DVD player, disc and TV should match in order for the disc to play. Before changing the TV system, determine the color system of your TV. Video Setup Page E Select a setting and press OK. Follow the instructions show on the TV to confirm the selection. English Getting Started (continued) CHANGING PAL TO NTSC: 1.ENSURE THAT YOUR TV SUPPORTS NTSC STANDARD. 2.
Getting Started (continued) English Step 5 : Setting the language The language options are different depending on your country or region. It may not correspond to the illustrations shown on the user manual. On-screen display (OSD) language Select this to change the language of this DVD player screen display menu. The menu language (on-screen display) for the system will remain as you set it.
IMPORTANT! – If the inhibit icon appears on the TV screen when a button is pressed, it means the function is not available on the current disc or at the current time. – DVD discs and players are designed with regional restrictions. Before playing a disc, make sure the disc is for the same zone as your player. English Playback from Disc Super Video CD MP3-Disc DivX® Disc (DivX® 3.11, 4.x, 5.x and 6.
Playback Features English Starting disc playback A Turn on the TV to the correct program number for the DVD player (e.g. ‘EXT’, ‘0’, ‘AV’). B Press STANDBY-ON 2 to turn on the DVD player. C Press OPEN/CLOSE ç on the front of the DVD player. You can also hold down the STOP button on the remote control to open and close the disc tray. D Place a disc into the disc tray with the label facing up, then press OPEN/ CLOSE ç. For double-sided discs, load the side which you want to play facing up.
Operations for video playback Using the Disc Menu Depending on the disc, a menu may appear on the TV screen once you load in the disc. To select a playback feature or item Use S T W X keys or numeric keypad (0-9) on the remote, then press OK to start playback. To access or remove the menu Press DISC MENU on the remote. Zooming in This function allows you to enlarge the picture on the TV screen and to pan through the enlarged picture.
Playback Features (continued) English Selecting various repeat functions Repeat play mode The repeat play options vary depending on the disc type. A While playing a disc, press REPEAT continuously to choose a repeat options.
Playback Features (continued) Using the OSD menu OSD menu shows the disc playback information (for example, title or chapter number, elapsed playing time, audio/ subtitle language), a number of operations can be done without interrupting disc playback. During playback, press DISPLAY on the remote control. The available disc information appears on the TV screen with the following sequence. MENU Title 01/01 Chapter 01/01 Audio 5.
Playback Features (continued) English z Time Display Press S T to select {Time Disp.} (Time Display), then press X to access. Î Depending on the disc in the DVD player, the following display types appear on the TV screen.
Viewing Audio CD playback information This function displays audio disc information on the TV screen during playback. During playback, press DISPLAY. A list of available disc information appears on the TV screen. Disc Go To / Track Go To / Track Selection A Press DISPLAY repeatedly to select an option. B Enter minutes and seconds from left to right in the time edit box using alphanumeric keypad 0-9. Playback will change to the chosen time or to the selected track.
Playback Features (continued) English Special VCD and SVCD Feature Playback Control (PBC) For VCD with Playback Control (PBC) feature (version 2.0 only) Press DISC MENU to toggle between ‘PBC ON’ and ‘PBC OFF’. If you select ‘PBC ON’, the disc menu (if available) will appear on the TV. Use the PREV í / NEXT ë to go to previous/next page or use the alphanumeric keypad 0-9 to select a play option. During playback, pressing RETURN/ TITLE will return to the menu screen (if PBC is on).
USB mass storage device When connecting a USB mass storage device to the DVD player, you can enjoy the device’s stored music through the DVD player. Compatible USB mass storage device: – USB flash memory (USB 2.0 or USB 1.1) – USB flash players (USB 2.0 or USB 1.1) – memory cards (requires an additional card reader to work with this DVD player). Compatibility of USB device Not all Portable audio/video players and Digital cameras are supported.
Playback Features (continued) English Playing from USB flash drive or USB memory card reader You can play or view the data files (JPEG, MP3 or WMA) in the USB flash drive or USB memory card reader through this DVD player. However, editing and copying the data files are not possible. A During disc playback, insert a USB mass storage device into the USB port (see page 14). Î ‘Press USB key to select device’ will appear on the TV screen. B Press USB on the remote control to access the data in the drive.
Playback Features (continued) This DVD player can playback MP3, WMA and JPEG files on a personally recorded CD-R/RW disc, commercial CD or USB device. IMPORTANT! You have to turn on your TV and set to the correct Video In channel. (See page 17 ‘Finding your viewing channel’). Tip: – If the playing file is not selected, the ID3/ Meta information will disappear. English E Press OK to confirm.
Playback Features (continued) English Playback with multi-angles (JPEG) During playback, press S T W X to rotate the picture on the TV screen. S: flip the picture vertically by 180º T: flip the picture horizontally by 180º W: rotate the picture anti-clockwise by 90º X: rotate the picture clockwise by 90º Tips: – It may not be possible to play certain MP3/JPEG disc due to the configuration and characteristics of the disc or condition of the recording.
This DVD Player setup is carried out via the TV, enabling you to customize the DVD player to suit your particular requirement. Using the General setup menu A Press SETUP on the remote control. The system setup menu appears. General Setup Page Disc Lock OSD Language Sleep Volume DivX(r) VOD Code Locking/Unlocking the disc for viewing Not all discs are rated or coded by the disc maker. You can prevent a specific disc from playing by locking the disc. Up to 20 discs can be locked.
DVD Menu Options (continued) English Sleep Sleep function allows you to turn off the DVD player automatically after a preset time. A In ‘General Setup Page’, press S T to select { Sleep }, then press X. DivX® VOD registration code DivX® VOD registration code allows you to rent and purchase movies using the DivX® service from the internet. For more information, visit website; http://vod.divx.com { 15 Mins } Turn off the DVD player after 15 minutes.
Using the Audio setup menu A Press SETUP on the remote control. The system setup menu appears. Audio Setup Page Analog Output Digital Audio Setup Sound Mode Speaker Setup CD Upsampling Night Mode B Press W X to select { Audio Setup Page }. C Press S T to select an item, then press X to access. Example: { Night Mode } The options for the selected item appears. If the selection in the menu is greyed out, that means the feature is not available or not possible to change at the current state.
DVD Menu Options (continued) English Digital Output Set the Digital Output according to your optional audio equipment connection. { All } Select this if the connected device has a built-in multichannel decoder that supports one of the multichannel audio format (Dolby Digital, MPEG-2). { PCM Only } Select this if the connected device is not capable of decoding multichannel audio. The DVD player will convert the Dolby Digital and MPEG-2 multichannel signals to PCM (Pulse Code Modulation).
CD Upsampling This feature allows you to convert your music CD to a higher sampling rate using sophisticated digital signal processing for better sound quality. A In ‘Audio Setup Page’, press S T to select { CD Upsampling }, then press X. { Off } Select this to disable CD Upsampling. { 88.2 kHz (x2) } Select this to convert the sampling rate of the CDs twice higher than the original. { 176.4 kHz (x4) } Select this to convert the sampling rate of the CDs four times higher than the original.
DVD Menu Options (continued) English Using the Video setup menu A Press SETUP on the remote control. The system setup menu appears. Video Setup Page TV Type TV Display Progressive Picture Setting TV Type This menu contains the options for selecting the color system that matches the connected TV. For details, see page 19. Setting the TV Display The picture shape can be adjusted to fit your TV and the format must be available on the playback disc.
Progressive In the progressive scan mode, you can enjoy the high quality picture with less flickers. It only works when you have connected the DVD player’s YPbPr jacks to your TV that supports the progressive video input. Otherwise, a distorted picture will appear on the TV. For proper progressive scan set up, see page 18. A In ‘Video Setup Page’, press S T to select { Progressive }, then press X. Picture Setting This DVD player provides four predefined sets of picture color settings.
DVD Menu Options (continued) English D Press S T to highlight one of the following options. BRIGHTNESS Increase the value to brighten the picture or vice versa. Choose zero (0) for average setting. CONTRAST Increase the value to sharpen the picture or vice versa. Choose zero (0) to balance the contrast. Using the Preference setup menu A Press STOP Ç twice to stop playback, (if any), then press SETUP on the remote control. The system setup menu appears.
DVD Menu Options (continued) Parental Depending on the DVD, you may be asked to change the parental level while playing the disc. The rating levels are from 1 to 8 and are country dependent. You can prohibit the playing of certain discs that are not suitable for your children, or have certain discs played with alternative scenes. A In ‘Preference Page’, press S T to select { Parental }, then press X.
DVD Menu Options (continued) English PBC You can set the PBC to {On} or {Off}. This feature is available only on SVCD or Video CD 2.0 with playback control (PBC) feature. For details, see page 28. C Use the alphanumeric keypad 0-9 to enter the six-digit password. When doing this for the first time, enter the default password ‘136900’. MP3/JPEG Menu MP3/JPEG Navigator can be set only if the disc is recorded with menu. It allows you to select different display menu for easy navigation.
{Subwoofer} On – when a subwoofer is connected. Off –when no subwoofer is connected. Setting the speaker’s channels You can adjust the delay times (center and rear only) and volume level for individual speakers. These adjustments let you optimises the sound according to your surroundings and setup. IMPORTANT! The speaker settings only available on Multi-channel audio outputs. {Speakers Volume} Volume Level setting for individual speakers (-6dB ~ +6dB).
Others English Software upgrade Periodically Philips will issue software upgrade to enhance your user experience. IMPORTANT! – Power supply must not be interrupted during upgrade! To check the current software version of this DVD player; A Press OPEN/CLOSE ç on the DVD player to open the disc tray. The disc tray will open. B Press numeric keypad ‘55’ on the remote control. The file name of the software installed in the DVD player appears on the TV screen.
TV STANDARD (PAL/50Hz) (NTSC/60Hz) Number of lines 625 525 Playback Multistandard (PAL/NTSC) VIDEO PERFORMANCE Video DAC 12 bit, 108 MHz YPbPr 0.7 Vpp ~ 75 ohm Video Output 1Vpp ~ 75 ohm VIDEO FORMAT Digital MPEG 2 for DVD,SVCD Compression MPEG 1 for VCD DivX® DVD 50Hz Horiz. resolution 720 pixels Vertical resolution 576 lines 60Hz 720 pixels 480 lines VCD 50Hz Horiz.
Troubleshooting English WARNING Under no circumstances should you try to repair the system yourself, as this will invalidate the warranty. Do not open the system as there is a risk of electric shock. If a fault occurs, first check the points listed below before taking the system for repair. If you are unable to remedy a problem by following these hints, consult your dealer or Philips for help. Problem Solution No power. – Press STANDBY-ON button on the front of the DVD player to turn on the system.
Problem Solution Not able to select some items in the setup/system menu. – Press STOP button twice before selecting the setup/system menu. – Depending on the disc availability, some menu items cannot be selected. The DVD player does not start playback. – Insert a readable disc with the playback side facing down. – Check the disc type, color system (PAL/NTSC) and region code. – Check for any scratches or smudges on the disc. – Press SETUP to turn off the setup menu screen.
Frequently Asked Questions (USB) English Why does it take so long to display the contents on my USB device? – This could be due to the large numbers of files (>500 files/folders) or size of the files (>1MB.) – There could be other non-supported files in the device that the system is trying to read/display. What if un-supported devices (e.g. USB mouse, keyboards) are plugged into the player? – The device may cause the player to be unstable. Remove the unsupported device and unplug the mains cord.
Analog: Sound that has not been turned into numbers. Analog sound varies, while digital sound has specific numerical values. These jacks send audio through two channels, the left and right. Aspect ratio: The ratio of vertical and horizontal sizes of a displayed image. The horizontal vs. vertical ratio of conventional TVs. is 4:3, and that of widescreens is 16:9. AUDIO OUT Jacks: Jacks on the back of the DVD System that send audio to another system (TV, Stereo, etc.).
English 50 01-51_dvp3166_94_eng1.
English Meet Philips at the Internet http://www.philips.com/support DVP 3166 CLASS 1 LASER PRODUCT SgpSL-0650/94-2 51 01-51_dvp3166_94_eng1.