VoiceTracer Audio recorder DVT7500 User manual
8 Device and data management Table of contents 1 Important information Safety instructions Rechargeable built-in battery Data reset Hearing protection Cleaning and disinfection Recycling About this user manual Symbols used 2 Your audio recorder Product highlights What’s in the box Overview of the recorder 3 Getting started Charging the battery Turn the device on and off Key lock Connect to a computer Set the date and time Set the device language 4 Recording Recording screen Record a file Adjust micropho
1 Important information Don’t make any adjustments and modifications that aren’t described in this manual. Follow all safety instructions to ensure proper operation of the device. The manufacturer assumes no liability for damages resulting from non-compliance with the safety instructions. Safety instructions • Protect the device from rain and liquids to prevent damage to the device or a short circuit.
About this user manual Find a quick overview of your device on the next pages. For detailed description, see the following chapters of this user manual. Read the instructions carefully. Symbols used Note • This symbol indicates notices which you should observe when handling or operating the device. Caution • This symbol warns of damage to the device and possible data loss. Damage can be caused by improper handling.
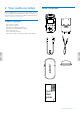
2 Your audio recorder What’s in the box We are delighted that you have chosen a Philips device. Visit our website for comprehensive support, such as user manuals, software downloads, warranty information and more: www.philips.com/dictation. Product highlights • • • • • • • One-touch recording Digital noise reduction Recording formats MP3 and WAV Simultaneous multichannel recording USB 2.
Overview of the recorder 6 7 8 1 9 25 21 2 3 10 11 4 17 22 12 13 18 14 5 15 19 23 24 16 20 1 Headphones jack 20 Micro USB port 2 External microphone jack 21 Microphone gain control 3 XLR jack 22 Noise cut switch 4 Power switch, Lock switch 23 Speed button 5 MicroSD card slot 24 Delete button 6 Center microphone 25 Speaker 7 Stereo microphones 8 Record/Play indicator 9 Screen 10 Stop button 11 Play/Pause button 12 Volume up button 13 Menu button 14 F
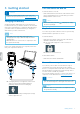
3 Getting started Turn the device on and off To turn the device on or off: Caution • Before you connect and install your recorder, first read the safety instructions (see Safety instructions). Charging the battery Charge the built-in battery before you use the device for the first time or if you haven’t used it for an extended time period. If the battery is completely discharged and your device turns off, allow the battery to charge for a while before you turn on the device.
Set the date and time You can always change the date and time as well as the time format on your device. 1 In stop mode, press and hold the Menu button 2 Press the Fast forward button to scroll to the Device menu. 3 Press the Menu button 4 Press the Volume down button to scroll to your desired setting, and then press the Menu button confirm your selection. 5 Use the Volume up or Volume down button to select the time format.
4 Recording Record a file Note Recording screen 1 8 2 9 • Before you start recording, make sure your device has enough battery power left. When your battery is almost discharged, you will see a battery low icon: 10 3 11 4 12 5 The device will turn off and your current recording will automatically be saved. • Be careful not to cover the microphones while recording. This might result in a lower recording quality.
Adjust microphone gain Adjust the microphone gain during recording in order to achieve the best recording quality. 1 In recording mode, press the Focus button. 2 Use the microphone gain control to set the appropriate microphone level. 3 Press the Focus button again to finish the microphone gain adjustment. Multichannel recording You can use multiple recording channels at the same time, such as XLR, Line-in, and the built-in microphones.
Line-in recording If you don’t want to use your device’s built-in microphones, you can also record via an external recording channel. Simply connect an external microphone or an audio equipment’s audio output, such as the audio output of a radio, CD player, or DVD player, to your Voice Tracer by using a stereo audio cable. Start an XLR recording 1 Place your Voice Tracer into the supplied XLR adapter. 2 Connect the audio cable of the XLR adapter to your Voice Tracer’s XLR jack.
In the professional music field where XLR equipment is needed, a 24V/48V XLR connector might be required.
5 Playback Play back files Note Playback screen 1 9 • If you have connected headphones to your Voice Tracer, the built-in speakers are disabled. 2 10 3 A 4 WAV 96K/24 5 01/66 00:02:59 11 12 13 00:10:06 6 REC001.WAV 7 1024kbps 8 Select a file 1 In stop mode, press the Index button to select your desired folder. 2 Press the Fast rewind or the Fast forward button to scroll to your desired file.
Playback speed Edit files Set your desired playback speed if you want to play back your recording more slowly or faster. You can edit existing recordings in playback mode. To switch between the editing options Append, Insert, Divide, and Cut, press the Menu button to select your desired editing option. The selected editing option is displayed. It replaces the File details icon on the screen. 1 In playback mode, press the Speed button on the right side of your device.
Cut: Cut out a part of an existing recording. To cut out a part of an existing recording: 1 In playback mode, press the Menu button times to select Cut. 2 Press the Focus button to mark the beginning of the part to be cut out. 3 Press the Play/Pause button to mark the end of the part to be cut out. XX The marked sequence is removed from the existing recording. four Delete files You can delete individual files or all files stored in the selected folder.
6 Music mode Music playback screen 1 7 2 8 3 9 4 10 5 11 6 Your Voice Tracer is not only a high-quality audio recorder, but it is also perfect as a music player. Simply copy your favorite music from your computer to your Voice Tracer. Due to the built-in high-performance Wolfson audio decoder chip, you can listen to your music in highest audio quality. The device supports multiple playback formats, such as MP3, WMA, or WAV format.
Play back music files A-B replay mode Start and pause playback • Press the Play/Pause button. You can mark a sequence A-B in an existing recording to replay only this marked section. Select a track Mark an A-B sequence • Press the Fast forward or Fast rewind button • Alternatively: 1 In stop mode, press the Menu button and select your desired track by using the Volume up or Volume down button. 1 In playback mode, press the Menu button ‘A-B’ is displayed on the top of the screen.
Add an index mark Use one or more index marks to mark certain points in a music file as points of reference. Note • Up to 10 index marks can be set per recording. To add an index mark: • In recording mode, press the Index button at the desired part of your recording. To go to a particular index mark: 1 In playback mode, press and hold the Index button. 2 Use the Volume up or Volume down button to scroll to the option Go to bookmark.
File 7 Settings Settings mode Repeat In the settings mode, you can change and adjust various settings according to your own preferences. 1 2 3 Off: Play back tracks in selected folder sequentially. Random: Play back tracks in selected folder randomly. Folder: Repeat tracks in a playlist. File: Repeat the current track continuously. When all tracks in the current folder have been played, the playback stops automatically.
Quality Auto off You can set the bit rate for each recording according to your own preferences. Select a time for your device to automatically turn off when you don’t operate it. If you set the time to 0, the device won’t automatically turn off. Timer Format device Use the timer function to automatically start recording on a preset date and at a preset time. You can also select when the recording should stop. Use this function to format your device’s internal storage and delete all data.
8 Device and data management Transfer data to and from the computer Reset your data and settings Reset data You can format your device’s internal storage and delete all data from your device. Caution Move your files from the device to the computer, or vice versa. • Formatting your Voice Tracer will delete all data on your device. Before you perform a data reset, back up any important data saved on your device. Caution • Don’t disconnect the USB cable from the device while you are transferring files.
To reset your settings: 1 In stop mode of the recording screen, press the Menu button to open the settings screen. 2 Use the Fast forward or Fast rewind button to switch to the Device menu. 3 Use the Volume up or Volume down button to scroll to the Reset to default setting. Press the Menu button to confirm your selection. 4 Select Yes. XX All settings on your device are reset to their default state. Updating your device Your device is controlled by an internal program called firmware.
9 Service and support Don’t perform any maintenance operations that aren’t described in this user manual. Don’t disassemble the device into its component parts to carry out repairs. The device may only be repaired in authorized service centers. Display device information See various information about your device, such as the available memory space, information about the external microSD card, or the firmware version.
Troubleshooting Find the most common problems you could encounter with your Voice Tracer in the following table. If you are unable to solve the problem with the information below, contact the supporting Philips partner you purchased your device from. Problem Possible cause Solution The device doesn’t turn on. • The battery has run out of power. • Charge the device for a while and then turn it on again. I can’t record with the device.
Problem I can’t hear anything from the headphones. An external microphone connected to Voice Tracer doesn’t work. Possible cause Solution • The volume is off or too low. • Turn on or turn up the volume. • The headphones aren’t connected properly. • Disconnect the headphones and connect them to the headphones jack again. • The headphones are connected to the wrong jack (i.e. external microphone jack). • Disconnect the headphones and connect them to the headphones jack.
10 Technical data System requirements Specifications • Operating System: Windows 10, Windows 8, Windows 7, Windows Vista, Windows XP, Mac OS X 10.7, OS X 10.8 • Port: USB • Product dimensions (W × D × H): 125 × 64.5 × 22 mm • Weight: 166 g Connectivity • Headphones: Stereo jack, 3.5 mm • Microphone: Stereo jack, 3.5 mm • USB: micro USB 2.
FCC Warning Statement œ Changes or modifications not expressly approved by the party responsible for compliance could void the user’s authority to operate the equipment. This equipment has been tested and found to comply with the limits for a Class B digital device, pursuant to Part 15 of the FCC Rules. These limits are designed to provide reasonable protection against harmful interference in a residential installation.
Technical data
Issue date 2016-07-18 Version 1.0 © 2016 Speech Processing Solutions GmbH. All rights reserved. Specifications are subject to change without notice. Philips and the Philips shield emblem are registered trademarks of Koninklijke Philips N.V. and are used by Speech Processing Solutions GmbH under license from Koninklijke Philips N.V. All trademarks are the property of their respective owners. www.philips.