
Operation Manual


9Recording
4 Recording
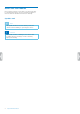
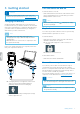
Recording screen
12
8
9
10
11
3
4
5
6
7
1
2
1
File name
2
Microphone sensitivity
3
Current folder
4
Recording status
5
Audio progress bar
6
Left volume level meter
7
Right volume meter
8
Recording type
9
Battery status
10
Total number of les in current folder
11
Number of current le
12
Audio time: Passed time and total time of current le
Record a le
Note
• Before you start recording, make sure your device has
enough battery power left.
When your battery is almost discharged, you will see
a battery low icon:
The device will turn o and your current recording will
automatically be saved.
• Be careful not to cover the microphones while
recording. This might result in a lower recording
quality.
• Before you start recording, rst select the folder you
want your recording to be saved in. You can store 99
les in each of the folders A, B, C, and D.
If one of the folders is full, your subsequent recordings
will automatically be stored in the next folder.
• If the recording time of your current recording exceeds
the available storage capacity, the recording will stop.
In this case, delete les from your device to make
more storage available.
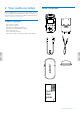
Start a new recording
1
In stop mode, press the Index button to select the
desired folder you want your le to be saved in after
recording.
2
Press the Record button to start a new recording.
X The Record/Play indicator illuminates red.
Pause recording
• In recording mode, press the Record button.
X The Record/Play indicator ickers and the
Recording status icon changes to ‘pause’.
Finish recording and save the recorded le
• In recording or pause mode, press the Stop button.
X The recording is saved to the preselected folder.