VoiceTracer Audio Recorder DVT4110 DVT6110 DVT7110 DVT8110 User manual
Table of contents 1 Important 3 2 Your VoiceTracer audio recorder 6 Product highlights What's in the box Overview of your audio recorder 6 6 7 3 Get started Charging the battery Turn the device on and off Key lock Connect to a computer Set the date and time Set the device language 4 Recording Record a file Edit a file 5 Playback Play back files Delete files 6 Settings Settings mode Recording settings Playback settings Device settings 8 8 8 8 9 9 9 10 10 10 11 11 11 12 12 12 13 13 7 Connect to
1 Important Do not make any adjustments and modifications that are not described in this manual. Follow all safety instructions to ensure proper operation of the device. The manufacturer assumes no liability for damages resulting from non-compliance with the safety instructions. Safety instructions • Protect the device from rain and liquids to prevent damage to the device or a short circuit. • Do not expose the device to excessive heat caused by placing it on a heating device or in direct sunlight.
If you have any questions about using your wireless device with an implanted medical device, consult your health care provider. Hearing aids Some digital wireless devices may interfere with some hearing aids. If interference occurs, consult your service provider.
You can also call 1-800-822-8837 or visit www.call2recycle.org for battery drop-off locations. • For assistance, visit our website www.philips.com/support or call 1-800-243-3050 toll free. Canada About this user manual Find a quick overview of your device on the next pages. For detailed description, see the following chapters of this user manual. Read the instructions carefully.
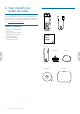
2 Your VoiceTracer audio recorder What's in the box We are delighted that you have chosen a Philips device. Visit our website for comprehensive support, such as user manuals, software downloads, warranty information and more: www.philips.com/dictation.
Overview of your audio recorder 1 360° microphone 2 Directional microphone 2 3 Record/Status LED 3 4 Display 5 Left function button 6 Middle function button 7 Right function button 8 Up button 9 Backward button 10 Record button 11 Down button 12 Forward button 13 File list/Back button 14 Play/Stop button 15 Tripod thread 16 Power/Lock switch 17 Wi-Fi on/off switch 18 Reset button 19 External microphone jack 20 Headphones jack 21 MicroSD card slot 22 USB Type-C p
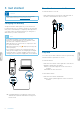
3 Get started Turn the device on and off To turn the device on or off: Caution • Before you connect your VoiceTracer, first read the safety instructions (see Safety instructions). • Slide and hold the Power switch on the right side of the device downwards for three seconds. Charging the battery Charge the built-in battery before you use the device for the first time or if you haven’t used it for an extended time period.
Connect to a computer Set the device language You can use your recorder as a USB mass storage to conveniently store, back up and move files. Link the device to a computer with a USB cable. Your recorder will automatically be recognized as a mass storage device. You don’t need to install any software. You can always change the language of your device. For more information on how to connect your device to a computer, see the illustration in Start a new recording.
4 Recording Record a file Note • Be careful not to cover the microphones while recording. This might result in a lower recording quality. • If the recording time of your current recording exceeds the available storage capacity, the recording will stop. In this case, delete files from your device to make more storage available. 3 Press the Record button to start recording. XX The recording screen is displayed. XX The Record/Status LED flashes red. 4 Press the Record button again to stop recording.
5 Playback Play back files from a selected folder 1 In stop mode, press the File list button. XX All voice recordings are displayed. Play back files 2 Press the Left function button panel. Note 3 Press the Up/Down buttons to navigate to your desired folder and then press the Record button to confirm your selection. XX Only the files in the selected folder are displayed now. • If you have connected headphones to your Voice Tracer, the built-in speakers are disabled.
Scene Note Format MP3 • 128 kbps Format High Select the format of your recording according to specific recording situations. 6 Settings Mic sensitivity Limiter Settings mode On Mic sensitivity In the settings mode, you can change and adjust various Mic zoom settings according to your own preferences.# 360° Noise cut Adjust the microphone sensitivity of your Voice Tracer.
Auto divide Backlight During recording, the auto divide feature will automatically split the current 14:31 recording and save a new file every 15, 30 or 60 minutes. To save your Voice Tracer’s battery power, you can reduce the backlight time. If you don’t operate your device for the preset time, the backlight turns off automatically. Play mode Repeat folder Auto bookmark Equalizer Use the Auto bookmark funktion to automatically set Date & time bookmarks at preset time intervals.
7 Connect to VoiceTracer App You can connect your VoiceTracer to the dedicated Philips VoiceTracer App via Wi-Fi. This allows you to remotely control your VoiceTracer with your smartphone. In addition, you can easily and conveniently transfer recordings from your VoiceTracer to the app and then share and forward your recordings immediately from your smartphone.
8 How to use the meeting microphone (DVT8110 only) The meeting microphone can be used during a meeting or a multi-participant conference. For optimum sound quality, the participants should not be more than two meters away from the microphone. 1 Stop the recording currently in progress. 2 Insert the microphone connector into the microphone jack on the left side of the VoiceTracer.
9 Device and data management Transfer data to the computer You can quickly and conveniently move files from your VoiceTracer to your computer. Link the device to a computer with a USB cable. Your recorder will automatically be recognized as a mass storage device. You don’t need to install any software.
Reset data To reset your settings: You can format your device’s internal storage and delete all data from your device. 1 In stop mode, press the Right function button open the settings panel. 2 Press the Record button to select All settings. 3 Press the Right function button to enter the Device settings. 4 Use the Up/Down buttons to navigate to Reset and then press the Record button to confirm your selection. 5 Select Yes. XX All settings on your device are reset to their default state.
Update your VoiceTracer 1 Connect the device to the computer via the supplied USB cable. XX A charging battery icon appears on the screen and the Record/Status LED flashes orange for a few seconds. 2 Download the firmware update file for your model from the product website www.voicetracer.com/help. 3 Open Windows Explorer on a Windows computer, or open Finder on a Mac computer. 4 Double-click the VoiceTracer drive. XX The content of your VoiceTracer is displayed in a new window.
10 Troubleshooting Find the most common problems you could encounter with the VoiceTracer in the following table. If you are unable to solve the problem with the information below, contact the supporting Philips partner you purchased the device from. Problem Cause Solution The device doesn’t turn on. • The battery has run out of power. • Charge the device for a while and then turn it on again. I can’t record with the device. • You have reached the maximum file number or the device’s memory is full.
11 Technical data Storage media Connectivity • Built-in memory capacity: 8 GB • Mass storage class compliant • MicroSD card socket: up to 32 GB • Headphones: stereo jack, 3.5 mm, impedance 16 Ohm or more • Microphone: stereo jack, 3.5 mm, impedance 2 kOhm • USB: type C, high-speed 2.
Green specifications Open source software • Compliant to 2011/65/EU (RoHS) • Lead-free soldered product Products mentioned in this manual may contain open source software. Speech Processing Solutions GmbH hereby offers to deliver, upon request, a copy of the complete corresponding source code for the copyrighted open source software packages used in this product for which such offer is requested by the respective licenses. This offer is valid up to three years after product purchase.
FCC Warning Statement œ Changes or modifications not expressly approved by the party responsible for compliance could void the user’s authority to operate the equipment. This equipment has been tested and found to comply with the limits for a Class B digital device, pursuant to Part 15 of the FCC Rules. These limits are designed to provide reasonable protection against harmful interference in a residential installation.
Technical data 23
Issue date 2019-07-09 Version 1.0 © 2019 Speech Processing Solutions GmbH. All rights reserved. Specifications are subject to change without notice. Philips and the Philips shield emblem are registered trademarks of Koninklijke Philips N.V. and are used by Speech Processing Solutions GmbH under license from Koninklijke Philips N.V. All trademarks are the property of their respective owners. www.philips.