ED16DVDS 03-01-2005 08:58 Pagina 1 ED16DVDS
ED16DVDS 03-01-2005 08:58 Pagina 2 Contents - Inhalt - Table des matières UK D F 2 How to connect the ED16DVDS to my computer? How to disconnect the ED16DVDS without shutting down the computer? How to capture video from a digital DV-camcorder? How to make a video disc? How to watch video? How to copy a disc? How to make a Data disc? How to make an Audio disc? How to find warranty information? FAQ, Frequently Asked Questions Specifications Safety Precautions 5 23 27 37 45 51 57 65 73 77 91 98 Wie v
ED16DVDS 03-01-2005 08:58 Pagina 3 Indice - Inhoud - Índice I NL E Come collegare il ED16DVDS al computer? Come si disconnette l'ED16DVDS senza spegnere il computer? Come registrare un video da una DV-camcorder digitale? Come creare un video dischi? Come si possono guardare i video? Come copiare un dischi? Come creare un dischi di dati? Come creare un dischi Audio? Come si accede alle informazioni sulla garanzia memorizzate? FAQ, Domande frequenti Specifiche Safety Precautions 5 23 27 37 45 51 57 65
ED16DVDS 4 03-01-2005 08:58 Pagina 4
ED16DVDS 03-01-2005 08:58 Pagina 5 How to connect the ED16DVDS to my computer? Wie verbindet man den ED16DVDS mit einen Computer? Raccordement du ED16DVDS à mon ordinateur Come collegare il ED16DVDS al computer? Hoe sluit ik de ED16DVDS op mijn computer aan? ¿Cómo conectar ED16DVDS al ordenador? UK D F I NL E The next pages show how to connect your new ED16DVDS to a computer.
ED16DVDS 03-01-2005 08:58 Pagina 6 1 UK D F I NL E 6 You will find a ED16DVDS device and following cables in the retail box A: ED16DVDS device. B: Power supply (2 parts). C: HiSpeed USB Cable. Der Verpackungskarton enthält die folgenden Teile: A: ED16DVDS Laufwerk. B: Netzteil (2 Teile). C: HiSpeed USB-Kabel.
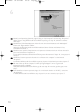
ED16DVDS 03-01-2005 08:58 Pagina 7 2 UK D F I NL E At the back side, you will find the plugs you need for connecting your ED16DVDS to your computer. A: Power. B: HiSpeed USB. C: Audio connector. Auf der Rückseite finden Sie die Anschlüsse, die Sie zum Anschließen Ihres ED16DVDS an Ihren Computer benötigen. A: Stromversorgung. B: HiSpeed USB. C: Audio-Steckverbinder. Au dos se trouvent les connecteurs requis pour brancher votre ED16DVDS à l’ordinateur.
ED16DVDS 03-01-2005 08:58 Pagina 8 3 UK D F I NL E Connect the power cables together and connect them to the ED16DVDS and a power outlet. Verbinden Sie die Stromversorgungskabel miteinander und mit dem ED16DVDS und einer Steckdose. Raccordez les câbles d’alimentation l’un à l’autre puis branchez-les à l’ED16DVDS et à une prise secteur. Collegate i cavi di alimentazione tra loro e collegateli tra l'ED16DVDS ed una presa elettrica.
ED16DVDS 03-01-2005 08:58 Pagina 9 5 UK D F I NL E Search for the HiSpeed USB connector on your PC. A: Logo for the preferred HiSpeed USB or connector. B: Logo for the alternative LowSpeed USB connector. When connected to LowSpeed USB (or USB 1.x), speeds are limited (4x writing and 6x reading on CD, 0,7x reading on DVD) and it is not possible to write on DVD or to watch video. Suchen Sie den HiSpeed USB-Anschluss an Ihrem PC. A: Logo für den bevorzugten HiSpeed USB-Anschluss.
ED16DVDS 03-01-2005 08:58 Pagina 10 6 UK D F I NL E 10 Identify your Operating System by right clicking on “My Computer” and choosing “Properties”. When you are using Windows 98 Second Edition, please go to step 11, otherwise continue with step 7. Identifizieren Sie Ihr Betriebssystem, indem Sie mit der rechten Maustaste auf “Arbeitsplatz” klicken und “Eigenschaften” wählen. Wenn Sie mit Windows 98 Second Edition arbeiten, fahren Sie bitte mit Schritt 11 fort, andernfalls mit Schritt 7.
ED16DVDS 03-01-2005 08:58 Pagina 11 7 UK D F I NL E Connect the USB cable to the computer. Schließen Sie das USB-Kabel an den Computer an. Branchez le câble USB à l’ordinateur. Collegate il cavo USB al computer. Sluit de USB-kabel op de computer aan. Conecte el cable USB al ordenador.
ED16DVDS 03-01-2005 08:58 Pagina 12 8 UK D F I NL E 12 Windows XP will warn you when you connect the ED16DVDS to a slow USB 1 connection. Check step 5 again. This is valid for Windows XP only. Windows XP warnt Sie, wenn Sie das ED16DVDS mit einem langsamen USB 1-Anschluss verbinden. Kontrollieren Sie erneut Schritt 5. Dies gilt nur für Windows XP. Windows XP affiche un message d'avertissement si vous avez branché l'ED16DVDS à un connecteur USB 1 (bas débit). Vérifiez l’étape 5.
ED16DVDS 03-01-2005 08:58 Pagina 13 9 UK D F I NL E The drivers will be installed automatically. This may take some seconds. The popups shown are operating system dependent. Die Treiber werden automatisch installiert. Dies kann einige Sekunden dauern. Welche Anzeigen auf dem Bildschirm erscheinen, hängt vom Betriebssystem ab. Les pilotes sont installés automatiquement. Cette opération peut prendre quelques secondes. Les messages affichés varient selon le système d’exploitation.
ED16DVDS 03-01-2005 08:58 Pagina 14 10 UK D F I NL E 14 Insert the Nero Disc in the ED16DVDS. Go to step 15! Legen Sie die Nero-CD in das ED16DVDS-Laufwerk ein. Fahren Sie mit Schritt 15 fort! Insérez le disque Nero dans l’ED16DVDS. Passez à l'étape 15. Inserite il disco di Nero nell'ED16DVDS. Procedete al punto 15! Leg de Nero-CD in de ED16DVDS. Ga naar stap 15! Inserte el disco de Nero en ED16DVDS. Vaya al paso 15.
ED16DVDS 03-01-2005 08:58 Pagina 15 11 UK D F I NL E Windows 98 Second Edition only! Insert the Nero disc in the CDROM device of your computer, not in the ED16DVDS. If you do not have a CD-ROM on your computer, please refer to the Frequently Asked Questions. Nur Windows 98 Second Edition! Legen Sie die Nero-CD in das CDROM-Laufwerk Ihres Computers ein, nicht in das ED16DVDS. Wenn Sie kein CDROM-Laufwerk in Ihrem Computer haben, sehen Sie bitte bei den häufig gestellten Fragen nach.
ED16DVDS 03-01-2005 08:58 Pagina 16 12 UK D F I NL E Windows 98 Second Edition only! Wait until this screen pops up. Nur Windows 98 Second Edition! Warten Sie, bis diese Anzeige erscheint. Windows 98 Deuxième Édition uniquement ! Attendez que cet écran apparaisse. Solo per Windows 98 Second Edition! Attendete la comparsa di questa finestra. Alleen voor Windows 98 Tweede Edition! Wacht tot het volgende scherm verschijnt. Sólo para Windows 98 Second Edition Espere a que aparezca esta pantalla.
ED16DVDS 03-01-2005 08:58 Pagina 17 14 UK D F Windows 98 Second Edition only! The “Add New Hardware Wizard” will pop up. Follow these steps: A. Click “Next” in “The wizard searches for new drivers…:”. B. Choose “Search for the best drivers…” C. Choose “Specify a location”. D. Browse to the directory “Philips drivers” on the Nero disc and click Next. E. The drivers will be installed. F. Continue with step 15.
ED16DVDS 03-01-2005 08:58 Pagina 18 14 I NL E 18 Solo per Windows 98 Second Edition! Compare la finestra “Installazione guidata nuovo hardware”. Svolgete i seguenti passaggi: A. Fate clic su “Avanti” in “Saranno cercati i nuovi driver…:”. B. Selezionate “Ricercare un driver migliore…” C. Selezionate “Specificare un percorso”. D. Selezionate la cartella dei driver "Philips drivers" sul disco Nero e fate clic su Avanti. E. I driver verranno installati. F. Procedete al punto 15.
ED16DVDS 03-01-2005 08:58 Pagina 19 15 UK D F I NL E Click on “Install Suite” to install the main software. The software will ask to reboot the PC at the end of the installation process. Klicken Sie auf “Suite installieren”, um die Haupt-Software zu installieren. Die Software fordert Sie am Ende des Installationsvorgangs auf, den PC neu zu booten. Cliquez sur « Install Suite » (installer la suite) pour installer le programme principal.
ED16DVDS 03-01-2005 08:58 Pagina 20 16 UK D F I NL E 20 Remember the typenumber of your ED16DVDS, which is located on the sticker on the bottom of the device. This model number will allow you to find easily information and updates on the Philips website: www.philips.com/support Merken Sie sich die Modellnummer Ihres ED16DVDS – sie befindet sich auf dem Aufkleber am Boden des Geräts.
ED16DVDS 03-01-2005 08:58 Pagina 21 17 After installing the software, you should reboot your computer. Congratulations.Your Philips device is now ready for use. How to use it and what software applications you need to perform your tasks, is described in the next chapters of this How To Manual. Nach der Installation der Software sollten Sie Ihren Computer neu starten. Herzlichen Glückwunsch. Ihr Philips Gerät ist jetzt einsatzbereit.
ED16DVDS 22 03-01-2005 08:58 Pagina 22
ED16DVDS 03-01-2005 08:58 Pagina 23 How to disconnect the ED16DVDS without shutting down the computer? Wie kann man die Verbindung zum ED16DVDS trennen, ohne den Computer herunterzufahren? Comment débrancher l’ED16DVDS sans arrêter l’ordinateur? Come si disconnette l'ED16DVDS senza spegnere il computer? Hoe ontkoppel ik de ED16DVDS zonder de computer uit te zetten? ¿Cómo desconectar ED16DVDS sin apagar el ordenador? UK D F I NL E The next pages show how to disconnect your new ED16DVDS to a compute
ED16DVDS 03-01-2005 08:58 Pagina 24 1 UK D F I NL E To disconnect the ED16DVDS without shutting down your computer, click on this symbol. Um die Verbindung zum ED16DVDS zu trennen, ohne den Computer herunterzufahren, klicken Sie auf dieses Symbol. Pour déconnecter l’ED16DVDS sans arrêter l’ordinateur, cliquez sur cette icône. Per disconnettere l'ED16DVDS senza spegnere il computer, fate clic su questo simbolo. Klik op dit pictogram als u de ED16DVDS wilt ontkoppelen zonder uw computer uit te zetten.
ED16DVDS 03-01-2005 08:58 Pagina 25 3 UK D F I NL E When this popup appears, you may disconnect the ED16DVDS Wenn diese Anzeige erscheint, können Sie die Verbindung zum ED16DVDS trennen. Lorsque ce message apparaît, vous pouvez déconnecter l’ED16DVDS. Quando compare questo messaggio potete scollegare l'ED16DVDS Als dit venster verschijnt, kunt u de ED16DVDS ontkoppelen.
ED16DVDS 26 03-01-2005 08:58 Pagina 26
ED16DVDS 03-01-2005 08:58 Pagina 27 How to capture video from a digital DV-camcorder? Videos von einem digitalen DV-Camcorder aufnehmen Comment acquérir les images vidéo d’une caméra numérique DV ? Come registrare un video da una DV-camcorder digitale? Hoe kopieer ik de opnames van een digitale DV-camcorder naar mijn computer? ¿Cómo capturar secuencias de vídeo de una videocámara digital DV? UK D F I NL E This manual shows an example on how to capture video from a digital DV-camcorder which is co
ED16DVDS 03-01-2005 08:58 Pagina 28 1 UK D F I NL E Start "Nero SmartStart" from the desktop. Starten Sie "Nero SmartStart" von Ihrer Oberfläche aus. Lancez "Nero SmartStart" depuis le bureau. Aprire "Nero SmartStart" dal desktop. Start "Nero SmartStart" vanaf het bureaublad. Inicie "Nero SmartStart" desde el escritorio. 2 UK D F I NL E 28 Connect your camera to the computer and switch it on. Verbinden Sie Ihre Kamera mit dem Computer und schalten Sie sie ein.
ED16DVDS 03-01-2005 08:58 Pagina 29 3 UK D F I NL E Choose "DVD". Wählen Sie "DVD". Choisissez "DVD". Selezionare "DVD". Kies "DVD". Seleccione "DVD". 4 UK D F I NL E Choose "Photo and video" and click "Capture video". Wählen Sie "Photo und Video" und klicken Sie auf "Video aufnehmen". Choisissez "Photo et vidéo" puis cliquez sur "Capturer une vidéo". Selezionare "Foto e video" e fare clic su "Cattura video".
ED16DVDS 03-01-2005 08:58 Pagina 30 5 UK D F I NL E You can use these buttons to control your DV-camera. Press the "record" button to record video. Diese Tasten können Sie benutzen, um Ihre DV-Kamera zu steuern. Drücken Sie die Taste "Aufnehmen", um Video-informationen aufzunehmen. Ces boutons vous permettent de commander votre caméra DV. Appuyez sur le bouton "Enregistrer" pour enregistrer la vidéo. E' possibile utilizzare questi pulsanti per controllare la camera-DV.
ED16DVDS 03-01-2005 08:58 Pagina 31 7 UK D F I NL E When all video sequences are captured, click "Next". Wenn alle Videosequenzen aufgenommen sind, klicken Sie auf "Weiter". Une fois l’acquisition de toutes les séquences vidéo terminée, cliquez sur "Suivant". Dopo aver catturato tutte le sequenze video, fare clic su "Avanti". Na het opnemen van alle videofragmenten klikt u op "Volgende". Una vez capturadas las secuencias de vídeo, haga clic en "Siguiente"."Volgende".
ED16DVDS 03-01-2005 08:58 Pagina 32 9 UK D F I NL E The captured movies are shown here.You can edit them by choosing "Edit Movie". Hier werden die aufgenommenen Filme gezeigt. Sie können sie editieren, indem Sie "Edit Movie" wählen. Les séquences disponibles sont répertoriées ici.Vous pouvez les monter en choisissant "Edit Movie". Qui sono visualizzati i filmati catturati. E' possibile modificarli selezionando "Edit Movie". Hier ziet u de vastgelegde films.
ED16DVDS 03-01-2005 08:59 Pagina 33 11 UK D F I NL E After editing all files, click "Next". Nach dem Editieren aller Dateien klicken Sie auf "Weiter". Une fois tous les fichiers modifiés, cliquez sur "Suivant". Dopo aver modificato tutti i file, fare clic su "Avanti". Na het bewerken van alle bestanden klikt u op "Volgende". Cuando haya editado todos los archivos, haga clic en "Siguiente". 12 UK D F I NL E You can change the layout, the background, add titles,… here. When done, click "Next".
ED16DVDS 03-01-2005 08:59 Pagina 34 13 UK D F I NL E You can preview the finished movie by pressing on the thumbnails. When done, click "Next". Wenn Sie auf die Thumbnail-Symbole klicken, sehen Sie eine Vorschau des fertigen Films. Wenn Sie fertig sind, klicken Sie auf "Weiter". Vous pouvez afficher un aperçu du film en appuyant sur les miniatures.Lorsque vous avez terminé, cliquez sur "Suivant". Selezionando le miniature è possibile visualizzare un'anteprima del filmato realizzato.
ED16DVDS 03-01-2005 08:59 Pagina 35 15 UK D F I NL E NeroVision Express is transcoding and burning your disc. NeroVision Express transcodiert und brennt Ihre Disk. NeroVision Express procède au transcodage et à la gravure de votre disque. NeroVision Express è in fase di trascodifica e scrittura del disco. NeroVision Express zet de informatie om en brandt die op de disc. NeroVision Express está transcodificando y grabando el disco.
ED16DVDS 36 03-01-2005 08:59 Pagina 36
ED16DVDS 03-01-2005 08:59 Pagina 37 How to make a video disc? Wie erstellt man eine Video Disk? Comment créer un disque vidéo? Come creare un video dischi? Hoe maak ik een videodisc? ¿Cómo crear un disco de vídeo? UK D F I NL E This manual will show you how to make a DVD-Video from source files which are stored on your hard disc or on one or more discs and that can be played in most DVD-players.
ED16DVDS 03-01-2005 08:59 Pagina 38 1 UK D F I NL E Start "Nero SmartStart" from the desktop. Starten Sie "Nero SmartStart" von Ihrer Oberfläche aus. Lancez "Nero SmartStart" depuis le bureau. Aprire "Nero SmartStart" dal desktop. Start "Nero SmartStart" vanaf het bureaublad. Inicie "Nero SmartStart" desde el escritorio. 2 UK D F I NL E 38 Choose "DVD". Wählen Sie "DVD". Choisissez "DVD". Selezionare "DVD". Kies "DVD". Seleccione "DVD".
ED16DVDS 03-01-2005 08:59 Pagina 39 3 UK D F I NL E Choose "Photo and video" and "Make DVD-Video". Wählen Sie "Photo und Video" und "DVD-Video erstellen". Choisissez "Photo et vidéo" puis cliquez sur "Créer un DVD vidéo". Selezionare "Foto e video" e "Crea DVD-Video". Kies "Foto en video" en dan "DVD-Video maken". Seleccione "Foto y vídeo" y haga clic en "Crear DVD-Vídeo". 4 UK D F I NL E Choose "Add Video files". Wählen Sie "Video-Dateien hinzufügen". Choisissez "Ajouter des fichiers vidéo".
ED16DVDS 03-01-2005 08:59 Pagina 40 5 UK D F I NL E Choose the files you want to add and click "Open". Wählen Sie die hinzuzufügenden Dateien und klicken Sie auf "Öffnen". Sélectionnez les fichiers à ajouter puis cliquez sur "Ouvrir". Selezionare i file da aggiungere e fare clic su "Apri". Kies de bestanden die u wilt toevoegen en klik op "Openen". Seleccione los archivos que desea añadir y haga clic en "Abrir". 6 UK D F I NL E 40 The movies you loaded are shown here.
ED16DVDS 03-01-2005 08:59 Pagina 41 7 UK D F I NL E In the Edit Movie screen, you can add video effects, text effects and transitions. Auf der Anzeige Edit Movie können Sie Videoeffekte,Texteffekte und Übergänge hinzufügen. L’écran Edit Movie vous permet d’ajouter des effets vidéo et textuels, ainsi que des transitions. Nello schermo Edit Movie, è possibile aggiungere effetti video, effetti testo e transizioni. In het scherm "Edit Movie" kunt u video- en teksteffecten en overgangen toevoegen.
ED16DVDS 03-01-2005 08:59 Pagina 42 9 UK D F I NL E After editing all files, choose "Next". Nach dem Editieren aller Dateien wählen Sie "Weiter". Une fois tous les fichiers modifiés, choisissez "Suivant". Dopo aver modificato tutti i file, fare clic su "Avanti". Na het bewerken van alle bestanden klikt u op "Volgende". Cuando haya editado todos los archivos, haga clic en "Siguiente". 10 UK D F I NL E 42 You can change the layout, the background, add titles, … here. When done, choose "Next".
ED16DVDS 03-01-2005 08:59 Pagina 43 11 UK D F I NL E You can preview the finished movie by pressing on the thumbnails. When done, choose "Next". Wenn Sie auf die Thumbnail-Symbole klicken, sehen Sie eine Vorschau des fertiggestellten Films. Wenn Sie fertig sind, wählen Sie "Weiter". Vous pouvez afficher un aperçu du film en appuyant sur les miniatures. Lorsque vous avez terminé, choisissez "Suivant". Selezionando le miniature è possibile visualizzare un'anteprima del filmato realizzato.
ED16DVDS 03-01-2005 08:59 Pagina 44 13 UK D F I NL E NeroVision Express is transcoding and burning your disc. NeroVision Express transcodiert und brennt Ihre Disk. NeroVision Express procède au transcodage et à la gravure de votre disque. NeroVision Express è in fase di trascodifica e scrittura del disco. NeroVision Express zet de informatie om en brandt die op de disc. NeroVision Express está transcodificando y grabando el disco.
ED16DVDS 03-01-2005 08:59 Pagina 45 How to watch video? Wie kann man sich Videos ansehen? Comment regarder des vidéos ? Come si possono guardare i video? Hoe kan ik video bekijken? ¿Cómo ver vídeo? UK The next pages show how to watch video from your new ED16DVDS. D Auf den nächsten Seiten wird beschrieben, wie Sie sich mit Ihrem neuen ED16DVDS Videos ansehen können. F Les pages suivantes montrent comment regarder des vidéos sur votre nouvel ED16DVDS.
ED16DVDS 03-01-2005 08:59 Pagina 46 1 UK D F I NL E Start “Nero SmartStart” from the desktop. Starten Sie “Nero SmartStart” von Ihrer Oberfläche aus. Lancez « Nero SmartStart » depuis le bureau. Aprite “Nero SmartStart” dal desktop. Start vanaf het bureaublad het programma “Nero SmartStart”. Inicie “Nero SmartStart” en el escritorio. 2 UK D F I NL E 46 Choose “Photo and video” and “Play video” and insert a DVD-Video in your ED16DVDS.
ED16DVDS 03-01-2005 08:59 Pagina 47 3 UK D F I NL E The first time you put a DVD-Video in your drive, you may have to choose a region. Please choose your region correctly (see also step 4). After setting the region, you can change it 4 more times. The last setting will remain permanent. Wenn Sie zum ersten Mal eine DVD-Video in Ihr Laufwerk einlegen, müssen Sie eventuell eine Region wählen. Bitte wählen Sie Ihre Region auf korrekte Weise (siehe auch Schritt 4).
ED16DVDS 03-01-2005 08:59 Pagina 48 4 UK D F I NL E 48 This map shows the different regions. For Europe, the region is 2. Diese Karte zeigt die verschiedenen Regionen. Für Europa lautet die Ziffer für die Region 2. Cette carte montre les différentes zones. L’Europe est la zone 2. Questa mappa evidenzia la suddivisione in regioni. L'Europa è abbinata alla regione 2. Het volgende overzicht toont de verschillende regio's. Voor Europa is de regiocode 2. Este mapa muestra las regiones.
ED16DVDS 03-01-2005 08:59 Pagina 49 5 UK D F I NL E These are the main controls of ShowTime: A: Play, forward, backward, stop and pause. B: Open other files. C: Switch to full screen (or use the “z” on the keyboard) D: Volume control. Dies sind die wichtigsten Bedienelemente für ShowTime: A: Wiedergabe,Vorwärts, Rückwärts, Stopp und Pause. B: Andere Dateien öffnen. C: Umschalten auf Vollbild (oder mit der “z”-Taste auf der Tastatur). D: Lautstärkeregelung.
ED16DVDS 50 03-01-2005 08:59 Pagina 50
ED16DVDS 03-01-2005 08:59 Pagina 51 How to copy a disc? Eine Disk kopieren Comment copier un disque? Come copiare un dischi? Hoe kopieer ik een disc? ¿Cómo copiar un disco? UK D F I NL E This manual shows an example of how to copy a disc. This product is for personal use only. Unauthorized duplication and distribution of copyrighted materials is a violation of copyright law. In diesem Handbuch wird an einem Beispiel gezeigt, wie eine Disk kopiert wird.
ED16DVDS 03-01-2005 08:59 Pagina 52 1 UK D F I NL Start "Nero SmartStart" from the desktop. Starten Sie "Nero SmartStart" von Ihrer Oberfläche aus. Lancez "Nero SmartStart" depuis le bureau. Aprire "Nero SmartStart" dal desktop. Start "Nero SmartStart" vanaf het bureaublad. Inicie "Nero SmartStart" desde el escritorio. 2 UK D F I NL E 52 Choose "CD" or "DVD". Wählen Sie "CD" oder "DVD". Choisissez "CD" ou "DVD". Selezionare "CD" o "DVD". Kies "CD" of "DVD". Seleccione "CD" o "DVD".
ED16DVDS 03-01-2005 08:59 Pagina 53 3 UK D F I NL E Choose "Copy and Backup" and click "Copy Disc". Wählen Sie "Kopieren und Sichern" und klicken Sie auf "Disk kopieren". Choisissez "Copier et sauvegarder" puis cliquez sur "Copier un disque". Selezionare "Copia e Backup" e fare clic su "Copia disco". Kies "Kopiëren en backup" en klik op "Schijf kopiëren". Seleccione "Copiar y copia seg." y haga clic en "Copiar disco". 4 UK D F I NL E Choose the source drive and insert the source disc in this drive.
ED16DVDS 03-01-2005 08:59 Pagina 54 5 UK D F I NL E Choose the destination drive. Wählen Sie das Ziellaufwerk. Choisissez l’unité de destination. Selezionare drive di destinazione. Kies het doelstation. Seleccione la unidad de destino. 6 UK D F I NL E 54 If possible, you may mark the checkbox "quick copy" if your source drive is fast enough. Otherwise, unmark the checkbox. Click "Burn". Wenn Ihr Quelllaufwerk schnell genug ist, können Sie bei Bedarf das Kästchen "Schnellkopie" ankreuzen.
ED16DVDS 03-01-2005 08:59 Pagina 55 7 UK D F I NL E Insert an empty disc in your destination drive. Legen Sie eine leere Disk in Ihr Ziellaufwerk ein. Insérez un disque vierge dans votre lecteur de destination. Inserire un disco vuoto nell'unità di destinazione. Leg een lege disc in het doelstation. Coloque un disco vacío en la unidad de destino. 8 UK D F I NL E "Nero" will now burn your disc. "Nero" wird jetzt Ihre Disk brennen. "Nero" grave alors votre disque.
ED16DVDS 03-01-2005 08:59 Pagina 56 9 UK D F I NL E 56 Congratulations, your disc has been written successfully. Click "OK". You may exit the application now. Herzlichen Glückwunsch – Ihre Disk wurde erfolgreich erstellt. Klicken Sie auf "OK". Sie können jetzt die Anwendung verlassen. Félicitations, votre disque est prêt. Cliquez sur "OK". Vous pouvez maintenant fermer l’application. Congratulazioni, il disco è stato scritto correttamente. Fare clic su "OK".
ED16DVDS 03-01-2005 08:59 Pagina 57 How to make a Data disc? Eine Daten-Disk erstellen Comment créer un disque de données? Come creare un dischi di dati? Hoe maak ik zelf een data-disc? ¿Cómo crear un disco de datos? UK D F I NL E This manual shows you an example of how to make a Data disc. This product is for personal use only. Unauthorized duplication and distribution of copyrighted materials is a violation of copyright law.
ED16DVDS 03-01-2005 08:59 Pagina 58 1 UK D F I NL E Start "Nero SmartStart" from the desktop. Starten Sie "Nero SmartStart" von Ihrer Oberfläche aus. Lancez "Nero SmartStart" depuis le bureau. Aprire "Nero SmartStart" dal desktop. Start "Nero SmartStart" vanaf het bureaublad. Inicie "Nero SmartStart" desde el escritorio. 2 UK D F I NL E 58 Choose "CD" or "DVD". Wählen Sie "CD" oder "DVD". Choisissez "CD" ou "DVD". Selezionare "CD" o "DVD". Kies "CD" of "DVD". Seleccione "CD" o "DVD".
ED16DVDS 03-01-2005 08:59 Pagina 59 3 UK D F I NL E Choose "Data" and click "Make a data disc". Wählen Sie "Daten" und klicken Sie auf "Daten Disk erstellen". Choisissez "Données" puis cliquez sur "Enregistrer un disque de données". Selezionare "Dati" e fare clic su "Crea disco dati". Kies "Data" en klik op "Data-cd maken". Seleccione "Datos" y haga clic en "Crear un disco de datos". 4 UK D F I NL E Click "Add". Klicken Sie auf "Hinzufügen". Cliquez sur "Ajouter". Fare clic su "Aggiungi".
ED16DVDS 03-01-2005 08:59 Pagina 60 5 UK D F I NL E Choose the files to burn and click "Add". Wählen Sie die zu brennenden Dateien und klicken Sie auf "Hinzufügen". Choisissez les fichiers à graver puis cliquez sur "Ajouter". Selezionare i file da scrivere e fare clic su "Aggiungi". Selecteer de bestanden die u op de disc wilt branden en klik op "Toevoegen". Seleccione los archivos que desee grabar y haga clic en "Añadir". 6 UK D F I NL E 60 When all files are added, click "Finish".
ED16DVDS 03-01-2005 08:59 Pagina 61 7 UK D F I NL E Click "Next". Klicken Sie auf "Weiter". Cliquez sur "Suivant". Fare clic su "Avanti". Klik op "Volgende". Haga clic en "Siguiente". 8 UK D F I NL E Choose the drive you use for burning and click "Burn". Wählen Sie das Laufwerk zum Brennen der Disk und klicken Sie auf "Brennen". Choisissez le lecteur à utiliser pour la gravure puis cliquez sur "Graver". Selezionare l'unità da utilizzare per la scrittura e fare clic su "Scrivi".
ED16DVDS 03-01-2005 08:59 Pagina 62 9 UK D F I NL E Insert an empty disc. Legen Sie eine leere Disk ein. Insérez un disque vierge. Inserire un disco vuoto. Plaats een lege disc in uw recorder. Ponga un disco vacío. 10 UK D F I NL E 62 "Nero" will now burn your disc. "Nero" wird jetzt Ihre Disk brennen. "Nero" grave alors votre disque. "Nero" inizierà a scrivere sul disco. "Nero" zal nu uw disc branden. "Nero" grabará ahora el disco.
ED16DVDS 03-01-2005 08:59 Pagina 63 11 UK D F I NL E Congratulations, your disc has been written successfully. Click "OK". You may exit the application now. Herzlichen Glückwunsch – Ihre Disk wurde erfolgreich erstellt. Klicken Sie auf "OK". Sie können jetzt die Anwendung verlassen. Félicitations, votre disque est prêt. Cliquez sur "OK". Vous pouvez maintenant fermer l’application. Congratulazioni, il disco è stato scritto correttamente. Fare clic su "OK". Ora è possibile chiudere l'applicazione.
ED16DVDS 64 03-01-2005 08:59 Pagina 64
ED16DVDS 03-01-2005 08:59 Pagina 65 How to make an Audio disc? Erstellen einer Audio-Disk Comment créer un disque audio? Come creare un dischi Audio? Hoe maak ik zelf een muziek-disc? ¿Cómo crear un disco de audio? UK D F I NL E This manual shows you an example of how to make an Audio disc which can be played in any CD-Player This product is for personal use only. Unauthorized duplication and distribution of copyrighted materials is a violation of copyright law.
ED16DVDS 03-01-2005 08:59 Pagina 66 1 UK D F I NL E Start "Nero SmartStart" from the desktop. Starten Sie "Nero SmartStart" von Ihrer Oberfläche aus. Lancez "Nero SmartStart" depuis le bureau. Aprire "Nero SmartStart" dal desktop. Start "Nero SmartStart" vanaf het bureaublad. Inicie "Nero SmartStart" desde el escritorio. 2 UK D F I NL E 66 Choose "CD". Wählen Sie "CD". Choisissez "CD". Selezionare "CD". Kies "CD". Seleccione "CD".
ED16DVDS 03-01-2005 08:59 Pagina 67 3 UK D F I NL E Choose "Audio" and "Make Audio CD". Wählen Sie "Audio" oder "Audio CD erstellen". Choisissez "Audio" puis "Créer un CD audio". Selezionare "Audio" e fare clic su "Crea CD audio". Kies "Audio" en dan "Audio-cd maken". Seleccione "Audio" y "Crear CD de audio". 4 UK D F I NL E Click "Add". Klicken Sie auf "Hinzufügen". Cliquez sur "Ajouter". Fare clic su "Aggiungi". Klik op "Toevoegen". Haga clic en "Añadir".
ED16DVDS 03-01-2005 08:59 Pagina 68 5 UK D F I NL E Go to the location where your audio files are located. Wechseln Sie zu dem Verzeichnis, in dem sich Ihre Audio-Dateien befinden. Accédez à l’emplacement de vos fichiers audio. Accedere alla posizione in cui sono presenti i file audio. Ga naar de map waar uw audiobestanden zijn opgeslagen. Acceda a la ubicación donde se encuentran los archivos de audio. 6 UK D F I NL E 68 Select the audio files (*.
ED16DVDS 03-01-2005 08:59 Pagina 69 7 UK D F I NL E When all files are added, click "Finished". Wenn alle Dateien hinzugefügt sind, klicken Sie auf "Fertig". Une fois tous les fichiers ajoutés, cliquez sur "Terminé". Dopo aver aggiunto tutti i file, fare clic su "Finito". Klik op "Voltooid" als alle bestanden zijn toegevoegd. Una vez añadidos todos los archivos, haga clic en "Finalizado". 8 UK D F I NL E Click "Next". Klicken Sie auf "Weiter". Cliquez sur "Suivant". Fare clic su "Avanti".
ED16DVDS 03-01-2005 08:59 Pagina 70 9 UK D F I NL E Choose your recorder and click "Burn". Wählen Sie Ihren Recorder und klicken Sie auf "Brennen". Choisissez le périphérique d'enregistrement puis cliquez sur "Graver". Selezionare il recorder e fare clic su "Scrivi". Kies uw recorder en klik op "Branden". Seleccione su grabadora y haga clic en "Grabar". 10 UK D F I NL E 70 Insert an empty disc. Legen Sie eine leere Disk ein. Insérez un disque vierge. Inserire un disco vuoto.
ED16DVDS 03-01-2005 08:59 Pagina 71 11 UK D F I NL E "Nero" will now burn your disc. "Nero" wird jetzt Ihre Disk brennen. "Nero" grave alors votre disque. "Nero" inizierà a scrivere sul disco. "Nero" zal nu uw disc branden. "Nero" grabará ahora el disco. 12 UK D F I NL E Congratulations, your disc has been written successfully. Click "OK". You may exit the application now. Herzlichen Glückwunsch – Ihre Disk wurde erfolgreich erstellt. Klicken Sie auf "OK".
ED16DVDS 72 03-01-2005 08:59 Pagina 72
ED16DVDS 03-01-2005 08:59 Pagina 73 How to find warranty information? Wie findet man Garantie-Informationen? Comment trouver les informations relatives à la garantie? Come si accede alle informazioni sulla garanzia memorizzate? Waar vind ik informatie over de garantie? ¿Cómo encontrar información sobre la garantía? 73
ED16DVDS 03-01-2005 08:59 Pagina 74 1 UK D F I NL E Insert the Nero disc again, and click "exit". Legen Sie die Nero Disk wieder ein und klicken Sie auf "Exit". Réinsérez le disque Nero et cliquez sur "Quitter". Inserire nuovamente il disco Nero e fare clic su "esci". Leg de Nero-CD weer in de lade en klik op "Sluiten". Vuelva a colocar el disco de Nero y haga clic en "salir". 2 UK D F I NL E 74 Click on the "My Computer" icon on your desktop (A) or click "Start", "My Computer" (B).
ED16DVDS 03-01-2005 08:59 Pagina 75 3 UK D F I NL E Click with the right mouse button on the "Nero" icon (A) and choose "Explore" (B). Klicken Sie mit der rechten Maustaste auf das Symbol "Nero" (A) und wählen Sie "Explore" (B). Cliquez avec le bouton droit sur l’icône "Nero" (A) et choisissez "Explorer" (B). Fare un clic destro sull'icona "Nero" (A) e selezionare "Esplora" (B). Klik met de rechtermuisknop op het pictogram "Nero" (A) en daarna op "Verkennen" (B).
ED16DVDS 76 03-01-2005 08:59 Pagina 76
ED16DVDS 03-01-2005 08:59 Pagina 77 FAQ Frequently Asked Questions FAQ Häufig gestellte Fragen FAQ Questions fréquentes FAQ Domande frequenti FAQ Vaak gestelde vragen FAQ Preguntas frecuentes 77
ED16DVDS UK 03-01-2005 08:59 Pagina 78 Question 1: I have a windows 98 Second Edition PC and there is no CDROM in the computer but I have another PC. How do I install the drivers? 1. Start another computer. 2. Insert the Nero disc for the ED16DVDS into the CDROM. 3. Click "Exit" when the Nero Installation screen appears. 4. Click on “My Computer”. 5. Click on the “Nero”-logo. 6. Click on the right mouse button and choose “Explore”. 7. Go to the directory “Philips Drivers” 8.
ED16DVDS 03-01-2005 08:59 Pagina 79 Question 6: I inserted a disc and it is not played. 1. Ensure the disc label is facing up. 2. Clean the disc. 3. Check whether the disc has the same region code as the player. 4. Check if the disc is defective by trying another disc. 5. Check to see if the disc is defective, badly scratched or warped (not flat) Question 7: Player does not respond to some operating commands during playback. Check whether a PC connection is active.
ED16DVDS D 03-01-2005 08:59 Pagina 80 Frage 1: Ich habe einen PC mit Windows 98 Second Edition und es befindet sich kein CDROM-Laufwerk im Computer, aber ich habe noch einen anderen PC. Wie kann ich die Treiber installieren? 1. Starten Sie den anderen Computer. 2. Legen Sie die Nero-CD für das ED16DVDS in das CDROM-Laufwerk ein. 3. Klicken Sie auf "Beenden", wenn die Anzeige für die Nero Installation erscheint. 4. Klicken Sie auf "Arbeitsplatz". 5. Klicken Sie auf das „Nero“-Logo. 6.
ED16DVDS 03-01-2005 08:59 Pagina 81 Frage 6: Ich habe eine CD eingelegt und es wird nichts wiedergegeben. 1. Kontrollieren, ob die CD mit der bedruckten Seite nach oben eingelegt wurde. 2. Reinigen Sie die CD. 3. Prüfen Sie, ob die CD den gleichen Regionalcode hat wie der Spieler. 4. Kontrollieren Sie, ob die CD defekt ist. Probieren Sie zu diesem Zweck eine andere CD aus. 5. Prüfen Sie, ob die CD defekt, stark verkratzt oder verzogen (nicht flach) ist.
ED16DVDS F 03-01-2005 08:59 Pagina 82 Question 1 : Je possède un PC fonctionnant sous Windows 98 Deuxième Édition sans lecteur de CD-ROM, mais je possède aussi un autre PC. Comment installer les pilotes ? 1. Démarrez un autre ordinateur. 2. Insérez le disque Nero de l’ED16DVDS dans le lecteur de CD-ROM. 3. Cliquez sur « Exit » lorsque la fenêtre Nero Installation apparaît. 4. Cliquez sur « Poste de travail ». 5. Cliquez sur le logo « Nero ». 6.
ED16DVDS 03-01-2005 08:59 Pagina 83 Question 6 : J’ai inséré un disque, mais la lecture est inopérante. 1. Assurez-vous que l’étiquette du disque est sur le dessus. 2. Nettoyez le disque. 3. Vérifiez que le disque a le même code de zone que le lecteur. 4. Vérifiez si le disque n’est pas défectueux en insérant un autre disque. 5. Vérifiez si le disque n’est pas défectueux, rayé ou gondolé. Question 7 : Le lecteur ne répond pas à certaines commandes pendant la lecture.
ED16DVDS I 03-01-2005 08:59 Pagina 84 Domanda 1: Utilizzo un PC con Windows 98 Second Edition in cui non è installata un'unità CDROM, ma posseggo un altro PC. Come devo procedere per installare i driver? 1. Avviate l'altro computer. 2. Inserite il disco di Nero per l'ED16DVDS nell'unità CDROM. 3. Fate clic su "Exit" (Esci) alla comparsa dello schermo d'installazione di Nero. 4. Fate clic su "Risorse del computer". 5. Fate clic sul logo "Nero". 6. Fate un clic destro e selezionate "Esplora". 7.
ED16DVDS 03-01-2005 08:59 Pagina 85 Domanda 6: Ho inserito un disco, ma non viene riprodotto. 1. Verificate che l'etichetta del disco sia rivolta verso l'alto. 2. Pulite il disco. 3. Controllate se il disco è codificato per lo stesso codice regionale impostato nel lettore. 4. Controllate se il disco è difettoso, provandone un altro. 5.
ED16DVDS NL 03-01-2005 08:59 Pagina 86 Vraag 1: Mijn computer met Windows 98 Tweede Edition heeft geen CD-ROMstation, maar ik heb een andere PC. Hoe kan de stuurprogramma's installeren? 1. Start de andere computer op. 2. Leg de Nero-CD voor de ED16DVDS in het CD-ROM-station. 3. Klik op "Verlaten" zodra het Nero-installatiescherm verschijnt. 4. Klik op "Deze computer". 5. Klik op het "Nero"-logo. 6. Klik met de rechtermuisknop en kies "Verkennen". 7. Ga naar de map "Philips drivers". 8.
ED16DVDS 03-01-2005 08:59 Pagina 87 Vraag 6: Ik heb een disc geplaatst, maar die wordt niet afgespeeld. 1. Controleer of de disc met de bedrukte zijde naar boven is geplaatst. 2. Maak de disc schoon. 3. Controleer of de disc en de speler dezelfde regiocode hebben. 4. Plaats een andere disc om na te gaan of de eerste defect is. 5. Controleer of de disc defect, sterk bekrast of verbogen is. Vraag 7:Tijdens het afspelen reageert de speler niet op sommige bedieningshandelingen.
ED16DVDS E 03-01-2005 08:59 Pagina 88 Pregunta 1:Tengo un PC con Windows 98 Second Edition que no tiene CDROM, pero tengo otro PC. ¿Cómo instalo los controladores? 1. Inicie el otro ordenador. 2. Inserte el disco de Nero para ED16DVDS en el CDROM. 3. Haga clic en "Exit" (Salir) cuando aparezca la pantalla de instalación de Nero. 4. Haga clic en “Mi PC”. 5. Haga clic en el logotipo de “Nero”. 6. Haga clic con el botón derecho del ratón y elija “Explore” (Explorar). 7.
ED16DVDS 03-01-2005 08:59 Pagina 89 Pregunta 6: He insertado un disco pero no se reproduce. 1. Asegúrese de que la etiqueta del disco está hacia arriba. 2. Limpie el disco. 3. Compruebe si el disco tiene el mismo código de región que el reproductor. 4. Compruebe si el disco está defectuoso probando con otro disco. 5. Compruebe si el disco está defectuoso, muy arañado o deformado (no es plano). Pregunta 7: El reproductor no responde a algunos comandos durante la reproducción.
ED16DVDS 90 03-01-2005 08:59 Pagina 90
ED16DVDS 03-01-2005 08:59 Pagina 91 Specifications Technische Daten Caractéristiques techniques Specifiche Specificaties Especificaciones 91
ED16DVDS UK 03-01-2005 08:59 Pagina 92 Maximum write speeds: 48x on CD-Recordable 24x on UltraSpeed CD-ReWritable 16x on DVD+R 4x on DVD+R Double Layer 8x on DVD+RW 16x on DVD-R 6x on DVD-RW The actual write speed may be lower as this is disc dependent. Maximum read speeds: 48x on CD 16x on DVD-ROM 8x on Recorded DVD’s The ED16DVDS reads following discs: CD / CD-R / CD-RW formats both 8cm & 12cm discs (up to 99 min).
ED16DVDS D 03-01-2005 08:59 Pagina 93 Maximale Schreibgeschwindigkeit: 48fach auf CD-Recordable 24fach auf UltraSpeed CD-ReWritable 16fach auf DVD+R 4fach auf DVD+R Double Layer 8fach auf DVD+RW 16fach auf DVD-R 6fach auf DVD-RW Die tatsächliche Schreibgeschwindigkeit kann geringer sein, weil sie von der Disk abhängt.
ED16DVDS F 03-01-2005 08:59 Pagina 94 Vitesses maximales en écriture : 48x sur CD inscriptible 24x sur CD réinscriptible ultrarapide 16x sur DVD+R 4x sur DVD+R Double couche 8x sur DVD+RW 16x sur DVD-R 6x sur DVD-RW La vitesse d’écriture réelle peut être inférieure selon le type de disque. Vitesses maximales en lecture : 48x sur CD 16x sur DVD-ROM 8x sur DVD enregistrés L’ED16DVDS lit les disques suivants : CD / CD-R / CD-RW 8 cm et 12 cm (jusqu'à 99 minutes).
ED16DVDS I 03-01-2005 08:59 Pagina 95 Velocità in scrittura max: 48x su CD-R 24x su CD-RW ultraveloci 16x su DVD+R 4x su DVD+R Doppio layer 8x su DVD+RW 16x su DVD-R 6x su DVD-RW La velocità in scrittura effettiva può risultare inferiore poiché legata alla natura del disco. Velocità in lettura max: 48x su CD 16x su DVD-ROM 8x su DVD registrati ED16DVDS è in grado di leggere i seguenti dischi: Dischi CD / CD-R / CD-RW in formato 8 cm e 12 cm (fino a 99 min).
ED16DVDS NL 03-01-2005 08:59 Pagina 96 Maximale schrijfsnelheid: 48x op CD-Recordable 24x op UltraSpeed CD-ReWritable 16x op DVD+R 4x op DVD+R Dubbellaags 8x op DVD+RW 16x op DVD-R 6x op DVD-RW De daadwerkelijke schrijfsnelheid kan lager zijn, omdat die van de disc afhankelijk is. Maximale leessnelheid: 48x vanaf CD 16x vanaf DVD-ROM 8x vanaf opgenomen DVD’s De ED16DVDS leest de volgende typen discs: CD / CD-R / CD-RW, zowel discs van 8 cm als 12 cm (tot 99 min.
ED16DVDS E 03-01-2005 08:59 Pagina 97 Velocidades de escritura máximas: 48x en CD grabable 24x en CD regrabable UltraSpeed 16x en DVD+R 4x en DVD+R Doble capa 8x en DVD+RW 16x en DVD-R 6x en DVD-RW La velocidad de escritura real puede ser más lenta en función del disco. Velocidades de lectura máximas: 48x en CD 16x en DVD-ROM 8x en DVD grabados ED16DVDS lee los siguientes discos: CD / CD-R / CD-RW de 8 cm y 12 cm (hasta 99 min).
ED16DVDS 03-01-2005 08:59 Pagina 98 Safety Precautions UK D F I NL E 98 WARNING Plastic bags can be dangerous. To avoid danger of suffocation, keep this bag away from babies and small children. ATTENTION Pour eviter danger d’etouffement tenir ce sachet loin de la portee des enfants. ACHTUNG Um Erstickungsgefahr zu vermeiden bitte diesen Beutel von Kindern fernhalten. ATENCION Para evitar el peligro de asfixia no dejar este saco al alcance de los niños.
ED16DVDS 03-01-2005 08:59 Pagina 99 Safety Precautions USA/Canada: This player is for use only with IBM compatible UL listed Personal Computers or Macintosh UL listed workstations, weighing less than 18 kg. LASER SAFETY This unit employs a laser. Do not remove the cover or attempt to service this device when connected due to the possibility of eye damage. LASER-SICHERHEIT In das Gerät ist ein Laser eingebaut.
ED16DVDS 03-01-2005 08:59 Pagina 100 Additional information available at our website: www.philips.com/support Specifications subject to change without notice. All dimensions shown are approximate. © 2005 Koninklijke Philips Electronics N.V. All rights reserved. Reproduction, copying, usage, modifying, hiring, renting, public performance, transmission and/or broadcasting in whole or part is prohibited without the written consent of Philips Electronics N.V. 3104 125 2002.