
User Guide

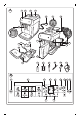
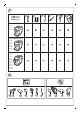
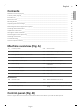
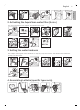
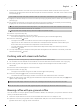
Table Of Contents
- Contents
- Machine overview (Fig. A)
- Control panel (Fig. B)
- Introduction
- Before first use
- Brewing drinks
- Adjusting machine settings
- Removing and inserting the brew group
- Cleaning and maintenance
- AquaClean water filter
- Setting the water hardness
- Descaling procedure (30 min.)
- Ordering accessories
- Troubleshooting
- Technical specifications
- Contenido
- Descripción general del aparato (Fig. A)
- Panel de control (Fig. B)
- Introducción
- Antes de utilizarlo por primera vez
- Preparación de bebidas
- Cambio de los ajustes de la máquina
- Retirada e inserción del grupo de preparación del café
- Limpieza y mantenimiento
- Filtro de agua AquaClean
- Ajuste de la dureza del agua
- Procedimiento de eliminación de los depósitos de cal (30 minutos)
- Solicitud de accesorios
- Resolución de problemas
- Especificaciones técnicas
- Conteúdo
- Visão geral da cafeteira (Fig. A)
- Painel de controle (Fig. B)
- Introdução
- Antes da primeira utilização
- Preparo de bebidas
- Ajuste das configurações da cafeteira
- Remoção e inserção do conjunto de preparo
- Limpeza e manutenção
- Filtro d'água AquaClean
- Determinação da dureza da água
- Procedimento de remoção de impurezas (30 min.)
- Encomenda de acessórios
- Solução de problemas
- Especificações técnicas

Some of the buttons/icons are for specific types only.
B1 On/off button B7 Warning icons
B2 Drink icons* B8 Start light
B3 Aroma strength/pre-ground coffee icon B9 Start/stop button
B4 Drink quantity icon B10 Calc / Clean icon
B5 Milk quantity icon (specific types only) B11 AquaClean icon
B6 Coffee temperature icon (specific types only)
* Drink icons: espresso, espresso lungo, coffee, americano, cappuccino, latte macchiato, hot water,
steam (specific types only)
Introduction
Congratulations on your purchase of a Philips fully automatic coffee machine! To fully benefit from the
support that Philips offers, please register your product at www.philips.com/welcome.
Read the separate safety booklet carefully before you use the machine for the first time and save it for
future reference.
To help you get started and to get the best out of your machine, Philips offers support in multiple
ways. In the box you find:
1 This user manual with picture-based usage instructions and more detailed information on cleaning
and maintenance.
There are multiple versions of this espresso machine, which all have different features. Each
version has its own type number. You can find the type number on the data label on the inside of
the service door (see fig A11).
2 The separate safety booklet with instructions on how to use the machine in a safe way.
3 For online support (frequently asked questions, movies etc.), scan the QR code on the cover of this
booklet or visit www.philips.com/coffee-care
This machine has been tested with coffee. Although it has been carefully cleaned, there may be
some coffee residues left. We guarantee, however, that the machine is absolutely new.
The machine automatically adjusts the amount of ground coffee that is used to make the best-tasting
coffee. You should brew 5 coffees initially to allow the machine to complete its self-adjustment.
Make sure you rinse the LatteGo (milk container) or the classic milk frother before first use.
Before first use
1. Setting up the machine
After you have switched on the machine, some water may be dispensed from the hot water spout or
coffee spout. This is normal.
6
English