
User Manual


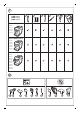
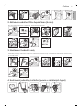


Table Of Contents
- Obsah
- Přehled přístroje (obr. A)
- Ovládací panel (obrázek B)
- Úvod
- Před prvním použitím
- Vaření nápojů
- Úprava nastavení přístroje
- Vyjmutí a vložení varné sestavy
- Čištění a údržba
- Vodní filtr AquaClean
- Nastavení tvrdosti vody
- Odstranění vodního kamene (30 min)
- Objednávání příslušenství
- Řešení problémů
- Technické specifikace
- Sisukord
- Masina ülevaade (joonis A)
- Juhtpaneel (joonis B)
- Sissejuhatus
- Enne esmakordset kasutamist
- Jookide valmistamine
- Masina seadistuste reguleerimine
- Kohvimooduli eemaldamine ja tagasipanemine
- Puhastamine ja hooldus
- AquaClean-veefilter
- Vee kareduse seadistamine
- Katlakivi eemaldamine (30 minutit)
- Tarvikute tellimine
- Veaotsing
- Tehnilised andmed
- Sadržaj
- Pregled uređaja (slika A)
- Upravljačka ploča (slika B)
- Uvod
- Prije prve uporabe
- Kuhanje napitaka
- Prilagodba postavki uređaja
- Vađenje i umetanje sklopa za kuhanje
- Čišćenje i održavanje
- Filtar vode AquaClean
- Postavljanje tvrdoće vode
- Postupak uklanjanja kamenca (30 min)
- Naručivanje dodataka
- Rješavanje problema
- Tehničke specifikacije
- Saturs
- Ierīces pārskats (A att.)
- Vadības panelis (B att.)
- Ievads
- Pirms pirmās lietošanas reizes
- Dzērienu gatavošana
- Ierīces iestatījumu pielāgošana
- Gatavošanas vienības izņemšana un ievietošana
- Tīrīšana un kopšana
- Ūdens filtrs „AquaClean”
- Ūdens cietības iestatīšana
- Atkaļķošanas procedūra (30 min)
- Piederumu pasūtīšana
- Traucējummeklēšana
- Tehniskie rādītāji
- Turinys
- Mašinos apžvalga (A pav.)
- Valdymo skydelis (B pav.)
- Įvadas
- Prieš naudojant pirmą kartą
- Gėrimų virimas
- Mašinos nustatymų reguliavimas
- Virimo grupės išėmimas ir įstatymas
- Valymas ir priežiūra
- „AquaClean“ vandens filtras
- Vandens kietumo nustatymas
- Nuovirų šalinimo procedūra (30 min.)
- Priedų užsakymas
- Trikčių diagnostika ir šalinimas
- Techninės specifikacijos
- Tartalom
- A készülék bemutatása („A” ábra)
- Kezelőpanel („B” ábra)
- Bevezetés
- Teendők az első használat előtt
- Italok főzése
- A készülék beállítása
- A főzőegység eltávolítása és behelyezése
- Tisztítás és karbantartás
- AquaClean vízszűrő
- A vízkeménység beállítása
- Vízkőmentesítés (30 perc)
- Tartozékok rendelése
- Hibaelhárítás
- Műszaki jellemzők
- Spis treści
- Opis urządzenia (Rys. A)
- Panel sterowania (Rys. B)
- Wprowadzenie
- Przed pierwszym użyciem
- Parzenie napojów
- Dostosowywanie ustawień urządzenia
- Wyjmowanie i wkładanie jednostki zaparzającej
- Czyszczenie i konserwacja
- Filtr wody AquaClean
- Ustawianie twardości wody
- Procedura odwapniania (30 min)
- Zamawianie akcesoriów
- Rozwiązywanie problemów
- Dane techniczne
- Cuprins
- Prezentarea generală a aparatului (Fig. A)
- Panou de control (Fig. B)
- Introducere
- Înainte de prima utilizare
- Prepararea băuturilor
- Reglarea setărilor aparatului
- Scoaterea și introducerea unității de infuzare
- Curăţare şi întreţinere
- Filtru de apă AquaClean
- Setarea durității apei
- Procedura de detartrare (30 de minute)
- Comandarea accesoriilor
- Depanare
- Specificații tehnice
- Kazalo
- Predstavitev aparata (sl. A)
- Nadzorna plošča (sl. B)
- Uvod
- Pred prvo uporabo
- Priprava napitkov
- Prilagajanje nastavitev aparata
- Odstranjevanje in vstavljanje kuhalnega sklopa
- Čiščenje in vzdrževanje
- Vodni filter AquaClean
- Nastavitev trdote vode
- Postopek odstranjevanja vodnega kamna (30 minut)
- Naročanje dodatne opreme
- Odpravljanje težav
- Tehnični podatki
- Obsah
- Prehľad zariadenia (obr. A)
- Ovládací panel (obr. B)
- Úvod
- Pred prvým použitím
- Príprava nápojov
- Úprava nastavení zariadenia
- Vyberanie a vkladanie varnej zostavy
- Čistenie a údržba
- Vodný filter AquaClean
- Výber tvrdosti vody
- Proces odstraňovania vodného kameňa (30 minút)
- Objednávanie príslušenstva
- Riešenie problémov
- Technické parametre
- Sadržaj
- Prikaz aparata (slika A)
- Upravljačka ploča (slika B)
- Uvod
- Pre prvog korišćenja
- Kuvanje napitaka
- Prilagođavanje podešavanja aparata
- Uklanjanje i umetanje bloka za kuvanje
- Čišćenje i održavanje
- Filter za vodu AquaClean
- Podešavanje tvrdoće vode
- Postupak uklanjanja kamenca (30 min.)
- Naručivanje dodataka
- Rešavanje problema
- Tehničke specifikacije
- Съдържание
- Общ преглед на машината (Фиг. А)
- Контролен панел (фиг. B)
- Въведение
- Преди първата употреба
- Приготвяне на напитки
- Регулиране на настройките на машината
- Изваждане и поставяне на блока за приготвяне
- Почистване и поддръжка
- Воден филтър AquaClean
- Настройване на твърдостта на водата
- Процедура по премахване на накип (30 мин)
- Поръчване на аксесоари
- Отстраняване на неизправности
- Технически спецификации
- Зміст
- Огляд машини (рис. A)
- Панель керування (рис. В)
- Вступ
- Перед першим використанням
- Приготування напоїв
- Налаштування кавомашини
- Виймання та встановлення блоку заварювання
- Чищення та догляд
- Фільтр для води AquaClean
- Налаштування жорсткості води
- Процедура видалення накипу (30 хв.)
- Замовлення приладдя
- Усунення несправностей
- Технічні характеристики

Příprava nápojů obsahujících mléko pomocí jednotky LatteGo
(nádržka na mléko)
Jednotka LatteGo se skládá znádržky na mléko, rámu a víčka. Ještě než nádržku naplníte mlékem,
zkontrolujte, zda rám inádržka drží správně při sobě, aby mléko nevyteklo.
1 Postup montáže systému LatteGo: nejprve vložte horní část nádržky na mléko pod háček ve vrchní
části rámu (obr. 4). Poté domáčkněte do úchytu i spodní část nádržky na mléko. Až se díly správně
spojí, uslyšíte zaklapnutí (obr. 5).
Poznámka: Před sestavením nádržky na mléko arámu zkontrolujte, že jsou obě součásti čisté.
2 Jednotku LatteGo mírně nakloňte anasaďte ji na dávkovací hubici (obr. 6) horké vody. Poté
zatlačte na spodní část, až díl správně zaklapne (obr. 7).
3 Naplňte LatteGo mlékem až po úroveň označenou na nádržce na mléko pro nápoj, který
připravujete (obr. 8). Nádržku na mléko nenaplňujte nad úroveň značky maxima.
Pokud jste nastavili vlastní množství mléka, možná budete muset do nádržky nalít více či méně
mléka, než pro daný nápoj udává jednotka LatteGo.
Kdosažení co nejlepšího výsledku vždy používejte mléko čerstvě vytažené zlednice.
4 Na odkapávací tácek umístěte šálek.
5 Klepněte na nápoj obsahující mléko dle vašeho výběru.
-
Nyní si můžete nápoj upravit podle vlastních preferencí.
6 Stiskněte tlačítko spuštění/zastavení
.
-
Po dobu přípravy nápoje bude blikat symbol nápoje. Při přípravě nápoje cappuccino nebo latte
macchiato přístroj nejprve nadávkuje mléko apoté kávu. Pokud připravujete café latte, přístroj
začne nejdříve dávkovat kávu apotom mléko.
-
Stisknutím tlačítka spuštění/zastavení
můžete dávkování mléka ukončit ještě předtím, než
přístroj nadávkuje nastavené množství mléka.
7 Přípravu celého nápoje (mléka akávy) můžete předčasně ukončit podržením tlačítka
spuštění/zastavení .
Napěnění mléka pomocí klasického napěňovače na mléko
Kdosažení co nejkvalitnější pěny vždy používejte mléko čerstvě vytažené zlednice.
1 Černou silikonovou páčku na přístroji otočte směrem doleva anasuňte na ni (obr. 9) napěňovač
mléka.
2 Do džbánku nalijte přibližně 100ml mléka při přípravě nápoje cappuccino apřibližně 150ml mléka
při přípravě nápoje latte macchiato.
3 Napěňovač ponořte přibližně 1cm do mléka.
4 Stiskněte symbol (obr. 10) páry.
-
Symbol páry se rozsvítí azačne blikat kontrolka spuštění.
5 Stisknutím tlačítka spuštění/zastavení
zahajte pěnění mléka (obr. 11).
-
Přístroj se začne zahřívat a pára proudí pod tlakem do mléka, které se napění.
6 Jakmile mléčná pěna dosáhne ve džbánku požadovaného objemu, opětovným stisknutím tlačítka
spuštění/zastavení
zastavte pěnění mléka.
Mléko nikdy nepěňte déle než 90sekund. Pěnění se po 90sekundách automaticky vypne.
Abyste získali nejlepší mléčnou pěnu, není třeba se džbánkem nijak pohybovat.
9
Čeština
Čeština