
User Manual

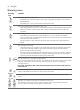
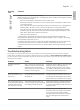
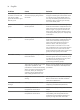
Table Of Contents
- Contents
- Machine overview (Fig. A)
- Control panel (Fig. B)
- Introduction
- Before first use
- Brewing drinks
- Adjusting machine settings
- Removing and inserting the brew group
- Cleaning and maintenance
- AquaClean water filter
- Setting the water hardness
- Descaling procedure (30 min.)
- Ordering accessories
- Troubleshooting
- Technical specifications
- Contenido
- Descripción general de la máquina (Fig. A)
- Panel de control (Fig. B)
- Introducción
- Antes del primer uso
- Preparación de bebidas
- Cambio de los ajustes de la máquina
- Retirada e inserción del grupo de preparación del café
- Limpieza y mantenimiento
- Filtro de agua AquaClean
- Establecer la dureza del agua
- Procedimiento de eliminación de los depósitos de cal (30 minutos)
- Pedido de accesorios
- Solución de problemas
- Especificaciones técnicas
- Table des matières
- Vue d’ensemble de la machine (fig. A)
- Panneau de commande (fig. B)
- Introduction
- Avant la première utilisation
- Infusion de boissons
- Étapes générales
- Personnalisation des boissons
- Préparation d’un café à partir de grains
- Préparation des boissons à base de lait avec le LatteGo (récipient à lait)
- Production de mousse de lait avec le mousseur à lait classique
- Infuser du café avec du café prémoulu
- Préparation du café glacé (certains modèles uniquement)
- Distribution d’eau chaude
- Réglage des paramètres de la machine
- Retrait et insertion du groupe de percolation
- Nettoyage et entretien
- Filtre à eau AquaClean
- Réglage de la dureté de l’eau
- Procédure de détartrage (30 min.)
- Commande d'accessoires
- Résolution des problèmes
- Caractéristiques techniques

20
English
Problem Cause Solution
The coffee grounds
container is too full and
the 'empty coffee
grounds container' light
did not go on.
You removed the drip tray
without emptying the grounds
container.
When you remove the drip tray, also
empty the coffee grounds container even
if it contains only a few coffee pucks. In
this way the coffee grounds counter will
be reset to zero, re-starting to correctly
count the coffee pucks.
I cannot remove the brew
group.
The brew group is not in the
correct position.
Reset the machine in the following way:
close the service door and place back the
water tank. Switch the machine off and
back on again. Try again to remove the
brew group. See chapter 'Removing and
inserting the brew group' for step by step
instructions.
I cannot insert the brew
group.
The brew group is not in the
correct position.
Reset the machine in the following way:
close the service door and place back the
water tank. Leave the brew group out.
Switch the machine off and unplug it.
Wait for 30 sec. and then plug the
machine back in and switch it on. Then
put the brew group in the correct position
and reinsert it into in the machine. See
chapter 'Removing and inserting the brew
group' for step by step instructions.
The coffee is watery. The brew group is dirty or needs
to be lubricated.
Remove the brew group (see 'Removing
the brew group from the machine'), rinse
it under the tap and leave it to dry. Then
lubricate the moving parts (see
'Lubricating the brew group').
The machine is performing its self-
adjustment procedure. This
procedure is started automatically
when you use the machine for the
first time, when you change to
another type of coffee beans or
after a long period of non-use.
Brew 5 cups of coffee initially to allow the
machine to complete its self-adjustment
procedure.
The grinder is set to a too coarse
setting.
Set the grinder to a finer (lower) setting.
Brew 2 to 3 drinks to be able to before
taste the full difference.
The coffee is not hot
enough.
The temperature is set too low. Set the temperature to the maximum (see
'Adjusting the coffee temperature').
A cold cup reduces the
temperature of the drink.
Preheat the cups by rinsing them with hot
water.
Adding milk reduces the
temperature of the drink.
Regardless of whether you add hot or cold
milk, adding milk always reduces the
temperature of the coffee. Preheat the
cups by rinsing them with hot water.