
Instruction Manual
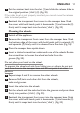


3 Put the retainer back into the slot (1) and slide the release slide to
the original position (‘click’) (2) (Fig. 22)
If the roller brush is not properly inserted, you cannot move the release
slide to locked position.
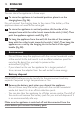
4 Reattach the transparent front cover to the sweeper base. Grab
the cover with both hands, push it downwards (1) and inwards (2)
rmly until it snaps back into the slots (‘click’). (Fig. 23)
Cleaning the wheels
1 Switch off the appliance.
2 Remove the transparent front cover from the sweeper base. Grab
the bottom edge of the cover with both hands, pull it outwards (1)
and upwards (2) rmly until it is released from the slots (Fig. 16).
3 Place the sweeper base upside down.
4 Insert a slotted screwdriver underneath one of the wheels. Rotate
the screwdriver to loosen the wheel and axle from the
groove (Fig. 24).
Do not place your hand on the wheel.
To prevent the wheel and axle from hitting you or others, do not put
your face close to the sweeper base and do not point it at other
persons.
5 Repeat steps 4 and 5 to remove the other wheels.
6 Remove uff, hairs and other dirt from the wheels,
axles and grooves.
7 Insert the axles into the wheels.
8 Put the wheels and the axles back into the grooves and press them
rmly into position (‘click’). (Fig. 25)
9 Reattach the transparent front cover into the sweeper base. Grab
the cover with both hands, push it downwards (1) and inwards (2)
rmly until it snaps back into the slots (‘click’). (Fig. 23)
ENGLISH 11