
User manual
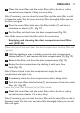


7 Putthelterunitbackintothedustcompartment(Fig.18).
Note: Make sure you insert the lter unit in the correct way.
1 Removethelterunitfromthedustcompartment(Fig.13).
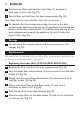
2 Turntheinnerlteranticlockwise(1)andremoveitfromtheouter
lter(2).(Fig.20)
3 Gentlyturntheinnerlteranticlockwise(1)andremoveitfrom
thelterholder(2)(Fig.23).
4 Placeanewinnerlteronthelterholder(1)andturnit
clockwisetoattachit(2)(Fig.24).
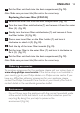
5 Pushthetipoftheinnerlterinwards(Fig.25).
6 Puttheinnerlterintheouterlter(1)andturnitclockwiseto
xit(2).(Fig.21)
7 Putthelterunitbackintothedustcompartment(Fig.18).
Note: Make sure you insert the lter unit in the correct way.
Ordering accessories
To purchase accessories for this appliance, please visit our online shop at
www.shop.philips.com/service. If the online shop is not available in
your country, go to your Philips dealer or a Philips service centre. If you
have any difculties obtaining accessories for your appliance, please
contact the Philips Consumer Care Centre in your country. You nd its
contact details in the worldwide guarantee leaet.
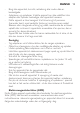
Environment
- Do not throw away the appliance with the normal household waste
at the end of its life, but hand it in at an ofcial collection point for
recycling. By doing this, you help to preserve the
environment (Fig. 26).
ENGLISH 13