Register your product and get support at www.philips.
1
FC8749-FC8710 English 6 Dansk 21 Deutsch 36 Ελληνικα 51 Español 67 Suomi 82 Français 97 Italiano 112 Nederlands 127 Norsk 142 Português 158 Svenska 173 Türkçe 188 215 228
English Introduction Congratulations on your purchase and welcome to Philips! To fully benefit from the support that Philips offers, register your product at www.philips.com/welcome. Philips incorporates the latest technologies to create products that are good for the environment in terms of energy consumption as well as material usage. Specific types in this range are partly made of bioplastics and recycled plastics.
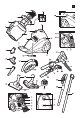
English 35 36 37 38 39 40 41 42 43 44 45 46 7 Tri-Active nozzle (specific types only) Side brush Accessory clip (specific types only) Telescopic tube (specific types only) Telescopic tube (specific types only) Filter grille Super Clean Air filter (specific types only) Mains plug Parking slot Super Clean Air HEPA filter (specific types only) Swivel wheel Type plate Important Read this user manual carefully before you use the appliance and save it for future reference.
English -- Only use the Philips filter cylinder supplied with the appliance. -- During vacuum cleaning, especially in rooms with low air humidity, your vacuum cleaner builds up static electricity. As a result you can experience electric shocks when you touch the tube or other steel parts of your vacuum cleaner. These shocks are not harmful to you and do not damage the appliance.
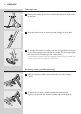
English 9 2 To disconnect the handgrip from the tube, hold the handgrip with one hand. With the other hand, hold the telescopic tube and press the tube release button (1) and pull the tube off the handgrip (2). Attaching the standard handgrip (specific types only) 1 To connect the telescopic tube to the handgrip, press the springloaded lock button on the handgrip (1) and insert the handgrip into the tube (2). Fit the spring-loaded lock button into the opening in the tube (‘click’).
English Telescopic tube 1 Position the nozzle on the floor and hold the tube at an angle of 45° to the floor. 2 Move the tube lock up or down until the handgrip is at hip level. 3 To connect the tube to a nozzle, press the spring-loaded lock button on the tube and insert the tube into the nozzle. Fit the spring-loaded lock button into the opening in the nozzle (‘click’). -- To disconnect the tube from the handgrip, press the spring-loaded lock button and pull the handgrip out of the tube.
English Accessory clip (specific types only) The accessory clip can simply be snapped onto the tube. -- You can snap the crevice tool and the small nozzle (specific types only) onto the clip. Accessory holder (specific types only) -- The accessory holder can simply be snapped onto the handgrip. You can store accessories in the accessory holder by pushing them into the holder. To detach the accessories, pull them out of the holder.
English Crevice tool and small nozzle (specific types only) 1 Connect the crevice tool (1) or small nozzle (2) with or without brush attachment (3) to the tube or directly to the handgrip. 3 Brush attachment (specific types only) 1 To assemble the brush attachment, slide it onto the bottom of the small nozzle (‘click’). 2 To disassemble the brush attachment, slide it off the bottom of the small nozzle.
English 13 -- The side brushes catch more dust and dirt at the sides of the nozzle and allow you to clean better along furniture and other obstacles. -- The opening at the front of the nozzle allows you to suck up larger particles. 1 Use the hard floor setting to clean hard floors (for instance for tiled, parqueted, laminated and linoleumed flooring): push the rocker switch on top of the nozzle with your foot to make the brush strip come out of the housing.
English 2 To clean carpets, push the rocker switch again to make the brush strips disappear into the nozzle housing again. Using the appliance 1 Pull the cord out of the appliance and put the mains plug in the wall socket. 2 Press the on/off button to switch on the appliance. -- During vacuuming, you can adjust the suction power with the suction power knob. -- Use maximum suction power to vacuum very dirty carpets and hard floors. -- Use minimum suction power to vacuum curtains, table carpets, etc.
English 15 Emptying the dust bucket -- Empty the dust bucket as soon as the dust level has reached the round disc of the filter cylinder case. 1 Disconnect the hose from the appliance. 2 Pull the dust bucket retainer downwards to release the dust bucket. 3 Grab the dust bucket handle and lift the dust bucket out of the appliance. 4 Hold the dust bucket over a dustbin and lift the filter cylinder case out of it. 5 Empty the dust bucket into the dustbin.
English Cleaning and maintenance of filters Filter cylinder Clean the filter cylinder every week. 1 Remove the dust bucket from the appliance, unlock the filter cylinder lock (1) and lift the filter cylinder out of the filter cylinder case (2). 2 Clean the filter cylinder with the brush supplied. Brush from the top of the filter cylinder downwards along the ribs. Only use the brush supplied! Other brushes may damage the filter cylinder.
English 17 3 Press the clean motor protection filter firmly back into the filter compartment to ensure that it is properly placed. Super Clean Air filter (specific types only) The Super Clean Air filter located in the back of the appliance has electrostatically charged fibres. These fibres filter a large part of the smaller particles from the exhaust air. Replace the Super Clean Air filter every six months. 1 Open the filter grille. 2 Remove the filter holder.
English 5 Put the filter holder back into the appliance. 6 Close the filter grille (‘click’). Super Clean Air HEPA filter (specific types only) Instead of with the Super Clean Air filter, some types are equipped with the special Super Clean Air HEPA filter. This filter is able to remove 99.5% of all particles down to 0.0003mm in size from the outlet air.
English 19 Ordering accessories and filters If you have any difficulties obtaining filters or other accessories for this appliance, contact the Philips Consumer Care Centre in your country or consult the worldwide guarantee leaflet. -- Philips filter cylinders are available under service number 4322 004 93320. -- Super Clean Air filters are available under type number FC8032. -- Super Clean Air HEPA filters are available under type number FC8044.
English Problem Possible cause Solution When I use my vacuum cleaner I sometimes feel electric shocks. Your vacuum cleaner has built up static electricity. The lower the air humidity in the rooms, the more static electricity the appliance builds up. To reduce this inconvenience, we advise you to discharge the appliance by frequently holding the tube against other metal objects in the room (for example legs of a table or chair, radiator etc.).
Dansk 21 Introduktion Tillykke med dit køb og velkommen til Philips! For at få fuldt udbytte af den støtte, Philips tilbyder, skal du registrere dit produkt på www.philips.com/welcome. Philips integrerer de nyeste teknologier for at fremstille produkter, der er skånsomme over for miljøet både med hensyn til energiforbrug og brug af materialer. Bestemte typer i denne serie er delvist fremstillet af bioplast og genbrugsplast.
Dansk 35 36 37 38 39 40 41 42 43 44 45 46 Tri-Active mundstykke (kun nogle modeller) Sidebørste Holder til tilbehør (kun nogle modeller) Teleskoprør (kun nogle modeller) Teleskoprør (kun nogle modeller) Filtergitter Super Clean Air-filter (kun bestemte typer) Stik Parkeringsbeslag Super Clean Air HEPA Filter (kun nogle modeller) Drejehjul Typeskilt Vigtigt Læs denne brugsvejledning omhyggeligt igennem, inden apparatet tages i brug, og gem den til eventuelt senere brug.
Dansk 23 -- Når du støvsuger, især i rum med lav luftfugtighed, genererer din støvsuger statisk elektricitet. Derfor kan du opleve elektriske stød, når du rører ved støvsugerrøret eller andre ståldele på støvsugeren. Disse stød er ikke farlige for dig og skader ikke apparatet. Hvis du vil undgå dette fremover, anbefaler vi, at du: 1 jævnligt aflader apparatet ved at holde røret mod andre metalobjekter i rummet (f.eks. bord- og stoleben, radiatorer osv.
Dansk Montering af ComfortControl-håndgrebet (kun nogle modeller) 1 Sæt håndgrebet på teleskoprøret (“klik”). 2 Håndgrebet tages af røret ved at holde håndgrebet med den ene hånd. Med den anden hånd holder du teleskoprøret og trykker på udløserknappen (1) og trækker røret af håndgrebet (2).
Dansk 25 2 Slangen tages af ved at trykke på udløserknappen (1) og trække slangetilslutningen ud af åbningen til tilslutningen af slangen (2). Teleskoprør 1 Placer mundstykket på gulvet, og hold røret i en vinkel på 45° i forhold til gulvet. 2 Skub rørlåsen op eller ned, indtil håndgrebet er i hoftehøjde. 3 Hvis du vil sætte røret på et mundstykke, skal du trykke på den fjederbelastede låseknap på røret og sætte røret ind i mundstykket.
Dansk Tilbehørsholder (kun nogle modeller) 1 Skub tilbehørsholderen med tilbehør på grebet (“klik”). 2 Hvis du vil tage tilbehørsholderen af, skal du presse udløseren sammen (1) og skubbe tilbehørsholderen af håndgrebet (2). Holder til tilbehør (kun nogle modeller) Tilbehørsholderen kan “klikkes” fast på røret. -- Sprækkemundstykket og det lille mundstykke (gælder kun nogle typer) kan klikkes på holderen. Tilbehørsholder (kun nogle modeller) -- Tilbehørsholderen kan nemt fastsættes på håndgrebet.
Dansk 27 -- Sprækkemundstykke og lille mundstykke. Vær opmærksom på, hvordan det lille mundstykke skal sidde i tilbehørsholderen. -- Sprækkemundstykke og lille børstestykke. Sprækkemundstykke og lille mundstykke (kun nogle modeller) 1 Sæt sprækkemundstykket (1) eller det lille mundstykke (2) med eller uden børstetilbehør (3) på røret eller direkte på håndgrebet. 3 Børstetilbehør (kun nogle modeller) 1 Børstetilbehøret samles ved at skubbe det på bunden af det lille mundstykke (“klik”).
Dansk Fugemundstykke, møbelmundstykke og lille børstemundstykke (kun nogle modeller). -- Sæt sprækkemundstykket (1), det lille mundstykke (2) eller den lille børste (3) direkte på håndgreb eller rør. Tri-Active mundstykke (kun nogle modeller) Tri-Active-mundstykket er multifunktionelt og til både tæpper og hårde gulve. -- Sidebørsterne fanger mere støv og skidt ved mundstykkets sider, så du bedre kan rengøre langs møbler og andre forhindringer.
Dansk 2 Brug indstillingen til tæpper til rengøring af tæpper: Tryk på vippeknappen igen, så børsten forsvinder ind i mundstykket. Hjulet sænkes automatisk. Kombimundstykke (kun nogle modeller) Kombimundstykket kan benyttes på tæpper (med børsterne indtrukket) eller hårde gulve (med børsterne udskudt). 1 Ved støvsugning af hårde gulve trykkes på vippekontakten oven på kombimundstykket med foden, så børsterne skydes ud af mundstykket.
Dansk -- Sugestyrken kan justeres under støvsugningen ved hjælp af knappen til regulering af sugestyrke. -- Brug maksimal sugestyrke til støvsugning af meget snavsede tæpper og hårde gulve. -- Brug minimal sugestyrke til gardiner, duge osv. -- Ønsker du at holde pause et øjeblik, kan røret parkeres i en praktisk stilling ved at sætte rillen på mundstykket i parkeringsbeslaget. Rengøring og vedligeholdelse Hverken dele eller tilbehør til støvsugeren må kommes i opvaskemaskine.
Dansk 31 3 Tag fat i støvbeholderens håndtag og løft støvbeholderen ud af apparatet. 4 Hold støvbeholderen over en skraldespand og løft filtercylinderkabinettet ud. 5 Tøm støvbeholderen i skraldespanden. Støvbeholderen kan rengøres med koldt vand og lidt opvaskemiddel. 6 Sæt filtercylinder-kabinettet tilbage i støvbeholderen, og sæt støvbeholderen tilbage i apparatet. Sørg for at filtercylinderen er placeret i filtercylinder-kabinettet, ellers er det ikke muligt at lukke støvbeholderen.
Dansk Filterkabinet 1 Fjern filtercylinder-kabinettet fra støvbeholderen. 2 Hvis der er snavs på indersiden af kabinettet, tømmes beholderen over en skraldespand. 3 Om nødvendigt rengøres kabinettet med koldt vand og lidt opvaskemiddel. 4 Udløs låsen til filtercylinderen og sæt filtercylinderen tilbage i filtercylinder-kabinettet. 5 Sæt filtercylinder-kabinettet tilbage i støvbeholderen, og sæt støvbeholderen tilbage i apparatet. Motorbeskyttelsesfilter Rengør motorbeskyttelsesfilteret en gang om året.
Dansk 33 3 Luk filterholderen op, og tag det gamle filter ud. 4 Sæt det nye filter i filterholderen og luk holderen (“klik”). 5 Sæt filterholderen tilbage i apparatet (‘klik’). 6 Luk filtergitteret (“klik”). Super Clean Air HEPA Filter (kun nogle modeller) I stedet for et Super Clean Air-filter er nogle modeller udstyret med et særligt Super Clean Air HEPA-filter. Dette filter fjerner 99,5 % af alle partikler ned til en størrelse på 0,0003 mm fra udblæsningsluften.
Dansk Opbevaring 1 Sluk for apparatet, og tag stikket ud af stikkontakten. 2 Tryk på knappen til indspoling af ledningen, så den ruller ind. 3 Sæt altid Tri-Active-mundstykket på gulvtæppeindstilling under opbevaring, så sidebørsterne ikke bøjes. 4 Sæt rillen på mundstykket ned i parkeringsbeslaget for at fastgøre mundstykket til apparatet. Opbevar apparatet i vandret position med alle hjul på gulvet.
Dansk 35 Reklamationsret og service For alle yderligere oplysninger eller ved eventuelle problemer med apparatet henvises til Philips hjemmeside på adressen www.philips.com eller det lokale Philips Kundecenter (telefonnumre findes i vedlagte “Worldwide Guarantee”-folder). Hvis der ikke findes et kundecenter i dit land, bedes du venligst kontakte din lokale Philips-forhandler. Fejlfinding Dette kapitel opsummerer de mest almindelige problemer, du kan støde på ved brug af apparatet.
Deutsch Einführung Herzlichen Glückwunsch zu Ihrem Kauf und willkommen bei Philips! Um den Support von Philips optimal nutzen zu können, registrieren Sie Ihr Produkt bitte unter www.philips.com/welcome. Philips nutzt die neuesten technischen Verfahren zur Herstellung von Produkten, die sowohl hinsichtlich des Stromverbrauchs als auch der verwendeten Materialien die Umwelt schonen. Bestimmte Modelle dieser Produktreihe bestehen teilweise aus Biokunststoff und recyceltem Kunststoff.
Deutsch 33 34 35 36 37 38 39 40 41 42 43 44 45 46 37 Parkleiste Kippschalter Tri-Active-Düse (nur bestimmte Gerätetypen) Seitenbürste Zubehörbrücke (nur bestimmte Gerätetypen) Teleskoprohr (nur bestimmte Gerätetypen) Teleskoprohr (nur bestimmte Gerätetypen) Filtergitter Super Clean-Luftfilter (nur bestimmte Gerätetypen) Netzstecker Parkschlitz Super Clean Air HEPA-Filter (nur bestimmte Gerätetypen) Schwenkrolle Typenschild Wichtig Lesen Sie diese Bedienungsanleitung vor dem Gebrauch des Geräts aufmerksam
Deutsch -- Ziehen Sie stets den Netzstecker aus der Steckdose, bevor Sie den Staubbehälter leeren oder den Filter reinigen. -- Betreiben Sie das Gerät keinesfalls ohne Motorschutzfilter, da dies den Motor beschädigen und die Lebensdauer des Geräts verkürzen kann. -- Verwenden Sie ausschließlich den im Lieferumfang enthaltenen Philips Staubfilter. -- Besonders in Räumen mit niedriger Luftfeuchtigkeit lädt sich Ihr Gerät beim Staubsaugen statisch auf.
Deutsch 39 ComfortControl-Handgriff anbringen (nur bestimmte Gerätetypen) 1 Bringen Sie den Handgriff am Teleskoprohr an. (Er rastet hörbar ein.) 2 Um den Handgriff vom Rohr abzunehmen, halten Sie den Handgriff mit einer Hand. Halten Sie das Teleskoprohr mit der anderen Hand, drücken Sie die Rohrentriegelungstaste (1), und ziehen Sie das Rohr vom Handgriff ab (2).
Deutsch 2 Drücken Sie zum Lösen des Schlauchs die Entriegelungstasten (1) und ziehen Sie den Schlauchanschluss aus der Öffnung (2). Teleskoprohr 1 Stellen Sie die Düse auf den Boden, und halten Sie das Rohr in einem 45 °-Winkel zum Boden. 2 Bewegen Sie die Rohrsperre nach oben oder unten, bis sich der Handgriff auf Hüfthöhe befindet. 3 Um das Rohr an einer Düse anzubringen, drücken Sie die Federtaste am Rohr, und stecken Sie das Rohr in die Düse.
Deutsch 41 Zubehörhalterung (nur bestimmte Gerätetypen) 1 Schieben Sie die Zubehörhalterung mit Zubehör auf den Handgriff. (Sie rastet hörbar ein.) 2 Um die Zubehörhalterung abzunehmen, drücken Sie die Entriegelungshebel zusammen (1), und ziehen Sie dann die Zubehörhalterung vom Handgriff ab (2). Zubehörbrücke (nur bestimmte Gerätetypen) Die Zubehörbrücke kann einfach an das Rohr geklemmt werden. -- Die Fugendüse und die kleine Düse (nur bestimmte Gerätetypen) lassen sich auf die Zubehörbrücke stecken.
Deutsch -- Fugendüse und kleine Saugdüse Achten Sie bitte darauf, wie die kleine Saugdüse in die Zubehörhalterung eingepasst werden muss. -- Fugendüse und kleine Bürste. Fugendüse und kleine Düse (nur bestimmte Gerätetypen) 1 Verbinden Sie die Fugendüse 1) oder die kleine Saugdüse (2) mit oder ohne Bürstenaufsatz (3) mit dem Saugrohr oder direkt mit dem Handgriff.
Deutsch 43 Fugendüse, kleine Saugdüse und Bürstendüse (nur bestimmte Gerätetypen) -- Die Fugendüse (1), die kleine Saugdüse (2) und die kleine Bürste (3) können direkt am Handgriff oder Saugrohr angebracht werden. Tri-Active-Düse (nur bestimmte Gerätetypen) Die Tri-Active-Düse ist eine Mehrzweckdüse für Teppiche und Hartböden. -- Die Seitenbürsten erfassen seitlich mehr Staub und Schmutz, so dass Sie besser an Möbeln und anderen Gegenständen entlang saugen können.
Deutsch 2 Verwenden Sie die Teppicheinstellung zum Reinigen von Teppichen und Teppichböden. Drücken Sie erneut auf den Kippschalter, wodurch der Bürstenstreifen wieder im Gehäuse der Saugdüse versenkt wird. Dabei tritt automatisch das Laufrad heraus. Kombi-Düse (nur bestimmte Gerätetypen) Die Kombi-Düse ist sowohl für Textilböden (mit eingefahrenen Bürstenleisten) als auch für Hartböden (mit ausgefahrenen Bürstenleisten) geeignet.
Deutsch 45 -- Sie können die Saugleistung während des Staubsaugens mithilfe des Saugleistungsreglers einstellen. -- Saugen Sie sehr stark verschmutzte Teppiche und Hartböden bei maximaler Saugleistung. -- Verwenden Sie minimale Saugleistung zum Absaugen von Vorhängen, Tischläufern usw. -- Wenn Sie eine kleine Saugpause machen möchten, können Sie das Saugrohr ganz bequem parken, indem Sie die Leiste an der Saugdüse in den dafür vorgesehenen Parkschlitz stecken.
Deutsch 3 Heben Sie den Behälter an seinem Griff aus dem Gerät. 4 Halten Sie den Staubbehälter über einen Mülleimer und nehmen Sie das Filtergehäuse heraus. 5 Entleeren Sie den Staubbehälter in den Mülleimer. Reinigen Sie den Staubbehälter mit kaltem Leitungswasser und etwas Geschirrspülmittel. 6 Setzen Sie das Filtergehäuse wieder in den Staubbehälter und diesen wieder in das Gerät ein.
Deutsch 47 Filtergehäuse 1 Nehmen Sie das Filtergehäuse aus dem Staubbehälter. 2 Sollte sich an der Innenseite des Filtergehäuses Staub abgesetzt haben, entleeren Sie das Gehäuse über einem Mülleimer. 3 Reinigen Sie das Filtergehäuse bei Bedarf mit kaltem Leitungswasser und etwas Geschirrspülmittel. 4 Öffnen Sie die Filterverriegelung und setzen Sie den Filter wieder in das Filtergehäuse ein. 5 Setzen Sie das Filtergehäuse wieder in den Staubbehälter und diesen wieder in das Gerät ein.
Deutsch 3 Öffnen Sie den Filterhalter und entnehmen Sie den alten Filter. 4 Setzen Sie den neuen Filter in den Halter ein und schließen Sie diesen (er rastet hörbar ein). 5 Setzen Sie den Filterhalter wieder in das Gerät ein. 6 Schließen Sie das Filtergitter, bis es mit einem Klicken einrastet. Super Clean Air HEPA-Filter (nur bestimmte Gerätetypen) Einige Geräte sind nicht mit dem Super Clean-Luftfilter, sondern mit dem Super Clean Air HEPA-Filter ausgestattet.
Deutsch 49 2 Drücken Sie die Kabelaufwicklungstaste, um das Netzkabel aufzuwickeln. 3 Bringen Sie die Tri-Active-Düse in die Teppichposition, wenn Sie das Gerät wegstellen. Achten Sie dabei darauf, dass sich die Seitenbürsten nicht verbiegen. 4 Stecken Sie die Leiste an der Düse in den dafür vorgesehenen Parkschlitz, um die Düse am Gerät festzumachen. Stellen Sie den Staubsauger waagerecht ab, so dass alle Räder Bodenkontakt haben.
Deutsch Garantie und Kundendienst Benötigen Sie weitere Informationen oder treten Probleme auf, besuchen Sie bitte die Philips Website (www.philips.com), oder setzen Sie sich mit einem Philips Service-Center in Ihrem Land in Verbindung (Telefonnummer siehe Garantieschrift). Sollte es in Ihrem Land kein Service-Center geben, wenden Sie sich bitte an Ihren Philips Händler. Fehlerbehebung In diesem Kapitel sind die häufigsten Probleme aufgeführt, die beim Gebrauch Ihres Geräts auftreten können.
Ελληνικα 51 Εισαγωγή Συγχαρητήρια για την αγορά σας και καλώς ήρθατε στη Philips! Για να επωφεληθείτε πλήρως από την υποστήριξη που παρέχει η Philips, καταχωρήστε το προϊόν σας στην ιστοσελίδα www.philips.com/welcome. Η Philips ενσωματώνει τις τελευταίες τεχνολογίες για να δημιουργήσει προϊόντα τα οποία είναι φιλικά προς το περιβάλλον από άποψη κατανάλωσης ενέργειας και χρήσης υλικών. Ορισμένοι τύποι σε αυτή τη σειρά είναι κατασκευασμένοι εν μέρει από βιοπλαστικά και ανακυκλωμένα πλαστικά.
Ελληνικα 27 Εξάρτημα για ταπετσαρίες επίπλων (μόνο σε συγκεκριμένους τύπους) 28 Εξάρτημα βούρτσας (μόνο σε συγκεκριμένους τύπους) 29 Εργονομική λαβή ComfortControl (μόνο σε συγκεκριμένους τύπους) 30 Σύνδεση εύκαμπτου σωλήνα (μόνο σε συγκεκριμένους τύπους) 31 Εύκαμπτος σωλήνας 32 Πέλμα πολλαπλών χρήσεων (μόνο σε συγκεκριμένους τύπους) 33 Προεξοχή παρκαρίσματος 34 Διακόπτης 35 Πέλμα Tri-Active (μόνο σε συγκεκριμένους τύπους) 36 Πλαϊνή βούρτσα 37 Κλιπ εξαρτημάτων (μόνο σε συγκεκριμένους τύπους) 38 Τηλεσκοπ
Ελληνικα 53 Προσοχή -- Μην απορροφάτε μεγάλα αντικείμενα, γιατί μπορεί να προκληθεί παρακώλυση της διόδου του αέρα στον άκαμπτο/τηλεσκοπικό σωλήνα ή στον εύκαμπτο σωλήνα. -- Όταν χρησιμοποιείτε την ηλεκτρική σκούπα για να απορροφήσετε στάχτη, ψιλή άμμο, ασβέστη, τσιμεντόσκονη και παρόμοιες ουσίες, οι πόροι του κυλινδρικού φίλτρου φράσσονται. Εάν παρατηρήσετε σημαντική μείωση της απορροφητικής δύναμης, καθαρίστε το κυλινδρικό φίλτρο.
Ελληνικα Προετοιμασία για χρήση Συστάσεις για εργονομία Λαβή ComfortControl (μόνο σε συγκεκριμένους τύπους) -- Η μοναδική λαβή ComfortControl είναι εργονομικά σχεδιασμένη για να σας προσφέρει άνεση κατά τη διάρκεια του σκουπίσματος. -- Για να επωφεληθείτε πλήρως από αυτή τη λαβή, είναι σημαντικό να μην τοποθετείτε το άλλο σας χέρι στον άκαμπτο σωλήνα γιατί σε αυτή την περίπτωση η πλάτη σας στρέφεται και λυγίζει, γεγονός που μπορεί να της προκαλέσει προβλήματα.
Ελληνικα 55 Σημείωση: Αυτή η ηλεκτρική σκούπα διαθέτει οπές (μόνο σε συγκεκριμένους τύπους) στο τέλος της λαβής, χάρη στις οποίες μπορεί να αποτραπεί η φραγή ή φθορά αντικειμένων όταν χρησιμοποιείτε την ηλεκτρική σκούπα χωρίς τον άκαμπτο σωλήνα ή τα εξαρτήματα που παρέχονται. Εύκαμπτος σωλήνας 1 Για να συνδέσετε τον εύκαμπτο σωλήνα, εισαγάγετε το άγκιστρο στερέωσης του εύκαμπτου σωλήνα μέσα στο άνοιγμα (1) και, στη συνέχεια, πιέστε τη σύνδεση εύκαμπτου σωλήνα προς τα κάτω (‘κλικ’) (2).
Ελληνικα 3 Για να συνδέσετε τον άκαμπτο σωλήνα στο πέλμα, πιέστε το κουμπί κλειδώματος με ελατήριο και εισαγάγετε τον άκαμπτο σωλήνα στο πέλμα. Προσαρμόστε το κουμπί κλειδώματος με ελατήριο μέσα στο άνοιγμα του πέλματος (‘κλικ’). -- Για να αποσυνδέσετε τον άκαμπτο σωλήνα από τη λαβή, πιέστε το κουμπί κλειδώματος με ελατήριο και τραβήξτε τη λαβή από τον άκαμπτο σωλήνα.
Ελληνικα 57 Στήριγμα εξαρτημάτων (μόνο σε συγκεκριμένους τύπους) -- Το στήριγμα εξαρτημάτων μπορεί απλά να εφαρμοστεί στη λαβή. Μπορείτε να αποθηκεύσετε εξαρτήματα στο στήριγμα εξαρτημάτων, απλά πιέζοντάς τα μέσα στο στήριγμα. Για να αφαιρέσετε τα εξαρτήματα, τραβήξτε τα από το στήριγμα. Μπορείτε να αποθηκεύετε δύο εξαρτήματα κάθε φορά στο στήριγμα εξαρτημάτων: -- Εξάρτημα για γωνίες και εξάρτημα για ταπετσαρίες επίπλων.
Ελληνικα 2 Για να αποσυναρμολογήσετε το εξάρτημα βούρτσας, σύρετε το έξω από το κάτω μέρος του εξαρτήματος για ταπετσαρίες επίπλων. Εξάρτημα για γωνίες, εξάρτημα για ταπετσαρίες επίπλων και εξάρτημα βούρτσας (μόνο σε συγκεκριμένους τύπους) -- Μπορείτε να συνδέσετε το εξάρτημα για γωνίες (1), το εξάρτημα για ταπετσαρίες επίπλων (2) ή το εξάρτημα βούρτσας (3) απευθείας στη λαβή ή στον άκαμπτο σωλήνα.
Ελληνικα 59 1 Χρησιμοποιήστε τη ρύθμιση για σκληρά δάπεδα για να καθαρίσετε σκληρά δάπεδα (για παράδειγμα, δάπεδα με πλακάκια, παρκέ, λαμινέ επίστρωση και λινοτάπητα): πιέστε με το πόδι σας το διακόπτη στο επάνω μέρος του πέλματος για να βγει το βουρτσάκι από την εσοχή. Την ίδια στιγμή, ο τροχός ανασηκώνεται προκειμένου να αποφευχθούν γρατζουνιές και να αυξηθεί η δυνατότητα ελιγμών.
Ελληνικα Χρήση της συσκευής 1 Τραβήξτε το καλώδιο από τη συσκευή και συνδέστε το φις στην πρίζα. 2 Πιέστε το κουμπί on/off για να ενεργοποιήσετε τη συσκευή. -- Κατά τη διάρκεια του σκουπίσματος, μπορείτε να ρυθμίσετε την απορροφητική δύναμη με το διακόπτη απορροφητικής δύναμης. -- Χρησιμοποιήστε τη μέγιστη απορροφητική δύναμη για να σκουπίσετε πολύ βρόμικα χαλιά και σκληρά δάπεδα. -- Χρησιμοποιήστε την ελάχιστη απορροφητική δύναμη για να σκουπίσετε κουρτίνες, καλύμματα τραπεζιών, κλπ.
Ελληνικα 61 2 Τραβήξτε το εξάρτημα συγκράτησης του δοχείου συλλογής σκόνης προς τα κάτω για να απασφαλίσετε το δοχείο συλλογής σκόνης. 3 Πιάστε το δοχείο συλλογής σκόνης από τη λαβή του και ανασηκώστε το από τη συσκευή. 4 Κρατήστε το δοχείο συλλογής σκόνης πάνω από έναν κάδο απορριμμάτων και ανασηκώστε τη θήκη κυλινδρικού φίλτρου από το δοχείο. 5 Αδειάστε το δοχείο συλλογής σκόνης στον κάδο απορριμμάτων. Μπορείτε να καθαρίσετε το δοχείο συλλογής σκόνης με κρύο νερό βρύσης και λίγο υγρό απορρυπαντικό.
Ελληνικα 2 Καθαρίστε το κυλινδρικό φίλτρο με τη βούρτσα που παρέχεται. Βουρτσίστε από την κορυφή του κυλινδρικού φίλτρου προς τα κάτω κατά μήκος των ραβδώσεων. Χρησιμοποιείτε μόνο τη βούρτσα που παρέχεται! Άλλες βούρτσες μπορεί να προκαλέσουν βλάβη στο κυλινδρικό φίλτρο. 3 Εάν θέλετε να ξεπλύνετε το κυλινδρικό φίλτρο, χρησιμοποιήστε μόνο νερό. Μην χρησιμοποιείτε σαπούνι, υγρό απορρυπαντικό ή άλλο καθαριστικό για να καθαρίσετε το κυλινδρικό φίλτρο.
Ελληνικα 63 1 Ανοίξτε τη γρίλια του φίλτρου. 2 Αφαιρέστε το στήριγμα του φίλτρου. 3 Ανοίξτε το στήριγμα του φίλτρου και αφαιρέστε το παλιό φίλτρο. 4 Τοποθετήστε το νέο φίλτρο στο στήριγμα του φίλτρου και κλείστε το στήριγμα (‘κλικ’). 5 Τοποθετήστε ξανά το στήριγμα του φίλτρου στη συσκευή. 6 Κλείστε τη γρίλια του φίλτρου (“κλικ”). Φίλτρο Super Clean Air HEPA (μόνο σε συγκεκριμένους τύπους) Αντί του φίλτρου Super Clean Air, ορισμένοι τύποι διαθέτουν το ειδικό φίλτρο Super Clean Air HEPA.
Ελληνικα Αποθήκευση 1 Απενεργοποιήστε τη συσκευή και αφαιρέστε το φις από την πρίζα. 2 Πιέστε το κουμπί περιτύλιξης καλωδίου για να περιτυλίξετε το καλώδιο. 3 Οταν αποθηκεύετε το πέλμα Tri-Active να το γυρίζετε πάντα στη ρύθμιση για χαλιά και να αποφεύγετε να λυγίζουν οι πλαϊνές βούρτσες. 4 Εισαγάγετε την προεξοχή του πέλματος μέσα στη σχισμή παρκαρίσματος για να στερεώσετε το πέλμα στη συσκευή. Αποθηκεύστε τη συσκευή σε οριζόντια θέση, με όλους τους τροχούς να αγγίζουν το δάπεδο.
Ελληνικα 65 Εγγύηση & σέρβις Εάν χρειάζεστε σέρβις ή πληροφορίες ή εάν αντιμετωπίζετε κάποιο πρόβλημα, παρακαλούμε επισκεφτείτε την ιστοσελίδα της Philips στη διεύθυνση www.philips.com ή επικοινωνήστε με το Κέντρο Εξυπηρέτησης Καταναλωτών της Philips στη χώρα σας (θα βρείτε το τηλέφωνο στο φυλλάδιο διεθνούς εγγύησης). Εάν δεν υπάρχει Κέντρο Εξυπηρέτησης Καταναλωτών στη χώρα σας, απευθυνθείτε στον τοπικό αντιπρόσωπό σας της Philips.
Ελληνικα Πρόβλημα Πιθανή αιτία Λύση Για να μειώσετε αυτή την ενόχληση, σας συμβουλεύουμε να αυξάνετε το επίπεδο υγρασίας του αέρα τοποθετώντας νερό μέσα στο δωμάτιο. Για παράδειγμα, μπορείτε να κρεμάσετε δοχεία με νερό από τα καλοριφέρ σας ή να τοποθετήσετε μπολ με νερό επάνω ή κοντά στα καλοριφέρ σας.
Español 67 Introducción Enhorabuena por la compra de este producto y bienvenido a Philips. Para sacar el mayor partido de la asistencia que Philips le ofrece, registre su producto en www.philips.com/welcome. Philips incorpora las últimas tecnologías para crear productos respetuosos con el medio ambiente en cuanto a su consumo de energía y a los materiales de los que se componen. Este producto está fabricado en parte con plásticos biológicos y reciclados.
Español 32 33 34 35 36 37 38 39 40 41 42 43 44 45 46 Cepillo para suelos (sólo en modelos específicos) Saliente para aparcar Conmutador Cepillo Tri-Active (sólo en modelos específicos) Cepillo lateral Clip para accesorios (sólo en modelos específicos) Tubo telescópico (sólo en modelos específicos) Tubo telescópico (sólo en modelos específicos) Rejilla del filtro Filtro Super Clean Air (sólo en modelos específicos) Clavija Ranura para aparcar Filtro HEPA Super Clean Air (sólo en modelos específicos) Rue
Español 69 -- No utilice nunca el aparato sin el filtro protector del motor, ya que se podría dañar el motor y reducir la vida útil del aparato. -- Utilice sólo el filtro cilíndrico Philips que se suministra con el aparato. -- Durante la aspiración, especialmente la de las habitaciones con poca humedad en el aire, el aspirador creará electricidad estática. Por tanto puede sufrir descargas eléctricas al tocar el tubo u otras piezas de acero del aspirador.
Español Cómo colocar el mango ComfortControl (sólo en modelos específicos) 1 Acople el mango al tubo telescópico (“clic”). 2 Para desconectar el mango del tubo, sostenga el mango con una mano. Con la otra sujete el tubo telescópico, presione el botón de liberación del tubo (1) y tire del tubo para quitarlo del mango (2). Cómo colocar el mango estándar (sólo en modelos específicos) 1 Para conectar el tubo telescópico al mango, presione el botón de bloqueo del mango (1) e inserte éste en el tubo (2).
Español 71 2 Para desconectar la manguera, pulse los botones de liberación (1) y tire de la manguera para sacarla de la abertura de conexión (2). Tubo telescópico 1 Coloque el cepillo en el suelo y sujete el tubo formando un ángulo de 45° con respecto al suelo. 2 Mueva el bloqueo del tubo hacia arriba o hacia abajo hasta que el mango quede a la altura de la cadera. 3 Para conectar el tubo a un cepillo, presione el botón de bloqueo del tubo e insértelo en el cepillo.
Español Soporte para accesorios (sólo en modelos específicos) 1 Deslice el soporte para accesorios con los accesorios por el mango (“clic”). 2 Para desmontar el soporte para accesorios, apriete las palancas de liberación al mismo tiempo (1) y quite el soporte para accesorios del mango (2) deslizándolo. Clip para accesorios (sólo en modelos específicos) El clip para accesorios puede colocarse en el tubo simplemente presionando hasta que encaje.
Español 73 -- Boquilla estrecha y boquilla pequeña. Tenga en cuenta la forma en la que debe colocar la boquilla pequeña en el soporte para accesorios. -- Boquilla estrecha y cepillo pequeño. Boquilla estrecha y boquilla pequeña (sólo en modelos específicos) 1 Conecte la boquilla estrecha (1) o la boquilla pequeña (2) con o sin cepillo (3) al tubo o directamente al mango. 3 Cepillo (sólo en modelos específicos) 1 Para montar el cepillo, deslícelo sobre la parte inferior de la boquilla pequeña (“clic”).
Español Boquilla estrecha, boquilla pequeña y boquilla con cepillo (sólo en modelos específicos) -- Puede conectar la boquilla estrecha (1), la boquilla pequeña (2) o el cepillo pequeño (3) directamente a la empuñadura o al tubo. Cepillo Tri-Active (sólo en modelos específicos) El cepillo Tri-Active puede utilizarse para limpiar alfombras y suelos duros. -- Los cepillos laterales atrapan más polvo y suciedad por los lados del cepillo, y le permiten limpiar mejor junto a muebles y otros obstáculos.
Español 75 2 Utilice la posición para alfombras para limpiar alfombras y moquetas: vuelva a empujar el conmutador para que la tira de cepillos desaparezca dentro de la carcasa del cepillo. La rueda bajará automáticamente. Cepillo para suelos (sólo en modelos específicos) El cepillo para suelos se puede utilizar tanto en alfombras (con las tiras de cepillos ocultas) como en suelos duros (con las tiras de cepillos desplegadas).
Español -- Durante el funcionamiento del aparato, puede ajustar la potencia con el botón de potencia de succión. -- Utilice la potencia de succión máxima para aspirar alfombras y suelos duros que estén muy sucios. -- Utilice la potencia de succión mínima para aspirar cortinas, tapetes, etc. -- Si quiere hacer una pausa, inserte el saliente del cepillo en la ranura para aparcar con el fin de fijar el tubo en una posición cómoda.
Español 77 3 Agarre el asa de la cubeta y saque ésta del aparato. 4 Sujete la cubeta para el polvo sobre un cubo de la basura y saque la carcasa del filtro cilíndrico de ella. 5 Vacíe la cubeta para el polvo en el cubo de la basura. Puede limpiar la cubeta para el polvo con agua fría del grifo y un poco de detergente líquido. 6 Vuelva a colocar la carcasa del filtro cilíndrico en la cubeta y ésta en el aparato.
Español Carcasa del filtro 1 Saque la carcasa del filtro cilíndrico de la cubeta para el polvo. 2 Si hay suciedad en el interior de la carcasa, vacíela en el cubo de la basura. 3 Si es necesario, lave la carcasa del filtro cilíndrico con agua fría del grifo y un poco de detergente líquido. 4 Libere el bloqueo del filtro cilíndrico y vuelva a colocarlo en la carcasa. 5 Vuelva a colocar la carcasa del filtro cilíndrico en la cubeta y ésta en el aparato.
Español 3 Abra el soporte del filtro y quite el filtro usado. 4 Coloque el filtro nuevo en el soporte del filtro y cierre el soporte (oirá un clic). 5 Coloque de nuevo el portafiltro en el aparato (oirá un clic). 6 Cierre la rejilla del filtro (oirá un clic). Filtro HEPA Super Clean Air (sólo en modelos específicos) En lugar del filtro Super Clean Air, algunos modelos disponen de un filtro especial HEPA Super Clean Air.
Español 2 Pulse el botón de recogida del cable para recoger el cable de alimentación. 3 Cuando guarde el aparato, coloque siempre el cepillo Tri-Active en la posición para alfombras y evite que se doblen los cepillos laterales. 4 Introduzca el saliente del cepillo en la ranura para aparcar para acoplarlo al aparato. Guarde el aparato en posición horizontal, con todas las ruedas apoyadas en el suelo.
Español 81 Garantía y servicio Si necesita información o si tiene algún problema, visite la página Web de Philips en www.philips.com, o póngase en contacto con el Servicio de Atención al Cliente de Philips en su país (hallará el número de teléfono en el folleto de la garantía mundial). Si no hay Servicio de Atención al Cliente de Philips en su país, diríjase a su distribuidor local Philips. Guía de resolución de problemas En este capítulo se resumen los problemas más frecuentes que pueden surgir.
Suomi Johdanto Onnittelut ostoksestasi ja tervetuloa Philips-tuotteiden käyttäjäksi! Hyödynnä Philipsin tuki ja rekisteröi tuotteesi osoitteessa www.philips.com/welcome. Philips hyödyntää uusinta tekniikkaa luodessaan laitteita, jotka ovat ympäristöystävällisiä niin energiankulutuksensa kuin käytettyjen materiaalienkin suhteen. Tietyt tämän valikoiman laitteet on valmistettu osittain biomuovista ja kierrätysmuovista.
Suomi 35 36 37 38 39 40 41 42 43 44 45 46 83 Tri-Active-suutin (vain tietyissä malleissa) Sivuharja Tarvikepidike (vain tietyissä malleissa) Teleskooppiputki (vain tietyissä malleissa) Teleskooppiputki (vain tietyissä malleissa) Suodattimen pidike Super Clean Air -suodatin (vain tietyissä malleissa) Pistoke Taukopidike Super Clean Air -HEPA-suodatin (vain tietyissä malleissa) Kääntyvä pyörä Tyyppikilpi Tärkeää Lue tämä käyttöopas huolellisesti ennen käyttöä ja säilytä se vastaisen varalle.
Suomi 1 Pura laitteen varaus koskettamalla putkella usein muita huoneessa olevia metalliesineitä (esimerkiksi pöydän tai tuolin jalkoja, lämpöpatteria tms.). 2 Kohota huoneen ilmankosteutta pitämällä huoneessa vesiastiaa. Voit esimerkiksi ripustaa vedellä täytettyjä astioita lämpöpattereihin tai asettaa niitä lämpöpatterien päälle tai viereen. Sähkömagneettiset kentät (EMF) Tämä Philips-laite vastaa kaikkia, sähkömagneettisia kenttiä (EMF) koskevia standardeja.
Suomi 85 ComfortControl-kädensijan liittäminen (vain tietyissä malleissa) 1 Liitä kädensija teleskooppiputkeen. 2 Kun haluat irrottaa kädensijan putkesta, pitelee kädensijaa toisella kädellä. Pidä toisella kädellä teleskooppiputkesta, paina putken vapautuspainiketta (1) ja vedä putki irti kädensijasta (2). Vakiokädensijan liittäminen (vain tietyissä malleissa) 1 Liitä teleskooppiputki kädensijaan painamalla kädensijan lukitusnuppia (1) ja työntämällä kädensija putkeen (2).
Suomi 2 Irrota letku painamalla vapautuspainikkeita (1) ja vetämällä letkun liitin irti letkun kiinnitysaukosta (2). Teleskooppiputki 1 Aseta suutin lattialle ja pidä putkea 45 asteen kulmassa lattiaan nähden. 2 Siirrä putken lukitusta ylös tai alas, kunnes kädensija on lantion tasolla. 3 Liitä putki suuttimeen painamalla putken lukitusnuppia ja työntämällä putki suuttimeen. Sovita lukitusnuppi suuttimessa olevaan reikään, niin että se napsahtaa paikalleen.
Suomi Lisäosan pidike (vain tietyissä malleissa) 1 Napsauta tarvikepidike ja lisäosa kiinni kädensijaan. 2 Irrota lisäosan pidike puristamalla irrotusvivut yhteen (1) ja liu’uttamalla lisäosan pidike irti kädensijasta (2). Tarvikepidike (vain tietyissä malleissa) Tarvikepidike on helppo napsauttaa kiinni putkeen. -- Rakosuutin ja pieni suutin (vain tietyt mallit) voidaan napsauttaa kiinni pitimeen. Lisäosan pidike (vain tietyissä malleissa) -- Lisäosan pidike on helppo napsauttaa kiinni kädensijaan.
Suomi -- rakosuutin ja pieni suutin Kiinnitä huomiota tapaan, jolla pieni suutin on sijoitettava pidikkeeseen. -- Rakosuutin ja pieni harjasuutin. Rakosuutin ja pieni suutin (vain tietyissä malleissa) 1 Liitä rakosuutin (1) tai pieni suutin (2), jossa voi olla harja (3), letkuun tai suoraan kädensijaan. 3 Harjasuutin (vain tietyissä malleissa) 1 Aseta harjaspää liu’uttamalla se pienen suuttimen alaosan päälle siten, että se napsahtaa paikalleen.
Suomi 89 Rakosuutin, pieni suutin ja pieni harja (vain tietyissä malleissa) -- Voit kiinnittää rakosuuttimen (1), pienen suuttimen (2) tai pienen harjasuuttimen (3) suoraan kädensijaan tai putkeen. Tri-Active-suutin (vain tietyissä malleissa) Tri-Active-suutinta voi käyttää monenlaisten mattojen ja kovien lattiapintojen imurointiin. -- Suuttimen reunoilla olevat sivuharjat keräävät tehokkaasti pölyä ja likaa, mikä helpottaa esimerkiksi huonekalujen jalkojen imurointia.
Suomi Lattia- ja mattosuutin (vain tietyissä malleissa) Lattia- ja mattosuutinta voi käyttää joko matoilla (harja vedettynä sisään) tai kovalla lattialla (harja laskettuna alas). 1 Kun puhdistat kovia lattiapintoja, paina lattia- ja mattosuuttimen päällä olevaa keinukytkintä jalallasi, jolloin harja tulee ulos suuttimen kotelosta. 2 Voit puhdistaa mattoja painamalla keinukytkintä niin, että harjakset painuvat yhdistelmäsuuttimen sisään.
Suomi 91 Puhdistus ja hoito Älä puhdista mitään laitteen osaa astianpesukoneessa. Katkaise laitteesta virta ja irrota pistoke pistorasiasta, ennen kuin irrotat tai puhdistat osia. Pölysäiliön tyhjennys -- Tyhjennä pölysäiliö heti, kun pölyä on kertynyt suodatinsylinterin kotelon pyöreään levyyn asti. 1 Irrota letku laitteesta. 2 Vapauta pölysäiliö vetämällä pölysäiliön kiinnitintä alaspäin. 3 Tartu pölysäiliön kahvaan ja nosta pölysäiliö irti laitteesta.
Suomi 5 Tyhjennä pölysäiliö roskakoriin. Puhdista pölysäiliö kylmällä juoksevalla vedellä ja muutamalla tipalla astianpesuainetta. 6 Aseta suodatinsylinterin kotelo takaisin pölysäiliöön ja aseta säiliö takaisin laitteeseen. Varmista, että olet asettanut suodatinsylinterin koteloonsa, koska muuten et voi sulkea pölysäiliön kiinnitintä. Suodattimien puhdistus ja huolto Suodatinsylinteri Puhdista suodatinsylinteri kerran viikossa.
Suomi Moottorinsuojasuodatin Puhdista moottorinsuojasuodatin kerran vuodessa. 1 Irrota moottorinsuojasuodatin laitteesta. 2 Ravistele suodattimesta pöly roska-astian päällä. Jos moottorinsuojasuodatin on erittäin likainen, voit myös huuhdella sen juoksevalla, kylmällä vedellä. Älä käytä pesuaineita tai muita puhdistusaineita moottorinsuojasuodattimen puhdistamiseen. Anna suodatinsylinterin kuivua kokonaan, ennen kuin asetat sen takaisin laitteeseen.
Suomi 4 Aseta uusi suodatin suodatintelineeseen ja sulje teline (kuulet napsahduksen). 5 Aseta suodatinteline takaisin laitteeseen. 6 Sulje suodatinritilä, kunnes se napsahtaa paikalleen. Super Clean Air -HEPA-suodatin (vain tietyissä malleissa) Joissakin malleissa on Super Clean Air -suodattimen asemesta Super Clean Air -HEPA-suodatin, joka suodattaa poistoilmasta 99,5 % kaikista halkaisijaltaan vähintään 0,0003 mm:n hiukkasista.
Suomi 95 4 Kiinnitä suutin laitteeseen asettamalla suuttimen pidike taukopidikkeeseen. Säilytä laitetta vaaka-asennossa siten, että kaikki pyörät koskettavat lattiaa. Lisäosien ja suodatinten tilaaminen Jos suodattimien tai muiden lisäosien ostamisessa on hankaluuksia, ota yhteys Philipsin maakohtaiseen asiakaspalveluun tai katso lisätietoja kansainvälisestä takuulehtisestä. -- Philipsin suodatinsylintereitä on saatavissa huoltonumerolla 4322 004 93320.
Suomi Ongelma Mahdollinen syy Ratkaisu Moottorinsuojasuodatin ja/tai HEPA-suodatin ovat likaiset. Puhdista tai vaihda suodattimet (katso luku Puhdistus ja hoito). Suutin, putki tai letku on tukkeutunut. Poista tukos irrottamalla tukkeutunut osa ja liittämällä se (niin tiukasti kuin mahdollista) toisin päin laitteeseen. Käynnistä pölynimuri, jotta vastakkainen ilmavirta irrottaisi tukoksen. En näe pölysäiliön kiinnitintä. Et ole asettanut suodatinsylinteriä oikein suodatinsylinterin koteloon.
Français 97 Introduction Félicitations pour votre achat et bienvenue dans l’univers Philips ! Pour profiter pleinement de l’assistance Philips, enregistrez votre produit sur le site à l’adresse suivante : www.philips.com/welcome. Philips s’appuie sur les technologies de pointe pour créer des produits bons pour l’environnement, tant au niveau de la consommation d’énergie que des matériaux utilisés. Certains modèles de cette gamme sont partiellement composés de bioplastiques et de plastiques recyclés.
Français 31 32 33 34 35 36 37 38 39 40 41 42 43 44 45 46 Tuyau Embout combiné (certains modèles uniquement) Clavette Interrupteur à bascule Brosse Tri-Active (certains modèles uniquement) Brosse latérale Clip pour accessoires (certains modèles uniquement) Tube télescopique (certains modèles uniquement) Tube télescopique (certains modèles uniquement) Grille du filtre Filtre Super Clean Air (certains modèles uniquement) Cordon d’alimentation Logement du tube Filtre HEPA Super Clean Air (certains modèles
Français 99 -- Débranchez toujours l’appareil avant de vider le récupérateur de poussière ou de nettoyer le filtre cylindrique. -- N’utilisez jamais l’appareil sans le filtre de protection du moteur. Vous risqueriez d’endommager le moteur et de réduire la durée de vie de l’appareil. -- Utilisez exclusivement le filtre cylindrique Philips fourni avec l’appareil. -- Lors de l’aspiration, notamment dans des pièces où l’air est peu humide, l’aspirateur produit de l’électricité statique.
Français Fixation de la poignée ergonomique Confort-Contrôle (certains modèles uniquement) 1 Fixez la poignée au tube télescopique (vous devez entendre un clic). 2 Pour détacher la poignée du tube, tenez-la d’une main. De l’autre, tenez le tube télescopique et appuyez sur le bouton de déverrouillage du tube (1), puis retirez le tube de la poignée (2).
Français 101 2 Pour débrancher le tuyau, appuyez sur les boutons de déverrouillage (1) et tirez le raccord du tuyau hors de son orifice de raccordement (2). Tube télescopique 1 Placez l’embout sur le sol et maintenez le tube à un angle de 45° par rapport au sol. 2 Déplacez le verrouillage du tube vers le haut ou vers le bas jusqu’à ce que la poignée se trouve au niveau de la hanche. 3 Pour fixer un embout sur le bout du tube, appuyez sur le bouton de verrouillage du tube et insérez le tube dans l’embout.
Français Porte-accessoires (certains modèles uniquement) 1 Fixez le porte-accessoires sur la poignée (vous devez entendre un clic). 2 Pour retirer le porte-accessoires, appuyez simultanément sur les leviers de déverrouillage (1) et faites glisser le porte-accessoires de la poignée (2). Clip pour accessoires (certains modèles uniquement) Le clip pour accessoires se fixe directement sur le tube. -- Vous pouvez fixer le suceur plat et le petit embout (certains modèles uniquement) sur le clip.
Français 103 -- Suceur plat et petit embout Notez la manière dont le petit embout se place dans le porte-accessoires. -- Suceur plat et petite brosse Suceur plat et petit embout (certains modèles uniquement) 1 Fixez le suceur plat (1) ou le petit embout (2), avec ou sans brosse (3), directement sur la poignée ou le tube. 3 Brosse (certains modèles uniquement) 1 Pour fixer la brosse, emboîtez-la dans le petit embout (vous devez entendre un clic).
Français Suceur plat, petit embout et petite brosse (uniquement certains modèles) -- Vous pouvez fixer le suceur plat (1), le petit embout (2) ou la petite brosse (3) directement sur la poignée ou le tube. Brosse Tri-Active (certains modèles uniquement) La brosse Tri-Active est multifonctionnelle ; elle s’adapte aussi bien aux moquettes qu’aux sols durs.
Français 105 2 Utilisez la fonction moquette pour nettoyer les moquettes : rentrez la brossette en actionnant de nouveau l’interrupteur à bascule. La roue descend automatiquement. Embout combiné (certains modèles uniquement) L’embout combiné permet de nettoyer les moquettes (sans brossettes) ou les sols durs (avec brossettes). 1 Pour nettoyer les sols durs, faites sortir les brossettes en actionnant du pied l’interrupteur à bascule situé sur l’embout combiné.
Français -- Vous pouvez régler la puissance d’aspiration en cours d’utilisation à l’aide du bouton situé sur l’appareil. -- La puissance d’aspiration maximale permet de nettoyer des moquettes ou des sols durs très sales. -- La puissance d’aspiration minimale permet de nettoyer des rideaux, tapis de table, etc. -- Si vous souhaitez interrompre momentanément votre tâche, insérez la clavette de l’embout dans le logement du tube pour ranger ce dernier dans une position pratique.
Français 107 3 Saisissez le récupérateur de poussière par sa poignée et sortez-le de l’appareil. 4 Retirez le logement du filtre cylindrique du récupérateur de poussière tout en maintenant ce dernier au-dessus d’une poubelle. 5 Videz le contenu du récupérateur de poussière dans la poubelle. Vous pouvez nettoyer le récupérateur à l’eau froide avec un peu de liquide vaisselle. 6 Remettez le filtre cylindrique dans le récupérateur à poussière et replacez ce dernier dans l’appareil.
Français Logement du filtre 1 Sortez le logement du filtre cylindrique du récupérateur de poussière. 2 Si l’intérieur du logement contient de la poussière, videz-le au-dessus d’une poubelle. 3 Si nécessaire, vous pouvez nettoyer le logement du filtre cylindrique à l’eau froide du robinet avec un peu de liquide vaisselle. 4 Déverrouillez le filtre cylindrique et réinsérez-le dans son logement. 5 Remettez le filtre cylindrique dans le récupérateur à poussière et replacez ce dernier dans l’appareil.
Français 109 3 Ouvrez le support du filtre et retirez le filtre usagé. 4 Placez un nouveau filtre dans le support, puis fermez le support (clic). 5 Replacez le porte-filtre dans l’appareil. 6 Fermez la grille du filtre (clic). Filtre HEPA Super Clean Air (certains modèles uniquement) Au lieu du filtre Super Clean Air, certains modèles sont équipés d’un filtre HEPA Super Clean Air.
Français 2 Enroulez le cordon d’alimentation en appuyant sur le bouton d’enroulement. 3 Veillez à toujours rentrer la brossette de la brosse Tri-Active lorsque vous rangez l’appareil pour éviter que les brosses latérales se tordent. 4 Insérez la clavette de l’embout dans le logement du tube pour accrocher celui-ci par l’embout à l’appareil. Rangez l’appareil en position horizontale ; toutes les roues doivent toucher le sol.
Français 111 Garantie et service Si vous souhaitez obtenir des informations supplémentaires ou faire réparer l’appareil, ou si vous rencontrez un problème, rendez-vous sur le site Web de Philips à l’adresse www.philips.com ou contactez le Service Consommateurs Philips de votre pays (vous trouverez le numéro de téléphone correspondant sur le dépliant de garantie internationale). S’il n’existe pas de Service Consommateurs Philips dans votre pays, renseignez-vous auprès de votre revendeur Philips local.
Italiano Introduzione Congratulazioni per l’acquisto e benvenuti in Philips! Per trarre il massimo vantaggio dall’assistenza Philips, registrate il vostro prodotto su www.philips.com/welcome. Philips si avvale delle tecnologie più innovative nella creazione di prodotti ecologici in termini di consumo energetico e materiali utilizzati. Prodotti specifici di questa gamma sono realizzati parzialmente con bioplastiche e plastiche riciclate.
Italiano 113 35 36 37 38 39 40 41 42 43 44 45 46 Spazzola Tri-Active (solo alcuni modelli) Spazzola angolare Accessorio clip (solo alcuni modelli) Tubo telescopico (solo per alcuni modelli) Tubo telescopico (solo per alcuni modelli) Griglia del filtro Filtro Super Clean Air (solo alcuni modelli) Spina di rete Alloggiamento fermo di blocco Filtro Super Clean Air HEPA (solo modelli specifici) Ruota girevole Targhetta modello Importante Prima di utilizzare l’apparecchio, leggete attentamente il presente manu
Italiano -- Utilizzate l’apparecchio sempre in combinazione con il filtro di protezione del motore onde evitare di danneggiare il motore e compromettere il funzionamento dell’aspirapolvere. -- Utilizzate solo il cilindro del filtro Philips fornito in dotazione con l’apparecchio. -- Durante la pulizia, specialmente in stanze con una bassa umidità dell’aria, l’aspirapolvere genera elettricità statica.
Italiano 115 Collegamento dell’impugnatura ComfortControl (solo modelli specifici) 1 Collegate l’impugnatura al tubo telescopico facendola scattare in posizione. 2 Per scollegare l’impugnatura dal tubo, tenetela con una mano. Con l’altra, tenete il tubo telescopico e premete il pulsante di sgancio (1), quindi staccate il tubo dall’impugnatura (2).
Italiano 2 Per scollegare il tubo premete i pulsanti di rilascio (1) ed estraete il connettore dall’apertura di collegamento del flessibile (2). Tubo telescopico 1 Posizionate la bocchetta sul pavimento tenendo il tubo ad un angolo di 45° rispetto alla superficie. 2 Spostate il sistema di blocco del tubo verso l’alto o verso il basso fino a quando l’impugnatura non si trova all’altezza dell’anca.
Italiano 117 Supporto accessori (solo alcuni modelli) 1 Fate scorrere il supporto accessori nell’impugnatura fino a che non scatta in posizione. 2 Per scollegare il supporto accessori, stringete fra loro le leve di apertura (1) e sfilate il supporto accessori dall’impugnatura (2). Accessorio clip (solo alcuni modelli) L’accessorio clip può essere agganciato semplicemente sul tubo. -- La bocchetta a lancia e la bocchetta piccola (solo alcuni modelli) possono essere inserite sulla clip.
Italiano -- la bocchetta a lancia e la bocchetta piccola. Prestate attenzione al modo con cui la bocchetta deve essere riposta nel supporto accessori. -- Bocchetta a lancia e spazzolina. Bocchetta a lancia e bocchetta piccola (solo modelli specifici) 1 Collegate la bocchetta a lancia (1) o la bocchetta piccola (2) con o senza la spazzola (3) al tubo o direttamente all’impugnatura.
Italiano 119 Bocchetta a lancia, bocchetta piccola e spazzolina (solo per alcuni modelli) -- Inserite la bocchetta a lancia (1), la bocchetta (2) o la spazzolina (3) direttamente nell’impugnatura o nel tubo. Spazzola Tri-Active (solo alcuni modelli) La spazzola Tri-Active è una spazzola multifunzionale indicata per moquette e pavimenti.
Italiano 2 Per pulire i tappeti, utilizzate l’impostazione relativa: premete nuovamente l’interruttore a leva per far rientrare le setole nell’alloggiamento della bocchetta. La rotella si abbassa automaticamente. Bocchetta combi (solo alcuni modelli) Potete utilizzare la bocchetta combi sui tappeti (con le setole non estratte) o sui pavimenti duri (con le setole estratte).
Italiano 121 -- Durante l’aspirazione, potrete regolare la potenza di aspirazione usando la manopola di potenza aspirazione. -- Selezionate la potenza di aspirazione massima per pavimenti o moquette molto sporchi. -- Selezionate la potenza di aspirazione minima per tende, tappeti, ecc. -- Se desiderate fare una pausa, inserite la scanalatura della bocchetta nell’alloggiamento di sospensione per riporre il tubo nel modo più conveniente.
Italiano 3 Afferrate il manico del contenitore della polvere e estrarre il contenitore dall’apparecchio. 4 Tenete il contenitore della polvere sopra un bidone della spazzatura e sollevate l’alloggiamento del cilindro del filtro. 5 Svuotare il contenitore della polvere nel bidone della spazzatura. Pulite il contenitore della polvere in acqua fredda diluita con detergente liquido.
Italiano 123 Alloggiamento del filtro 1 Rimuovete l’alloggiamento del cilindro dal contenitore polvere. 2 Nel caso di sporcizia all’interno della custodia, svuotate quest’ultima tenendola sopra il secchio della spazzatura. 3 Se necessario, pulite l’alloggiamento del cilindro con acqua fredda diluita con detergente liquido. 4 Sganciate il blocco del cilindro del filtro e riposizionate il cilindro nell’alloggiamento.
Italiano 3 Aprite la griglia e togliete il filtro presente. 4 Inserite il nuovo filtro nel supporto e chiudete il supporto stesso (clic). 5 Reinserite il supporto del filtro nell’apparecchio. 6 Chiudete la griglia del filtro facendola scattare in posizione. Filtro Super Clean Air HEPA (solo modelli specifici) Al posto del filtro Super Clean Air, alcuni modelli sono provvisti dello speciale filtro Super Clean Air HEPA.
Italiano 125 Conservazione 1 Spegnete l’apparecchio dopo l’uso e rimuovete la spina dalla presa di corrente. 2 Premete il pulsante di riavvolgimento per avvolgere il cavo di alimentazione. 3 Prima di riporre l’apparecchio mettete sempre la bocchetta TriActive sull’impostazione per tappeti al fine di evitare che le setole laterali si pieghino. 4 Inserite la scanalatura della bocchetta nell’alloggiamento di fermo per applicare la bocchetta all’apparecchio.
Italiano Garanzia e assistenza Se avete bisogno di assistenza o informazioni o in caso di problemi, visitate il sito Web Philips all’indirizzo www.philips.com oppure contattate il Centro Assistenza Clienti Philips del vostro Paese (per conoscere il numero di telefono consultate l’opuscolo della garanzia). Se nel vostro Paese non esiste un Centro Assistenza Clienti, rivolgetevi al vostro rivenditore Philips.
Nederlands 127 Inleiding Gefeliciteerd met uw aankoop en welkom bij Philips! Als u volledig wilt profiteren van de ondersteuning die Philips biedt, registreer uw product dan op www.philips.com/welcome. Philips maakt gebruik van de nieuwste technologieën om producten te maken die goed zijn voor het milieu met betrekking tot energieverbruik en materiaalgebruik. Bepaalde typen in deze serie zijn gedeeltelijk gemaakt van biokunststof en gerecyclede kunststof.
Nederlands 34 35 36 37 38 39 40 41 42 43 44 45 46 Kantelpedaal Tri-Active-zuigmond (alleen bepaalde typen) Zijborstel Accessoireclip (alleen bepaalde typen) Telescoopbuis (alleen bepaalde typen) Telescoopbuis (alleen bepaalde typen) Filterrooster Super Clean Air-filter (alleen bepaalde typen) Stekker Parkeersleuf Super Clean Air HEPA-filter (alleen bepaalde typen) Zwenkwiel Typeplaatje Belangrijk Lees deze gebruiksaanwijzing zorgvuldig door voordat u het apparaat gaat gebruiken.
Nederlands 129 -- Haal altijd de stekker uit het stopcontact voordat u de stofemmer leegt of de filtercilinder schoonmaakt. -- Gebruik het apparaat nooit zonder het motorbeschermingsfilter. Dit kan de motor beschadigen en de levensduur van het apparaat verkorten. -- Gebruik uitsluitend de bijgeleverde Philips-filtercilinder. -- Tijdens het stofzuigen, met name in kamers met een lage luchtvochtigheid, bouwt de stofzuiger statische elektriciteit op.
Nederlands De ComfortControl-handgreep bevestigen (alleen bepaalde typen) 1 Bevestig de handgreep aan de telescoopbuis (‘klik’). 2 Als u de handgreep wilt loskoppelen van de buis, houdt u de handgreep met één hand vast. Met de andere hand houdt u de telescoopbuis vast, drukt u op de buisontgrendelknop (1) en trekt u de buis van de handgreep af (2).
Nederlands 131 2 Verwijder de slang door op de ontgrendelknoppen te drukken (1) en de slangkoppeling uit de aansluitopening voor de slang te trekken (2). Telescoopbuis 1 Plaats de zuigmond op de vloer en houd de buis in een hoek van 45° ten opzichte van de vloer. 2 Beweeg de buisvergrendeling omhoog of omlaag totdat de handgreep zich op heuphoogte bevindt. 3 Als u een zuigmond op de buis wilt aansluiten, drukt u op het geveerde vergrendelingsknopje op de buis en duwt u de buis in de zuigmond.
Nederlands Accessoirehouder (alleen bepaalde typen) 1 Schuif de accessoirehouder met accessoires op de handgreep (‘klik’). 2 Om de accessoirehouder los te koppelen, knijpt u de ontgrendelhendeltjes naar elkaar toe (1) en schuift u de accessoirehouder van de handgreep af (2). Accessoireclip (alleen bepaalde typen) De accessoireclip kan eenvoudigweg op de buis worden geklikt. -- U kunt de spleetzuigmond en de kleine zuigmond (alleen bepaalde typen) op de clip klikken.
Nederlands 133 -- Spleetzuigmond en kleine zuigmond. Let op de manier waarop de kleine zuigmond in de accessoirehouder moet worden geplaatst. -- Spleetzuigmond en kleine borstel. Spleetzuigmond en kleine zuigmond (alleen bepaalde types) 1 Bevestig de spleetzuigmond (1) of kleine zuigmond (2) met of zonder opzetborstel (3) aan de buis of rechtstreeks aan de handgreep.
Nederlands Spleetzuigmond, kleine zuigmond en kleine borstel (alleen bepaalde typen) -- Bevestig de spleetzuigmond (1), de kleine zuigmond (2) of de kleine borstel (3) rechtsteeks aan de handgreep of aan de buis. Tri-Active-zuigmond (alleen bepaalde typen) De Tri-Active-zuigmond is een veelzijdige zuigmond voor tapijten en harde vloeren. -- De zijborstels nemen meer stof en vuil op aan de zijkanten van de zuigmond zodat u beter kunt schoonmaken langs meubelen en andere obstakels.
Nederlands 135 2 Om tapijten schoon te maken gebruikt u de stand voor tapijt. Druk nogmaals op het kantelpedaal zodat de borstelstrip wordt ingeklapt. Het wiel zakt automatisch omlaag. Combinatiezuigmond (alleen bepaalde typen) U kunt de combinatiezuigmond gebruiken om tapijten te stofzuigen (met de borstelstrips ingeklapt) en om harde vloeren te stofzuigen (met de borstelstrips uitgeklapt).
Nederlands -- Tijdens het stofzuigen kunt u de zuigkracht instellen met de zuigkrachtknop. -- Gebruik maximale zuigkracht voor het stofzuigen van erg vuile tapijten en harde vloeren. -- Gebruik minimale zuigkracht om gordijnen, tafelkleden enzovoort te stofzuigen. -- Als u even wilt pauzeren, parkeert u de buis in een handige stand door de rand op de zuigmond in de parkeersleuf te schuiven. Schoonmaken en onderhoud Maak geen enkel onderdeel van het apparaat in de vaatwasmachine schoon.
Nederlands 137 3 Pak de handgreep van de stofemmer vast en til de stofemmer uit het apparaat. 4 Houd de stofemmer boven een afvalemmer en til de filtercilinderhouder uit de stofemmer. 5 Leeg vervolgens de stofemmer in de afvalemmer. Maak de stofemmer schoon met koud kraanwater en wat afwasmiddel. 6 Plaats de filtercilinderhouder terug in de stofemmer en plaats de stofemmer terug in het apparaat.
Nederlands Filtercilinderhouder 1 Neem de filtercilinderhouder uit de stofemmer. 2 Als er vuil aan de binnenzijde van de filtercilinderhouder zit, leeg de houder dan in een afvalemmer. 3 Indien gewenst, kunt u de filtercilinderhouder onder de koude kraan en met wat afwasmiddel schoonmaken. 4 Ontgrendel de filtercilindervergrendeling en plaats de filtercilinder terug in de filtercilinderhouder. 5 Plaats de filtercilinderhouder terug in de stofemmer en plaats de stofemmer terug in het apparaat.
Nederlands 139 3 Open de filterhouder en verwijder het oude filter. 4 Plaats het nieuwe filter in de filterhouder en sluit de houder (‘klik’). 5 Plaats de filterhouder terug in het apparaat. 6 Sluit het filterrooster (‘klik’). Super Clean Air HEPA-filter (alleen bepaalde typen) Sommige typen zijn uitgerust met het speciale Super Clean Air HEPA-filter in plaats van met het Super Clean Air-filter.
Nederlands 2 Druk op de snoeropwindknop om het netsnoer op te winden. 3 Plaats de Tri-Active-zuigmond altijd in de stand voor tapijt wanneer u het apparaat opbergt en voorkom dat de zijborsteltjes verbogen raken. 4 Schuif de rand op de zuigmond in de parkeersleuf om de zuigmond aan het apparaat te bevestigen. Berg het apparaat horizontaal op, met alle wielen op de grond.
Nederlands 141 Garantie & service Als u service of informatie nodig hebt of als u een probleem hebt, bezoek dan de Philips-website (www.philips.nl), of neem contact op met het Philips Consumer Care Centre in uw land (u vindt het telefoonnummer in het ‘worldwide guarantee’-vouwblad). Als er geen Consumer Care Centre in uw land is, ga dan naar uw Philips-dealer. Problemen oplossen Dit hoofdstuk behandelt in het kort de problemen die u kunt tegenkomen tijdens het gebruik van het apparaat.
Norsk Innledning Gratulerer med kjøpet og velkommen til Philips! Du får best mulig nytte av støtten som Philips tilbyr, hvis du registrerer produktet ditt på www.philips.com/welcome. Philips benytter den nyeste teknologien for å lage produkter som er snille mot miljøet når det gjelder både energiforbruk og materialbruk. Spesielle typer i denne serien er delvis laget av bioplast og resirkulert plast. Delene som er laget av bioplast, er miljøvennlige fordi de er utvunnet fra fornybare biomassekilder.
Norsk 143 36 37 38 39 40 41 42 43 44 45 46 Sidebørste Klemme for tilleggsutstyr (kun bestemte modeller) Teleskoprør (kun bestemte modeller) Teleskoprør (kun bestemte modeller) Filtergitter Super Clean Air-filter (kun bestemte modeller) Støpsel Parkeringsspor Super Clean Air HEPA-filter (kun bestemte modeller) Svinghjul Merkeplate Viktig Les denne brukerveiledningen nøye før du bruker apparatet, og ta vare på den for senere referanse. Fare -- Sug aldri opp vann eller annen væske.
Norsk -- Mens du støvsuger, spesielt på rom med lav luftfuktighet, bygger støvsugeren opp statisk elektrisitet. Et resultat av det er at du kan oppleve å få elektrisk støt når du berører røret eller andre deler i stål på støvsugeren. Disse støtene er ikke skadelige for deg, og de skader ikke apparatet. Vi anbefaler følgende for å redusere dette: 1 Utlad apparatet ved ofte å holde røret mot andre metallgjenstander i rommet (for eksempel stol- og bordben, radiator osv.).
Norsk 145 Feste ComfortControl-håndtaket (kun bestemte modeller) 1 Fest håndtaket til teleskoprøret (til det sier klikk). 2 Når du skal koble håndtaket fra røret, holder du håndtaket med én hånd. Med den andre hånden holder du teleskoprøret og trykker på utløserknappen for røret (1) og trekker røret av håndtaket (2). Feste standardhåndtaket (kun bestemte modeller) 1 Koble teleskoprøret til håndtaket ved å trykke på låseknappen på håndtaket (1) og sette håndtaket inn i røret (2).
Norsk 2 Når du skal koble fra slangen, trykker du på utløserknappene (1), og trekker slangetilkoblingen ut av åpningen (2). Teleskoprør 1 Sett munnstykket på gulvet og hold røret i en vinkel på 45° mot gulvet. 2 Flytt rørlåsen opp eller ned til håndtaket er i hoftehøyde. 3 Når du vil koble røret til et munnstykke, trykker du på den fjærbelastede låseknappen på røret og setter røret inn i munnstykket. Den fjærbelastede låseknappen skal passe inn i åpningen i munnstykket (til det sier klikk).
Norsk 147 2 Når du skal ta av tilbehørsholderen, trykker du utløserhendlene sammen (1) og skyver tilbehørsholderen av håndtaket (2). Klemme for tilleggsutstyr (kun bestemte modeller) Klemmen for tilleggsutstyr settes enkelt og greit på røret. -- Fugemunnstykket og det lille munnstykket (gjelder kun bestemte modeller) kan monteres fast i klemmen. Tilbehørsholder (kun bestemte modeller) -- Tilbehørsbeholderen kan enkelt festes på håndtaket.
Norsk Fugemunnstykke og lite munnstykke (bare enkelte modeller) 1 Koble fugemunnstykket (1) eller det lille munnstykket (2) med eller uten børstehode (3) til røret eller direkte på håndtaket. 3 Børstehode (kun bestemte modeller) 1 Når du skal sette sammen børsten, skyver du den inn nederst på det lille munnstykket (til det sier klikk). 2 Når du skal ta fra hverandre børsten, skyver du den av det lille munnstykket (til det sier klikk).
Norsk 149 -- Sidebørstene fanger opp mer støv og smuss på sidene av munnstykket, og dette gjør at du kan rengjøre bedre langs møbelben og andre hindringer. -- Åpningen foran på munnstykket gjør at du kan suge opp større partikler. 1 Bruk innstillingen for harde gulv til å rengjøre harde gulv (for eksempel fliser, parkett, laminat og linoleum): Trykk på vippebryteren øverst på munnstykket med foten for å få frem børstekanten i munnstykket.
Norsk 2 Når du skal støvsuge tepper, trykker du på vippebryteren igjen for å få børsten til å trekke seg inn i munnstykket. Bruke apparatet 1 Trekk ledningen ut av apparatet og koble støpselet til veggkontakten. 2 Trykk på av/på-knappen for å slå på apparatet. -- Når du støvsuger, kan du justere sugeeffekten ved hjelp av knappen for sugeeffekt. -- Bruk maksimal sugeeffekt når du støvsuger svært skitne tepper og harde gulv. -- Bruk minimal sugeeffekt når du støvsuger gardiner, duker osv.
Norsk 151 Tømme støvbeholderen -- Tøm støvbeholderen så snart støvnivået har nådd den runde platen på filtersylinderbeholderen. 1 Koble slangen fra apparatet. 2 Dra støvbeholderfestet nedover for å løse ut støvbeholderen. 3 Ta tak i støvbeholderhåndtaket, og løft støvbeholderen ut av apparatet. 4 Hold støvbeholderen over en søppelkasse, og løft ut filtersylinderbeholderen. 5 Tøm støvbeholderen i søppelkassen. Du kan rengjøre støvbeholderen med kaldt vann fra springen og litt oppvaskmiddel.
Norsk Rengjøre og vedlikeholde filtrene Filtersylinder Rengjør filtersylinderen hver uke. 1 Fjern støvbeholderen fra apparatet, lås opp filtersylinderlåsen (1), og løft filtersylinderen ut av filtersylinderbeholderen (2). 2 Rengjør filtersylinderen med børsten som følger med. Børst fra toppen av filtersylinderen og nedover langs ribbene. Bruk bare børsten som følger med! Andre børster kan skade filtersylinderen. 3 Hvis du vil rengjøre filtersylinderen, kan du vaske den med rent vann.
Norsk 153 3 Trykk det rene motorbeskyttelsesfilteret ordentlig på plass i filterrommet for å sikre at det sitter godt på plass. Super Clean Air-filter (kun bestemte modeller) Super Clean Air-filteret som sitter bak i apparatet, har elektrostatisk ladede fibre. Disse fibrene filtrerer ut mange av de mindre partiklene fra utløpsluften. Skift Super Clean Air-filteret hver sjette måned. 1 Åpne filtergrillen. 2 Ta ut filterholderen. 3 Åpne filterholderen, og ta ut det gamle filteret.
Norsk 5 Sett filterholderen tilbake i apparatet. 6 Lukk filtergrillen (klikk). Super Clean Air HEPA-filter (kun bestemte modeller) I stedet for Super Clean Air-filteret er enkelte modeller utstyrt med det spesielle Super Clean Air HEPA-filteret. Dette filteret kan fjerne 99,5 % av alle partikler ned til 0,0003 mm i størrelse fra utløpsluften. Dette omfatter ikke bare vanlig husstøv, men også mikroskopiske skadedyr som husstøvmidd og ekskrementene fra midden.
Norsk 155 4 Sett kanten på munnstykket inn i parkeringssporet for å feste munnstykket til apparatet. Oppbevar apparatet i vannrett stilling, med alle hjulene i kontakt med gulvet. Bestille tilbehør og filtre Hvis du har problemer med å få tak i filtre eller annet tilbehør til dette apparatet, kan du ta kontakt med Philips’ forbrukerstøtte i landet der du bor, eller se i garantiheftet. -- Philips filtersylindere har servicenummeret 4322 004 93320. -- Super Clean Air-filtre har typenummer FC8032.
Norsk Problem Mulig årsak Løsning Motorbeskyttelsesfilteret og/eller HEPA-filteret er skittent. Rengjør eller bytt filtrene (se avsnittet Rengjøring og vedlikehold). Munnstykket, slangen eller røret er blokkert. Når du vil fjerne en blokkering, kobler du den tilstoppede enheten fra, snur den og kobler den til den andre veien (så langt det lar seg gjøre). Slå deretter på støvsugeren for å tvinge luften forbi den tilstoppede enheten fra motsatt side.
Norsk 157
Português Introdução Parabéns pela sua compra e bem-vindo à Philips! Para tirar todo o partido da assistência fornecida pela Philips, registe o seu produto em www.philips.com/welcome. A Philips incorpora as mais recentes tecnologias na criação de produtos ecológicos em termos de consumo de energia e utilização de materiais. Os modelos específicos desta gama são parcialmente fabricados com bioplástico ou plástico reciclado.
Português 159 33 34 35 36 37 38 39 40 41 42 43 44 45 46 Encaixe de arrumação Interruptor rotativo Escova Tri-Active (apenas em modelos específicos) Escova lateral Mola para os acessórios (apenas em modelos específicos) Tubo telescópico (apenas em modelos específicos) Tubo telescópico (apenas em modelos específicos) Grelha do filtro Filtro Super Clean Air (apenas em modelos específicos) Ficha de alimentação Ranhura de descanso Filtro Super Clean Air HEPA (apenas em modelos específicos) Roda rotativa Sinalét
Português -- Nunca utilize o aparelho sem o filtro de protecção do motor, pois poderá danificar o motor e reduzir o tempo de vida do aparelho. -- Utilize apenas o filtro Philips fornecido com o aparelho. -- Ao aspirar, especialmente em divisões com baixa humidade do ar, o seu aspirador gera electricidade estática. Como consequência disso, pode sofrer choques eléctricos ao tocar no tubo ou outros componentes de aço do seu aspirador. Estes choques não são perigosos para si e não danificam o aparelho.
Português 161 Fixar a pega ComfortControl (apenas em modelos específicos) 1 Fixe o punho ao tubo telecóspico (estalido). 2 Para separar o punho do tubo, segure no punho com uma mão. Com a outra mão, segure no tubo, prima o botão de libertação do tubo (1) e puxe o tubo do punho (2). Fixar a pega normal (apenas em modelos específicos) 1 Para montar o tubo ao punho, pressione o botão de bloqueio com mola do punho (1) e introduza o punho no tubo (2). Encaixe o botão de bloqueio na abertura do tubo.
Português 2 Para desencaixar a mangueira, prima os botões de abertura (1) e puxe o conector da mangueira para fora da abertura da ligação da mangueira (2). Tubo telescópico 1 Posicione a escova no chão e segure o tubo num ângulo de 45° em relação ao chão. 2 Movimente o bloqueio do tubo para cima ou para baixo até a pega ficar ao nível da anca. 3 Para ligar o tubo a um acessório, prima o botão de bloqueio com mola no tubo e introduza o tubo no bico.
Português 163 Suporte dos acessórios (apenas em modelos específicos) 1 Deslize o suporte de acessórios com acessórios no punho (estalido). 2 Para retirar o suporte dos acessórios, aperte as alavancas de libertação em conjunto (1) e deslize o suporte de acessórios para fora do punho (2). Mola para os acessórios (apenas em modelos específicos) A mola para os acessórios encaixa-se simplesmente no tubo. -- O bico para fendas e o bocal para estofos (apenas em modelos específicos) podem ser encaixados no clipe.
Português -- Bico para fendas e bocal para estofos. Tenha em atenção a forma como o bocal para estofos deve ser colocado no suporte para acessórios. -- Bico e escova pequena. Bico para fendas e bico pequeno (apenas em modelos específicos). 1 Encaixe o bico para fendas (1) ou o bico pequeno (2) com ou sem a escova (3) no tubo ou directamente no punho. 3 Escova (apenas em modelos específicos) 1 Para montar o acessório de escova, deslize-o na parte inferior do bico pequeno (estalido).
Português 165 Bico para fendas, bocal pequeno e escova pequena (apenas em modelos específicos) -- Pode montar o bico para fendas (1), o bocal para estofos (2) ou a escova pequena (3) directamente à pega ou ao tubo. Escova Tri-Active (apenas em modelos específicos) A escova Tri-Active é uma escova multifunções para carpetes e soalhos. -- As escovas laterais apanham mais poeira e sujidade e permitem uma melhor limpeza junto do mobiliário e de outros obstáculos.
Português 2 Utilize a regulação de carpetes para limpar carpetes: empurre novamente o botão basculante para fazer com que o conjunto de escovas fique protegido no respectivo compartimento. A roda baixarse-á automaticamente. Escova de dupla função (apenas em modelos específicos) Pode utilizar escova dupla acção em tapetes (com a escova recolhida) ou em soalhos rígidos (com a escova para fora). 1 Para limpar soalhos rígidos, empurre com o pé o botão rotativo, na parte de cima da escova dupla acção .
Português 167 -- Enquanto aspira, pode regular a potência de sucção com o botão da potência de sucção. -- Utilize a potência de sucção máxima para aspirar tapetes e soalhos rígidos muito sujos. -- Utilize a potência de sucção mínima para aspirar cortinas, toalhas, etc. -- Se quiser fazer uma pausa, introduza o gancho do bocal na ranhura de arrumação, colocando o tubo numa posição conveniente. Limpeza e manutenção Não limpe nenhuma das peças do aparelho na máquina da loiça.
Português 3 Agarre a pega do recipiente do pó e retire-o do aparelho, puxando-o para cima. 4 Segure o recipiente do pó por cima de um balde do lixo e levante o compartimento do filtro para fora do recipiente do pó. 5 Esvazie o recipiente do pó para o caixote do lixo. Pode limpar o recipiente do pó com água fria da torneira e detergente líquido. 6 Volte a colocar o compartimento do filtro no recipiente do pó e o recipiente no aparelho.
Português 169 Compartimento do filtro 1 Retire o compartimento do filtro do recipiente do pó. 2 Se houver sujidade no interior do compartimento do filtro, esvazie-o sobre o balde do lixo. 3 Se necessário, limpe o compartimento do filtro com água fria da torneira e detergente líquido. 4 Desbloqueie o bloqueio do filtro do aspirador e coloque-o novamente no compartimento do filtro do aspirador. 5 Volte a colocar o compartimento do filtro no recipiente do pó e o recipiente no aparelho.
Português 3 Abra o suporte do filtro e retire o filtro antigo. 4 Coloque o novo filtro no suporte do filtro e feche o suporte (‘clique’). 5 Coloque o suporte do filtro novamente no aparelho. 6 Feche a grelha do filtro (clique). Filtro Super Clean Air HEPA (apenas em modelos específicos) Em vez do Filtro Super Clean Air, alguns modelos estão equipados com o filtro especial Super Clean Air HEPA. Este filtro é capaz de remover do ar extraído 99,5% de todas as partículas com um tamanho até 0,0003 mm.
Português 171 2 Prima o botão de recolha do fio para recolher o fio de alimentação. 3 Quando arrumar o aspirador, coloque sempre a escova Tri-Active na regulação para carpetes, para evitar que as escovas laterais fiquem dobradas. 4 Introduza o gancho da escova na ranhura de descanso para a encaixar no aparelho. Guarde o aparelho na posição horizontal, com todas as rodas a tocarem no chão.
Português Garantia e assistência Se necessitar de assistência ou informações ou se tiver problemas, visite o Web site da Philips em www.philips.com ou contacte o Centro de Apoio ao Consumidor da Philips no seu país (pode encontrar os números de telefone no folheto da garantia mundial). Se não existir um Centro de Apoio no seu país, visite o seu representante Philips local. Resolução de problemas Este capítulo resume os problemas mais comuns que pode ter com o aparelho.
Svenska 173 Introduktion Grattis till inköpet och välkommen till Philips! För att dra maximal nytta av den support som Philips erbjuder kan du registrera din produkt på www.philips.com/welcome. Philips använder den senaste tekniken för att skapa produkter som är bra för miljön vad gäller energiförbrukning och materialanvändning. Vissa modeller i den här serien är delvis tillverkad av bioplast och återvunnen plast.
Svenska 35 36 37 38 39 40 41 42 43 44 45 46 Tri-Active-munstycke (endast vissa modeller) Sidoborste Tillbehörsfäste (endast vissa modeller) Teleskoprör (endast vissa modeller) Teleskoprör (endast vissa modeller) Filtergaller Super Clean Air-filter (endast vissa typer) Stickkontakt Parkeringsspår Super Clean Air HEPA-filter (endast vissa modeller) Svängbart hjul Märkplåt Viktigt Läs användarhandboken noggrant innan du använder apparaten och spara den för framtida bruk.
Svenska 175 -- Under dammsugningen, särskilt i rum med låg luftfuktighet, byggs det upp statisk elektricitet i dammsugaren. Därför kan du få stötar när du rör vid röret eller någon annan av dammsugarens metalldelar. Stötarna är inte skadliga för dig och skadar heller inte apparaten. Men för att undvika problemet kan du göra följande: 1 ladda ur apparaten från statiskt elektricitet genom att regelbundet hålla röret mot andra metallföremål i rummet (till exempel bords- eller stolsben, element osv.
Svenska 2 Håll handtaget med en hand om du vill koppla bort det från slangen. Håll teleskopröret med andra handen och tryck på frigöringsknappen för röret (1) och dra av röret från handtaget (2). Sätta fast standardhandtaget (endast vissa modeller) 1 Anslut teleskopröret till handtaget genom att trycka på den fjäderbelastade låsknappen på handtaget (1) och trycka in handtaget i röret (2). Passa in den fjäderbelastade låsknappen i rörets öppning (ett klickljud hörs).
Svenska 177 Teleskoprör 1 Sätt munstycket på golvet och håll röret i 45° vinkel mot golvet. 2 För rörlåset uppåt eller nedåt tills handtaget är i höftnivå. 3 Koppla röret till ett munstycke genom att trycka på den fjäderbelastade låsknappen på röret och sätt in röret i munstycket. Passa in den fjäderbelastade låsknappen i munstyckets öppning (ett klickljud hörs). -- Tryck på den fjäderbelastade låsknappen och dra ut handtaget ur röret för att koppla bort röret från handtaget.
Svenska Tillbehörsfäste (endast vissa modeller) Tillbehörshållaren kan enkelt knäppas fast på röret. -- Fogmunstycket och det smala munstycket (endast på vissa modeller) kan knäppas fast på fästet. Tillbehörshållare (endast vissa modeller) -- Tillbehörshållaren kan enkelt knäppas på handtaget. Du kan förvara tillbehören genom att trycka in dem i hållaren. De kan sedan dras ut ur hållaren igen. Du kan förvara två tillbehör samtidigt i hållaren: -- Fogmunstycke och litet munstycke.
Svenska 179 Fogmunstycke och litet munstycke (endast vissa modeller). 1 Sätt fast fogmunstycket (1) eller det lilla munstycket (2) med eller utan borsttillbehör (3) på röret eller direkt på handtaget. 3 Borsttillbehör (endast vissa modeller) 1 Montera borsttillbehöret genom att sätta det längst ned på det lilla munstycket (ett klickljud hörs). 2 Ta bort borsttillbehöret genom att dra av det från det lilla munstycket.
Svenska -- Sidoborstarna fångar upp mer damm och smuts på sidorna av munstycket och det blir lättare att göra rent längs med möbler och andra föremål. -- Större partiklar kan sugas upp med öppningen längst fram på munstycket. 1 Använd inställningen för hårda golv till att rengöra hårda golv (till exempel kakel-, parkett-, laminat- och linoleumgolv): tryck med foten på lägesomkopplaren på munstyckets ovansida så att borsten kommer fram.
Svenska 181 2 När du ska dammsuga mattor trycker du på lägesomkopplaren igen för att fälla in borsten i kombinationsmunstycket. Använda apparaten 1 Dra sladden ut ur apparaten och anslut den till vägguttaget. 2 Slå på apparaten genom att trycka på på/av-knappen. -- Vid dammsugning kan du justera sugeffekten med vredet för sugeffekt. -- Använd högsta sugeffekt vid dammsugning av mycket smutsiga mattor och hårda golv. -- Använd lägsta sugeffekt vid dammsugning av gardiner, väggbonader osv.
Svenska Tömma dammbehållaren -- Töm dammbehållaren när dammnivån har nått den runda skivan i filterbehållaren. 1 Koppla bort slangen från apparaten. 2 Tryck dammbehållarens hållare nedåt så att dammbehållaren frigörs. 3 Ta tag i dammbehållarens handtag och lyft ut dammbehållaren från apparaten. 4 Håll dammbehållaren över en papperskorg och lyft ut filterbehållaren. 5 Töm dammbehållaren i en papperskorg. Du kan rengöra dammbehållaren med kallt vatten och lite diskmedel.
Svenska 183 Rengöring och underhåll av filter Filter Rengör filtercylindern varje vecka. 1 Ta bort dammbehållaren från apparaten, lås upp filtercylinderlåset (1) och lyft ut filtercylindern ur filterbehållaren (2). 2 Rengör filtercylindern med den medföljande borsten. Borsta från toppen av filtercylindern nedåt längs räfflorna. Använd endast den medföljande borsten! Andra borstar kan skada filtercylindern. 3 Om du vill tvätta filtercylindern använder du endast vatten.
Svenska 3 Tryck tillbaka det rena motorskyddsfiltret ordentligt i filterfacket och kontrollera att det sitter korrekt. Super Clean Air-filter (endast vissa typer) Det Super Clean Air-filter som finns längst bak på apparaten har elektrostatiskt laddade fibrer. De här fibrerna filtrerar ut en stor del av småpartiklarna i utluften. Byt ut Super Clean Air-filtret varje halvår. 1 Öppna filtergallret. 2 Ta bort filterhållaren. 3 Öppna filterhållaren och ta bort det gamla filtret.
Svenska 185 5 Sätt tillbaka filterhållaren i apparaten. 6 Stäng filtergallret (ett klickljud hörs). Super Clean Air HEPA-filter (endast vissa modeller) Istället för Super Clean Air-filtret är vissa typer utrustade med det speciella Super Clean Air HEPA-filtret. Detta filter kan avlägsna 99,5 % av alla partiklar ned till 0,0003 mm storlek från utsläppsluften.
Svenska Beställa tillbehör och filter Om du får problem med att skaffa filter eller andra tillbehör till apparaten kan du kontakta Philips kundtjänst i ditt land eller läsa i garantibroschyren. -- Philips filtercylindrar har servicenummer 4322 004 93320. -- Super Clean Air-filter har modellnummer FC8032. -- Super Clean Air HEPA-filter har modellnummer FC8044. Miljön -- Kasta inte apparaten i hushållssoporna när den är förbrukad.
Svenska 187 Problem Möjlig orsak Lösning När jag använder dammsugaren får jag ibland stötar. Statisk elektricitet har byggts upp i dammsugaren. Ju lägre luftfuktigheten är i rummen desto mer statisk elektricitet byggs upp i apparaten. Om du vill undvika problemet laddar du ur apparaten från statiskt elektricitet genom att regelbundet hålla röret mot andra metallföremål i rummet (till exempel bords- eller stolsben, element osv.).
Türkçe Giriş Ürünümüzü satın aldığınız için teşekkür ederiz; Philips’e hoş geldiniz! Philips’in sunduğu destekten faydalanabilmek için lütfen ürününüzü şu adresten kaydedin: www.philips.com/welcome. Philips, enerji tüketimi ve malzeme kullanımı konularında çevre dostu ürünler üretmek için en yeni teknolojileri kullanmaktadır. Bu serideki bazı ürünler, kısmen biyoplastikten ve geri dönüştürülmüş plastiklerden yapılmıştır.
Türkçe 189 34 35 36 37 38 39 40 41 42 43 44 45 46 Pedal Tri-Active başlık (belirli modellerde bulunmaktadır) Köşe fırçası Aksesuar klipsi (belirli modellerde bulunmaktadır) Teleskopik boru (belirli modellerde bulunmaktadır) Teleskopik boru (belirli modellerde bulunmaktadır) Filtre ızgarası Süper Temiz Hava filtresi (belirli modellerde bulunmaktadır) Elektrik fişi Durdurma yuvası Süper Temiz Hava HEPA filtresi (belirli modellerde bulunmaktadır) Döner tekerlek Tip plakası Önemli Cihazı kullanmadan önce bu k
Türkçe -- Yalnızca cihazla birlikte verilen Philips filtrelerini kullanın. -- Özellikle az nemli odalarda elektrikli süpürgeyle temizlik sırasında, elektrikli süpürgenizde statik elektrik birikir. Bunun sonucunda, boruya veya elektrikli süpürgenizin diğer çelik parçalarına dokunduğunuzda elektrik çarpması yaşayabilirsiniz. Bu çarpmalar size ve cihaza zarar vermez.
Türkçe 191 2 Tutamağı borudan ayırmak için, tutamağı tek elinizle tutun. Diğer elinizle, teleskopik boruyu tutun ve boru ayırma düğmesine (1) basın ve boruyu tutamaktan dışarı çekerek çıkarın (2). Standart tutamağın takılması (belirli modellerde bulunmaktadır) 1 Teleskopik boruyu tutamağa bağlamak için tutamak (1) üzerinde bulunan yaylı kilit düğmesine basın ve tutamağı boruya (2) geçirin. Yaylı kilit düğmesini borunun girişine yerleştirin (‘klik’).
Türkçe Teleskopik boru 1 Başlığı zemin üzerine yerleştirin ve boruyu zeminle 45° açı yapacak şekilde tutun. 2 Tutamak kalça hizasına gelene kadar boru kilidini yukarı veya aşağı hareket ettirin. 3 Boruyu bir başlığa bağlamak için borudaki yaylı kilit düğmesine basın ve boruyu başlığa takın.Yaylı kilit düğmesini başlıktaki açıklığa oturtun (‘klik’). -- Boruyu el tutamağından çıkarmak için, yaylı kilitleme düğmesine bastırın ve el tutamağını borudan dışarıya doğru çekin.
Türkçe 193 Aksesuar klipsi (belirli modellerde bulunmaktadır) Aksesuar klipsi, kolaylıkla borunun üzerine yerleştirilebilir. -- Oluklu başlık ve küçük başlığı (belirli modellerde bulunur) klipse takabilirsiniz. Aksesuar yuvası (belirli modellerde bulunmaktadır) -- Aksesuar tutucu el tutamağına kolayca takılabilir. Aksesuarları, aksesuar yuvasına doğru iterek yuvada saklayabilirsiniz. Aksesuarı çıkarmak için, yuvadan dışarıya doğru çekin.
Türkçe Aralık temizleme başlığı ve küçük başlık (belirli modellerde bulunmaktadır). 1 Aralık temizleme başlığını (1) veya küçük başlığı (2) fırça aparatıyla veya fırça aparatı (3) olmadan boruya veya doğrudan tutamağa bağlayın. 3 Fırça aparatı (belirli modellerde bulunmaktadır) 1 Fırça aparatını monte etmek için, küçük başlığın altına sürgüleyerek takın (‘klik’). 2 Fırça aparatını monte etmek için, küçük başlığın altından sürgüleyerek çıkarın.
Türkçe 195 -- Yan fırçalar, başlığın yan tarafında daha fazla toz ve kir yakalayarak mobilyaların ve diğer şeylerin etrafında daha iyi temizlik sağlar. -- Başlığın ön tarafındaki deliği kullanarak daha büyük parçaları alabilirsiniz. 1 Sert zeminleri (örneğin fayans, parke, lamine ve muşamba zeminleri) silmek için sert zemin ayarını kullanın: fırça şeridinin muhafazadan çıkması için başlığın üstündeki pedala ayağınızla basın.
Türkçe 2 Halıları süpürürken, pedala tekrar basarak başlıkta bulunan fırçaları iç kısma çekin. Cihazın kullanımı 1 Elektrik kordonunu cihazdan çıkarın ve fişi elektrik prizine takın. 2 Cihazı çalıştırmak için açma/kapama düğmesine basın. -- Süpürge sırasında emiş gücünü, emiş gücü düğmesini kullanarak ayarlayabilirsiniz. -- Çok kirli halıları ve sert zeminleri temizlemek için maksimum emiş gücünü kullanın. -- Perdeleri, masa örtülerini vs. temizlemek için minimum emiş gücünü kullanın.
Türkçe 197 Toz kovasını boşaltma -- Toz seviyesi, filtre silindiri kutusundaki dairesel diske ulaşır ulaşmaz toz haznesini boşaltın. 1 Hortumu cihazdan çıkarın. 2 Toz kovasını çıkarmak için toz kovası muhafazasını aşağıya doğru çekin. 3 Toz kovasının sapını tutun ve kovayı kaldırarak cihazdan çıkarın. 4 Toz kovasını çöp kutusunun üzerinde tutun ve filtre silindirini kovadan çıkarın. 5 Toz kovasını çöp kutusuna boşaltın. Toz kovasını soğuk musluk suyu ve sıvı temizlik deterjanıyla yıkayabilirsiniz.
Türkçe Filtrelerin temizliği ve bakımı Filtre silindiri Filtre silindirini her hafta temizleyin. 1 Toz kovasını cihazdan çıkarın, filtre silindiri kilidini açın (1) ve filtre silindirini, filtre silindiri muhafazasından kaldırarak çıkarın (2). 2 Filtre silindirini cihazla birlikte verilen fırça ile temizleyin. Silindirin üst kısmından alt kısmına doğru, şeritler boyunca fırçalayın. Sadece cihaz ile birlikte verilen fırçayı kullanın! Diğer fırçalar filtreye zarar verebilir.
Türkçe 199 3 Temizlenmiş motor koruma filtresini, filtre bölmesine sertçe bastırarak yerine tam olarak oturmasını sağlayın. Süper Temiz Hava filtresi (belirli modellerde bulunmaktadır) Cihazın arka tarafında bulunan Süper Temiz Hava filtresinde elektrostatik yüklü teller bulunmaktadır. Bu teller dışarı verilen havadaki en küçük partiküllerin büyük bir bölümünü filtreler. Süper Temiz Hava filtresini altı ayda bir değiştirin. 1 Filtre ızgarasını açın. 2 Filtre yuvasını çıkarın.
Türkçe 5 Filtre yuvasını tekrar cihaza takın. 6 Filtre ızgarasını kapatın (‘klik’). Süper Temiz Hava HEPA filtresi (belirli modellerde bulunmaktadır) Bazı modellerde Süper Temiz Hava filtresi yerine, özel Süper Temiz Hava HEPA filtresi bulunmaktadır. Bu filtre, dışarı atılan havadaki 0,0003 mm’den küçük bütün zerrecikleri %99.5 oranında ortadan kaldırabilir. Bu sadece normal ev tozunu değil, solunum yolu alerjisinin başlıca sebeplerinden olan ev tozu keneleri ve kirlerini de kapsar.
Türkçe 201 Aksesuar ya da filtre sipariş edilmesi Bu cihazla ilgili filtrelere ve diğer aksesuarlara ulaşmakta zorlanıyorsanız, lütfen ülkenizde bulunan Philips Müşteri Hizmetleri Merkezine başvurun ya da garanti belgesine bakın. -- Philips filtre silindiri 4322 004 93320 servis numarası ile satın alınabilir. -- Süper Temiz Hava filtreleri FC8032 tip numarası ile satın alınabilir. -- Süper Temiz Hava HEPA filtreleri FC8044 tip numarası ile satın alınabilir.
Türkçe Sorun Nedeni Çözüm Elektrikli süpürgemi kullanırken bazen elektrik çarpması yaşıyorum. Elektrikli süpürgenizde statik elektrik birikmiştir. Odalardaki nem oranı ne kadar az olursa, cihazda o kadar çok statik elektrik birikir. Bu sıkıntıyı azaltmak için, boruyu sık sık odadaki diğer metal nesnelere değdirerek cihaz yükünü boşaltmak (örneğin, masanın veya sandalyenin ayakları, radyatör vb.). Bu sıkıntıyı azaltmak için, odaya su koyarak odadaki nem seviyesini artırmak.
4222.003.3306.