
operation manual
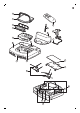
Table Of Contents
- Introduction
- General description
- Remote control
- How your robot works
- Before first use
- Preparing for use
- Using your robot
- Cleaning and maintenance
- Replacement
- Troubleshooting
- Pengenalan
- Perihalan umum
- Unit kawalan jauh
- Bagaimana robot anda berfungsi
- Sebelum penggunaan pertama
- Membuat persediaan untuk guna
- Menggunakan robot anda
- Pembersihan dan penyelenggaraan
- Penggantian
- Penyelesai Masalah
- ข้อมูลเบื้องต้น
- คำอธิบายทั่วไป
- รีโมทคอนโทรล
- วิธีการทำงานของหุ่นยนต์
- ก่อนใช้งานครั้งแรก
- การเตรียมตัวก่อนใช้งาน
- การใช้หุ่นยนต์
- การทำความสะอาดและบำรุงรักษา
- การเปลี่ยนอะไหล่
- การแก้ปัญหา
- 说明
- 基本说明
- 遥控器
- 吸尘器如何工作
- 首次使用之前
- 使用准备
- 使用吸尘器
- 清洁和保养
- 更换
- 故障种类和处理方法
- 簡介
- 一般描述
- 遙控器
- 自動吸塵機器人運作方式
- 第一次使用前
- 使用前準備
- 使用自動吸塵機器人
- 清潔與維護
- 更換
- 疑難排解
- 소개
- 제품 정보
- 리모콘
- 로봇 청소기 작동 원리
- 처음 사용 전
- 사용 준비
- 로봇 청소기 사용
- 청소 및 유지관리
- 교체
- 문제 해결

5 You can also press the start/stop button to interrupt or stop the cleaning run. If you press the
start/stop button again and there is still enough energy in the rechargeable battery, the robot
continues cleaning in the auto cleaning mode.
6 To make the robot return to the docking station before the rechargeable battery runs low, press the
docking button on the remote control (Fig. 23).
7 The start/stop button starts flashing and the robot returns to the docking station.
Note: If you did not start the robot from the docking station, it does not return to the docking
station automatically when the rechargeable battery runs low. If there is still enough energy in the
rechargeable battery, you can press the docking button on the remote control to make the robot
return to the docking station. If the rechargeable battery is completely empty, you have to place
the robot on the docking station manually.
Cleaning mode selection
This robot has three individual cleaning modes that can each be activated by pressing the
appropriate button on the remote control.
Random mode
In this mode, the robot cleans the room in a mixed pattern of straight and crisscross movements (Fig.
24).
Wall-following mode
In this mode, the robot follows the walls of the room to give the area alongside the walls an extra
clean (Fig. 25).
Spot-cleaning mode
In this mode, the robot moves randomly on a small area to clean this area thoroughly (Fig. 26).
Note: The manually selected modes are only active for a couple of minutes. After that, the robot
switches to auto-cleaning mode.
Manual driving
You can drive the robot manually with buttons on the remote control.
1 Use the arrow buttons above and below and to the left and right of the start/stop button on the
remote control to navigate the robot through the room. (Fig. 27)
Note: Be careful when you drive the robot manually close to height differences and staircases.
Note: The vacuuming function and the side brushes only work when the robot is driven forward.
The left, right or back buttons are only for maneuvering the robot.
Using the 24-hour scheduler
The 24-hour scheduler can be activated with the remote control. Make sure the robot is in standby
mode and is not positioned on the docking station.
1 Press the 24-hour scheduler button (Fig. 28) on the remote control to activate the 24-hour
scheduler.
-
When you activate the 24-hour scheduler, the display starts to flash briefly every few seconds.
-
The robot will start a cleaning run 24 hours after you activated the 24-hour scheduler. It will
continue to start a cleaning run at the same time every 24 hours until you deactivate the
24-hour scheduler.
2 To deactivate the 24-hour scheduler, press the 24-hour scheduler button. The display will light up
continuously to show the robot is in standby mode and the 24-hour scheduler is no longer active.
9
English