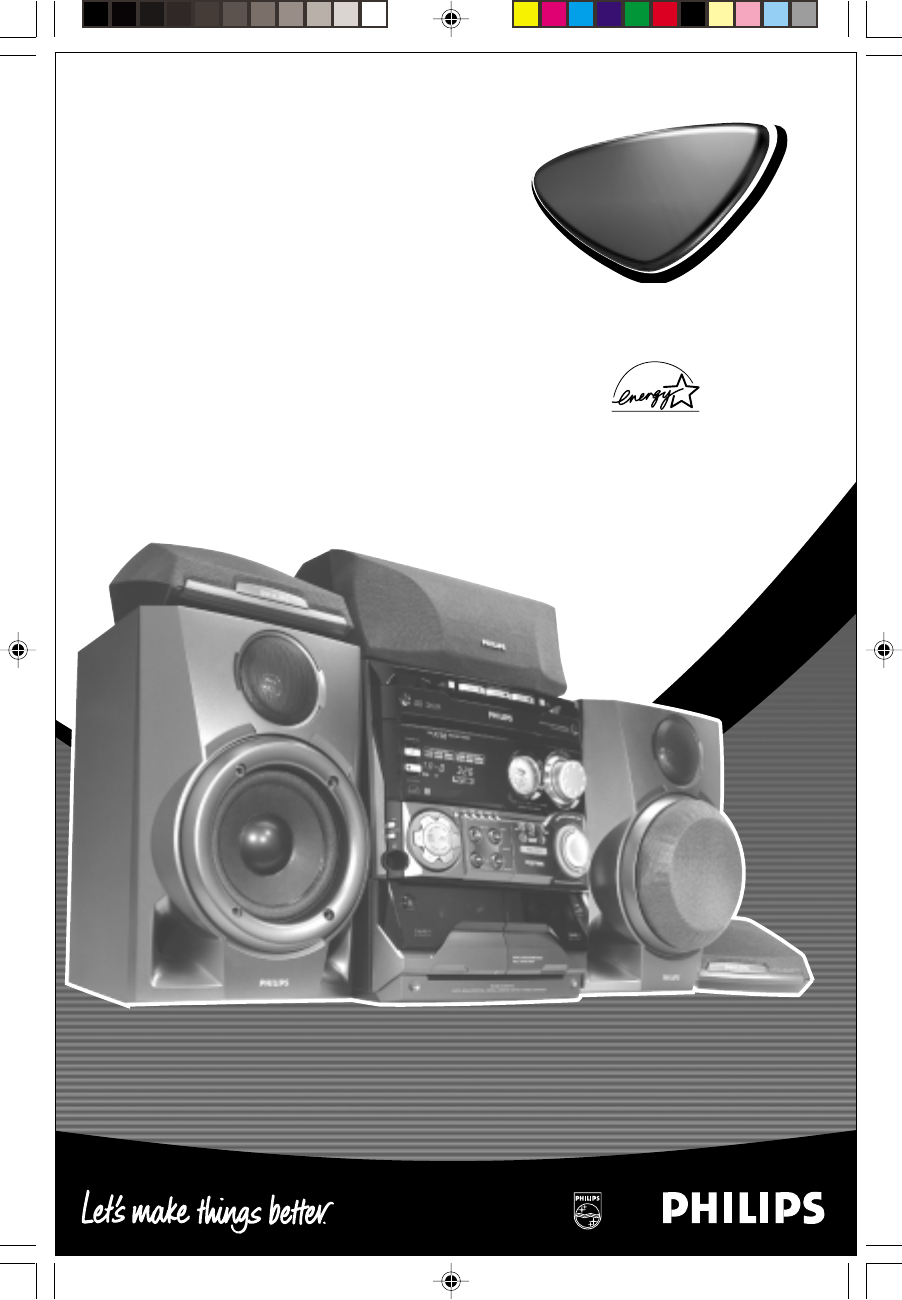
P750 Mini Hi-Fi System FW- E G A M I Y R D E V EA O C TR NO 1 pg 001-031/P750/22-Eng 1 3/7/01, 4:13 PM 3139 115 20612
Important notes for users in the U.K. Mains plug This apparatus is fitted with an approved 13 Amp plug. To change a fuse in this type of plug proceed as follows: 1 2 Remove fuse cover and fuse. 3 Refit the fuse cover. Italia DICHIARAZIONE DI CONFORMITA’ Si dichiara che l’apparecchio FW-P750 Philips risponde alle prescrizioni dell’art. 2 comma 1 del D.M. 28 Agosto 1995 n. 548. Fatto a Eindhoven Fix new fuse which should be a BS1362 5 Amp, A.S.T.A. or BSI approved type.
5 4 OPEN • CLOSE DISC 3 DISC 2 CD SYNCHRO RECORDING CHANGER FW- 7 CD / CD-R / CD-RW COMPATIBLE 3CD MINI HIFI SYSTEM 8 VOLUME STANDBY-ON 9 ECO POWER MUSIC LEVEL 0 VOLUME INTERACTIVE VU METER PROG DISPLAY CD 1•2•3 PR EV PRESET EA LEFT L C S SURROUND SPEAKERS R ! DS C RIGHT CENTER CD TUNER TAPE AUX S VAC DEMO STOP/ CLEAR BAND N PLAY• PAUSE SOURCE PRO LOGIC G NEW S/TA VIGATION - JOG D NA UN SO CLOCK• AUTO TIMER REPLAY DUBBING REC RDS S * & DISC 1 T EX 3 2
DK SF Advarsel: Usynlig laserstråling ved åbning når sikkerhedsafbrydere er ude af funktion. Undgå utsættelse for stråling. Luokan 1 laserlaite Varoitus! Laitteen käyttäminen muulla kuin tässä käyttöohjeessa mainitulla tavalla saattaa altistaa käyttäjän turvallisuusluokan 1 ylittävälle näkymättömälle lasersäteilylle. Oikeus muutoksiin varataan. Laite ei saa olla alttiina tippu-ja roiskevedelle. Bemærk: Netafbryderen er sekundært indkoblet og ofbryder ikke strømmen fra nettet.
English Index Français English ------------------------------------------------ 6 Español Français -------------------------------------------- 32 Deutsch Español --------------------------------------------- 59 Nederlands Deutsch --------------------------------------------- 86 Italiano Nederlands -------------------------------------- 113 Svenska Italiano -------------------------------------------- 140 Dansk Svenska ------------------------------------------- 167 Suomi Dansk ------------
Contents English General Information Radio Reception Environmental Information ................................ Acknowledgement ............................................... Supplied Accessories ........................................... Safety Information ................................................ 7 7 7 7 Preparations Rear Connections ............................................ 8–9 Optional Connections ........................................ 9 Inserting batteries into the remote control ...
This product complies with the radio interference requirements of the European Community. Environmental Information All unnecessary packaging has been omitted. We have tried to make the packaging easy to separate into three materials: cardboard (box), polystyrene foam (buffer) and polyethylene (bags, protective foam sheet). Your system consists of materials which can be recycled and reused if disassembled by a specialised company.
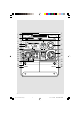
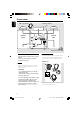
Preparations English FM wire antenna AM loop antenna right surround speaker (right) R centre speaker left surround C speaker (left) B L AUX/ CDR IN AM ANTENNA FM ANTENNA CENTER 6Ω + C – REAR SURROUND + R – – L + SUBWOOFER SUBWOOFER OUT OUT AC MAINS + R – – L + C A SPEAKERS 6Ω AC power cord B Antennas Connection Rear Connections The type plate is located at the rear of the system. For users in the U.K.: please follow the instructions on page 2.
FM Antenna English Preparations Optional Connections The optional equipment and connecting cords are not supplied. Refer to the operating instructions of the connected equipment for details. ¶ For better FM stereo reception, connect an outdoor FM antenna to the FM ANTENNA terminal. C Speakers Connection Front Speakers Connect the speaker wires to the SPEAKERS (FRONT) terminals, right speaker to "R" and left speaker to "L", coloured (marked) wire to "+" and black (unmarked) wire to "-".
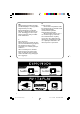
Dolby Pro Logic English Dolby ProLogic Surround Sound provides the current industry standard for home cinema sound from VCR and TV broadcasts. The front left and right speakers deliver detailed, directional sound as the centre speaker "steers" dialogue/ vocal sound and centre screen action toward the TV screen. Both surround speakers add a greater sense of depth with special effects. Positioning the Speakers To get the best surround sound effect, place the speakers as follows.
➜ "TEST TONE" followed by "ADAPT BALANCE, CENTER AND REAR LEVEL" will be displayed. ➜ The test signal will last for about 90 seconds. Adjust the sound level - + - Dolby Surround This setting is for a full Dolby Surround Pro Logic mode. ➜ “DOLBY SURROUND” will be displayed. LEFT L C R RIGHT CENTER S SURROUND SPEAKERS S Dolby Center Phantom This setting is for use L C R without the centre speaker.
Controls (main system’s illustration on page 3) English Controls on the system and remote control 1 ECO POWER – 2 – 3 – 4 5 – 6 – 7 – 8 – 9 – 0 – – – ! – @ – # – $ – % – to switch the system on or to Eco Power Standby mode. STANDBY ON y to switch the system on or to Standby mode. DISPLAY SCREEN to view the current status of the system. DISC TRAY DISC CHANGE to change disc(s). DISC 1 / DISC 2 / DISC 3 (CD DIRECT) to select a disc tray for playback. OPEN•CLOSE to open or close the disc tray.
English Controls )n – to connect headphones. ¡ NEWS/TA – ™ – £ – ≤ ∞ – § – ≥ – • – ª – º – ⁄ – ¤ – ‹ – › – fi – fl – – to hear News or Traffic Announcement automatically. RDS to select RDS information. DISPLAY to select different screen display mode : NORMAL, MODE 1, MODE 2, or MODE 3. PROG (PROGRAM) for CD ................. to programme disc tracks. for TUNER ........ to programme preset radio stations. for CLOCK ....... (on the system only) to select 12or 24-hour clock mode.
Basic Functions English FW- MINI HIFI SYSTEM VOLUME STANDBY-ON ECO POWER MUSIC LEVEL VOLUME INTERACTIVE VU METER DISPLAY PROG CD 1•2•3 EV PRESET C S SURROUND SPEAKERS R RIGHT DS C CENTER CD TUNER TAPE AUX S PLAY• PAUSE SOURCE PRO LOGIC G S EA LEFT L VAC DEMO STOP/ CLEAR BAND N T EX PR RDS A NEWS/T VIGATION - JOG D NA UN SO CLOCK• AUTO TIMER REPLAY DUBBING REC RC H • TUN IN DB B - + - + CDR / DVD TAPE 1•2 IMPORTANT! Before you operate the system, complete
Demonstration mode The system has a demonstration mode that shows the various features offered by the system. To activate the demonstration ● In Standby mode, press and hold DEMO STOPÇon the system until "DEMO ON" is displayed. ➜ The demonstration will begin. To deactivate the demonstration ● Press and hold DEMO STOP Çon the system until "DEMO OFF" is displayed. ➜ The system will switch to Standby mode.
Basic Functions English Sound Navigation Display mode There are four different display modes for selection. For optimal sound listening, select only one of the following navigation sound controls at a time : DSC, VAC or DBB. ● Press DISPLAY repeatedly to select NORMAL, MODE 1, MODE 2, or MODE 3. DSC (Digital Sound Control) The DSC feature enables you to adjust the system to suit your type of music.
English Basic Functions DBB (Dynamic Bass Boost) There are three DBB settings to enhance the bass response. 1 Press DBB. ➜ DBB button lights up. Adjust the JOG CONTROL (or press DBB on the remote control repeatedly) to select the desired Dynamic Bass Boost level : BEAT, PUNCH, BLAST or DBB OFF. will appear on ➜ If “BEAT“ is selected, the display. ➜ If “PUNCH“ is selected, will appear on the display. will appear on ➜ If “BLAST“ is selected, the display. ➜ If “DBB OFF” is selected, DBB will be deactivated.
CD Operation English 3 DISC DIRECT PLAY DISC CHANGE DISC 1 OPEN• CLOSE DISC 3 DISC 2 CD / CD-R / CD-RW COMPATIBLE 3CD CD SYNCHRO RECORDING CHANGER FW- MINI HIFI SYSTEM VOLUME STANDBY-ON ECO POWER MUSIC LEVEL VOLUME INTERACTIVE VU METER DISPLAY PROG CD 1•2•3 EV PRESET TUNER L C S SURROUND SPEAKERS R DS C RIGHT - S PLAY• PAUSE SOURCE + - + PRO LOGIC G S EA LEFT CENTER CD VAC DEMO STOP/ CLEAR BAND N T EX NEW PR RDS S/TA VIGATION - JOG D NA UN SO CLOCK• AUTO T
Disc Playback a disc is loaded in the disc tray 1 2 the current selected disc tray is empty the current selected disc tray is loaded or playing To playback all discs on the disc tray ● Press PLAYÉ. ➜ All the available discs will play once, then stop. ➜ During playback, the selected disc tray, track number and elapsed playing time of the current track will appear on the display. To playback one disc only ● Press the DISC DIRECT PLAY button : DISC 1, DISC 2 or DISC 3.
CD Operation English To erase the entire programme ● Press Ç once when playback is stopped or twice during playback. ➜ "PROGRAM CLEARED" will be displayed. ➜ PROG will disappear from the display. Note: – The programme will be erased when the system is disconnected from the power supply or when the disc tray is opened. Repeat The current track, a disc, all available discs or all programmed tracks can be played repeatedly. 1 Press REPEAT on the remote control repeatedly to select various repeat modes.
FW- MINI HIFI SYSTEM English Radio Reception VOLUME STANDBY-ON ECO POWER MUSIC LEVEL VOLUME INTERACTIVE VU METER DISPLAY PROG CD 1•2•3 EV PRESET TUNER L C S SURROUND SPEAKERS R DS C RIGHT TAPE AUX S PLAY• PAUSE SOURCE PRO LOGIC G S EA LEFT CENTER CD VAC DEMO STOP/ CLEAR BAND N T EX PR RDS A NEWS/T VIGATION - JOG D NA UN SO CLOCK• AUTO TIMER REPLAY DUBBING REC RC H • TUN IN DB B CDR / DVD TAPE 1•2 - Storing Preset Radio Stations You can store up to 40 preset r
Radio Reception English Notes: – If you attempt to store more than 40 preset radio stations, "PROGRAM FULL" will be displayed. – During programming, if no button is pressed within 20 seconds, the system will exit the Programme mode automatically. RDS RDS (Radio Data System) is a broadcasting service that allows FM stations to send additional information along with the regular FM radio signal. This additional information can contain: STATION NAME: The radio station name is displayed.
Note: – Some RDS station may be transmitting a real time clock at a minute interval. The accuracy of the transmitted time depends on the transmitting RDS station. To cancel NEWS/TA function ● Press NEWS/TA again or press TUNER to select tuner mode. ● During news bulletin or traffic announcement, press any other available source keys to execute the relevant source mode.
Tape Operation/Recording English FW- MINI HIFI SYSTEM VOLUME STANDBY-ON ECO POWER MUSIC LEVEL VOLUME INTERACTIVE VU METER DISPLAY PROG CD 1•2•3 PRESET RC H TUNER L C S SURROUND SPEAKERS R DS C RIGHT S PLAY• PAUSE SOURCE S EA LEFT CENTER CD VAC DEMO STOP/ CLEAR BAND N I • TUN PRO LOGIC G EV T EX PR RDS A NEWS/T VIGATION - JOG D NA UN SO CLOCK• AUTO TIMER REPLAY DUBBING REC N TAPE AUX DB TAPE 1•2 B CDR / DVD - TAPE 1 - + TAPE 2 IMPORTANT! – Before playing a
1 2 To rewind or fast forward when playback is stopped Press à or á. Press Ç when you reached the desired passage. IMPORTANT! – Recording is permissible if copyright or other rights of third parties are not infringed upon. – Recording is possible only on tape deck 2. – Switch off Dolby Pro Logic when recording. To reset tape counter number ● When in stop mode, pressÇ. ➜ “TP1 000” or “TP2 000” will be displayed.
Tape Operation/Recording To select another track during recording Press PAUSEÅ to interrupt recording. Pressí or ë to select the desired track. Press PLAYÉ to resume recording. ● Dubbing of tapes is possible on one side of the tape only. To continue record on the reverse side, at the end of side A, flip the tapes to side B and repeat the procedure. To stop dubbing ● Press Ç. To stop recording ● Press Ç. ➜ Recording and disc playback will stop simultaneously.
FW- MINI HIFI SYSTEM English Clock/Timer VOLUME STANDBY-ON ECO POWER MUSIC LEVEL VOLUME INTERACTIVE VU METER DISPLAY PROG CD 1•2•3 PRESET TUNER L C S SURROUND SPEAKERS R DS C RIGHT S PLAY• PAUSE SOURCE PRO LOGIC G S EA LEFT CENTER CD VAC DEMO STOP/ CLEAR BAND N T EX A NEWS/T PR RDS EV VIGATION - JOG D NA UN SO CLOCK• AUTO TIMER REPLAY DUBBING REC RC H • TU N NI TAPE AUX DB B CDR / DVD TAPE 1•2 - IMPORTANT! When in Eco Power Standby mode, it is not possible to
Clock/Timer English 2 Press CD, TUNER or TAPE to select the desired source. ● Before setting timer, make sure the music source has been prepared. CD – Load the disc(s). To start from a specific track, make a programme (refer to “CD Operation - Programming the disc tracks”). TUNER – tune to the desired radio station. TAPE – load the prerecorded tape into tape deck 2. 3 Press à or á on the system repeatedly to set the hour for the timer to start.
AMPLIFIER Output power ..................................... 2 x 90 W MPO DPL Mode Left/Right Channel .................. 2 x 45 W RMS(1) Centre Channel .......................... 25 W RMS, 6 Ω Surround Channel ........ 2 x 12.5 W RMS, 3 Ω Stereo Mode ................................. 2 x 45 W RMS(1) Signal-to-noise ratio .......................... ≥ 75 dBA (IEC) Frequency response ......... 40 – 20000 Hz, ± 3 dB Input sensitivity AUX In / CDR/DVD In .................... 500 mV / 1V Output Speakers .........
Maintenance English Cleaning the Cabinet ¶ Use a soft cloth slightly moistened with a mild detergent solution. Do not use a solution containing alcohol, spirits, ammonia or abrasives. Cleaning Discs ¶ When a disc becomes dirty, clean it with a cleaning cloth. Wipe the disc from the centre out. Do not wipe in a circular motion. ¶ Do not use solvents such as benzine, thinner, commercially available cleaners, or antistatic spray intended for analogue records.
RADIO RECEPTION Radio reception is poor. – If the signal is too weak, adjust the antenna or connect an external antenna for better reception. – Increase the distance between the Mini HiFi System and your TV or VCR. TAPE OPERATION/RECORDING Recording or playback cannot be made. The tape deck door cannot open. Recorded material sounds strange. GENERAL The system does not react when buttons are pressed. Sound cannot be heard or is of poor quality. The left and right sound outputs are reversed.