Important notes for users in the UK.: Mains Plug This apparatus is fitted with an approved 13 Amp plug. To change a fuse in this type of plug proceed as follows: * Remove fuse cover and fuse. * Fix new fuse which should be a BS1362 5 A, AS.TA. or BS! approved type. + Refit the fuse cover. T the fitted plug is not suitable for your socket sutlers, it should be cut off and an appropriate plug fitted in its place.
General Information/Safety Information Preparations busybody “General Information The type plate is located at the rear of the set. Recording is permissible if copyright or other rights of third parties are not infringed. Al unnecessary packaging material has been omitted. We have done our utmost to make the packaging easy to separate into three mono-materials: ~ cardboard {box} ~ expandable polystyrene {buffer) — polythene {bags, protective foam sheet).
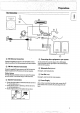
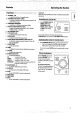
@ AM Antenna Connection Connect the supplied loop antenna to the AM AERIAL terminal. Adjust the position of the AM loop antenna for the best reception. FIM Wire Antenna Connection Connect the supplied FM wire antenna to the FM 75 € terminal. Adjust the position of the FM antenna for the best reception. Outdoor Antenna Far better FM stereo reception connect an outdoor FM antenna 1o the FM AERIAL 75 € terminal using 2 75 €3 coaxial wire.
v Demo Mode ladybug Rear View of set o\ e i fey You can connect either an external active suborder {recommended Philips FB 201} or an textual wireless active suborder {recommended Philips FB 202W) to the SUB WOOFER OUT socket. For the wireless system it uses a radio frequency transmitter. The sub woofer is dedicated to reproducing just the low bass effect (e.g. explosions, the rumble of the spaceships, catch. Be sure to follow the instructions supplied with the sub woofer unit.
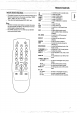
" Remote Controls First select the source you wish to control by pressing one of the source select keys on the remote control {e.g. TUNER, TAPE 1, TAPE 2, GD, AUX, TV or VCR). ~Then select the desired function (PLAY, NEXT, etc.). Notes: -~ Whenever a remote control button is pressed, the sauce icon on the display will flicker. This indicates the remote control signal is received by the set. For TVA/CR aeration, the TV or VCR must use the RC-5 code remote control system, i to switch the unit to standby mods.
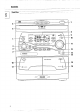
L titlist System 1 STANDBY-ON ~ to switch the set on of to standby mode. 2 DYNAMIC BASS DOST {DBB} ~ 10 switch on bass boast to enhance bass response or to switch off bass boost, 3 INCREDIBLE SURROUND ~ 1o switch on or off the surround sound effect. 4 DIGITAL SOUND CONTROL (DSC) ~ to select the desired sound effect : JAZZ, TECHNO, OPTIMAL, ROCK or CLASSIC. § CD CAROUSEL TRAY 6 3CD DIRECT PLAY ~ to select play for each CD in the tray. 7 Closeness — toecap o close the CO carousel tray.
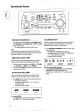
Operating the System b i S5 stinkbug » Press the respective source selection: D, TUNER, TAPE 12 or VIDEODISC {or CD, TUNER, TAPE 1, TAPE 2 or AUX. on the remote control). ~+ The display indicates the selected sound source. Nate: For external source, ensure that you had connected the audit left and right outputs of the external equipment {TV, VCR, Laser Disc player or DVD} to the AUX IN sockets.
Caning fo radio stations _Storing Preset Stations 1 Press TUNER on the unit o on the remote contra to select TUNER mode. ~ First TUNER appears on the display and after a few seconds it will show the current frequency or the station name if available. The available display button functions light Press BAND to select the desired waveband font for alf versions).
fungus Tuner Manual programming 1 Press TUNER on the unit or on the remote control. 2 Press PROGRAM for less than 1 second. — spanners flashes on the display. Press BAND to select the devised waveband {not for aft versions}. 4 Press TUNING
Auto Reverse 1 avarice it . Loading a cassette » Press OPEN, I 3 Pres Splay & {or PLAY » on the remote contra) to start playback. + The cassette compartment door opens. * Load the cassette with the open side downward and the full spoon to the (eft.
Cassette Decks Continuous Playback (only on TAPE DECK 2) The PLAY MODE enables you to select the different play modes. recording or playback on one side of the cassette in the normal or reverse direction. The cassette stops at the end of one side. =y recording or playback on both sides of the cassette; first in one direction and then in the reverse direction, The cassette then stops.
Cassette Decks General Information For recording, use only a cassette of [EC type I {normal cassette} or [EC type I {Chrome). The respective cassette type s selected automatically, ~The tape in the cassette is secured at both ends with a leader tape. At the beginning and end of & cassette, nothing will be recorded for six to seven seconds. ~ The recording level is set automatically, regardless of the position of VOLUME. ~ Check and tighten slack tape with a pencil before use.
fuggy 16 CD Changer = ‘macrocosm transceiver scoutmaster Cot — When the button is green, it indicates that there is no disc loaded in the disc tray. — When the button is red, it indicates that thees is a disc loaded in the disc tray. 3 CD Direct Play Hutton Playacting 1 Press W {or PLAY » on the remote control] to stat playback. The disc tray, track number and elapsed playing time of the current track appear on the display. To interrupt play, press B {or PAUSE Kt on the remote control).
SHUFFLE — playing all the available discs and their tracks in random order. It can also be used when fracks are programmed. To shuffle ali the discs and tracks 1 Press SHUFFLE {or SHUFFLE on the remote control). = “SHUFFLE" flashes briefly on the display. = The sulfurs flag, the disc and the track selected at random appear on the display. » The discs and the tracks will now be played in random order unfit you press M. 2 Press SHUFFLE again to resume normal playback.
€b Chandler External Connection "CD Synchrony Start Audio Recording _Selecting External Connection Daring €D synchrony stats audio recording, * Iris not advisable ta fast forward/rewind your cassette in TAPE DECK 1. * iris not possible to fasten to another sound source. 1 Press GD on the unit or on the remote control to select CD mode. 2 Load a disc into the disc tray.
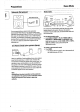
Clock Setting Timer Setting Timer Setting —— N 1 press CLOCKS TIMER. Press TIMER SET. = noo @ ~ The e flag flashes, Setting the clock 5:50 or 83058, Tha clock is in 24-hour made, e.q. 1 Press Clocks Timer. —~ 88" starts flashing, =2 LS Z 8527 Press SET CLOCK, ~ “DG:00" starts flashing Set the hour with Set the minute with <
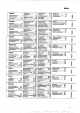
2 Maintenance Specifications “Maintenance o Specifications o Cleaning the Cabinet AMPLIFIER » Use a soft cloth slightly moistened with a mild detergent Standby pow solution, Do not use a solution containing alcohol, spirits, Output power 2x80W MPO ammonia or abrasive. 2% 40 W RMS {10% THD, 8Q, 1 dB} Power band wid .40 Hz Gleaning Discs » When a disc becomes dirty, clean it with a cleaning cloth. Wipe the disc from the center out.
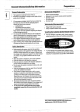
: Troubleshooting Guide Warning! Under no circumstances should yip try to repair the set yourself, a5 this will fa validate the warranty. . If & fault occurs, check the points listed below before taking the set for repair. Should any problems persist after you have made these checks, consult your nearest dealer or service center. English SYMPTOM POSSIBLE CAUSE REMEDY [RADIO RECEPTION The STEED indicate flashes. The signal is 100 weak, Adjust the antenna, Saver hum or noise.