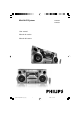
Mini Hi-Fi System FWM352 FWM371 User manual Manual do usuário Manual del usuario pg001-027_M352/371_55_Eng 1 2006.1.
México Es necesario que lea cuidadosamente su instructivo de manejo. PRECAUCIÓN - ADVERTENCIA No abrir, riesgo de choque eléctrico ATENCIÓN Verifique que el voltaje de alimentación sea el requerido para su aparato Para evitar el riesgo de choque eléctrico, no quite la tapa. En caso de requerir servicio, dirijase al personal calificado. Minisistema de Audio FWM352/55, FWM371/55 110–127 / 220–240 V; ~50/60 Hz FWM352/70 W, FWM371/80 W Philips Mexicana, S.A. de C.V. Av. La Palma No.6 Col.
y CD1/2/3 2 REPEAT TUNER AUX PROGRAM 1 MUTE SHUFFLE ™ VOL £ 0 4 TITLE ! ALBUM ) ( DISPLAY SLEEP DIM TIMER ON/OFF DSC 6 ¡ DBB 5 * 2 1 3 8 6 4 7 9 ^ 0 % ! 5 $ # @ & 3 pg001-027_M352/371_55_Eng 3 2006.1.
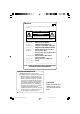
(for tuner installation) 4 pg001-027_M352/371_55_Eng 4 2006.1.
English Index Português English ------------------------------------------------ 6 Español Português ------------------------------------------ 28 Español --------------------------------------------- 50 5 pg001-027_M352/371_55_Eng 5 2006.1.
Contents English General Information Radio Reception Supplied accessories ............................................ 7 Environmental information ................................ 7 Safety information ................................................ 7 Tuning to radio stations .................................... 18 Storing preset radio stations .................... 18–19 Automatic preset programming Manual preset programming Tuning to preset radio stations .......................
● No naked flame sources, such as lighted candles, should be placed on the apparatus. Supplied accessories – – – – 2 speaker boxes remote control MW loop antenna FM wire antenna ● No objects filled with liquids, such as vases, shall be placed on the apparatus. Environmental information All unnecessary packaging has been omitted. We have tried to make the packaging easy to separate into three materials: cardboard (box), polystyrene foam (buffer) and polyethylene (bags, protective foam sheet).
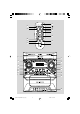
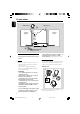
Preparations English FM antenna MW antenna B Speaker (right) Speaker (left) AM ANTENNA FM ANTENNA AUX/CDR R L R L + SPEAKERS 6Ω C A AC power cord Rear connections The type plate is located at the rear of the system. automatically under extreme conditions. If this happens, let the system cool down before reusing it (not available for all versions). B Antennas Connection A Power Before connecting the AC power cord to the wall outlet, ensure that all other connections have been made.
FM Antenna English Preparations Optional connection The optional equipment and connecting cords are not supplied. Refer to the operating instructions of the connected equipment for details. ● For better FM stereo reception, connect an outdoor FM antenna to the FM ANTENNA terminal. C Speakers Connection Front Speakers Connect the speaker wires to the SPEAKERS terminals, right speaker to "R" and left speaker to "L", coloured (marked) wire to "+" and black (unmarked) wire to "-".
Controls (illustrations on page 3) English Controls on the system and remote control ! Mode Selection ALBUM (-/ +) à á SEARCH•TUNING for MP3-CD ............. to select previous/next album. for CD/ MP3-CD .. (press and hold) to search backward/forward. for Tuner ..................... to tune to a lower or higher radio frequency. for Clock .................... to set the hour. 1 STANDBY-ON B – switches the system on or to standby mode.
English Controls % MIC IN – to connect microphone ^ MIC VOLUME – to adjust the mixing level for Karaoke & Tape Deck Operation RECORD● ... starts recording. PLAY 2 ............ starts playback. SEARCHà / á fast rewinds/winds the tape. STOP•OPENÇ0 ................................. stops the tape; opens the tape compartment. PAUSEÅ ....... interrupts recording or playback. * Disc tray ( DISPLAY – to select disc information display mode.
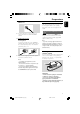
Basic Functions English y CD1/2/3 REPEAT TUNER AUX PROGRAM MUTE SHUFFLE VOL TITLE ALBUM DISPLAY SLEEP DIM TIMER ON/OFF DSC IMPORTANT! Before you operate the system, complete the preparation procedures. Plug and Play (for tuner installlation) Plug and Play allows you to store all available radio stations automatically. First time setup/power up 1 When you turn on the main supply, "AUTO INSTALL - PRESS PLAY" is displayed. 2 PressÉÅ to start installation. ➜ "PLUG AND PLAY" ....
English Basic Functions Demonstration mode The system has a demonstration mode that shows the various features offered by the system. To activate the demonstration ● In standby mode, press and hold STOPÇ for 5 seconds to switch to demonstration. To deactivate the demonstration ● Press and hold STOPÇ for 5 seconds to switch to standby mode. Switching the system on ● Press STANDBY-ON 2. ➜ The system will switch to the last selected source. ● Press DISC (CD 1/2/3), TUNER, TAPE or AUX.
Basic Functions English Automatic DSC-DBB selection The best DBB setting is generated automatically for each DSC selection. You can manually select the DBB setting that best suits your listening environment. Sound control DSC (Digital Sound Control) The DSC feature enables you to enjoy special sound effects that have preset equaliser settings, providing the best music reproduction. 1 Press DSC to select : OPTIMAL, TECHNO, ROCK or JAZZ. ➜ The selected DSC is shown.
English CD/MP3-CD Operations y CD1/2/3 TUNER REPEAT AUX PROGRAM MUTE SHUFFLE VOL TITLE ALBUM DISPLAY SLEEP DIM TIMER ON/OFF DBB DSC IMPORTANT! – This system is designed for regular discs. Therefore, do not use any accessories such as disc stabiliser rings or disc treatment sheets, etc., as offered on the market, because they may jam the changer mechanism. – Do not load more than one disc into each tray. About MP3 disc Supported formats – ISO9660, Joliet, Multisession – Max.
CD/MP3-CD Operations English 3 Press OPEN•CLOSE to close the disc tray. ➜ READING is displayed as the CD player scans the contents of a disc, and then the total number of tracks and playing time (or the total number of albums and tracks for MP3 disc) are shown. Text display during playback In CD mode ● Press DISPLAY to show the current track number and remaining playback time. In MP3-CD mode Notes: – Load the discs with the label side facing up.
Different play modes: SHUFFLE and REPEAT You can select and change the various play modes before or during playback. The play modes can also be combined with PROGRAMME. SHUF ................ tracks of the entire disc are played in random order SHUF REP ALL…repeats the entire disc continuously in random order REP ALL ........... repeats the entire disc/ programme REP ...................
Radio Reception English y CD1/2/3 REPEAT TUNER AUX PROGRAM MUTE SHUFFLE VOL TITLE MHz ALBUM DISPLAY SLEEP DIM TIMER ON/OFF DSC ➜ If a radio station has been stored in one of the presets, it will not be stored again under another preset number. Tuning to radio stations 1 Press TUNER to select TUNER mode. ➜ "TUNER" is displayed. A few seconds later, the current radio frequency will appear on the display. 2 Press TUNER again to select the desired waveband : FM or MW.
1 2 Manual Preset Programming Changing tuning grid (not available for Tune to your desired radio station (refer to “Tuning to radio stations”). all versions) In North and South America, the frequency step between adjacent channels in the MW band is 10 kHz (9 kHz in some areas). The preset frequency step in the factory is 10 kHz. Press PROGRAM. ➜ PROG starts flashing. ➜ The next available preset number is displayed for selection.
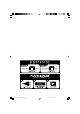
Tape Operation/Recording English IMPORTANT! – Before playing a tape, check and tighten slack tape with a pencil. Slack tape may get jammed or may burst in the mechanism. – C-120 tape is extremely thin and is easily deformed or damaged. It is not recommended for use in this system. – Store the tapes at room temperature and do not put them too close to a magnetic field (for example, a transformer,TV or speaker). Tape playback 1 2 Select TAPE source. 3 Press STOP•OPENÇ0 to open the tape door.
General information on recording ● If you do not intend to record via the microphone, unplug the microphone to avoid accidental mixing with other recording source. ● Recording is permissible insofar as copyright or other rights of third par ties are not infringed. ● For recording, use only NORMAL (IEC type I) tapes on which the tabs have not yet been broken. This deck is not suited for recording on METAL (IEC IV) type tapes.
Tape Operation/Recording English Maintenance Cleaning the Cabinet ● Use a soft cloth slightly moistened with a mild detergent solution. Do not use a solution containing alcohol, spirits, ammonia or abrasives. Cleaning Discs ● When a disc becomes dirty, clean it with a cleaning cloth. Wipe the disc from the centre out. ● Do not use solvents such as benzene, thinner, commercially available cleaners, or antistatic spray intended for analogue records.
English Clock/Timer y CD1/2/3 REPEAT TUNER AUX PROGRAM MUTE SHUFFLE VOL TITLE ALBUM DISPLAY SLEEP DIM TIMER ON/OFF DSC 1 2 3 4 DBB Clock setting Timer setting The system only supports 24-hour time mode. The system can switch on to CD or TUNER mode automatically at a preset time, serving as an alarm to wake you up. In standby or view clock mode, press CLOCK•TIMER once. In other source mode, press CLOCK•TIMER twice.
Clock/Timer English 4 Press í or ë repeatedly to set the minute for the timer to start. 5 Press CLOCK•TIMER to store the start time. ● At the preset time, the selected source will play. To exit without storing the setting ● Press STOP Ç on the system. Notes: – When the preset time is reached and the selected disc tray is empty, the next available disc will be selected. If all the disc trays are not available,Tuner will be selected automatically.
AMPLIFIER Output power for FWM371 ........................................... 2200W PMPO .................................................................... 2 x 60 W RMS(1) for FWM352 ........................................... 1200W PMPO ..................................................................... 2 x 30W RMS(1) Signal-to-noise ratio .......................... ≥ 60 dBA (IEC) Frequency response ....................... 125 – 16000 Hz Input sensitivity AUX/CDR In ....................................
Troubleshooting English WARNING Under no circumstances should you try to repair the system yourself, as this will invalidate the warranty. Do not open the system as there is a risk of electric shock. If a fault occurs, first check the points listed below before taking the system for repair. If you are unable to remedy a problem by following these hints, consult your dealer or Philips for help. Problem Solution “NO DISC” is displayed. ✔ Insert a disc. ✔ Check if the disc is inserted upside down.
The remote control does not function properly. ✔ Select the source (CD or TUNER, for example) before pressing the function button (É,í,ë). ✔ Reduce the distance between the remote control and the system. ✔ Insert the batteries with their polarities (+/– signs) aligned as indicated. ✔ Replace the batteries. ✔ Point the remote control directly towards the IR sensor. ✔ Set the clock correctly. ✔ Press and hold TIMER ON/OFF to switch on the The time is not working. timer.