Register your product and get support at www.philips.
Contents 1 Important 2 2 4 8 Product information 19 19 19 2 Your Mini Hi-Fi System 6 6 6 7 8 9 Troubleshooting 20 Safety Notice Introduction What's in the box Overview of the main unit Overview of the remote control 3 Get started 10 10 10 10 4 Play 12 12 12 13 13 5 Listen to radio 15 15 15 15 6 Adjust sound 16 16 16 16 16 7 Additional features 17 17 17 18 18 Prepare the remote control Connect power Turn on Basic play operations Play from iPod/iPhone Play from USB Play options Tune to r
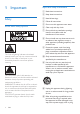
1 Important Important Safety Instructions a Read these instructions. b Keep these instructions. Safety Know these safety symbols c Heed all warnings. d Follow all instructions. e Do not use this apparatus near water. f Clean only with dry cloth. g Do not block any ventilation openings. Install in accordance with the manufacturer's instructions. h Do not install near any heat sources such as radiators, heat registers, stoves, or other apparatus (including amplifiers) that produce heat.
is damaged, liquid has been spilled or objects have fallen into the apparatus, the apparatus has been exposed to rain or moisture, does not operate normally, or has been dropped. n Battery usage CAUTION – To prevent battery leakage which may result in bodily injury, property damage, or damage to the unit: • Install all batteries correctly, + and - as marked on the unit. • Do not mix batteries (old and new or carbon and alkaline, etc.). • Remove batteries when the unit is not used for a long time.
Be sure to observe the following guidelines when using your headphones. • Listen at reasonable volumes for reasonable periods of time. • Be careful not to adjust the volume as your hearing adapts. • Do not turn up the volume so high that you can't hear what's around you. • You should use caution or temporarily discontinue use in potentially hazardous situations. Do not use headphones while operating a motorized vehicle, cycling, skateboarding, etc.
“Made for iPod” and “Made for iPhone” mean that an electronic accessory has been designed to connect specifically to iPod or iPhone respectively, and has been certified by the developer to meet Apple performance standards. Apple is not responsible for the operation of this device or its compliance with safety and regulatory standards. Please note that the use of this accessory with iPod or iPhone may affect wireless performance. iPod and iPhone are trademarks of Apple Inc., registered in the U.S.
2 Your Mini Hi-Fi System Congratulations on your purchase, and welcome to Philips! To fully benefit from the support that Philips offers, register your product at www.philips.com/welcome.
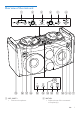
Overview of the main unit a b c d e f DISPLAY FLIP DISPLAY FLIP FM s r q p a MIC 1/MIC 2 • Connect microphones. o n m l k ji h g b MIC VOL • Adjust volume of the connected microphone(s).
c DISPLAY FLIP • Reverse the text displayed on the screen. p CROSS FADER ASSIGN • swap play between audio source A and B. VOL Adjust headphone volume. q MP3 LINK(A/B) • Connect an external audio device. d e f g • • Connect a headphone for monitoring. OUTPUT A/B • Switch headphone output between audio source A and B. • (A/B) Connect a USB mass storage device. h Play control keys / • Skip to the previous/next track. ALBUM/PRESET /TUNING (A) • Select a preset radio station.
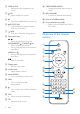
a • Turn on the unit or switch to standby mode. b LIGHT • Adjust the decoration light around the speakers. c SOURCE A/B • Select a source (A/B): iPod/Phone, USB or MP3-LINK. m DSC • Select a preset sound setting. n MAX SOUND • Turn on/off instant power boost. o PROG • Program radio stations. p • Mute or restore sound output. d OK/ • Start or pause play. • confirm a selection. • In dock mode, navigate in the iPod/ iPhone menu. e • • : in tuner mode, tune to a radio station.
3 Get started Caution • Use of controls or adjustments or performance of procedures other than herein may result in hazardous radiation exposure or other unsafe operation. Always follow the instructions in this chapter in sequence. If you contact Philips, you will be asked for the model and serial number of this apparatus. The model number and serial number are on the back of the apparatus. Write the numbers here: Model No. __________________________ Serial No.
1 2 Turn thePOWER ON/OFF switch on the back panel to the | position. Press . » The unit switches to the last selected source. Switch to standby mode • Press to switch the unit to standby mode. » The backlight on the display panel turns off.
4 Play Compatible iPod/iPhone Basic play operations You can control play through the following operations. Function To stop play To pause/ resume play To skip to a track To search during play To swap play between audio source A and B Action press MENU/ . . press press / . / , then press and hold release to resume normal play. • Press SOURCE A or SOURCE Brepeatedly. • * On the top panel, move the channel fader to the left (A) or right (B) to fade in and fade out.
Listen to the iPod/iPhone Note • Make sure that your iPod/iPhone has been loaded securely. 1 2 Depending on which source you want to listen to, press SOURCE A or SOURCE B repeatedly to select the iPod/iPhone source. Start music play on your iPod/iPhone. » You can hear music from the Hi-Fi system. Basic play operations 1 Besides the basic play operations, you can also control iPod/iPhone play through the following operations.
Listen through headphone Note • When you listen and monitor through a headphone, the loudspeaker of the unit will be not muted. 1 2 3 14 Plug a headphone into the top panel. socket on the Depending on which audio source you want to listen to, switch OUTPUT to the left (A) or right (B). Use VOL to adjust the monitor headphone volume.
5 Listen to radio Tune to radio stations Note • You can also use the numeric keypad directly to • allocate a preset number. To allocate a 2-digit number, press the number corresponding to the first digit, and then press the number corresponding to the second digit within 2 seconds. To overwrite a programmed station, store another station in its place. Note • To improve FM reception, fully extend and adjust the position of the FM antenna attached to the back panel.
6 Adjust sound Adjust speaker volume • During play, press VOL +/- to increase/ decrease speaker volume. Select a sound effect Note • You cannot use different sound effects at the same time. Boost sound power This feature allows you to give an instant boost to the sound power. • Press MAX SOUND to turn on or off instant power boost. Select a preset sound effect The DSC (Digital Sound Control) feature allows you to enjoy special sound effects.
7 Additional features Play audio from an external device Speak or sing through the HiFi system You can speak or sing through this Hi-Fi system with a microphone. With this Hi-Fi system, you can play audio from an external audio device. MIC 1 1 1 2 3 2 Connect an MP3 Link cable (not supplied) to • the MP3-LINKsocket on the left (A) or right (B) of the top panel • the headphone socket on an external device Connect a microphone (not supplied) to the MIC 1 or MIC 2 socket on the top panel.
Enjoy simultaneous play Adjust decoration light You can output audio to multiple compatible Hi-Fi systems (FWP1000) to enjoy simultaneous play. • In power-on mode, press LIGHT repeatedly to adjust the decoration light around the loudspeakers. • Blue (default, blinking blue with the music beat) • Red (blinking red with the music beat) • Purple (blinking in different colors with the music beat) • Off Tip • The light blinks as the music beat changes.
8 Product information Note • Product information is subject to change without prior notice. Specifications Frequency Response Signal to Noise Ratio 300 W RMS Max Power 35 Hz - 20 kHz, - 3 dB > 70 dB Tuner (FM) Tuning Range Tuning grid Sensitivity - Mono, 50 dB S/N Ratio Total Harmonic Distortion Signal to Noise Ratio 87 5 - 108 MHz 50 KHz 18 - 22 dBf > 2.
9 Troubleshooting Warning To keep the warranty valid, never try to repair the system yourself. If you encounter problems when using this apparatus, check the following points before requesting service. If the problem remains unsolved, go to the Philips web site (www. philips.com/welcome). When you contact Philips, ensure that the apparatus is nearby and the model number and serial number are available. No power • Make sure that the AC power plug of the unit is connected properly.
Specifications are subject to change without notice © 2012 Koninklijke Philips Electronics N.V. All rights reserved. FWP3200D_12_UM_V1.