CDR Mini Hi-Fi system R88 FW- Toll Free Help Line Ligne d’assistance en service libre Linea de ayuda telefónica sin cargo 800-531-0039
Return your Warranty Registration card today to ensure you receive all the benefits you’re entitled to. • Once your Philips purchase is registered, you’re eligible to receive all the privileges of owning a Philips product. • So complete and return the Warranty Registration Card enclosed with your purchase at once. And take advantage of these important benefits.
English: This digital apparatus does not exceed the Class B limits for radio noise emissions from digital apparatus as set out in the Radio Interference Regulations of the Canadian Department of Communications. Français : Cet appareil numérique n'émet pas de bruits radioélectriques dépassant les limites applicables aux appareils numériques de Classe B prescrites dans le Règlement sur le Brouillage Radioélectrique édicté par le Ministère des Communications du Canada. English Canada Français English .....
GENERAL INFORMATION English Safety instructions....................................................................................2 & 3 General information Accessories supplied ....................................................................................4 Setup information...........................................................................................4 Maintenance ..................................................................................................
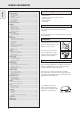
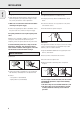
Discs for recording CD(RW) handling For recording, make sure to use special audio discs only. These discs are marked “Digital Audio” and with the logos shown below. If the CDR Mini Hi-Fi system fails to read discs correctly, use a commonly available cleaning-CD to clean the lenses before submitting the unit to repair. Other cleaning methods may destroy the lenses. Always keep the trays closed to avoid dust on the lenses.
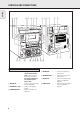
CONTROLS AND CONNECTIONS English ^ 9% $# @ ! 0 9 87 6 5 4 OPEN/CLOSE CD CHANGE CD CHAN GER ANALOG DIGITAL / AUX STANDBY ON ª TUNER SOR iR SEN CD 1 AM AERIAL CD 2 IMER CD 3 CK/T T CLO CD TEX • ≥ SPEAKERS 6Ω L FM AERIAL 300 Ω DISPLAY R § G CD-TEXT EDITIN SE OPEN/CLO R SUBWOOFE OUT DIGITAL IN RDER CD RECO L CDR AUX IN R L LINE OUT RECORD MASTER VOLUME R AC MA COMPILE MIC LEVEL INS ~ CD REC TYPE ERASE FINALIZE CD CD EDIT MIC 1 & * ( ) ¡™ £ 2 3 ≤ ∞ On the bac
On the front 9 Source selection CD 1, CD 2, CD 3 ..................selects the CD changer, switches to CD 1, CD 2 or CD 3 CDR........................................selects the CD recorder TUNER...................................selects the tuner DIGITAL / ANALOG AUX ....selects the input for an additional appliance 0 ...............................................CD changer tray ! OPEN/CLOSE........................opens and closes the CD changer tray @ CD CHANGE .........................
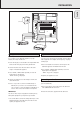
INSTALLATION English Power Antenna connections The type plate is located on the rear of the unit. AM antenna The supplied loop antenna is for indoor use only. 1 Check whether the power voltage as shown on the type plate corresponds to your local power voltage. If it does not, consult your dealer or service organization. 1 Fit the plug of the loop antenna to AM AERIAL as shown below. 2 Make sure all connections have been made before switching on the power supply.
English INSTALLATION SUBWOOFER AM AERIAL SPEAKERS 6 Ω FM AERIAL 300 Ω L R SUBWOOFER OUT DIGITAL IN L AUX IN R L LINE OUT R AC MAINS ~ TAPE RECORDER CD PLAYER Analog audio connections Digital audio connections AUX IN L/R It is possible to use an additional appliance, e.g. tape recorder, TV or VCR, with the unit. DIGITAL IN You can use this coaxial input for recordings from any digital audio equipment with a digital coaxial output e.g. CD player or DVD player.
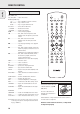
REMOTE CONTROL 2 ...........................switches the unit to standby CDR, TUNER, CD1, CD2, CD3, AUX........selects the sources Number/alphabet keys 1–0 ....................keys in numbers for tracks or stations ABC – XYZ ........keys in letters for text SPACE ...............keys in a space within the text EDIT TEXT ................enters the text edit menu -VOLUME.............decreases the volume +VOLUME.............increases the volume ÉÅ........................starts, interrupts playback í ..........
DISPLAY Information area PRESET STEP TOTAL TRACK TIME TOTAL REM REC REM TOTAL REC TRACK TIME AM PM CD RECORDER CD CHANGER CD R W TUNER CD R W COMPILE CDC FM TUNER CD CD AUX START RECORDING IN PROGRESS FINALIZE MIC ALC FINISH CD TEXT EDIT TRACK REC PROG ALARM SLEEP REPEAT SHUFFLE DISC TRACK ALL STEREO NEWS TA EON INCREDIBLE AUX SURROUND LOUDNESS DIGITAL ANALOG PURE 20 + 1 2 3 4 5 6 7 8 9 10 11 12 13 14 15 16 17 18 19 This area is used for feedback of the CD changer, CD recorder, tuner
BASIC FUNCTIONS English OPEN/CLOSE CD CHANGE CD CHAN GER ANALOG DIGITAL / AUX STANDBY ON TUNER iR SEN CD 1 SOR CD 2 CD 3 CD TEX CK/ T CLO TIMER DISPLAY CD-TEXT EDIT ING LOSE OPEN/C CD RECORDER CDR 3 CD changer: Press OPEN/CLOSE on the unit again to close the tray. yThe tray is closed and Reading is displayed. yCD, the disc tray number, the total number of tracks and the total playing time of the disc in the last selected disc tray are displayed.
wOOx This feature enables you to select a deep and powerful bass. RECORD MASTER VOLUME COPY CD COMPILE CD • Press wOOx ON·OFF (wOOx on the remote control) repeatedly to switch the wOOx effect either on or off: ywOOx off: the wOOx effect is switched off. ywOOx level 1 (or 2, 3): the wOOx effect is switched on and the current level is displayed. REC TYPE ERASE FIN CD ALIZE CD T Sound control Volume adjustment • Adjust the volume by using MASTER VOLUME (-VOLUME/+on the remote control).
BASIC FUNCTIONS English Selecting a disc on the CD changer • Press either CD 1, CD 2 or CD 3 to select a particular disc. Selecting a track and searching Selecting a track during playback • Rotate í JOG CONTROL ë (pressí or ë on the remote control) to skip to the beginning of the previous or next track on the selected disc. y Playback continues with the selected track. Playing tracks in random order 1 Press SHUFFLE on the remote control during playback.
Erasing a track from the program RECORD 1 If necessary, press Ç STOP on the unit (Ç on the remote control) to stop playback. COPY CD COMPILE CD E MIC LEVEL REC TYP FINALIZE CD 2 Press either CD 1, CD 2, CD 3, or CDR to select the desired memory. EDIT MIC 3 Press PROG (PROGRAM on the remote control), followed by à SEARCH or á SEARCH (à or á on the remote control) to move through the program steps. y The track number at the selected step and the total program time are displayed.
ABOUT RECORDING English Basic information Direct Line Recording (DLR) The CD recorder deck offers you 3 main functions: – Recording from the internal CD changer and tuner or from a selected external source – Finalizing your CDR(W) discs and unfinalizing your CDRW discs – Erasing a CDRW disc The CD recorder is equipped with the high-performance Direct Line Recording technique. It ensures a perfect recording of the source material, meaning a true “bit for bit” recording.
Recording modes For internal recordings you can record from the internal CD changer or tuner. You can choose from the following recording modes: – High speed recording and automatic finalizing: Fast and easy! Record and finalize your CDR(W) in one quick step while the sound is muted. You can record the current CD or a program from the CD changer. – High speed recording: Record your CDR(W) fast while the sound is muted. You can record an entire CD, a track, a program or a track edit from the CD changer.
INTERNAL RECORDING English ANALOG DIGITAL / AUX STANDBY ON TUNER iR SEN CD 1 SOR CD 2 CK T CLO CD 3 /TIM CD TEX 5 Press YES to confirm your selection. yBoth decks will be selected in the display, the arrow starts blinking. The remaining recording time of the CDR(W), the total recording time of the CDR(W) and either Record CD1 (or 2, 3)?, Record Prog? or Record A-B? is displayed. Note: When the CDR(W) already contains a recording, ALC will also become active and ALC will be shown.
4 Press CD 1, CD 2 or CD 3 to select the disc with which you wish to mix the microphone. ANALOG DIGITAL / AUX STANDBY ON TUNER iR SEN CD 1 5 Press REC TYPE on the unit to enter the recording menu. SOR CD 2 CK T CLO CD 3 /TIM CD TEX DISPLAY CD -TEXT EDIT 6 Rotate í JOG CONTROL ë to select the manual recording mode for the microphone: yCD Mix Mic is displayed. ING LOSE OPEN/C 7 Press YES to confirm. yWait and Record? are displayed. DER CD RECOR 8 Press YES to start recording.
EXTERNAL RECORDING 6 Start playback on the selected source. yThe CD recorder starts to record simultaneously and RECORDING IN PROGRESS is shown. The remaining recording time on the CDR(W) is displayed. English ANALOG DIGITAL / AUX STANDBY ON TUNER iR SEN CD 1 SOR CD 2 CK T CLO CD 3 /TIMER CD TEX DISPLAY CD -TEXT EDIT Note: If you start playback on the selected source within a track, recording starts at the beginning of the next track or after 2.7 seconds of silence in analog recordings.
Manual recording Manual recording from an external source 1 Make sure the CDR(W) is absolutely free of scratches and dust particles. 2 Repeatedly press DIGITAL / ANALOG AUX to select the input for the external source from which you want to record. yAUX Digital is displayed if the digital input is selected. yAUX Analog is displayed if the analog input is selected. 3 Press REC TYPE on the unit to enter the recording menu. 4 Rotate í JOG CONTROL ë to select the type of recording.
EXTERNAL RECORDING (UN)FINALIZING, ERASING English Automatic track increment RECORD In recording mode, tracks will be incremented automatically so that the track numbers are in the same position as the original. COPY CD COMPILE • To switch the automatic track increment function on, press as often as necessary TRACK INCR. on the remote control during stop. yAuto Tr ON is displayed and the function is on. Track increments are now automatically detected from digital source material.
Unfinalizing CDRW discs If you want to record (or erase) on (from) a finalized CDRW, you have to unfinalize it first. Notes: – Unfinalizing will take approximately 2 minutes. – After unfinalizing of the CDRW, CD changes to CDRW on the display. – When unfinalizing a CDRW with CD text on it available, this text will be transferred to the CD recorder memory. In case the memory is full, you have to erase text (see “Erasing from the memory”) or to finalize another disc first in order to obtain memory space.
FEATURES English RECORD CD CD COMPILE CD E MIC LEVEL REC TYP FINALIZE CD Storing text during recording You can store and edit text even while recording a single track or single CD, or when recording from an external source or tuner. Editing text during finalizing is not possible. Make sure, when using high speed recording and automatic finalizing, to enter the text before finalizing starts, otherwise automatic finalizing will be cancelled.
Erasing text 1 Press EDIT TEXT to enter the text edit menu. yCD TEXT EDIT is blinking, Text Edit is displayed. 2 Rotate í JOG CONTROL ë to select the text erase menu. yText Erase is displayed. 3 Press YES to confirm. 4 Rotate í JOG CONTROL ë to select one of the following: yAll Text: All text of the selected disc is chosen to be erased in one step. yAlbum Artist: CD artist’s name is chosen to be erased. yAlbum Title: CD title is chosen to be erased.
TUNER English ANALOG DIGITAL / AUX STANDBY ON TUNER iR SEN CD 1 SOR CD 2 CK T CLO CD 3 /TIM CD TEX DISPLAY CD -TEXT EDIT 2 Keep PROG (PROGRAM on the remote control) pressed for more than 2 seconds. y Autoprogram is displayed, PROG and the current preset number in the music calendar start blinking. y All available radio stations for the selected waveband are stored automatically. PROG goes off, the preset number, the waveband and the frequency of the last preset station are displayed briefly.
CLOCK/TIMER English ANALOG DIGITAL / AUX STANDBY ON TUNER iR SEN CD 1 SOR CD 2 CK T CLO CD 3 /TIMER CD TEX DISPLAY CD -TEXT EDIT ING LOSE OPEN/C DER CD RECOR CDR RECORD R MASTE E VOLUM COPY CD COMPILE CD E MIC LEVEL REC TYP ERASE FINALIZE CD CD EDIT MIC Clock setting Manual clock setting 1 Press y STANDBY ON as often as necessary on the unit to switch the unit to standby. 2 Press CLOCK/TIMER on the unit. 3 Rotate í JOG CONTROL ë to select the clock.
CLOCK/TIMER English You can select different timer functions which will be activated at a chosen time. Make sure the clock is set before using one of these features. Alarm timer Alarm timer setting The unit can be used as an alarm clock, whereby the tuner, CD recorder or CD changer starts playback automatically at a preset time. 1 Press y STANDBY ON as often as necessary on the unit to switch the unit to standby. 2 Press CLOCK/TIMER on the unit. 3 Rotate í JOG CONTROL ë to select the alarm timer.
Subject to modification without notice. General AC Power ..............................................................120 V / 60 Hz Power consumption Active.........................................................................148 W Standby.....................................................................< 30 W Economy power save mode .......................................< 2 W Dimensions, w × h × d ...........................10.4 × 12.2 × 15.6 in. Weight (without speakers) ..........................
TROUBLESHOOTING English WARNING Under no circumstances should you try to repair the unit yourself as this will invalidate the guarantee. Do not open the unit as there is a risk of electric shock. If a fault occurs, first check the points listed, before taking the unit for repair. If you are unable to solve a problem by following these hints, consult your dealer or service center. LASER SAFETY This unit employs a laser.
LIMITED WARRANTY AUDIO SYSTEM One Year Free Labor One Year Free Service on Parts This product must be carried in for repair. WHO IS COVERED? BEFORE REQUESTING SERVICE... You must have proof of purchase to receive warranty service. A sales receipt or other document showing that you purchased the product is considered proof of purchase. Please check your owner’s manual before requesting service. Adjustments of the controls discussed there may save you a service call.
PHILIPS CONSUMER ELECTRONICS COMPANY English A Division of Philips Electronics North America Corporation Knoxville, Tennessee 37914-1810, U.S.A. Français Español W CLASS 1 LASER PRODUCT 3103 306 1757.