GC3100 SERIES
English 4 Español 11 Français 19 Português 27 Türkçe 35 48 GC3100 SERIES 55 Italiano 56
English Introduction Congratulations on your purchase and welcome to Philips! To fully benefit from the support that Philips offers, register your product at www.philips. com/welcome. Important Read this user manual carefully before you use the appliance and save it for future reference. Danger - Never immerse the iron in water. Warning - Check if the voltage indicated on the appliance corresponds to the local mains voltage before you connect the appliance.
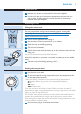
English Before first use 1 Remove any sticker or protective foil from the soleplate. 2 Let the iron heat up to maximum temperature and pass the iron over a piece of damp cloth for several minutes to remove any residues from the soleplate. Preparing for use Filling the water tank Do not put perfume, vinegar, starch, descaling agents, ironing aids, chemically descaled water or other chemicals in the water tank. Never immerse the iron in water. 1 Switch off the appliance and unplug it.
English 4 When the temperature light goes out, wait a while before you start ironing. During ironing, the temperature light goes on from time to time. This indicates that the iron is heating up to the set temperature. Using the appliance Note:The iron may give off some smoke when you use it for the first time.This stops after a short while. Steam ironing 1 Make sure that there is enough water in the water tank.
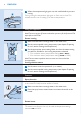
English 1 Press and release the steam boost button. Vertical steam boost (specific types only) 1 The steam boost function can also be used when you hold the iron in vertical position. This is useful for removing creases from hanging clothes, curtains etc. Never direct the steam at people. Drip stop (specific types only) This iron is equipped with a drip-stop function: the iron automatically stops producing steam when the temperature is too low to prevent water from dripping out of the soleplate.
English 2 If the temperature light goes on after you have moved the iron, wait for it to go out before you start ironing. Note: If the temperature light does not go on after you move the iron, the soleplate still has the right temperature and the iron is ready for use. Cleaning and maintenance Cleaning 1 Set the steam control to position 0, remove the plug from the wall socket and let the iron cool down.
English 3 Move the hot iron gently over a piece of used cloth to remove any water stains that may have formed on the soleplate. 4 Let the iron cool down before you store it. Storage 1 Set the steam control to position 0, remove the plug from the wall socket and let the iron cool down. 2 Empty the water tank. 3 Wind the mains cord round the cord storage facility. 4 Store the iron on its heel in a safe and dry place.
English Problem Possible cause Solution The iron is plugged in, but the soleplate stays cold. There is a connection problem. Check the mains cord, the plug and the wall socket. The temperature dial is set to MIN. Set the temperature dial to the required position There is not enough water in the water tank. Fill the water tank (see chapter ‘Preparing for use’, section ‘Filling the water tank). The steam control is set to position 0.
Español 11 Introducción Enhorabuena por la compra de este producto y bienvenido a Philips. Para sacar el mayor partido de la asistencia que Philips le ofrece, registre su producto en www.philips.com/welcome. Importante Antes de usar el aparato, lea atentamente este manual de usuario y consérvelo por si necesitara consultarlo en el futuro. Peligro - No sumerja nunca la plancha en agua.
Español Antes de utilizarlo por primera vez 1 Quite cualquier pegatina o lámina protectora de la suela. 2 Deje que la plancha se caliente hasta la temperatura máxima y pásela durante unos minutos sobre un paño húmedo para eliminar cualquier residuo que pudiera haber en la suela.
Español 13 4 Cuando se apague el piloto de temperatura, espere unos minutos antes de comenzar a planchar. Durante el planchado el piloto de temperatura se ilumina de vez en cuando. Esto indica que la plancha se está calentando a la temperatura seleccionada. Uso del aparato Nota: La plancha puede despedir un poco de humo al usarla por primera vez. Dejará de hacerlo al cabo de un rato. Planchado con vapor 1 Asegúrese de que haya suficiente agua en el depósito de agua.
Español 2 Pulse varias veces el botón spray para humedecer la prenda que vaya a planchar. Supervapor La potente función de supervapor le ayudará a eliminar las arrugas rebeldes. La función supervapor sólo se puede usar a temperaturas de planchado entre 2 y MAX. 1 Pulse y suelte el botón de Supervapor. Función supervapor vertical (sólo en modelos específicos) 1 La función de Supervapor también se puede utilizar con la plancha en posición vertical.
Español 15 Función de desconexión automática (sólo en modelos específicos) - La función de desconexión automática apaga la plancha automáticamente si ésta no se ha movido durante un período de tiempo. - El piloto rojo de desconexión automática parpadea para indicar que la plancha se ha apagado mediante la función de desconexión automática. Para que la plancha se caliente de nuevo: 1 Levante la plancha o muévala ligeramente. , El piloto rojo de desconexión automática se apagará.
Español 3 Ajuste el control de temperatura a la temperatura máxima. 4 Conecte el aparato a un enchufe con toma de tierra. 5 Desenchufe la plancha cuando el piloto de temperatura se apague. 6 Sujete la plancha sobre el fregadero, mantenga pulsado el botón CalcClean y sacuda suavemente el aparato hacia delante y hacia atrás. , De la suela saldrá vapor y agua hirviendo, arrastrando las impurezas y las partículas de cal (si las hay). 7 Suelte el botón Calc-Clean cuando se haya agotado el agua del depósito.
Español 17 Medio ambiente - Al final de su vida útil, no tire el aparato junto con la basura normal del hogar. Llévelo a un punto de recogida oficial para su reciclado. De esta manera ayudará a conservar el medio ambiente. Garantía y servicio Si necesita información o si tiene algún problema, visite la página Web de Philips en www.philips.com, o póngase en contacto con el Servicio de Atención al Cliente de Philips en su país (hallará el número de teléfono en el folleto de la garantía mundial).
Español Problema Posible causa Solución Durante el planchado salen partículas de cal e impurezas por la suela. El agua dura forma depósitos de cal en el interior de la suela. Utilice la función Calc-Clean una o más veces (consulte la sección “Función Calc-Clean” del capítulo “Limpieza y mantenimiento”). El piloto rojo de desconexión automática parpadea. La función de desconexión automática ha apagado la plancha (consulte el capítulo “Características”).
Français 19 Introduction Félicitations pour votre achat et bienvenue dans l’univers Philips ! Pour profiter pleinement de l’assistance Philips, enregistrez votre produit sur le site à l’adresse suivante : www.philips.com/welcome. Important Lisez attentivement ce mode d’emploi avant d’utiliser l’appareil et conservez-le pour un usage ultérieur. Danger - Ne plongez jamais le fer dans l’eau.
Français Avant la première utilisation 1 Ôtez tout autocollant ou film de protection de la semelle. 2 Laissez chauffer le fer jusqu’à la température maximale et repassez un chiffon humide pendant quelques minutes afin d’enlever tout résidu de la semelle. Avant utilisation Remplissage du réservoir Ne mettez jamais de parfum, de vinaigre, d’amidon, de détartrants, de produits d’aide au repassage ou autres agents chimiques dans le réservoir d’eau. Ne plongez jamais le fer dans l’eau.
Français 21 4 Une fois le voyant de température éteint, patientez un court instant avant de commencer à repasser. Pendant le repassage, le voyant de température s’allume de temps en temps pour indiquer que le fer est en train de chauffer afin de se maintenir à la température sélectionnée. Utilisation de l’appareil Remarque : Le fer peut fumer légèrement lors de la première utilisation. Ce phénomène est normal et cesse après un bref instant.
Français 2 Appuyez à plusieurs reprises sur le bouton du spray afin d’humidifier l’article à repasser. Effet pressing puissant Un effet pressing puissant est utile pour enlever les faux plis les plus tenaces. La fonction Effet pressing peut être utilisée uniquement à des températures situées entre 2 et MAX. 1 Appuyez sur le bouton Effet pressing, puis relâchez-le.
Français 23 Fonction d’arrêt automatique (certains modèles uniquement) - Cette fonction éteint automatiquement le fer s’il reste immobile pendant quelques temps. - Le voyant d’arrêt automatique rouge clignote pour indiquer que le fer a été éteint par la fonction d’arrêt automatique. Pour que le fer se réchauffe, procédez comme suit : 1 Prenez le fer en main et déplacez-le légèrement. , Le voyant d’arrêt automatique rouge s’éteint.
Français 3 Réglez le thermostat sur la température maximale. 4 Branchez le cordon d’alimentation sur une prise secteur. 5 Lorsque le voyant de température s’éteint, débranchez l’appareil. 6 Tenez le fer au-dessus de l’évier, maintenez le bouton Calc-Clean enfoncé et secouez légèrement le fer. , De la vapeur et de l’eau bouillante sortent de la semelle. Les impuretés et particules sont évacuées en même temps. 7 Relâchez le bouton Calc-Clean lorsque le réservoir est vide.
Français 25 Environnement - Lorsqu’il ne fonctionnera plus, ne jetez pas l’appareil avec les ordures ménagères, mais déposez-le à un endroit assigné à cet effet, où il pourra être recyclé. Vous contribuerez ainsi à la protection de l’environnement. Garantie et service Si vous souhaitez obtenir des informations supplémentaires ou faire réparer l’appareil, ou si vous rencontrez un problème, rendez-vous sur le site Web de Philips à l’adresse www.philips.
Français Problème Cause possible Solution Vous n’avez pas fermé correctement le bouchon de l’orifice de remplissage. Appuyez sur le bouchon jusqu’à ce que vous entendiez un clic. Des particules de calcaire et des impuretés s’écoulent de la semelle pendant le repassage. L’eau trop calcaire favorise la formation de dépôts calcaires à l’intérieur de la semelle. Utilisez la fonction anticalcaire une ou plusieurs fois (voir le chapitre « Nettoyage et entretien », section « Fonction anticalcaire »).
Português 27 Introdução Parabéns pela sua compra e bem-vindo à Philips! Para tirar todo o partido da assistência fornecida pela Philips, registe o seu produto em www.philips. com/welcome. Importante Leia cuidadosamente este manual do utilizador antes de utilizar o aparelho e guarde-o para consultas futuras. Perigo - Nunca mergulhe o ferro dentro de água. Aviso - Verifique se a voltagem indicada no aparelho corresponde à voltagem eléctrica local antes de o ligar.
Português pode ser utilizado em segurança com base em provas científicas disponíveis actualmente. Antes da primeira utilização 1 Retire todos os autocolantes ou película de protecção da base do ferro. 2 Deixe o ferro aquecer até à temperatura máxima e passe-o sobre um pedaço de pano húmido durante alguns minutos para remover todos os resíduos da base.
Português 29 baixa, tais como as de tecidos sintéticos. 3 Ligue a ficha a uma tomada com terra. 4 Quando a luz da temperatura se apagar, aguarde um pouco antes de começar a passar. Enquanto passa a ferro, a luz da temperatura acende-se de vez em quando. É sinal de que o ferro está a aquecer para atingir a temperatura certa. Utilizar o aparelho Nota: O ferro pode libertar algum fumo quando for utilizado pela primeira vez. É normal e pára passado pouco tempo.
Português A função super vapor apenas pode ser utilizada nas definições de temperatura entre 2 e MAX. 1 Prima e solte o botão do vapor turbo. Super Vapor Vertical (apenas em modelos específicos) 1 A função de super jacto de vapor também pode ser utilizada segurando o ferro na posição vertical. Este procedimento é útil para a remoção de vincos quando a roupa está pendurada nos cabides, para cortinas, etc. Nunca dirija o vapor a pessoas.
Português 31 - A luz de desligar automático (vermelha) apresenta-se intermitente, indicando que o ferro foi desligado pela função de desligar automático. Para que o ferro volte a aquecer: 1 Levante o ferro ou movimente-o ligeiramente. , A luz vermelha AUTO/OFF apaga-se. , Se a temperatura da base for inferior à temperatura de engomar definida, a luz de temperatura acende-se. 2 Se a luz da temperatura se acender depois de movimentar o ferro, aguarde que ela se apague antes de começar a passar.
Português 3 Regule a temperatura para a temperatura máxima. 4 Ligue a ficha a uma tomada com terra. 5 Desligue o ferro quando a luz da temperatura se apagar. 6 Segure o ferro sobre o lava-loiça, pressione e mantenha pressionado o botão da função Calc-Clean e agite suavemente o ferro de um lado para o outro. , O vapor e a água a ferver saem pela base do ferro. As impurezas e os resíduos de calcário (se os houver) também são expelidos.
Português 33 3 Enrole o fio do ferro no compartimento próprio. 4 Arrume o ferro na posição de descanso, num local seguro e seco. Meio ambiente - Não deite fora o aparelho junto com o lixo doméstico normal no final da sua vida útil; entregue-o num ponto de recolha oficial para reciclagem. Ao fazê-lo ajuda a preservar o ambiente. Garantia e assistência Se necessitar de reparações, informações ou se tiver problemas, visite o Web site da Philips em www.philips.
Português Problema Caem pingos de água nos tecidos enquanto estou a engomar. Saem flocos de calcário e impurezas da base do ferro enquanto passa a ferro. Causa provável Solução O ferro não está bem quente e/ou a função antipingos foi activada (apenas tipos específicos). Seleccione uma temperatura que seja adequada para passar com vapor ( 2 a MAX). Coloque o ferro em posição de descanso e aguarde que a luz laranja da temperatura se apague antes de começar a passar a roupa.
Türkçe 35 Giriş Ürünümüzü satın aldığınız için teşekkür ederiz; Philips’e hoş geldiniz! Philips’in sunduğu destekten tam faydalanmak için lütfen ürününüzü şu adresten kaydedin: www.philips.com/welcome. Önemli Cihazı kullanmadan önce bu kullanım kılavuzunu okuyun ve gelecekte de başvurmak üzere saklayın. Tehlike - Ütüyü asla suya batırmayın. Uyarı - Cihazı prize takmadan önce, üstünde yazılı olan gerilimin, evinizdeki şebeke gerilimiyle aynı olup olmadığını kontrol edin.
Türkçe Cihazın kullanıma hazırlanması Su haznesinin doldurulması Su haznesine parfüm, sirke, kola, kireç çözücü ürünler, ütülemeye yardımcı ürünler, kimsayasl olarak kireçten arındırılmış su ve diğer kimyasal maddeler koymayın. Ütüyü asla suya batırmayın. 1 Cihazı kapatarak fişini prizden çekin. 2 Buhar kontrolünü 0 konumuna getirin (= buharsız). 3 Doldurma deliğinin kapağını açın. 4 Ütüyü arkaya doğru yatırın. 5 Doldurma kabını kullanarak su haznesini maksimum seviyeye kadar musluk suyuyla doldurun.
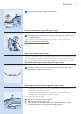
Türkçe Buharlı ütüleme 1 Su haznesinde yeterince su olduğundan emin olun. 2 Önerilen ütü sıcaklığını seçin (bkz. ‘Kullanıma hazırlama’ bölümü, ‘’Sıcaklığın ayarlanması” başlığı). 3 Uygun buhar ayarını seçin. Seçtiğiniz buhar ayarının seçilen ütüleme sıcaklığına uygun olduğundan emin olun: - hafif buhar için 1 - 2 (sıcaklık ayarları 2 - 3) - maksimum buhar için 3 - 4 (sıcaklık ayarı 3 - MAX) Dikkat: Ayarlanan sıcaklığa ulaştıktan sonra ütü buhar çıkarmaya başlar.
Türkçe Dikey buhar püskürtme (belirli modellerde bulunmaktadır) 1 Buhar püskürtme özelliği ütüyü dik olarak tuttuğunuzda da kullanılabilir. Bu işlem, asılan elbiseler, perdeler gibi ürünlerin kırışıklıklarını gidermek için kullanılabilir. Asla buharı insanlara yöneltmeyin. Damla tıpası (belirli modellerde bulunmaktadır) Bu ütü damla tıpası özelliğine sahiptir: sıcaklık suyun tabandan damlamasını engelleyemeyecek kadar düşük olduğunda, ütü buhar üretmeyi otomatik olarak durdurur.
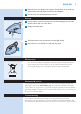
Türkçe 39 Temizlik ve bakım Temizleme 1 Buhar ayar düğmesini 0 konumuna getirin, fişini prizden çekin ve ürünün soğumasını bekleyin. 2 Tortuları ve tabandan çıkan diğer artıkları nemli bir bez ve aşındırıcı olmayan (sıvı) bir temizlik maddesiyle silin. Ütü tabanının düzlüğünü koruması için, metal cisimlerle sert temasından kaçının. Ütü tabanını temizlemek için ovma bezleri, sirke ve başka kimyasallar kullanmayın. 3 Ütünün üst kısmını nemli kumaşla silin. 4 Su haznesini düzenli olarak suyla durulayın.
Türkçe Saklama 1 Buhar ayar düğmesini 0 konumuna getirin, fişini prizden çekin ve ürünün soğumasını bekleyin. 2 Su haznesini boşaltın. 3 Elektrik kablosunu kablo saklama bölümünün etrafına sarın. 4 Ütüyü arka kısmının üzerinde kuru ve güvenli bir zeminde saklayın. Çevre - Kullanım ömrü sonunda, cihazı normal ev atıklarınızla birlikte atmayın; bunun yerine, geri dönüşüm için resmi toplama noktalara teslim edin. Böylece, çevrenin korunmasına yardımcı olursunuz.
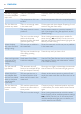
Türkçe Sorun Nedeni Çözüm Sıcaklık kadranı MIN olarak Sıcaklık kadranını gerekli konuma getirin. ayarlanmış. Ütü buhar üretmiyor. Ütüleme sırasında kumaş üzerine su damlıyor. Su haznesinde yeterince su yok. Su haznesini doldurun (bkz. ‘Kullanıma hazırlama’ bölümü, ‘Su haznesinin doldurulması’ başlığı). Buhar ayar düğmesini 0 konumuna getirin. Buhar ayar düğmesini 1 ile 4 arasında bir konuma getirin (bkz. ‘Cihazı kullanma’ bölümü, ‘Buharlı ütüleme’ başlığı).
Italiano Introduzione Congratulazioni per l’acquisto e benvenuti in Philips! Per trarre il massimo vantaggio dall’assistenza Philips, registrate il vostro prodotto su www.philips. com/welcome. Importante Prima di utilizzare l’apparecchio, leggete attentamente il presente manuale e conservatelo per eventuali riferimenti futuri. Pericolo - Non immergete mai il ferro nell’acqua.
Italiano 57 un utilizzo sicuro come confermato dai risultati scientifici attualmente disponibili. Prima di utilizzare l’apparecchio per la prima volta 1 Rimuovete gli eventuali adesivi o il foglio di protezione dalla piastra. 2 Riscaldate il ferro alla massima temperatura e passatelo su uno straccio umido per vari minuti, per eliminare eventuali residui dalla piastra.
Italiano 4 Quando la spia della temperatura si spegne, aspettate qualche minuto prima di iniziare a stirare. Durante la stiratura la spia della temperatura si accende, di quando in quando, per indicare che il ferro si sta riscaldando per mantenersi alla temperatura impostata. Modalità d’uso dell’apparecchio Nota La prima volta che si utilizza il ferro, si potrebbe notare la fuoriuscita di vapore; tuttavia scompare dopo poco tempo.
Italiano 59 2 Premete più volte il pulsante spray per inumidire il capo da stirare. Colpo di vapore Un potente colpo di vapore consente di eliminare le pieghe più ostinate. Il getto di vapore può essere utilizzato solo a temperature comprese tra 2 e MAX. 1 Premete e rilasciate il pulsante colpo di vapore. Funzione colpo di vapore verticale (solo modelli specifici) 1 La funzione colpo di vapore può essere utilizzata anche tenendo il ferro in posizione verticale.
Italiano Funzione di spegnimento automatico (solo per modelli specifici) - La funzione di spegnimento automatico consente di spegnere automaticamente il ferro se non viene mosso per alcuni minuti. - La spia rossa dello spegnimento automatico lampeggia per indicare che il ferro è stato spento dalla relativa funzione. Per riaccendere il ferro: 1 Sollevate il ferro o muovetelo leggermente. , La spia rossa dello spegnimento automatico si spegne.
Italiano 61 3 Impostate il termostato sulla temperatura massima. 4 Inserite la spina in una presa di messa a terra. 5 Scollegate l’apparecchio dalla presa di corrente non appena la spia della temperatura si spegne. 6 Tenendo il ferro sopra il lavandino, tenete premuto il pulsante CalcClean e scuotete delicatamente il ferro avanti e indietro. , In questo modo dalla piastra fuoriescono vapore e acqua bollente contenenti eventuali residui di calcare e altre impurità.
Italiano Tutela dell’ambiente - Per contribuire alla tutela dell’ambiente, non gettate l’apparecchio tra i rifiuti domestici quando non viene più utilizzato, ma consegnatelo a un centro di raccolta ufficiale. Garanzia e assistenza Per assistenza o informazioni e in caso di problemi, visitate il sito Web Philips all’indirizzo www.philips.com oppure contattate il Centro Assistenza Clienti Philips del vostro paese (per conoscere il numero di telefono consultate l’opuscolo della garanzia).
Italiano Problema 63 Possibile causa Soluzione Non avete chiuso accuratamente l’imboccatura di riempimento. Premete il tappo fino a sentire un clic. Durante la stiratura fuoriescono impurità e residui di calcare dalla piastra. L’acqua dura comporta la formazione di calcare all’interno della piastra. Utilizzate la funzione Calc-Clean una o più volte (vedere il capitolo “Pulizia e manutenzione”, sezione “Funzione Calc-Clean”). La spia rossa dello spegnimento automatico lampeggia.
4239.000.5539.